|
|
# 17|答疑现场:Spring Web 篇思考题合集
|
|
|
|
|
|
你好,我是傅健。
|
|
|
|
|
|
欢迎来到第二次答疑现场,恭喜你,已经完成了三分之二的课程。到今天为止,我们已经解决了 38 个线上问题,不知道你在工作中有所应用了吗?老话说得好,“纸上得来终觉浅,绝知此事要躬行”。希望你能用行动把知识从“我的”变成“你的”。
|
|
|
|
|
|
闲话少叙,接下来我就开始逐一解答第二章的课后思考题了,有任何想法欢迎到留言区补充。
|
|
|
|
|
|
## **[第9课](https://time.geekbang.org/column/article/373215)**
|
|
|
|
|
|
关于 URL 解析,其实还有许多让我们惊讶的地方,例如案例 2 的部分代码:
|
|
|
|
|
|
```
|
|
|
@RequestMapping(path = "/hi2", method = RequestMethod.GET)
|
|
|
public String hi2(@RequestParam("name") String name){
|
|
|
return name;
|
|
|
};
|
|
|
|
|
|
```
|
|
|
|
|
|
在上述代码的应用中,我们可以使用 [http://localhost:8080/hi2?name=xiaoming&name=hanmeimei](http://localhost:8080/hi2?name=xiaoming&name=hanmeimei) 来测试下,结果会返回什么呢?你猜会是 [xiaoming&name=hanmeimei](http://localhost:8080/hi2?name=xiaoming&name=hanmeimei) 么?
|
|
|
|
|
|
针对这个测试,返回的结果其实是"xiaoming,hanmeimei"。这里我们可以追溯到请求参数的解析代码,参考 org.apache.tomcat.util.http.Parameters#addParameter:
|
|
|
|
|
|
```
|
|
|
public void addParameter( String key, String value )
|
|
|
throws IllegalStateException {
|
|
|
//省略其他非关键代码
|
|
|
ArrayList<String> values = paramHashValues.get(key);
|
|
|
if (values == null) {
|
|
|
values = new ArrayList<>(1);
|
|
|
paramHashValues.put(key, values);
|
|
|
}
|
|
|
values.add(value);
|
|
|
}
|
|
|
|
|
|
```
|
|
|
|
|
|
可以看出当使用 [name=xiaoming&name=hanmeimei](http://localhost:8080/hi2?name=xiaoming&name=hanmeimei) 这种形式访问时,name 解析出的参数值是一个 ArrayList 集合,它包含了所有的值(此处为xiaoming和hanmeimei)。但是这个数组在最终是需要转化给我们的 String 类型的。转化执行可参考其对应转化器 ArrayToStringConverter 所做的转化,关键代码如下:
|
|
|
|
|
|
```
|
|
|
public Object convert(@Nullable Object source, TypeDescriptor sourceType, TypeDescriptor targetType) {
|
|
|
return this.helperConverter.convert(Arrays.asList(ObjectUtils.toObjectArray(source)), sourceType, targetType);
|
|
|
}
|
|
|
|
|
|
```
|
|
|
|
|
|
其中 helperConverter 为 CollectionToStringConverter,它使用了 "," 作为分隔将集合转化为 String 类型,分隔符定义如下:
|
|
|
|
|
|
```
|
|
|
private static final String DELIMITER = ",";
|
|
|
|
|
|
```
|
|
|
|
|
|
通过上述分析可知,对于参数解析,解析出的结果其实是一个数组,只是在最终转化时,可能因不同需求转化为不同的类型,从而呈现出不同的值,有时候反倒让我们很惊讶。分析了这么多,我们可以改下代码,测试下刚才的源码解析出的一些结论,代码修改如下:
|
|
|
|
|
|
```
|
|
|
@RequestMapping(path = "/hi2", method = RequestMethod.GET)
|
|
|
public String hi2(@RequestParam("name") String[] name){
|
|
|
return Arrays.toString(name);
|
|
|
};
|
|
|
|
|
|
```
|
|
|
|
|
|
这里我们将接收类型改为 String 数组,然后我们重新测试,会发现结果为 \[xiaoming, hanmeimei\],这就更好理解和接受了。
|
|
|
|
|
|
## **[第10课](https://time.geekbang.org/column/article/373942)**
|
|
|
|
|
|
在案例 3 中,我们以 Content-Type 为例,提到在 Controller 层中随意自定义常用头有时候会失效。那么这个结论是不是普适呢?即在使用其他内置容器或者在其他开发框架下,是不是也会存在一样的问题?
|
|
|
|
|
|
实际上,答案是否定的。这里我们不妨修改下案例 3 的 pom.xml。修改的目标是让其不要使用默认的内嵌 Tomcat 容器,而是 Jetty 容器。具体修改示例如下:
|
|
|
|
|
|
```
|
|
|
<dependency>
|
|
|
<groupId>org.springframework.boot</groupId>
|
|
|
<artifactId>spring-boot-starter-web</artifactId>
|
|
|
<exclusions>
|
|
|
<exclusion>
|
|
|
<groupId>org.springframework.boot</groupId>
|
|
|
<artifactId>spring-boot-starter-tomcat</artifactId>
|
|
|
</exclusion>
|
|
|
</exclusions>
|
|
|
</dependency>
|
|
|
<!-- 使用 Jetty -->
|
|
|
<dependency>
|
|
|
<groupId>org.springframework.boot</groupId>
|
|
|
<artifactId>spring-boot-starter-jetty</artifactId>
|
|
|
</dependency>
|
|
|
|
|
|
```
|
|
|
|
|
|
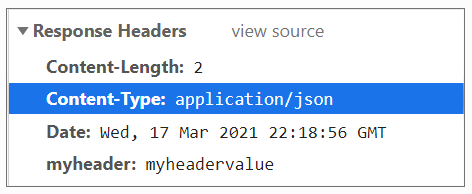
经过上面的修改后,我们再次运行测试程序,我们会发现 Content-Type 确实可以设置成我们想要的样子,具体如下:
|
|
|
|
|
|
|
|
|
|
|
|
同样是执行 addHeader(),但是因为置换了容器,所以调用的方法实际是 Jetty 的方法,具体参考 org.eclipse.jetty.server.Response#addHeader:
|
|
|
|
|
|
```
|
|
|
public void addHeader(String name, String value)
|
|
|
{
|
|
|
//省略其他非关键代码
|
|
|
if (HttpHeader.CONTENT_TYPE.is(name))
|
|
|
{
|
|
|
setContentType(value);
|
|
|
return;
|
|
|
}
|
|
|
//省略其他非关键代码
|
|
|
_fields.add(name, value);
|
|
|
}
|
|
|
|
|
|
```
|
|
|
|
|
|
在上述代码中,setContentType() 最终是完成了 Header 的添加。这点和 Tomcat 完全不同。具体可参考其实现:
|
|
|
|
|
|
```
|
|
|
public void setContentType(String contentType)
|
|
|
{
|
|
|
//省略其他非关键代码
|
|
|
if (HttpGenerator.__STRICT || _mimeType == null)
|
|
|
//添加CONTENT_TYPE
|
|
|
_fields.put(HttpHeader.CONTENT_TYPE, _contentType);
|
|
|
else
|
|
|
{
|
|
|
_contentType = _mimeType.asString();
|
|
|
_fields.put(_mimeType.getContentTypeField());
|
|
|
}
|
|
|
}
|
|
|
}
|
|
|
|
|
|
```
|
|
|
|
|
|
再次对照案例 3 给出的部分代码,在这里,直接贴出关键一段(具体参考 AbstractMessageConverterMethodProcessor#writeWithMessageConverters):
|
|
|
|
|
|
```
|
|
|
MediaType selectedMediaType = null;
|
|
|
MediaType contentType = outputMessage.getHeaders().getContentType();
|
|
|
boolean isContentTypePreset = contentType != null && contentType.isConcrete();
|
|
|
if (isContentTypePreset) {
|
|
|
selectedMediaType = contentType;
|
|
|
} else {
|
|
|
//根据请求 Accept 头和注解指定的返回类型(RequestMapping#produces)协商用何种 MediaType.
|
|
|
}
|
|
|
//省略其他代码:else
|
|
|
|
|
|
```
|
|
|
|
|
|
从上述代码可以看出,最终选择的 MediaType 已经不需要协商了,这是因为在Jetty容器中,Header 里面添加进了contentType,所以可以拿出来直接使用。而之前介绍的Tomcat容器没有把contentType添加进Header里,所以在上述代码中,它不能走入isContentTypePreset 为 true 的分支。此时,它只能根据请求 Accept 头和注解指定的返回类型等信息协商用何种 MediaType。
|
|
|
|
|
|
追根溯源,主要在于不同的容器对于 addHeader() 的实现不同。这里我们不妨再深入探讨下。首先,回顾我们案例 3 代码中的方法定义:
|
|
|
|
|
|
```
|
|
|
import javax.servlet.http.HttpServletResponse;
|
|
|
public String hi3(HttpServletResponse httpServletResponse)
|
|
|
|
|
|
```
|
|
|
|
|
|
虽然都是接口 HttpServletResponse,但是在 Jetty 容器下,会被装配成 org.eclipse.jetty.server.Response,而在 Tomcat 容器下,会被装配成 org.apache.catalina.connector.Response。所以调用的方法才会发生不同。
|
|
|
|
|
|
如何理解这个现象?容器是通信层,而 Spring Boot 在这其中只是中转,所以在 Spring Boot 中,HTTP Servlet Response 来源于最原始的通信层提供的对象,这样也就合理了。
|
|
|
|
|
|
通过这个思考题,我们可以看出:对于很多技术的使用,一些结论并不是一成不变的。可能只是换下容器,结论就会失效。所以,只有洞悉其原理,才能从根本上避免各种各样的麻烦,而不仅仅是凭借一些结论去“刻舟求剑”。
|
|
|
|
|
|
## **[第11课](https://time.geekbang.org/column/article/374654)**
|
|
|
|
|
|
通过案例 1 的学习,我们知道直接基于 Spring MVC 而非 Spring Boot 时,是需要我们手工添加 JSON 依赖,才能解析出 JSON 的请求或者编码 JSON 响应,那么为什么基于 Spring Boot 就不需要这样做了呢?
|
|
|
|
|
|
实际上,当我们使用 Spring Boot 时,我们都会添加相关依赖项:
|
|
|
|
|
|
```
|
|
|
<dependencies>
|
|
|
<dependency>
|
|
|
<groupId>org.springframework.boot</groupId>
|
|
|
<artifactId>spring-boot-starter-web</artifactId>
|
|
|
</dependency>
|
|
|
</dependencies>
|
|
|
|
|
|
```
|
|
|
|
|
|
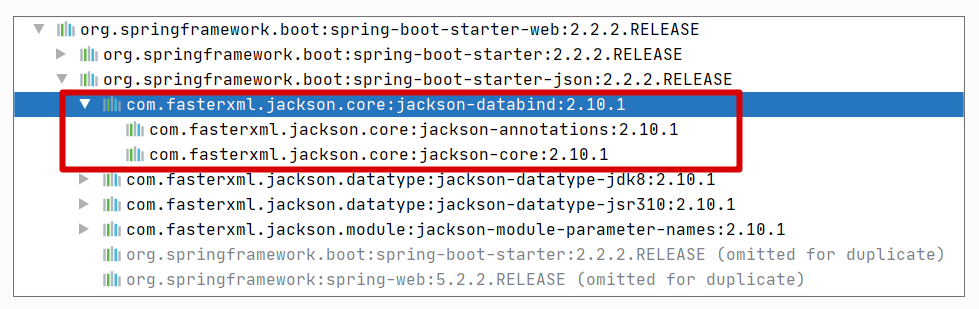
而这个依赖项会间接把 Jackson 添加进去,依赖关系参考下图:
|
|
|
|
|
|
|
|
|
|
|
|
后续 Jackson 编解码器的添加,和普通 Spring MVC 关键逻辑相同:都是判断相关类是否存在。不过这里可以稍微总结下,判断相关类是否存在有两种风格:
|
|
|
|
|
|
1. 直接使用反射来判断
|
|
|
|
|
|
例如前文介绍的关键语句:
|
|
|
|
|
|
> ClassUtils.isPresent("com.fasterxml.jackson.databind.ObjectMapper", null)
|
|
|
|
|
|
2. 使用 @ConditionalOnClass 参考 JacksonHttpMessageConvertersConfiguration 的实现:
|
|
|
|
|
|
```
|
|
|
package org.springframework.boot.autoconfigure.http;
|
|
|
|
|
|
@Configuration(proxyBeanMethods = false)
|
|
|
class JacksonHttpMessageConvertersConfiguration {
|
|
|
@Configuration(proxyBeanMethods = false)
|
|
|
@ConditionalOnClass(ObjectMapper.class)
|
|
|
@ConditionalOnBean(ObjectMapper.class)
|
|
|
@ConditionalOnProperty(name = HttpMessageConvertersAutoConfiguration.PREFERRED_MAPPER_PROPERTY,
|
|
|
havingValue = "jackson", matchIfMissing = true)
|
|
|
static class MappingJackson2HttpMessageConverterConfiguration {
|
|
|
@Bean
|
|
|
@ConditionalOnMissingBean(value = MappingJackson2HttpMessageConverter.class)
|
|
|
//省略部分非关键代码
|
|
|
MappingJackson2HttpMessageConverter mappingJackson2HttpMessageConverter(ObjectMapper objectMapper) {
|
|
|
return new MappingJackson2HttpMessageConverter(objectMapper);
|
|
|
}
|
|
|
}
|
|
|
|
|
|
```
|
|
|
|
|
|
以上即为判断某个类是否存在的两种方法。
|
|
|
|
|
|
## **[第12课](https://time.geekbang.org/column/article/375554)**
|
|
|
|
|
|
在上面的学籍管理系统中,我们还存在一个接口,负责根据学生的学号删除他的信息,代码如下:
|
|
|
|
|
|
```
|
|
|
@RequestMapping(path = "students/{id}", method = RequestMethod.DELETE)
|
|
|
public void deleteStudent(@PathVariable("id") @Range(min = 1,max = 10000) String id){
|
|
|
log.info("delete student: {}",id);
|
|
|
//省略业务代码
|
|
|
};
|
|
|
|
|
|
```
|
|
|
|
|
|
这个学生的编号是从请求的Path中获取的,而且它做了范围约束,必须在1到10000之间。那么你能找出负责解出 ID 的解析器(HandlerMethodArgumentResolver)是哪一种吗?校验又是如何触发的?
|
|
|
|
|
|
按照案例1的案例解析思路,我们可以轻松地找到负责解析ID值的解析器是PathVariableMethodArgumentResolver,它的匹配要求参考如下代码:
|
|
|
|
|
|
```
|
|
|
@Override
|
|
|
public boolean supportsParameter(MethodParameter parameter) {
|
|
|
if (!parameter.hasParameterAnnotation(PathVariable.class)) {
|
|
|
return false;
|
|
|
}
|
|
|
if (Map.class.isAssignableFrom(parameter.nestedIfOptional().getNestedParameterType())) {
|
|
|
PathVariable pathVariable = parameter.getParameterAnnotation(PathVariable.class);
|
|
|
return (pathVariable != null && StringUtils.hasText(pathVariable.value()));
|
|
|
}
|
|
|
//要返回true,必须标记@PathVariable注解
|
|
|
return true;
|
|
|
}
|
|
|
|
|
|
```
|
|
|
|
|
|
查看上述代码,当String类型的方法参数ID标记@PathVariable时,它就能符合上PathVariableMethodArgumentResolver的匹配条件。
|
|
|
|
|
|
翻阅这个解析类的实现,我们很快就可以定位到具体的解析方法,但是当我们顺藤摸瓜去找Validation时,却无蛛丝马迹,这点完全不同于案例1中的解析器RequestResponseBodyMethodProcessor。那么它的校验到底是怎么触发的?你可以把这个问题当做课后作业去思考下,这里仅仅给出一个提示,实际上,对于这种直接标记在方法参数上的校验是通过AOP拦截来做校验的。
|
|
|
|
|
|
## **[第13课](https://time.geekbang.org/column/article/376115)**
|
|
|
|
|
|
在案例2中,我们提到一定要避免在过滤器中调用多次FilterChain#doFilter()。那么假设一个过滤器因为疏忽,在某种情况下,这个方法一次也没有调用,会出现什么情况呢?
|
|
|
|
|
|
这样的过滤器可参考改造后的DemoFilter:
|
|
|
|
|
|
```
|
|
|
@Component
|
|
|
public class DemoFilter implements Filter {
|
|
|
public void doFilter(ServletRequest request, ServletResponse response, FilterChain chain) throws IOException, ServletException {
|
|
|
System.out.println("do some logic");
|
|
|
}
|
|
|
}
|
|
|
|
|
|
```
|
|
|
|
|
|
对于这样的情况,如果不了解Filter的实现逻辑,我们可能觉得,它最终会执行到Controller层的业务逻辑,最多是忽略掉排序在这个过滤器之后的一些过滤器而已。但是实际上,结果要严重得多。
|
|
|
|
|
|
以我们的改造案例为例,我们执行HTTP请求添加用户返回是成功的:
|
|
|
|
|
|
> POST [http://localhost:8080/regStudent/fujian](http://localhost:8080/regStudent/fujian)
|
|
|
>
|
|
|
> HTTP/1.1 200
|
|
|
> Content-Length: 0
|
|
|
> Date: Tue, 13 Apr 2021 11:37:43 GMT
|
|
|
> Keep-Alive: timeout=60
|
|
|
> Connection: keep-alive
|
|
|
|
|
|
但是实际上,我们的Controller层压根没有执行。这里给你解释下原因,还是贴出之前解析过的过滤器执行关键代码(ApplicationFilterChain#internalDoFilter):
|
|
|
|
|
|
```
|
|
|
private void internalDoFilter(ServletRequest request,
|
|
|
ServletResponse response){
|
|
|
if (pos < n) {
|
|
|
// pos会递增
|
|
|
ApplicationFilterConfig filterConfig = filters[pos++];
|
|
|
try {
|
|
|
Filter filter = filterConfig.getFilter();
|
|
|
// 省略非关键代码
|
|
|
// 执行filter
|
|
|
filter.doFilter(request, response, this);
|
|
|
// 省略非关键代码
|
|
|
}
|
|
|
// 省略非关键代码
|
|
|
return;
|
|
|
}
|
|
|
// 执行真正实际业务
|
|
|
servlet.service(request, response);
|
|
|
}
|
|
|
// 省略非关键代码
|
|
|
}
|
|
|
|
|
|
```
|
|
|
|
|
|
当我们的过滤器DemoFilter被执行,而它没有在其内部调用FilterChain#doFilter时,我们会执行到上述代码中的return语句。这不仅导致后续过滤器执行不到,也会导致能执行业务的servlet.service(request, response)执行不了。此时,我们的Controller层逻辑并未执行就不稀奇了。
|
|
|
|
|
|
相反,正是因为每个过滤器都显式调用了FilterChain#doFilter,才有机会让最后一个过滤器在调用FilterChain#doFilter时,能看到 pos = n 这种情况。而这种情况下,return就走不到了,能走到的是业务逻辑(servlet.service(request, response))。
|
|
|
|
|
|
## **[第14课](https://time.geekbang.org/column/article/377167)**
|
|
|
|
|
|
这节课的两个案例,它们都是在Tomcat容器启动时发生的,但你了解Spring是如何整合Tomcat,使其在启动时注册这些过滤器吗?
|
|
|
|
|
|
当我们调用下述关键代码行启动Spring时:
|
|
|
|
|
|
```
|
|
|
SpringApplication.run(Application.class, args);
|
|
|
|
|
|
```
|
|
|
|
|
|
会创建一个具体的 ApplicationContext 实现,以ServletWebServerApplicationContext为例,它会调用onRefresh()来与Tomcat或Jetty等容器集成:
|
|
|
|
|
|
```
|
|
|
@Override
|
|
|
protected void onRefresh() {
|
|
|
super.onRefresh();
|
|
|
try {
|
|
|
createWebServer();
|
|
|
}
|
|
|
catch (Throwable ex) {
|
|
|
throw new ApplicationContextException("Unable to start web server", ex);
|
|
|
}
|
|
|
}
|
|
|
|
|
|
```
|
|
|
|
|
|
查看上述代码中的createWebServer()实现:
|
|
|
|
|
|
```
|
|
|
private void createWebServer() {
|
|
|
WebServer webServer = this.webServer;
|
|
|
ServletContext servletContext = getServletContext();
|
|
|
if (webServer == null && servletContext == null) {
|
|
|
ServletWebServerFactory factory = getWebServerFactory();
|
|
|
this.webServer = factory.getWebServer(getSelfInitializer());
|
|
|
}
|
|
|
// 省略非关键代码
|
|
|
}
|
|
|
|
|
|
```
|
|
|
|
|
|
第6行,执行factory.getWebServer()会启动Tomcat,其中这个方法调用传递了参数getSelfInitializer(),它返回的是一个特殊格式回调方法this::selfInitialize用来添加Filter等,它是当Tomcat启动后才调用的。
|
|
|
|
|
|
```
|
|
|
private void selfInitialize(ServletContext servletContext) throws ServletException {
|
|
|
prepareWebApplicationContext(servletContext);
|
|
|
registerApplicationScope(servletContext);
|
|
|
WebApplicationContextUtils.registerEnvironmentBeans(getBeanFactory(), servletContext);
|
|
|
for (ServletContextInitializer beans : getServletContextInitializerBeans()) {
|
|
|
beans.onStartup(servletContext);
|
|
|
}
|
|
|
}
|
|
|
|
|
|
```
|
|
|
|
|
|
那说了这么多,你可能对这个过程还不够清楚,这里我额外贴出了两段调用栈帮助你理解。
|
|
|
|
|
|
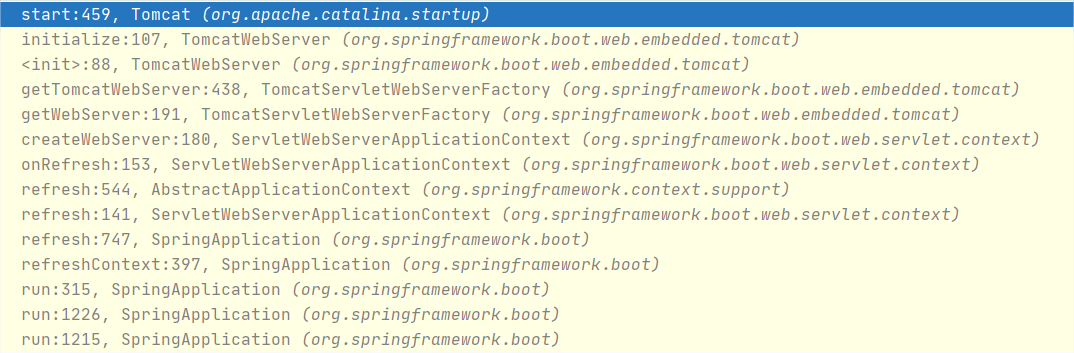
1. 启动Spring Boot时,启动Tomcat:
|
|
|
|
|
|
|
|
|
|
|
|
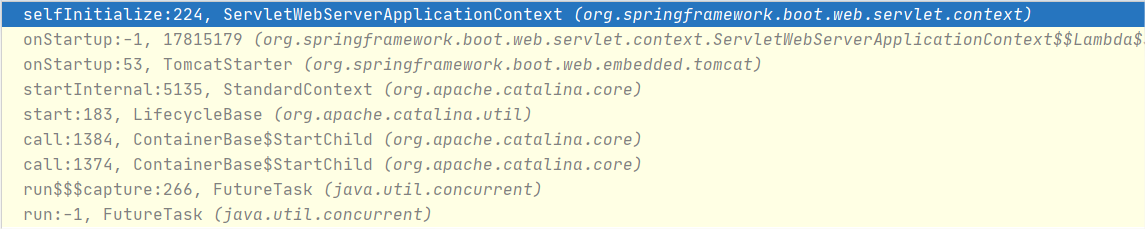
2. Tomcat启动后回调selfInitialize:
|
|
|
|
|
|
|
|
|
|
|
|
相信通过上述调用栈,你能更清晰地理解Tomcat启动和Filter添加的时机了。
|
|
|
|
|
|
## **[第15课](https://time.geekbang.org/column/article/378170)**
|
|
|
|
|
|
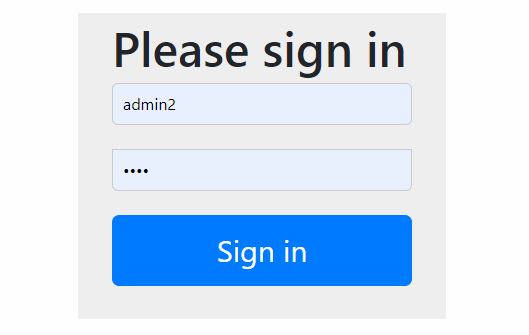
通过案例 1 的学习,我们知道在 Spring Boot 开启 Spring Security 时,访问需要授权的 API 会自动跳转到如下登录页面,你知道这个页面是如何产生的么?
|
|
|
|
|
|
|
|
|
|
|
|
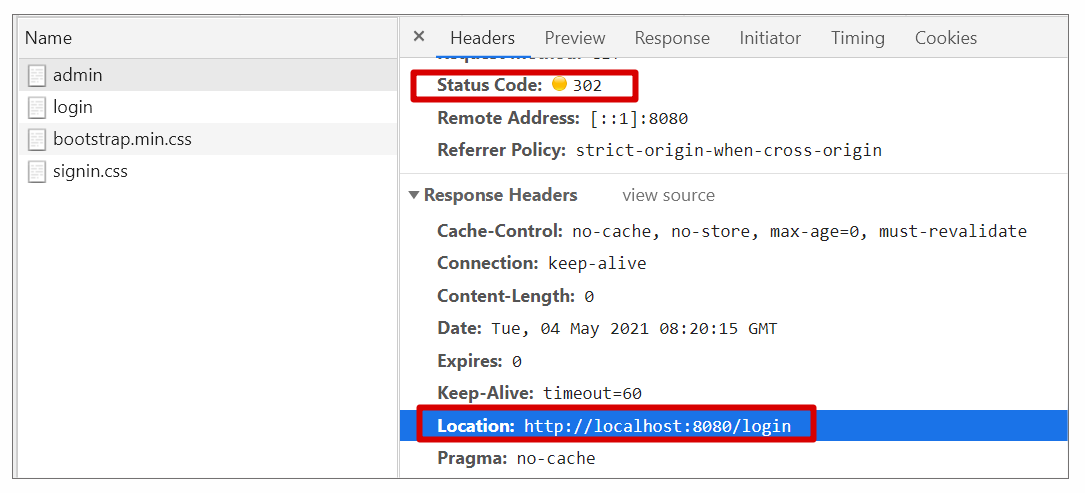
实际上,在 Spring Boot 启用 Spring Security 后,匿名访问一个需要授权的 API 接口时,我们会发现这个接口授权会失败,从而进行 302 跳转,跳转的关键代码可参考 ExceptionTranslationFilter 调用的 LoginUrlAuthenticationEntryPoint#commence 方法:
|
|
|
|
|
|
```
|
|
|
public void commence(HttpServletRequest request, HttpServletResponse response,
|
|
|
AuthenticationException authException) throws IOException, ServletException {
|
|
|
//省略非关键代码
|
|
|
redirectUrl = buildRedirectUrlToLoginPage(request, response, authException);
|
|
|
//省略非关键代码
|
|
|
redirectStrategy.sendRedirect(request, response, redirectUrl);
|
|
|
}
|
|
|
|
|
|
```
|
|
|
|
|
|
具体的跳转情况可参考 Chrome 的开发工具:
|
|
|
|
|
|
|
|
|
|
|
|
在跳转后,新的请求最终看到的效果图是由下面的代码生产的 HTML 页面,参考 DefaultLoginPageGeneratingFilter#generateLoginPageHtml:
|
|
|
|
|
|
```
|
|
|
private String generateLoginPageHtml(HttpServletRequest request, boolean loginError,
|
|
|
boolean logoutSuccess) {
|
|
|
String errorMsg = "Invalid credentials";
|
|
|
//省略部分非关键代码
|
|
|
|
|
|
StringBuilder sb = new StringBuilder();
|
|
|
sb.append("<!DOCTYPE html>\n"
|
|
|
+ "<html lang=\"en\">\n"
|
|
|
+ " <head>\n"
|
|
|
+ " <meta charset=\"utf-8\">\n"
|
|
|
+ " <meta name=\"viewport\" content=\"width=device-width, initial-scale=1, shrink-to-fit=no\">\n"
|
|
|
+ " <meta name=\"description\" content=\"\">\n"
|
|
|
+ " <meta name=\"author\" content=\"\">\n"
|
|
|
+ " <title>Please sign in</title>\n"
|
|
|
+ " <link href=\"https://maxcdn.bootstrapcdn.com/bootstrap/4.0.0-beta/css/bootstrap.min.css\" rel=\"stylesheet\" integrity=\"sha384-/Y6pD6FV/Vv2HJnA6t+vslU6fwYXjCFtcEpHbNJ0lyAFsXTsjBbfaDjzALeQsN6M\" crossorigin=\"anonymous\">\n"
|
|
|
+ " <link href=\"https://getbootstrap.com/docs/4.0/examples/signin/signin.css\" rel=\"stylesheet\" crossorigin=\"anonymous\"/>\n"
|
|
|
+ " </head>\n"
|
|
|
+ " <body>\n"
|
|
|
+ " <div class=\"container\">\n");
|
|
|
//省略部分非关键代码
|
|
|
sb.append("</div>\n");
|
|
|
sb.append("</body></html>");
|
|
|
|
|
|
return sb.toString();
|
|
|
}
|
|
|
|
|
|
```
|
|
|
|
|
|
上即为登录页面的呈现过程,可以看出基本都是由各种 Filter 来完成的。
|
|
|
|
|
|
## **第16课**
|
|
|
|
|
|
这节课的两个案例,在第一次发送请求的时候,会遍历对应的资源处理器和异常处理器,并注册到 DispatcherServlet 对应的类成员变量中,你知道它是如何被触发的吗?
|
|
|
|
|
|
实现了 FrameworkServlet 的 onRefresh() 接口,这个接口会在WebApplicationContext初始化时被回调:
|
|
|
|
|
|
```
|
|
|
public class DispatcherServlet extends FrameworkServlet {
|
|
|
@Override
|
|
|
protected void onRefresh(ApplicationContext context) {
|
|
|
initStrategies(context);
|
|
|
}
|
|
|
|
|
|
/**
|
|
|
* Initialize the strategy objects that this servlet uses.
|
|
|
* <p>May be overridden in subclasses in order to initialize further strategy objects.
|
|
|
*/
|
|
|
protected void initStrategies(ApplicationContext context) {
|
|
|
initMultipartResolver(context);
|
|
|
initLocaleResolver(context);
|
|
|
initThemeResolver(context);
|
|
|
initHandlerMappings(context);
|
|
|
initHandlerAdapters(context);
|
|
|
initHandlerExceptionResolvers(context);
|
|
|
initRequestToViewNameTranslator(context);
|
|
|
initViewResolvers(context);
|
|
|
initFlashMapManager(context);
|
|
|
}
|
|
|
}
|
|
|
|
|
|
```
|
|
|
|
|
|
以上就是这次答疑的全部内容,我们下一章节再见!
|
|
|
|