|
|
# 51 | 基于 GitHub Actions 的 CI 实战
|
|
|
|
|
|
你好,我是孔令飞。这是本专栏正文的最后一讲了,恭喜你坚持到了最后!
|
|
|
|
|
|
在Go项目开发中,我们要频繁地执行静态代码检查、测试、编译、构建等操作。如果每一步我们都手动执行,效率低不说,还容易出错。所以,我们通常借助CI系统来自动化执行这些操作。
|
|
|
|
|
|
当前业界有很多优秀的CI系统可供选择,例如 [CircleCI](https://circleci.com/)、[TravisCI](https://travis-ci.org/)、[Jenkins](https://github.com/jenkinsci/jenkins)、[CODING](https://coding.net/)、[GitHub Actions](https://github.com/features/actions) 等。这些系统在设计上大同小异,为了减少你的学习成本,我选择了相对来说容易实践的GitHub Actions,来给你展示如何通过CI来让工作自动化。
|
|
|
|
|
|
这一讲,我会先介绍下GitHub Actions及其用法,再向你展示一个CI示例,最后给你演示下IAM是如何构建CI任务的。
|
|
|
|
|
|
## GitHub Actions的基本用法
|
|
|
|
|
|
GitHub Actions是GitHub为托管在github.com站点的项目提供的持续集成服务,于2018年10月推出。
|
|
|
|
|
|
GitHub Actions具有以下功能特性:
|
|
|
|
|
|
* 提供原子的actions配置和组合actions的workflow配置两种能力。
|
|
|
* 全局配置基于[YAML配置](https://help.github.com/en/articles/migrating-github-actions-from-hcl-syntax-to-yaml-syntax),兼容主流CI/CD工具配置。
|
|
|
* Actions/Workflows基于[事件触发](https://help.github.com/en/articles/events-that-trigger-workflows),包括Event restrictions、Webhook events、Scheduled events、External events。
|
|
|
* 提供可供运行的托管容器服务,包括Docker、VM,可运行Linux、macOS、Windows主流系统。
|
|
|
* 提供主流语言的支持,包括Node.js、Python、Java、Ruby、PHP、Go、Rust、.NET。
|
|
|
* 提供实时日志流程,方便调试。
|
|
|
* 提供[平台内置的Actions](https://help.github.com/en/articles/about-github-actions#discovering-actions-in-the-github-community)与第三方提供的Actions,开箱即用。
|
|
|
|
|
|
### GitHub Actions的基本概念
|
|
|
|
|
|
在构建持续集成任务时,我们会在任务中心完成各种操作,比如克隆代码、编译代码、运行单元测试、构建和发布镜像等。GitHub把这些操作称为Actions。
|
|
|
|
|
|
Actions在很多项目中是可以共享的,GitHub允许开发者将这些可共享的Actions上传到[GitHub的官方Actions市场](https://github.com/marketplace?type=actions),开发者在Actions市场中可以搜索到他人提交的 Actions。另外,还有一个 [awesome actions](https://github.com/sdras/awesome-actions) 的仓库,里面也有不少的Action可供开发者使用。如果你需要某个 Action,不必自己写复杂的脚本,直接引用他人写好的 Action 即可。整个持续集成过程,就变成了一个 Actions 的组合。
|
|
|
|
|
|
Action其实是一个独立的脚本,可以将Action存放在GitHub代码仓库中,通过`<userName>/<repoName>`的语法引用 Action。例如,`actions/checkout@v2`表示`https://github.com/actions/checkout`这个仓库,tag是v2。`actions/checkout@v2`也代表一个 Action,作用是安装 Go编译环境。GitHub 官方的 Actions 都放在 [github.com/actions](https://github.com/actions) 里面。
|
|
|
|
|
|
GitHub Actions 有一些自己的术语,下面我来介绍下。
|
|
|
|
|
|
* workflow(工作流程):一个 `.yml` 文件对应一个 workflow,也就是一次持续集成。一个 GitHub 仓库可以包含多个 workflow,只要是在 `.github/workflow` 目录下的 `.yml` 文件都会被 GitHub 执行。
|
|
|
* job(任务):一个 workflow 由一个或多个 job 构成,每个 job 代表一个持续集成任务。
|
|
|
* step(步骤):每个 job 由多个 step 构成,一步步完成。
|
|
|
* action(动作):每个 step 可以依次执行一个或多个命令(action)。
|
|
|
* on:一个 workflow 的触发条件,决定了当前的 workflow 在什么时候被执行。
|
|
|
|
|
|
### workflow文件介绍
|
|
|
|
|
|
GitHub Actions 配置文件存放在代码仓库的`.github/workflows`目录下,文件后缀为`.yml`,支持创建多个文件,文件名可以任意取,比如`iam.yml`。GitHub 只要发现`.github/workflows`目录里面有`.yml`文件,就会自动运行该文件,如果运行过程中存在问题,会以邮件的形式通知到你。
|
|
|
|
|
|
workflow 文件的配置字段非常多,如果你想详细了解,可以查看[官方文档](https://docs.github.com/cn/actions/reference/workflow-syntax-for-github-actions)。这里,我来介绍一些基本的配置字段。
|
|
|
|
|
|
1. `name`
|
|
|
|
|
|
`name`字段是 workflow 的名称。如果省略该字段,默认为当前 workflow 的文件名。
|
|
|
|
|
|
```yaml
|
|
|
name: GitHub Actions Demo
|
|
|
|
|
|
```
|
|
|
|
|
|
2. `on`
|
|
|
|
|
|
`on`字段指定触发 workflow 的条件,通常是某些事件。
|
|
|
|
|
|
```yaml
|
|
|
on: push
|
|
|
|
|
|
```
|
|
|
|
|
|
上面的配置意思是,`push`事件触发 workflow。`on`字段也可以是事件的数组,例如:
|
|
|
|
|
|
```yaml
|
|
|
on: [push, pull_request]
|
|
|
|
|
|
```
|
|
|
|
|
|
上面的配置意思是,`push`事件或`pull_request`事件都可以触发 workflow。
|
|
|
|
|
|
想了解完整的事件列表,你可以查看[官方文档](https://docs.github.com/en/actions/reference/events-that-trigger-workflows)。除了代码库事件,GitHub Actions 也支持外部事件触发,或者定时运行。
|
|
|
|
|
|
3. `on.<push|pull_request>.<tags|branches>`
|
|
|
|
|
|
指定触发事件时,我们可以限定分支或标签。
|
|
|
|
|
|
```yaml
|
|
|
on:
|
|
|
push:
|
|
|
branches:
|
|
|
- master
|
|
|
|
|
|
```
|
|
|
|
|
|
上面的配置指定,只有`master`分支发生`push`事件时,才会触发 workflow。
|
|
|
|
|
|
4. `jobs.<job_id>.name`
|
|
|
|
|
|
workflow 文件的主体是`jobs`字段,表示要执行的一项或多项任务。
|
|
|
|
|
|
`jobs`字段里面,需要写出每一项任务的`job_id`,具体名称自定义。`job_id`里面的`name`字段是任务的说明。
|
|
|
|
|
|
```yaml
|
|
|
jobs:
|
|
|
my_first_job:
|
|
|
name: My first job
|
|
|
my_second_job:
|
|
|
name: My second job
|
|
|
|
|
|
```
|
|
|
|
|
|
上面的代码中,`jobs`字段包含两项任务,`job_id`分别是`my_first_job`和`my_second_job`。
|
|
|
|
|
|
5. `jobs.<job_id>.needs`
|
|
|
|
|
|
`needs`字段指定当前任务的依赖关系,即运行顺序。
|
|
|
|
|
|
```yaml
|
|
|
jobs:
|
|
|
job1:
|
|
|
job2:
|
|
|
needs: job1
|
|
|
job3:
|
|
|
needs: [job1, job2]
|
|
|
|
|
|
```
|
|
|
|
|
|
上面的代码中,`job1`必须先于`job2`完成,而`job3`等待`job1`和`job2`完成后才能运行。因此,这个 workflow 的运行顺序为:`job1`、`job2`、`job3`。
|
|
|
|
|
|
6. `jobs.<job_id>.runs-on`
|
|
|
|
|
|
`runs-on`字段指定运行所需要的虚拟机环境,它是必填字段。目前可用的虚拟机如下:
|
|
|
|
|
|
* ubuntu-latest、ubuntu-18.04或ubuntu-16.04。
|
|
|
* windows-latest、windows-2019或windows-2016。
|
|
|
* macOS-latest或macOS-10.14。
|
|
|
|
|
|
下面的配置指定虚拟机环境为`ubuntu-18.04`。
|
|
|
|
|
|
```yaml
|
|
|
runs-on: ubuntu-18.04
|
|
|
|
|
|
```
|
|
|
|
|
|
7. `jobs.<job_id>.steps`
|
|
|
|
|
|
`steps`字段指定每个 Job 的运行步骤,可以包含一个或多个步骤。每个步骤都可以指定下面三个字段。
|
|
|
|
|
|
* `jobs.<job_id>.steps.name`:步骤名称。
|
|
|
* `jobs.<job_id>.steps.run`:该步骤运行的命令或者 action。
|
|
|
* `jobs.<job_id>.steps.env`:该步骤所需的环境变量。
|
|
|
|
|
|
下面是一个完整的 workflow 文件的范例:
|
|
|
|
|
|
```yaml
|
|
|
name: Greeting from Mona
|
|
|
on: push
|
|
|
|
|
|
jobs:
|
|
|
my-job:
|
|
|
name: My Job
|
|
|
runs-on: ubuntu-latest
|
|
|
steps:
|
|
|
- name: Print a greeting
|
|
|
env:
|
|
|
MY_VAR: Hello! My name is
|
|
|
FIRST_NAME: Lingfei
|
|
|
LAST_NAME: Kong
|
|
|
run: |
|
|
|
echo $MY_VAR $FIRST_NAME $LAST_NAME.
|
|
|
|
|
|
```
|
|
|
|
|
|
上面的代码中,`steps`字段只包括一个步骤。该步骤先注入三个环境变量,然后执行一条 Bash 命令。
|
|
|
|
|
|
8. `uses`
|
|
|
|
|
|
`uses` 可以引用别人已经创建的 actions,就是上面说的 actions 市场中的 actions。引用格式为`userName/repoName@verison`,例如`uses: actions/setup-go@v1`。
|
|
|
|
|
|
9. `with`
|
|
|
|
|
|
`with` 指定actions的输入参数。每个输入参数都是一个键/值对。输入参数被设置为环境变量,该变量的前缀为 `INPUT_`,并转换为大写。
|
|
|
|
|
|
这里举个例子:我们定义 `hello_world` 操作所定义的三个输入参数(`first_name`、`middle_name` 和 `last_name`),这些输入变量将被 `hello-world` 操作作为 `INPUT_FIRST_NAME`、`INPUT_MIDDLE_NAME` 和 `INPUT_LAST_NAME` 环境变量使用。
|
|
|
|
|
|
```yaml
|
|
|
jobs:
|
|
|
my_first_job:
|
|
|
steps:
|
|
|
- name: My first step
|
|
|
uses: actions/hello_world@master
|
|
|
with:
|
|
|
first_name: Lingfei
|
|
|
middle_name: Go
|
|
|
last_name: Kong
|
|
|
|
|
|
```
|
|
|
|
|
|
10. `run`
|
|
|
|
|
|
`run`指定执行的命令。可以有多个命令,例如:
|
|
|
|
|
|
```yaml
|
|
|
- name: Build
|
|
|
run: |
|
|
|
go mod tidy
|
|
|
go build -v -o helloci .
|
|
|
|
|
|
```
|
|
|
|
|
|
11. `id`
|
|
|
|
|
|
`id`是step的唯一标识。
|
|
|
|
|
|
## GitHub Actions的进阶用法
|
|
|
|
|
|
上面,我介绍了GitHub Actions的一些基本知识,这里我再介绍下GitHub Actions的进阶用法。
|
|
|
|
|
|
### 为工作流加一个Badge
|
|
|
|
|
|
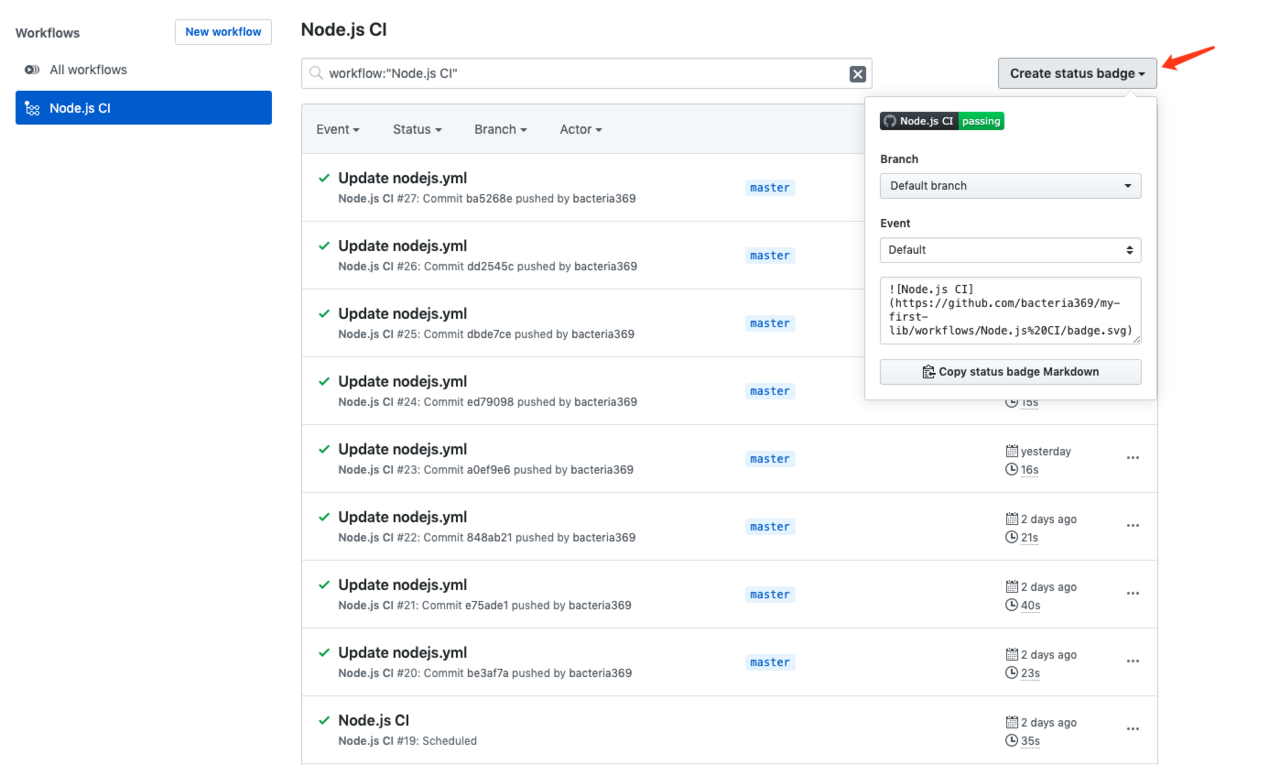
在action的面板中,点击`Create status badge`就可以复制Badge的Markdown内容到README.md中。
|
|
|
|
|
|
之后,我们就可以直接在README.md中看到当前的构建结果:
|
|
|
|
|
|
|
|
|
|
|
|
### 使用构建矩阵
|
|
|
|
|
|
如果我们想在多个系统或者多个语言版本上测试构建,就需要设置构建矩阵。例如,我们想在多个操作系统、多个Go版本下跑测试,可以使用如下workflow配置:
|
|
|
|
|
|
```yaml
|
|
|
name: Go Test
|
|
|
|
|
|
on: [push, pull_request]
|
|
|
|
|
|
jobs:
|
|
|
|
|
|
helloci-build:
|
|
|
name: Test with go ${{ matrix.go_version }} on ${{ matrix.os }}
|
|
|
runs-on: ${{ matrix.os }}
|
|
|
|
|
|
strategy:
|
|
|
matrix:
|
|
|
go_version: [1.15, 1.16]
|
|
|
os: [ubuntu-latest, macOS-latest]
|
|
|
|
|
|
steps:
|
|
|
|
|
|
- name: Set up Go ${{ matrix.go_version }}
|
|
|
uses: actions/setup-go@v2
|
|
|
with:
|
|
|
go-version: ${{ matrix.go_version }}
|
|
|
id: go
|
|
|
|
|
|
```
|
|
|
|
|
|
上面的workflow配置,通过`strategy.matrix`配置了该工作流程运行的环境矩阵(格式为`go_version.os`):`ubuntu-latest.1.15`、`ubuntu-latest.1.16`、`macOS-latest.1.15`、`macOS-latest.1.16`。也就是说,会在4台不同配置的服务器上执行该workflow。
|
|
|
|
|
|
### 使用Secrets
|
|
|
|
|
|
在构建过程中,我们可能需要用到`ssh`或者`token`等敏感数据,而我们不希望这些数据直接暴露在仓库中,此时就可以使用`secrets`。
|
|
|
|
|
|
我们在对应项目中选择`Settings`\-> `Secrets`,就可以创建`secret`,如下图所示:
|
|
|
|
|
|
|
|
|
|
|
|
配置文件中的使用方法如下:
|
|
|
|
|
|
```yaml
|
|
|
name: Go Test
|
|
|
on: [push, pull_request]
|
|
|
jobs:
|
|
|
helloci-build:
|
|
|
name: Test with go
|
|
|
runs-on: [ubuntu-latest]
|
|
|
environment:
|
|
|
name: helloci
|
|
|
steps:
|
|
|
- name: use secrets
|
|
|
env:
|
|
|
super_secret: ${{ secrets.YourSecrets }}
|
|
|
|
|
|
```
|
|
|
|
|
|
secret name不区分大小写,所以如果新建secret的名字是name,使用时用 `secrets.name` 或者 `secrets.Name` 都是可以的。而且,就算此时直接使用 `echo` 打印 `secret` , 控制台也只会打印出`*`来保护secret。
|
|
|
这里要注意,你的secret是属于某一个环境变量的,所以要指明环境的名字:`environment.name`。上面的workflow配置中的`secrets.YourSecrets`属于`helloci`环境。
|
|
|
|
|
|
### 使用Artifact保存构建产物
|
|
|
|
|
|
在构建过程中,我们可能需要输出一些构建产物,比如日志文件、测试结果等。这些产物可以使用Github Actions Artifact 来存储。你可以使用[action/upload-artifact](https://github.com/actions/upload-artifact) 和 [download-artifact](https://github.com/actions/download-artifact) 进行构建参数的相关操作。
|
|
|
|
|
|
这里我以输出Jest测试报告为例来演示下如何保存Artifact产物。Jest测试后的测试产物是coverage:
|
|
|
|
|
|
```yaml
|
|
|
steps:
|
|
|
- run: npm ci
|
|
|
- run: npm test
|
|
|
|
|
|
- name: Collect Test Coverage File
|
|
|
uses: actions/upload-artifact@v1.0.0
|
|
|
with:
|
|
|
name: coverage-output
|
|
|
path: coverage
|
|
|
|
|
|
```
|
|
|
|
|
|
执行成功后,我们就能在对应action面板看到生成的Artifact:
|
|
|
|
|
|

|
|
|
|
|
|
## GitHub Actions实战
|
|
|
|
|
|
上面,我介绍了GitHub Actions的用法,接下来我们就来实战下,看下使用GitHub Actions的6个具体步骤。
|
|
|
|
|
|
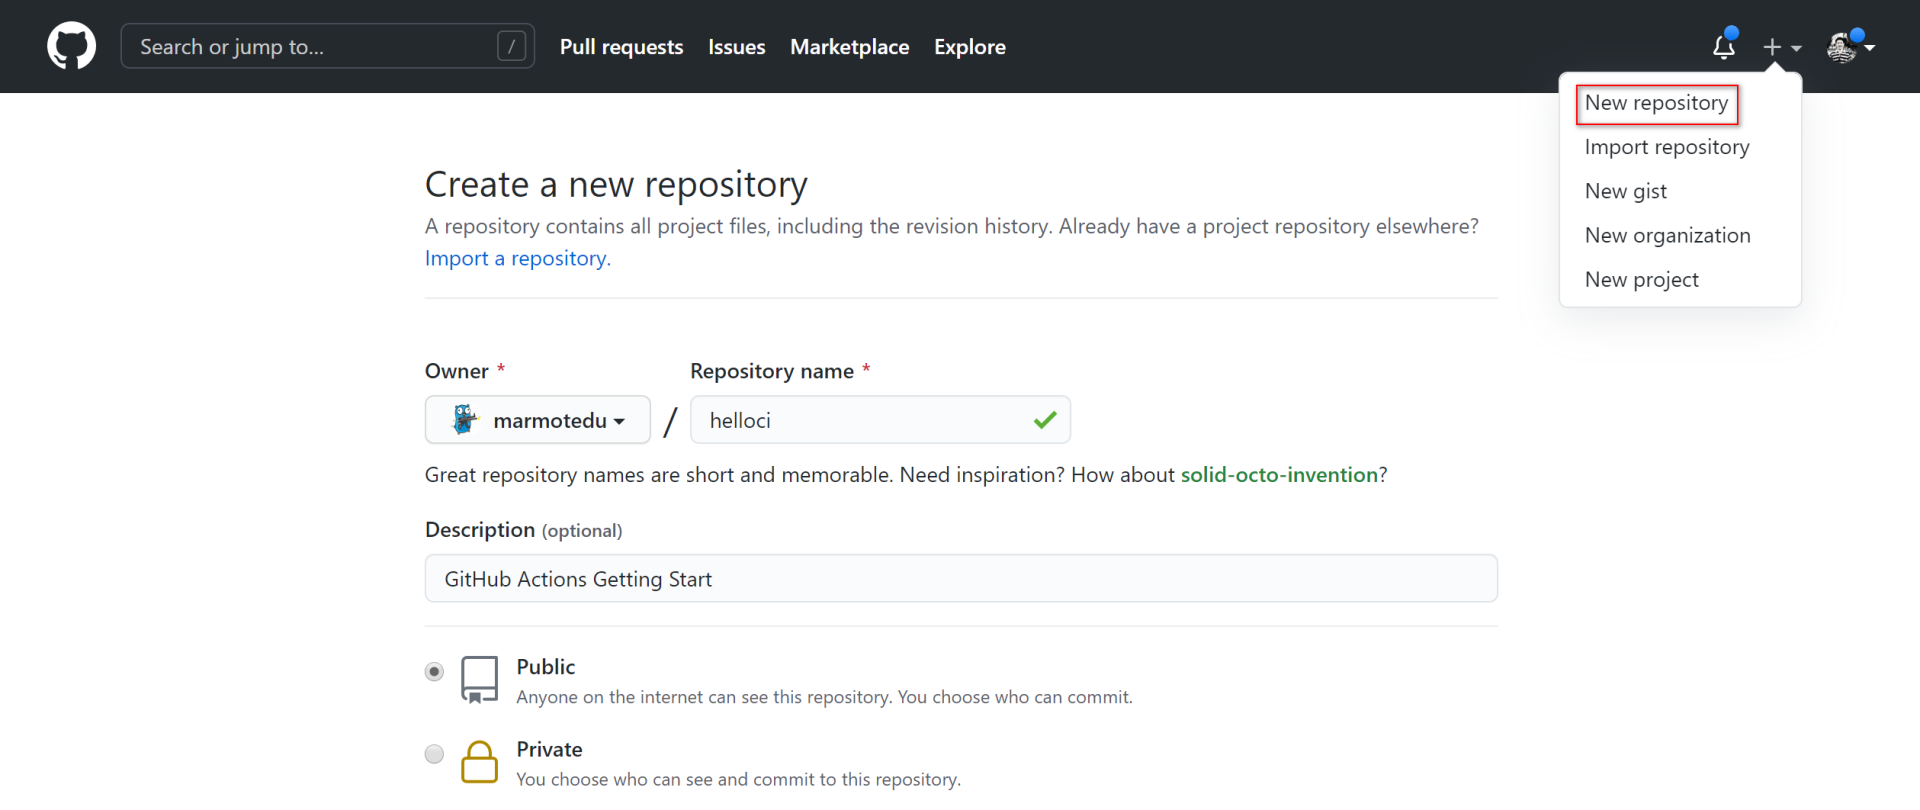
**第一步,**创建一个测试仓库。
|
|
|
|
|
|
登陆[GitHub官网](https://github.com/),点击**New repository**创建,如下图所示:
|
|
|
|
|
|
|
|
|
|
|
|
这里,我们创建了一个叫`helloci`的测试项目。
|
|
|
|
|
|
**第二步,**将新的仓库 clone 下来,并添加一些文件:
|
|
|
|
|
|
```bash
|
|
|
$ git clone https://github.com/marmotedu/helloci
|
|
|
|
|
|
```
|
|
|
|
|
|
你可以克隆[marmotedu/helloci](https://github.com/marmotedu/helloci),并将里面的文件拷贝到你创建的项目仓库中。
|
|
|
|
|
|
**第三步,**创建GitHub Actions workflow配置目录:
|
|
|
|
|
|
```bash
|
|
|
$ mkdir -p .github/workflows
|
|
|
|
|
|
```
|
|
|
|
|
|
**第四步,**创建GitHub Actions workflow配置。
|
|
|
|
|
|
在`.github/workflows`目录下新建`helloci.yml`文件,内容如下:
|
|
|
|
|
|
```yaml
|
|
|
name: Go Test
|
|
|
|
|
|
on: [push, pull_request]
|
|
|
|
|
|
jobs:
|
|
|
|
|
|
helloci-build:
|
|
|
name: Test with go ${{ matrix.go_version }} on ${{ matrix.os }}
|
|
|
runs-on: ${{ matrix.os }}
|
|
|
environment:
|
|
|
name: helloci
|
|
|
|
|
|
strategy:
|
|
|
matrix:
|
|
|
go_version: [1.16]
|
|
|
os: [ubuntu-latest]
|
|
|
|
|
|
steps:
|
|
|
|
|
|
- name: Set up Go ${{ matrix.go_version }}
|
|
|
uses: actions/setup-go@v2
|
|
|
with:
|
|
|
go-version: ${{ matrix.go_version }}
|
|
|
id: go
|
|
|
|
|
|
- name: Check out code into the Go module directory
|
|
|
uses: actions/checkout@v2
|
|
|
|
|
|
- name: Tidy
|
|
|
run: |
|
|
|
go mod tidy
|
|
|
|
|
|
- name: Build
|
|
|
run: |
|
|
|
go build -v -o helloci .
|
|
|
|
|
|
- name: Collect main.go file
|
|
|
uses: actions/upload-artifact@v1.0.0
|
|
|
with:
|
|
|
name: main-output
|
|
|
path: main.go
|
|
|
|
|
|
- name: Publish to Registry
|
|
|
uses: elgohr/Publish-Docker-GitHub-Action@master
|
|
|
with:
|
|
|
name: ccr.ccs.tencentyun.com/marmotedu/helloci:beta # docker image 的名字
|
|
|
username: ${{ secrets.DOCKER_USERNAME}} # 用户名
|
|
|
password: ${{ secrets.DOCKER_PASSWORD }} # 密码
|
|
|
registry: ccr.ccs.tencentyun.com # 腾讯云Registry
|
|
|
dockerfile: Dockerfile # 指定 Dockerfile 的位置
|
|
|
tag_names: true # 是否将 release 的 tag 作为 docker image 的 tag
|
|
|
|
|
|
```
|
|
|
|
|
|
上面的workflow文件定义了当GitHub仓库有`push`、`pull_request`事件发生时,会触发GitHub Actions工作流程,流程中定义了一个任务(Job)`helloci-build`,Job中包含了多个步骤(Step),每个步骤又包含一些动作(Action)。
|
|
|
|
|
|
上面的workflow配置会按顺序执行下面的6个步骤。
|
|
|
|
|
|
1. 准备一个Go编译环境。
|
|
|
2. 从[marmotedu/helloci](https://github.com/marmotedu/helloci)下载源码。
|
|
|
3. 添加或删除缺失的依赖包。
|
|
|
4. 编译Go源码。
|
|
|
5. 上传构建产物。
|
|
|
6. 构建镜像,并将镜像push到`ccr.ccs.tencentyun.com/marmotedu/helloci:beta`。
|
|
|
|
|
|
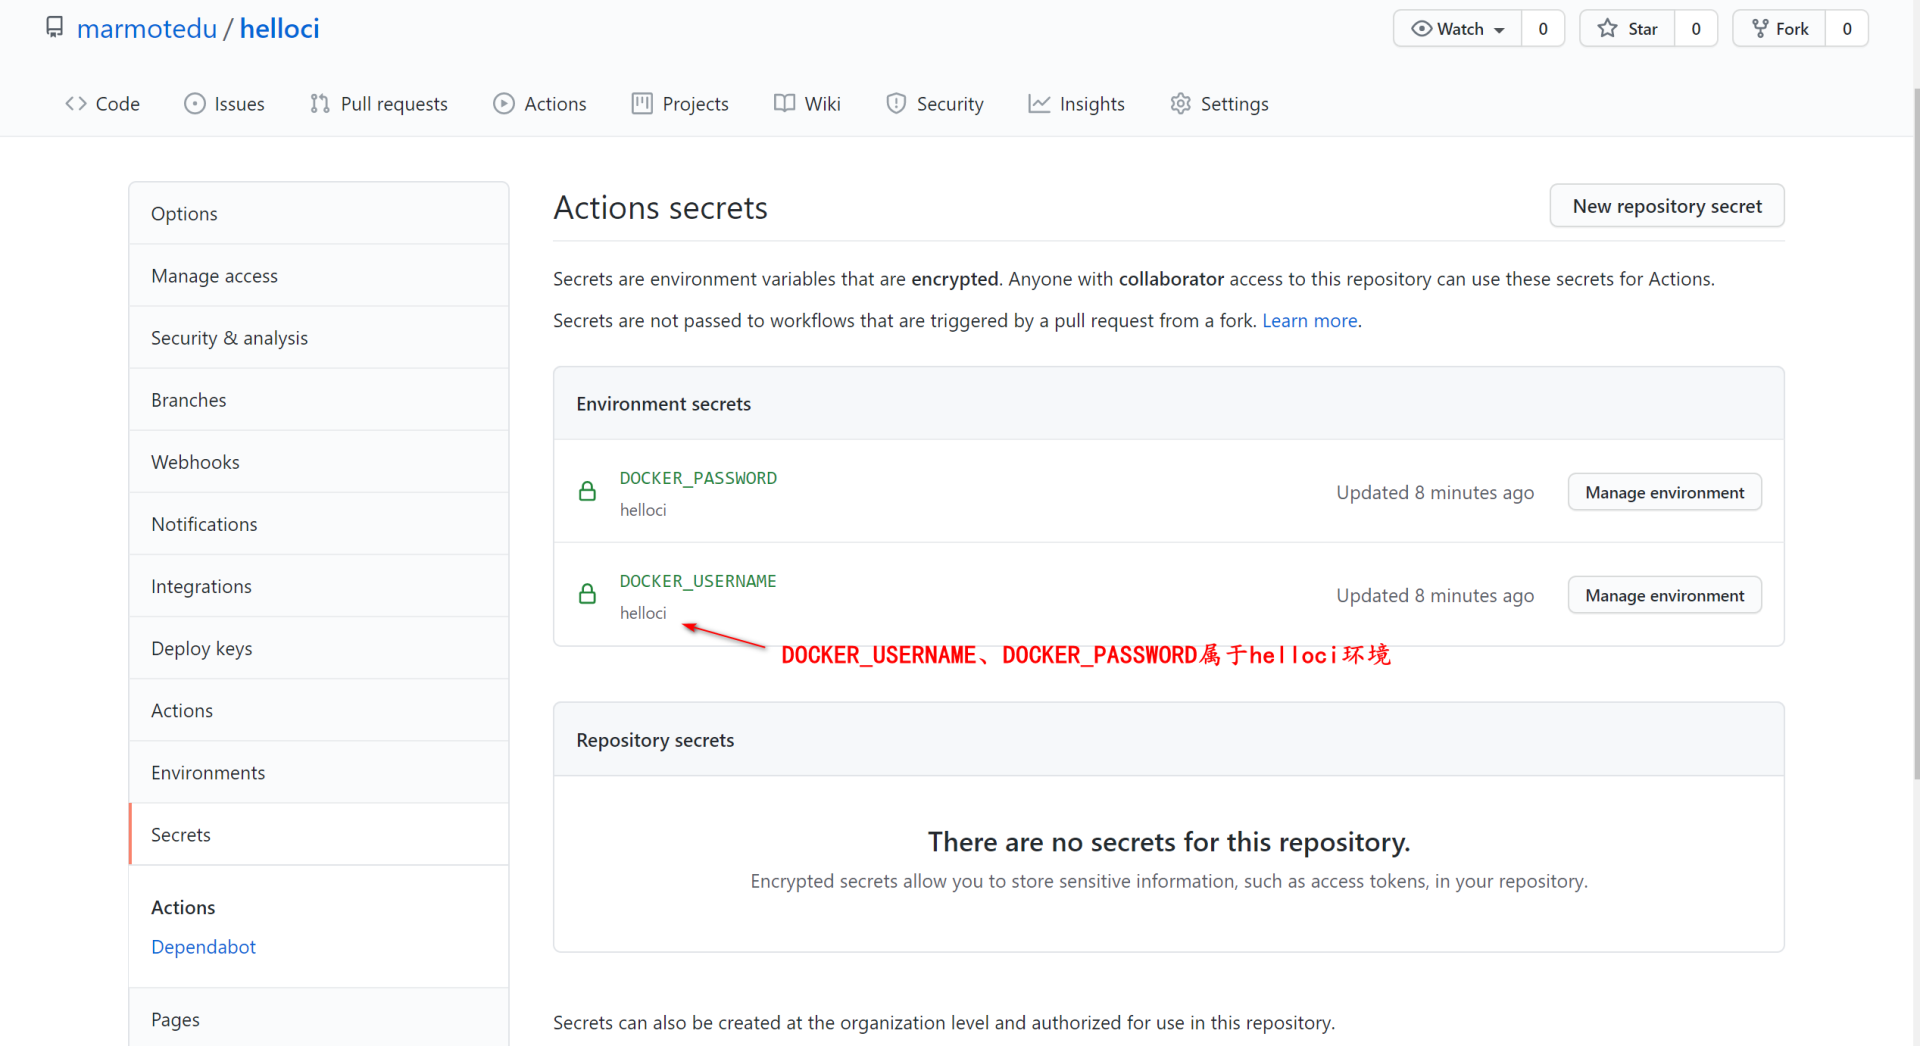
**第五步,**在push代码之前,我们需要先创建`DOCKER_USERNAME`和`DOCKER_PASSWORD` secret。
|
|
|
|
|
|
其中,`DOCKER_USERNAME`保存腾讯云镜像服务(CCR)的用户名,`DOCKER_PASSWORD`保存CCR的密码。我们将这两个secret保存在`helloci` Environments中,如下图所示:
|
|
|
|
|
|

|
|
|
|
|
|
**第六步,**将项目push到GitHub,触发workflow工作流:
|
|
|
|
|
|
```bash
|
|
|
$ git add .
|
|
|
$ git push origin master
|
|
|
|
|
|
```
|
|
|
|
|
|
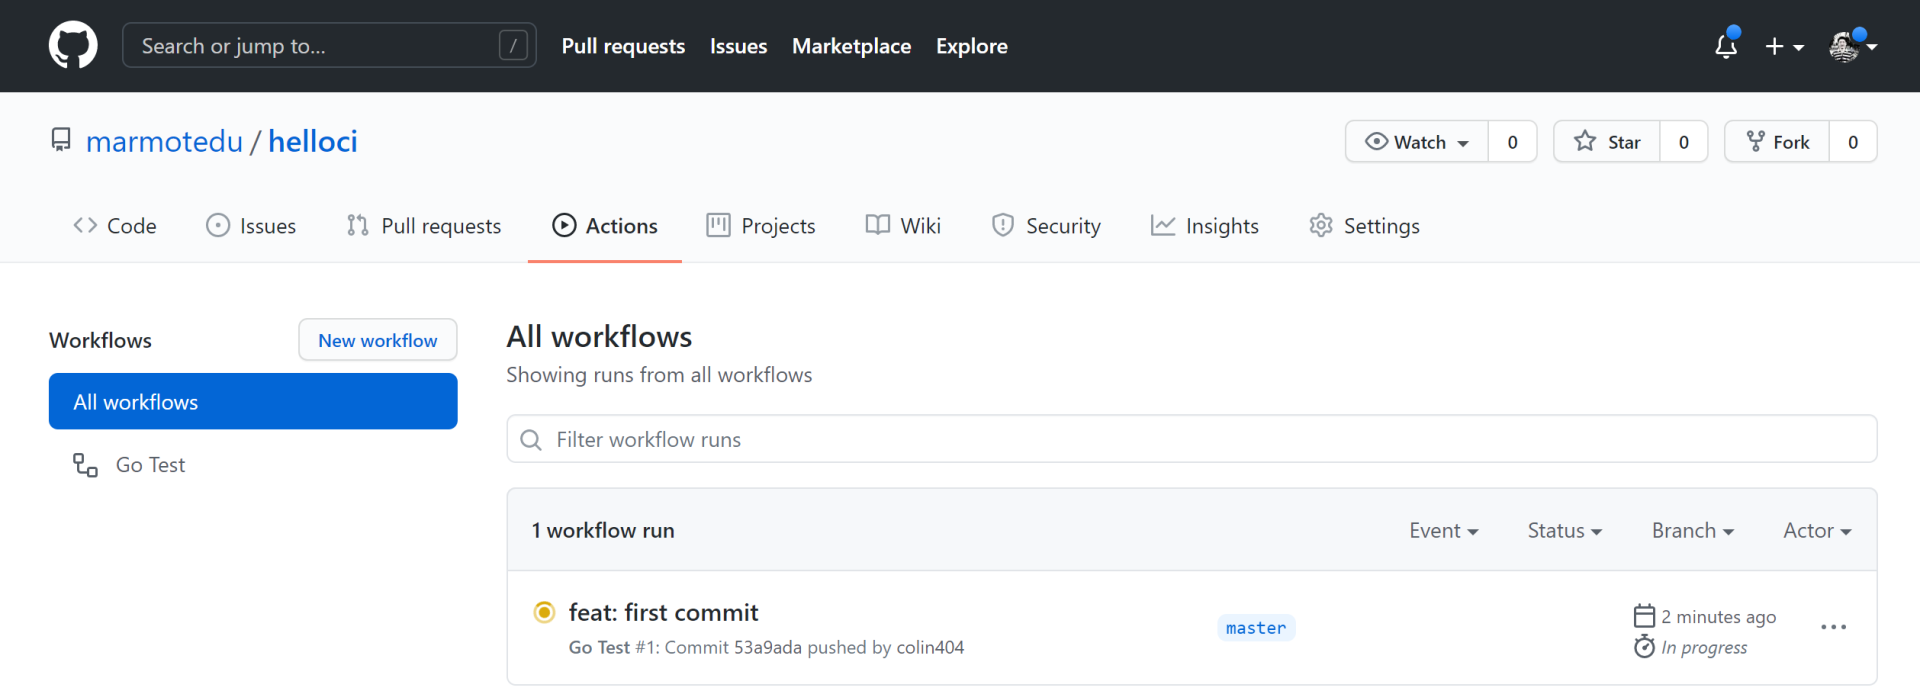
打开我们的仓库 Actions 标签页,可以发现GitHub Actions workflow正在执行:
|
|
|
|
|
|
|
|
|
|
|
|
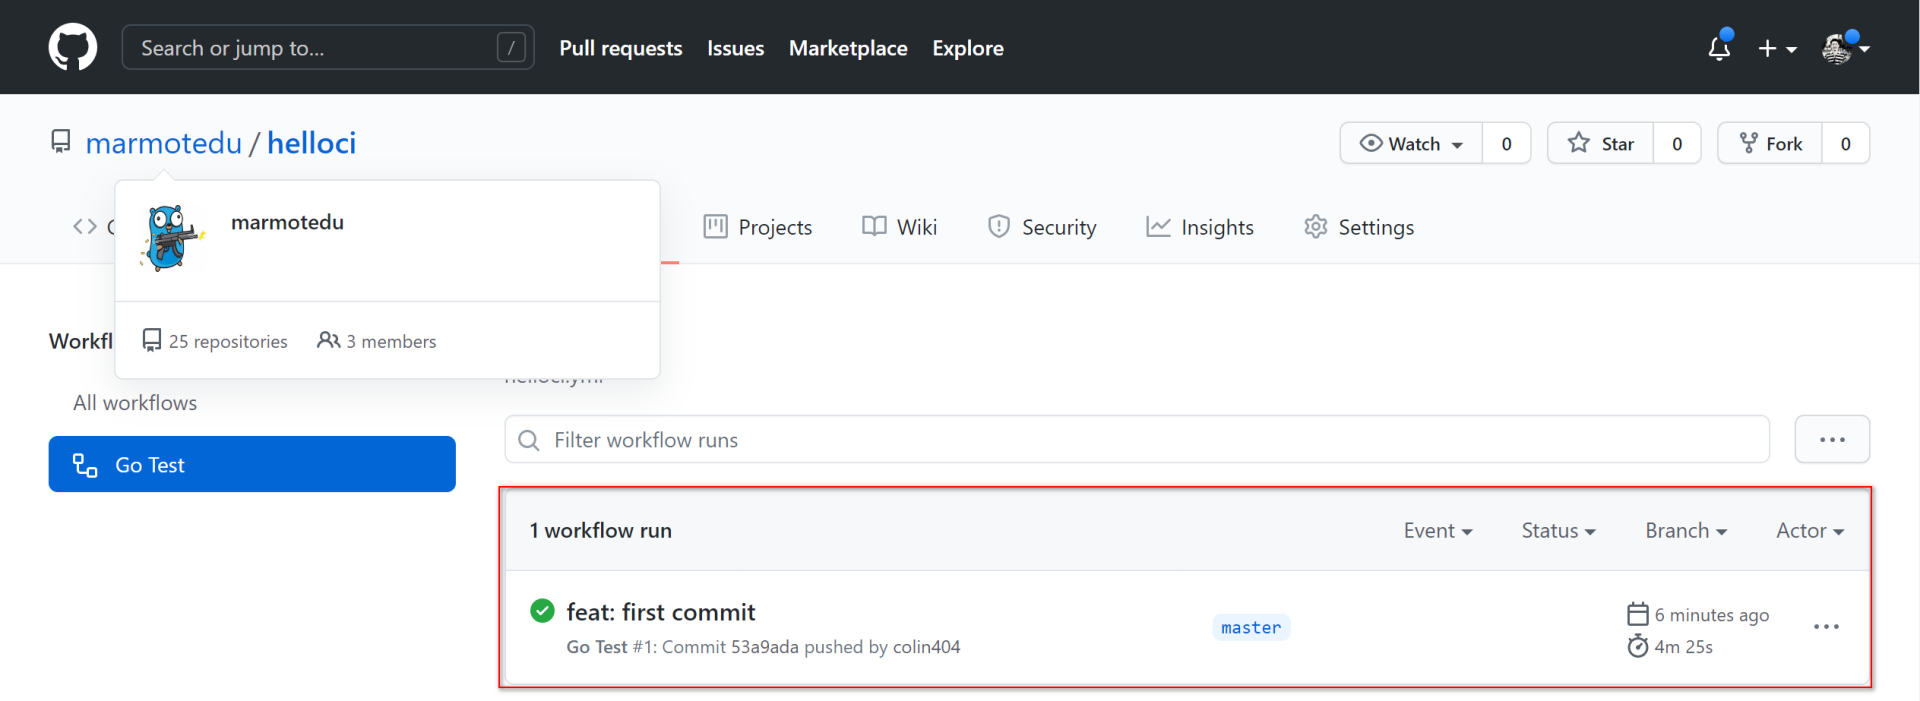
等workflow执行完,点击 **Go Test** 进入构建详情页面,在详情页面能够看到我们的构建历史:
|
|
|
|
|
|
|
|
|
|
|
|
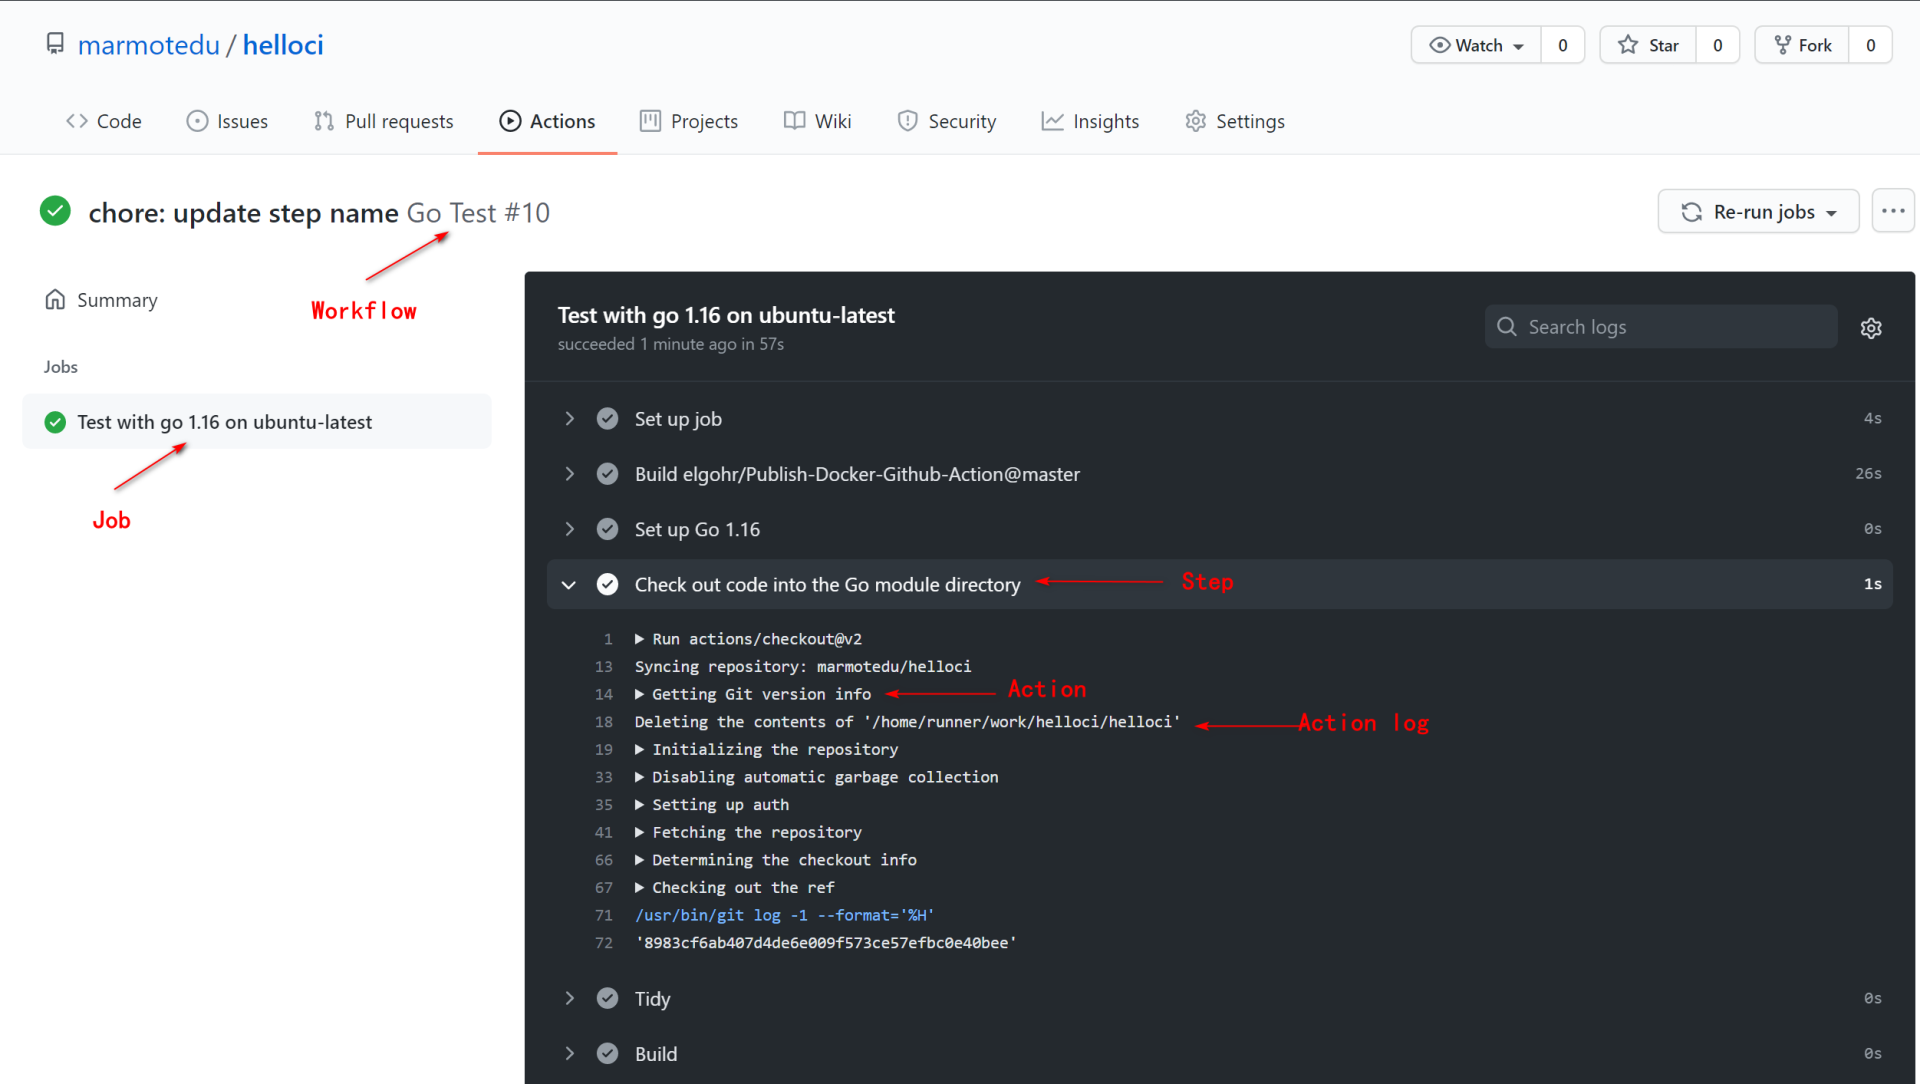
然后,选择其中一个构建记录,查看其运行详情(具体可参考[chore: update step name Go Test #10](https://github.com/marmotedu/helloci/actions/runs/1144156183)):
|
|
|
|
|
|
|
|
|
|
|
|
你可以看到,`Go Test`工作流程执行了6个Job,每个Job执行了下面这些自定义Step:
|
|
|
|
|
|
1. Set up Go 1.16。
|
|
|
2. Check out code into the Go module directory。
|
|
|
3. Tidy。
|
|
|
4. Build。
|
|
|
5. Collect main.go file。
|
|
|
6. Publish to Registry。
|
|
|
|
|
|
其他步骤是GitHub Actions自己添加的步骤:`Setup Job`、`Post Check out code into the Go module directory`、`Complete job`。点击每一个步骤,你都能看到它们的详细输出。
|
|
|
|
|
|
## IAM GitHub Actions实战
|
|
|
|
|
|
接下来,我们再来看下IAM项目的GitHub Actions实战。
|
|
|
|
|
|
假设IAM项目根目录为 `${IAM_ROOT}`,它的workflow配置文件为:
|
|
|
|
|
|
```bash
|
|
|
$ cat ${IAM_ROOT}/.github/workflows/iamci.yaml
|
|
|
name: IamCI
|
|
|
|
|
|
on:
|
|
|
push:
|
|
|
branchs:
|
|
|
- '*'
|
|
|
pull_request:
|
|
|
types: [opened, reopened]
|
|
|
|
|
|
jobs:
|
|
|
|
|
|
iamci:
|
|
|
name: Test with go ${{ matrix.go_version }} on ${{ matrix.os }}
|
|
|
runs-on: ${{ matrix.os }}
|
|
|
environment:
|
|
|
name: iamci
|
|
|
|
|
|
strategy:
|
|
|
matrix:
|
|
|
go_version: [1.16]
|
|
|
os: [ubuntu-latest]
|
|
|
|
|
|
steps:
|
|
|
|
|
|
- name: Set up Go ${{ matrix.go_version }}
|
|
|
uses: actions/setup-go@v2
|
|
|
with:
|
|
|
go-version: ${{ matrix.go_version }}
|
|
|
id: go
|
|
|
|
|
|
- name: Check out code into the Go module directory
|
|
|
uses: actions/checkout@v2
|
|
|
|
|
|
- name: Run go modules Tidy
|
|
|
run: |
|
|
|
make tidy
|
|
|
|
|
|
- name: Generate all necessary files, such as error code files
|
|
|
run: |
|
|
|
make gen
|
|
|
|
|
|
- name: Check syntax and styling of go sources
|
|
|
run: |
|
|
|
make lint
|
|
|
|
|
|
- name: Run unit test and get test coverage
|
|
|
run: |
|
|
|
make cover
|
|
|
|
|
|
- name: Build source code for host platform
|
|
|
run: |
|
|
|
make build
|
|
|
|
|
|
- name: Collect Test Coverage File
|
|
|
uses: actions/upload-artifact@v1.0.0
|
|
|
with:
|
|
|
name: main-output
|
|
|
path: _output/coverage.out
|
|
|
|
|
|
- name: Set up Docker Buildx
|
|
|
uses: docker/setup-buildx-action@v1
|
|
|
|
|
|
- name: Login to DockerHub
|
|
|
uses: docker/login-action@v1
|
|
|
with:
|
|
|
username: ${{ secrets.DOCKERHUB_USERNAME }}
|
|
|
password: ${{ secrets.DOCKERHUB_TOKEN }}
|
|
|
|
|
|
- name: Build docker images for host arch and push images to registry
|
|
|
run: |
|
|
|
make push
|
|
|
|
|
|
```
|
|
|
|
|
|
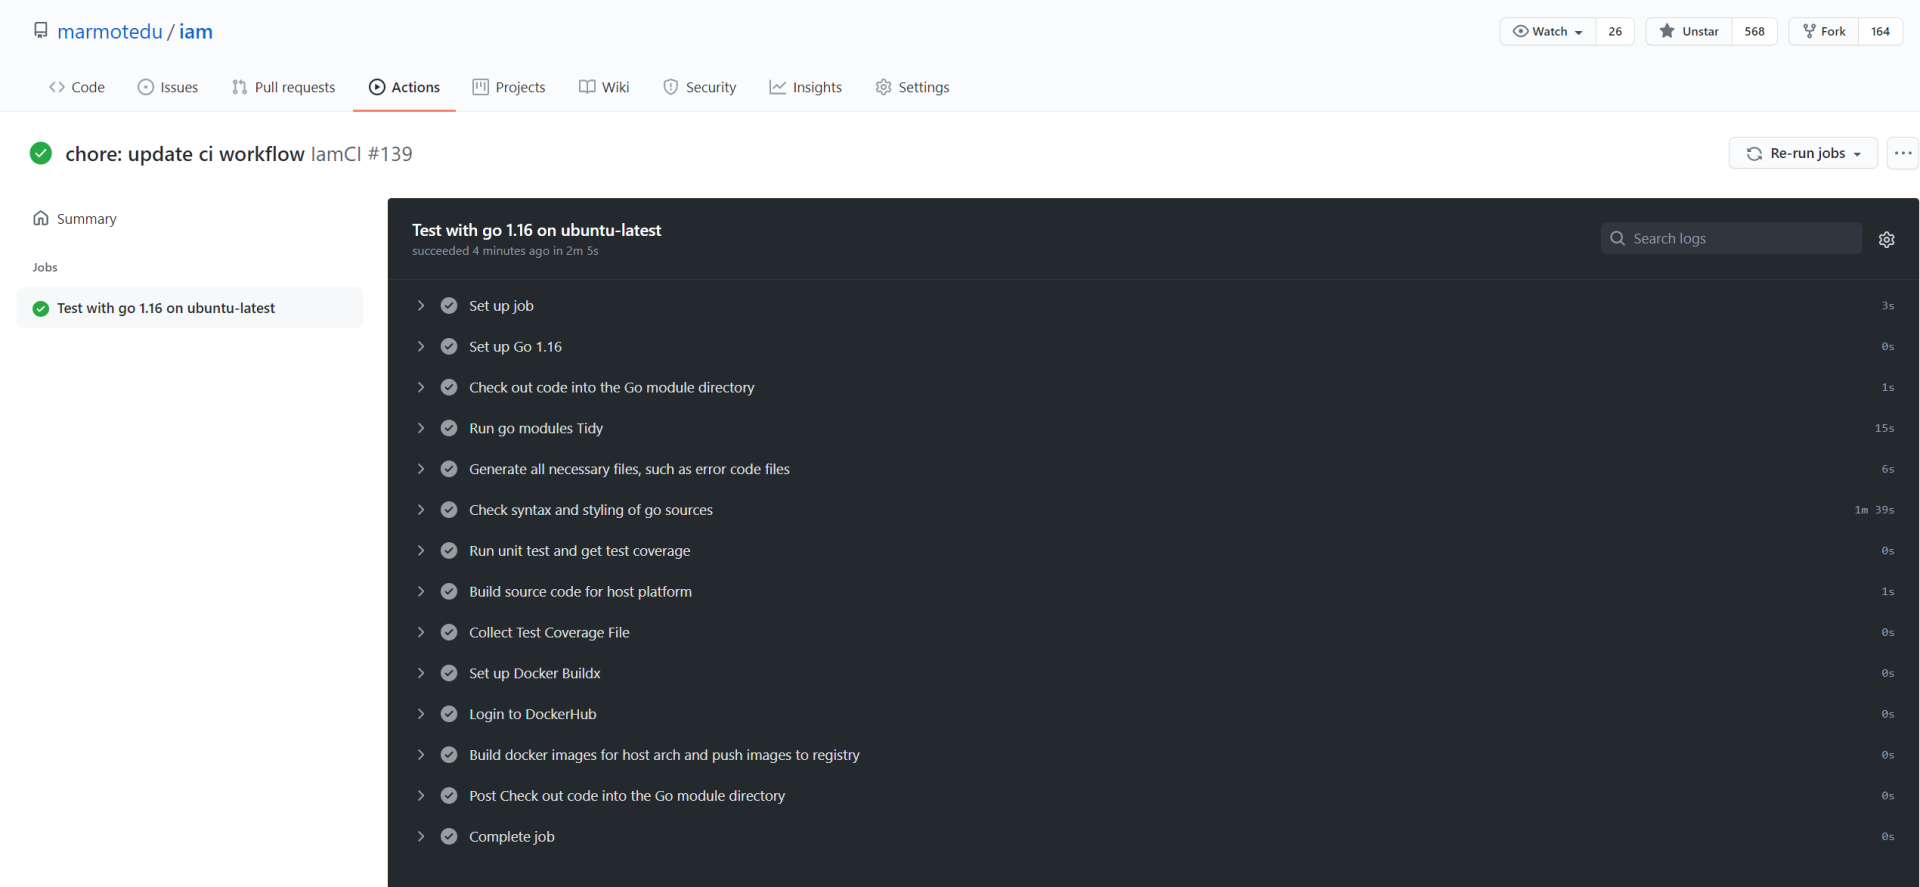
上面的workflow依次执行了以下步骤:
|
|
|
|
|
|
1. 设置Go编译环境。
|
|
|
2. 下载IAM项目源码。
|
|
|
3. 添加/删除不需要的Go包。
|
|
|
4. 生成所有的代码文件。
|
|
|
5. 对IAM源码进行静态代码检查。
|
|
|
6. 运行单元测试用例,并计算单元测试覆盖率是否达标。
|
|
|
7. 编译代码。
|
|
|
8. 收集构建产物`_output/coverage.out`。
|
|
|
9. 配置Docker构建环境。
|
|
|
10. 登陆DockerHub。
|
|
|
11. 构建Docker镜像,并push到DockerHub。
|
|
|
|
|
|
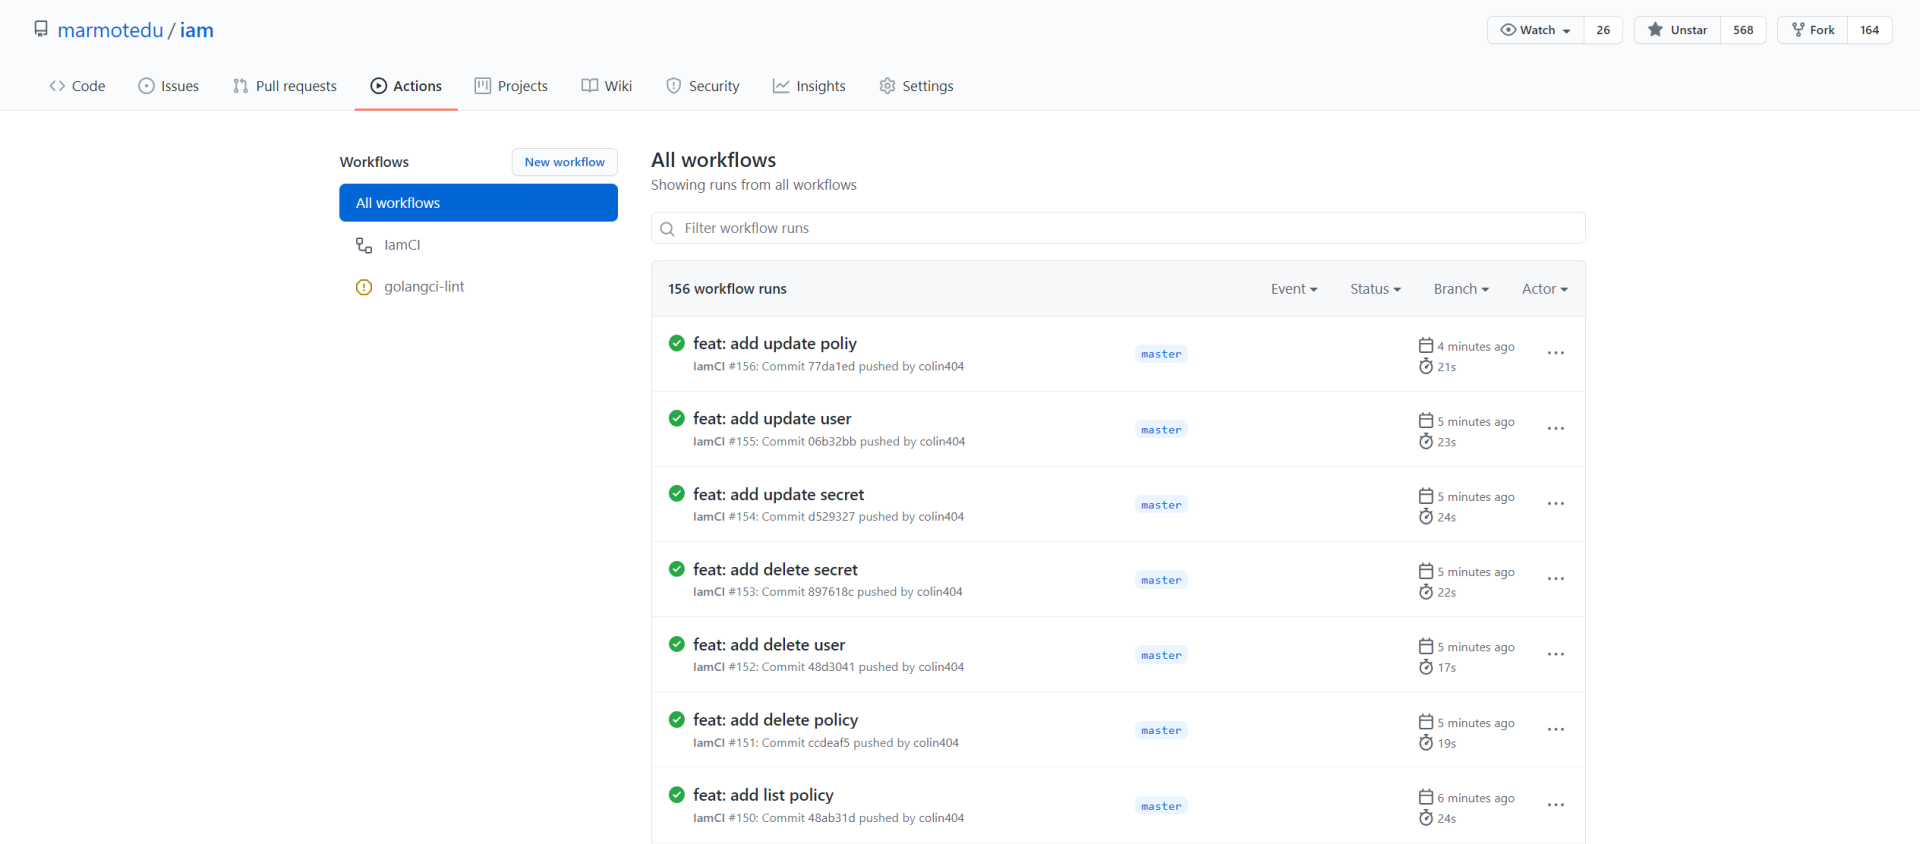
IamCI workflow运行历史如下图所示:
|
|
|
|
|
|
|
|
|
|
|
|
IamCI workflow的其中一次工作流程运行结果如下图所示:
|
|
|
|
|
|
|
|
|
|
|
|
## 总结
|
|
|
|
|
|
在Go项目开发中,我们需要通过CI任务来将需要频繁操作的任务自动化,这不仅可以提高开发效率,还能减少手动操作带来的失误。这一讲,我选择了最易实践的GitHub Actions,来给你演示如何构建CI任务。
|
|
|
|
|
|
GitHub Actions支持通过push事件来触发CI流程。一个CI流程其实就是一个workflow,workflow中包含多个任务,这些任务是可以并行执行的。一个任务又包含多个步骤,每一步又由多个动作组成。动作(Action)其实是一个命令/脚本,用来完成我们指定的任务,如编译等。
|
|
|
|
|
|
因为GitHub Actions内容比较多,这一讲只介绍了一些核心的知识,更详细的GitHub Actions教程,你可以参考 [官方中文文档](https://docs.github.com/cn/actions)。
|
|
|
|
|
|
## 课后练习
|
|
|
|
|
|
1. 使用CODING实现IAM的CI任务,并思考下:GitHub Actions和CODING在CI任务构建上,有没有本质的差异?
|
|
|
2. 这一讲,我们借助GitHub Actions实现了CI,请你结合前面所学的知识,实现IAM的CD功能。欢迎提交Pull Request。
|
|
|
|
|
|
这是我们这门课的最后一次练习题了,欢迎把你的思考和想法分享在留言区,也欢迎把课程分享给你的同事、朋友,我们一起交流,一起进步。
|
|
|
|