552 lines
28 KiB
Markdown
552 lines
28 KiB
Markdown
# 05 | 规范设计(下):commit 信息风格迥异、难以阅读,如何规范?
|
||
|
||
你好,我是孔令飞。今天,我们继续学习非编码类规范中的 Commit 规范。
|
||
|
||
我们在做代码开发时,经常需要提交代码,提交代码时需要填写 Commit Message(提交说明),否则就不允许提交。
|
||
|
||
而在实际开发中,我发现每个研发人员提交 Commit Message 的格式可以说是五花八门,有用中文的、有用英文的,甚至有的直接填写“11111”。这样的 Commit Message,时间久了可能连提交者自己都看不懂所表述的修改内容,更别说给别人看了。
|
||
|
||
所以在 Go 项目开发时,一个好的 Commit Message 至关重要:
|
||
|
||
* 可以使自己或者其他开发人员能够**清晰地知道每个 commit 的变更内容**,方便快速浏览变更历史,比如可以直接略过文档类型或者格式化类型的代码变更。
|
||
* 可以基于这些 Commit Message **进行过滤查找**,比如只查找某个版本新增的功能:`git log --oneline --grep "^feat|^fix|^perf"`。
|
||
* 可以基于规范化的 Commit Message **生成 Change Log**。
|
||
* 可以依据某些类型的 Commit Message **触发构建或者发布流程**,比如当 type 类型为 feat、fix 时我们才触发 CI 流程。
|
||
* **确定语义化版本的版本号**。比如 `fix` 类型可以映射为 PATCH 版本,`feat` 类型可以映射为 MINOR 版本。带有 `BREAKING CHANGE` 的 commit,可以映射为 MAJOR 版本。在这门课里,我就是通过这种方式来自动生成版本号。
|
||
|
||
总结来说,一个好的 Commit Message 规范可以使 Commit Message 的可读性更好,并且可以实现自动化。那究竟如何写一个易读的 Commit Message 呢?
|
||
|
||
接下来,我们来看下如何规范 Commit Message。另外,除了 Commit Message 之外,我还会介绍跟 Commit 相关的 3 个重点,以及如何通过自动化流程来保证 Commit Message 的规范化。
|
||
|
||
## Commit Message 的规范有哪些?
|
||
|
||
毫无疑问,我们可以根据需要自己来制定 Commit Message 规范,但是我更建议你采用开源社区中比较成熟的规范。一方面,可以避免重复造轮子,提高工作效率。另一方面,这些规范是经过大量开发者验证的,是科学、合理的。
|
||
|
||
目前,社区有多种 Commit Message 的规范,例如 jQuery、Angular 等。我将这些规范及其格式绘制成下面一张图片,供你参考:
|
||
|
||

|
||
|
||
在这些规范中,Angular 规范在功能上能够满足开发者 commit 需求,在格式上清晰易读,目前也是用得最多的。
|
||
|
||
Angular 规范其实是一种语义化的提交规范(Semantic Commit Messages),所谓语义化的提交规范包含以下内容:
|
||
|
||
* Commit Message 是语义化的:Commit Message 都会被归为一个有意义的类型,用来说明本次 commit 的类型。
|
||
* Commit Message 是规范化的:Commit Message 遵循预先定义好的规范,比如 Commit Message 格式固定、都属于某个类型,这些规范不仅可被开发者识别也可以被工具识别。
|
||
|
||
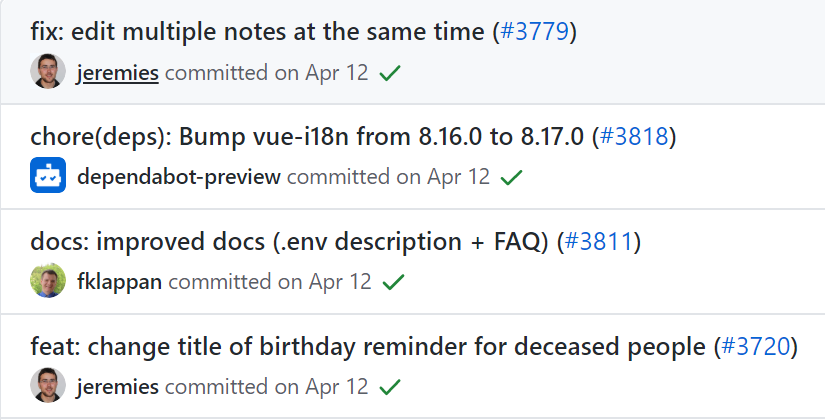
为了方便你理解 Angular 规范,我们直接看一个遵循 Angular 规范的 commit 历史记录,见下图:
|
||
|
||
|
||
|
||
再来看一个完整的符合 Angular 规范的 Commit Message,如下图所示:
|
||
|
||

|
||
|
||
通过上面 2 张图,我们可以看到符合 Angular Commit Message 规范的 commit 都是有一定格式,有一定语义的。
|
||
|
||
那我们该**怎么写出符合 Angular 规范的 Commit Message 呢**?
|
||
|
||
在 Angular 规范中,Commit Message 包含三个部分,分别是 **Header**、**Body** 和 **Footer**,格式如下:
|
||
|
||
```
|
||
<type>[optional scope]: <description>
|
||
// 空行
|
||
[optional body]
|
||
// 空行
|
||
[optional footer(s)]
|
||
|
||
```
|
||
|
||
其中,Header是必需的,Body和Footer可以省略。在以上规范中,`<scope>`必须用括号 `()` 括起来, `<type>[<scope>]` 后必须紧跟冒号 ,冒号后必须紧跟空格,2 个空行也是必需的。
|
||
|
||
在实际开发中,为了使 Commit Message 在 GitHub 或者其他 Git 工具上更加易读,我们往往会限制每行 message 的长度。根据需要,可以限制为 50/72/100 个字符,这里我将长度限制在 72 个字符以内(也有一些开发者会将长度限制为 100,你可根据需要自行选择)。
|
||
|
||
以下是一个符合 Angular 规范的 Commit Message:
|
||
|
||
```
|
||
fix($compile): couple of unit tests for IE9
|
||
# Please enter the Commit Message for your changes. Lines starting
|
||
# with '#' will be ignored, and an empty message aborts the commit.
|
||
# On branch master
|
||
# Changes to be committed:
|
||
# ...
|
||
|
||
Older IEs serialize html uppercased, but IE9 does not...
|
||
Would be better to expect case insensitive, unfortunately jasmine does
|
||
not allow to user regexps for throw expectations.
|
||
|
||
Closes #392
|
||
Breaks foo.bar api, foo.baz should be used instead
|
||
|
||
```
|
||
|
||
接下来,我们详细看看 Angular 规范中 Commit Message 的三个部分。
|
||
|
||
### Header
|
||
|
||
Header 部分只有一行,包括三个字段:type(必选)、scope(可选)和 subject(必选)。
|
||
|
||
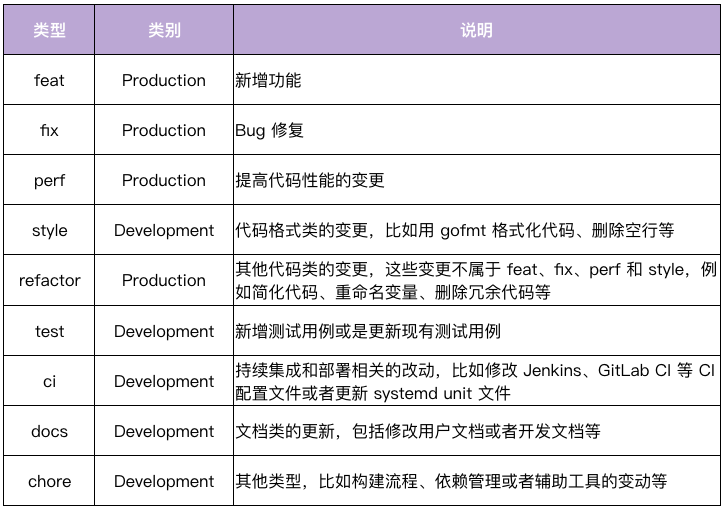
我们先来说 **type**,它用来说明 commit 的类型。为了方便记忆,我把这些类型做了归纳,它们主要可以归为 Development 和 Production 共两类。它们的含义是:
|
||
|
||
* Development:这类修改一般是项目管理类的变更,不会影响最终用户和生产环境的代码,比如 CI 流程、构建方式等的修改。遇到这类修改,通常也意味着可以免测发布。
|
||
* Production:这类修改会影响最终的用户和生产环境的代码。所以对于这种改动,我们一定要慎重,并在提交前做好充分的测试。
|
||
|
||
我在这里列出了 Angular 规范中的常见 type 和它们所属的类别,你在提交 Commit Message 的时候,一定要注意区分它的类别。举个例子,我们在做 Code Review 时,如果遇到 Production 类型的代码,一定要认真 Review,因为这种类型,会影响到现网用户的使用和现网应用的功能。
|
||
|
||
|
||
|
||
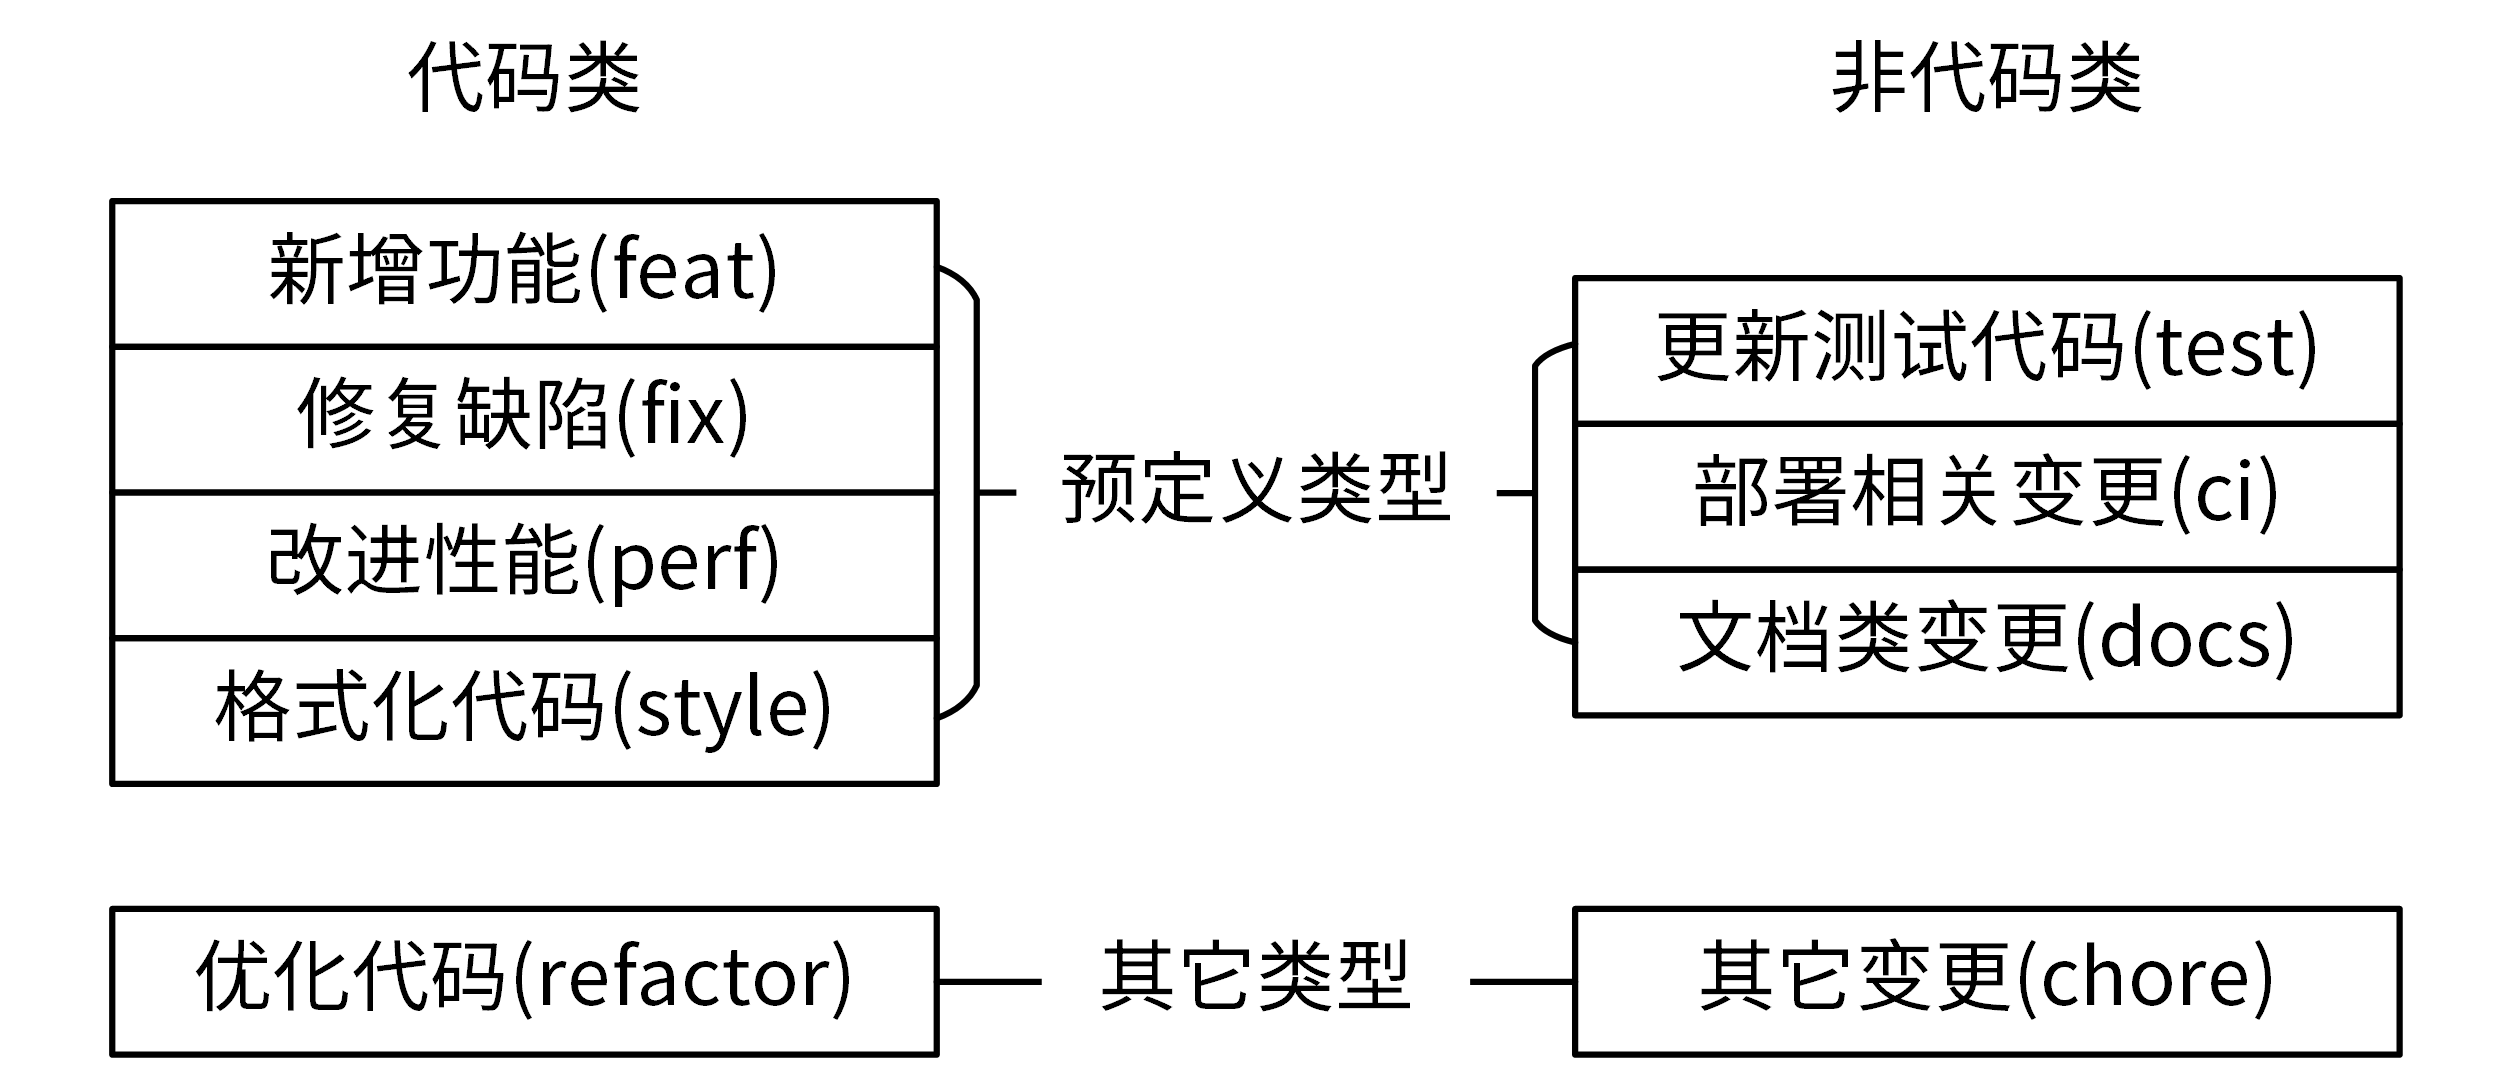
有这么多 type,我们该如何确定一个 commit 所属的 type 呢?这里我们可以通过下面这张图来确定。
|
||
|
||
|
||
|
||
如果我们变更了应用代码,比如某个 Go 函数代码,那这次修改属于代码类。在代码类中,有 4 种具有明确变更意图的类型:feat、fix、perf 和 style;如果我们的代码变更不属于这 4 类,那就全都归为 refactor 类,也就是优化代码。
|
||
|
||
如果我们变更了非应用代码,例如更改了文档,那它属于非代码类。在非代码类中,有 3 种具有明确变更意图的类型:test、ci、docs;如果我们的非代码变更不属于这 3 类,那就全部归入到 chore 类。
|
||
|
||
Angular 的 Commit Message 规范提供了大部分的 type,在实际开发中,我们可以使用部分 type,或者扩展添加我们自己的 type。但无论选择哪种方式,**我们一定要保证一个项目中的 type 类型一致。**
|
||
|
||
接下来,我们说说 Header 的第二个字段 **scope**。
|
||
|
||
scope 是用来说明 commit 的影响范围的,它必须是名词。显然,不同项目会有不同的 scope。在项目初期,我们可以设置一些粒度比较大的 scope,比如可以按组件名或者功能来设置 scope;后续,如果项目有变动或者有新功能,我们可以再用追加的方式添加新的 scope。
|
||
|
||
我们这门课采用的 scope,主要是根据组件名和功能来设置的。例如,支持 apiserver、authzserver、user 这些 scope。
|
||
|
||
**这里想强调的是,scope 不适合设置太具体的值**。太具体的话,一方面会导致项目有太多的 scope,难以维护。另一方面,开发者也难以确定 commit 属于哪个具体的 scope,导致错放 scope,反而会使 scope 失去了分类的意义。
|
||
|
||
当然了,在指定 scope 时,也需要遵循我们预先规划的 scope,所以我们要将 scope 文档化,放在类似 devel 这类文档中。这一点你可以参考下 IAM 项目的 scope 文档: [IAM commit message scope](https://github.com/marmotedu/iam/blob/master/docs/devel/zh-CN/scope.md) 。
|
||
|
||
最后,我们再说说 **subject。**
|
||
|
||
subject 是 commit 的简短描述,必须以动词开头、使用现在时。比如,我们可以用 change,却不能用 changed 或 changes,而且这个动词的第一个字母必须是小写。通过这个动词,我们可以明确地知道 commit 所执行的操作。此外我们还要注意,subject 的结尾不能加英文句号。
|
||
|
||
### Body
|
||
|
||
Header 对 commit 做了高度概括,可以方便我们查看 Commit Message。那我们如何知道具体做了哪些变更呢?答案就是,可以通过 Body 部分,它是对本次 commit 的更详细描述,是可选的。
|
||
|
||
Body 部分可以分成多行,而且格式也比较自由。不过,和 Header 里的一样,它也要以动词开头,使用现在时。此外,它还必须**要包括修改的动机**,以及**和跟上一版本相比的改动点**。
|
||
|
||
我在下面给出了一个范例,你可以看看:
|
||
|
||
```
|
||
The body is mandatory for all commits except for those of scope "docs". When the body is required it must be at least 20 characters long.
|
||
|
||
```
|
||
|
||
### Footer
|
||
|
||
Footer 部分不是必选的,可以根据需要来选择,主要用来说明本次 commit 导致的后果。在实际应用中,Footer 通常用来说明不兼容的改动和关闭的 Issue 列表,格式如下:
|
||
|
||
```
|
||
BREAKING CHANGE: <breaking change summary>
|
||
// 空行
|
||
<breaking change description + migration instructions>
|
||
// 空行
|
||
// 空行
|
||
Fixes #<issue number>
|
||
|
||
```
|
||
|
||
接下来,我给你详细说明下这两种情况:
|
||
|
||
* 不兼容的改动:如果当前代码跟上一个版本不兼容,需要在 Footer 部分,以 `BREAKING CHANG:` 开头,后面跟上不兼容改动的摘要。Footer 的其他部分需要说明变动的描述、变动的理由和迁移方法,例如:
|
||
|
||
```
|
||
BREAKING CHANGE: isolate scope bindings definition has changed and
|
||
the inject option for the directive controller injection was removed.
|
||
|
||
To migrate the code follow the example below:
|
||
|
||
Before:
|
||
|
||
scope: {
|
||
myAttr: 'attribute',
|
||
}
|
||
|
||
After:
|
||
|
||
scope: {
|
||
myAttr: '@',
|
||
}
|
||
The removed `inject` wasn't generaly useful for directives so there should be no code using it.
|
||
|
||
```
|
||
|
||
* 关闭的 Issue 列表:关闭的 Bug 需要在 Footer 部分新建一行,并以 Closes 开头列出,例如:`Closes #123`。如果关闭了多个 Issue,可以这样列出:`Closes #123, #432, #886`。例如:
|
||
|
||
```
|
||
Change pause version value to a constant for image
|
||
|
||
Closes #1137
|
||
|
||
```
|
||
|
||
### Revert Commit
|
||
|
||
除了 **Header**、**Body** 和 **Footer 这 3 个部分,**Commit Message 还有一种特殊情况:如果当前 commit 还原了先前的 commit,则应以 `revert:` 开头,后跟还原的 commit 的 Header。而且,在 Body 中必须写成 `This reverts commit <hash>` ,其中 hash 是要还原的 commit 的 SHA 标识。例如:
|
||
|
||
```
|
||
revert: feat(iam-apiserver): add 'Host' option
|
||
|
||
This reverts commit 079360c7cfc830ea8a6e13f4c8b8114febc9b48a.
|
||
|
||
```
|
||
|
||
为了更好地遵循 Angular 规范,建议你在提交代码时养成不用 `git commit -m`,即不用-m 选项的习惯,而是直接用 `git commit` 或者 `git commit -a` 进入交互界面编辑 Commit Message。这样可以更好地格式化 Commit Message。
|
||
|
||
但是除了 Commit Message 规范之外,在代码提交时,我们还需要关注 3 个重点内容:提交频率、合并提交和 Commit Message 修改。
|
||
|
||
## Commit 相关的 3 个重要内容
|
||
|
||
我们先来看下提交频率。
|
||
|
||
### 提交频率
|
||
|
||
在实际项目开发中,如果是个人项目,随意 commit 可能影响不大,但如果是多人开发的项目,随意 commit 不仅会让 Commit Message 变得难以理解,还会让其他研发同事觉得你不专业。因此,我们要规定 commit 的提交频率。
|
||
|
||
那到底什么时候进行 commit 最好呢?
|
||
|
||
我认为主要可以分成两种情况。一种情况是,只要我对项目进行了修改,一通过测试就立即 commit。比如修复完一个 bug、开发完一个小功能,或者开发完一个完整的功能,测试通过后就提交。另一种情况是,我们规定一个时间,定期提交。这里我建议代码下班前固定提交一次,并且要确保本地未提交的代码,延期不超过 1 天。这样,如果本地代码丢失,可以尽可能减少丢失的代码量。
|
||
|
||
按照上面 2 种方式提交代码,你可能会觉得代码 commit 比较多,看起来比较随意。或者说,我们想等开发完一个完整的功能之后,放在一个 commit 中一起提交。这时候,我们可以在最后合并代码或者提交 Pull Request 前,执行 `git rebase -i` 合并之前的所有 commit。
|
||
|
||
那么如何合并 commit 呢?接下来,我来详细说说。
|
||
|
||
### 合并提交
|
||
|
||
合并提交,就是将多个 commit 合并为一个 commit 提交。这里,我建议你把新的 commit 合并到主干时,只保留 2~3 个 commit 记录。那具体怎么做呢?
|
||
|
||
在 Git 中,我们主要使用 git rebase 命令来合并。git rebase 也是我们日后开发需要经常使用的一个命令,所以我们一定要掌握好它的使用方法。
|
||
|
||
**git rebase 命令介绍**
|
||
|
||
git rebase 的最大作用是它可以重写历史。
|
||
|
||
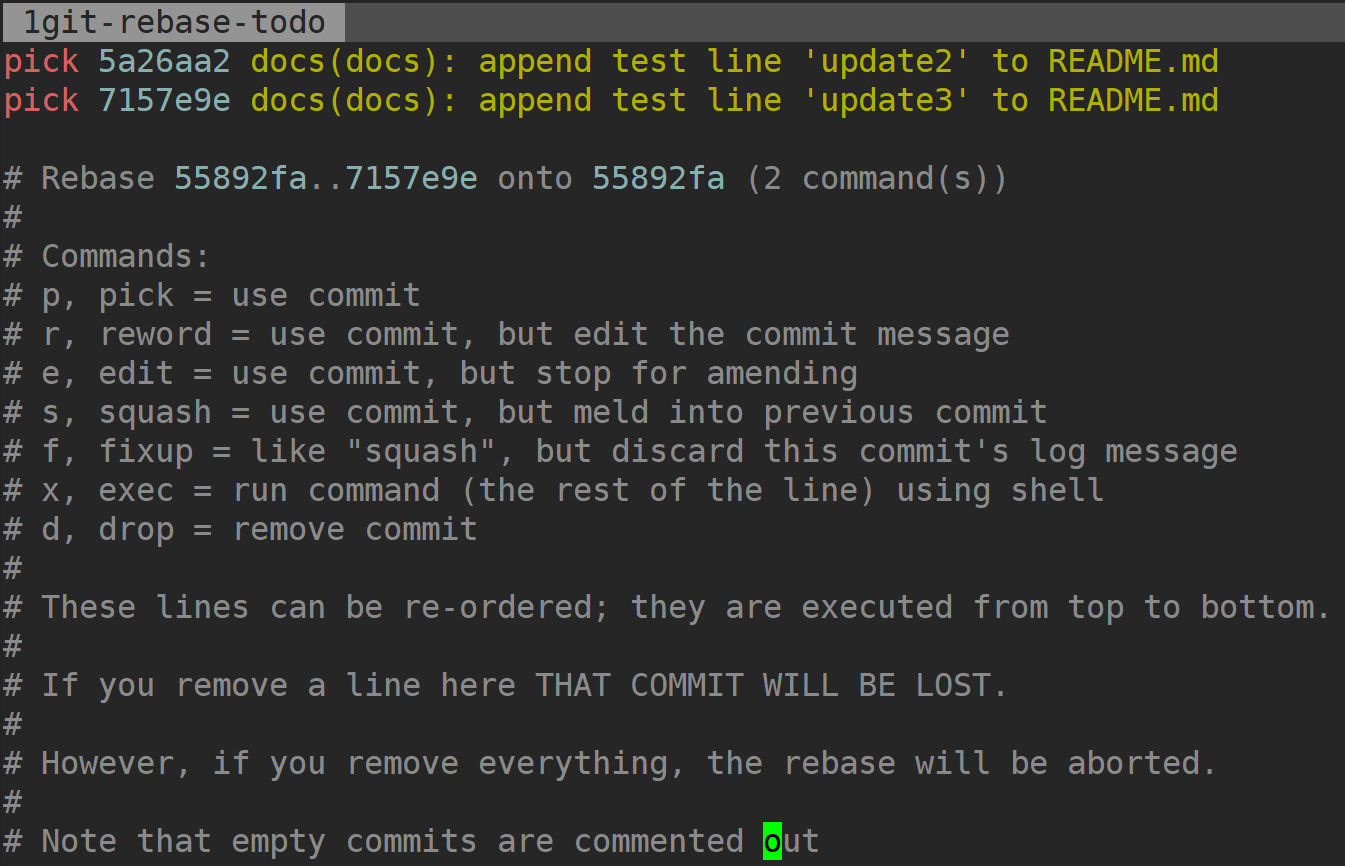
我们通常会通过 `git rebase -i <commit ID>`使用 git rebase 命令,`-i` 参数表示交互(interactive),该命令会进入到一个交互界面中,其实就是 Vim 编辑器。在该界面中,我们可以对里面的 commit 做一些操作,交互界面如图所示:
|
||
|
||
|
||
|
||
这个交互界面会首先列出给定`<commit ID>`之前(不包括,越下面越新)的所有 commit,每个 commit 前面有一个操作命令,默认是 pick。我们可以选择不同的 commit,并修改 commit 前面的命令,来对该 commit 执行不同的变更操作。
|
||
|
||
git rebase 支持的变更操作如下:
|
||
|
||
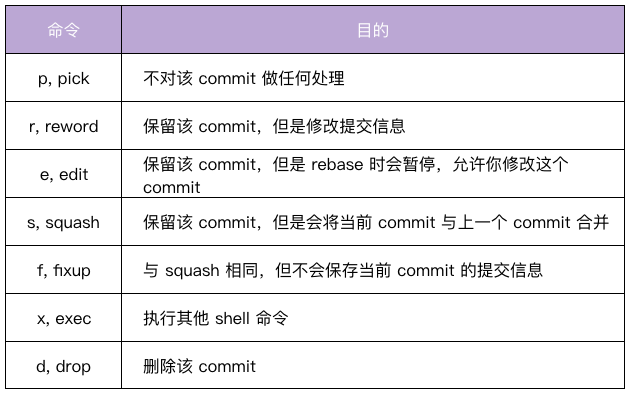
|
||
|
||
在上面的 7 个命令中,squash 和 fixup 可以用来合并 commit。例如用 squash 来合并,我们只需要把要合并的 commit 前面的动词,改成 squash(或者 s)即可。你可以看看下面的示例:
|
||
|
||
```
|
||
pick 07c5abd Introduce OpenPGP and teach basic usage
|
||
s de9b1eb Fix PostChecker::Post#urls
|
||
s 3e7ee36 Hey kids, stop all the highlighting
|
||
pick fa20af3 git interactive rebase, squash, amend
|
||
|
||
```
|
||
|
||
rebase 后,第 2 行和第 3 行的 commit 都会合并到第 1 行的 commit。这个时候,我们提交的信息会同时包含这三个 commit 的提交信息:
|
||
|
||
```
|
||
# This is a combination of 3 commits.
|
||
# The first commit's message is:
|
||
Introduce OpenPGP and teach basic usage
|
||
|
||
# This is the 2ndCommit Message:
|
||
Fix PostChecker::Post#urls
|
||
|
||
# This is the 3rdCommit Message:
|
||
Hey kids, stop all the highlighting
|
||
|
||
```
|
||
|
||
如果我们将第 3 行的 squash 命令改成 fixup 命令:
|
||
|
||
```
|
||
pick 07c5abd Introduce OpenPGP and teach basic usage
|
||
s de9b1eb Fix PostChecker::Post#urls
|
||
f 3e7ee36 Hey kids, stop all the highlighting
|
||
pick fa20af3 git interactive rebase, squash, amend
|
||
|
||
```
|
||
|
||
rebase 后,还是会生成两个 commit,第 2 行和第 3 行的 commit,都合并到第 1 行的 commit。但是,新的提交信息里面,第 3 行 commit 的提交信息会被注释掉:
|
||
|
||
```
|
||
# This is a combination of 3 commits.
|
||
# The first commit's message is:
|
||
Introduce OpenPGP and teach basic usage
|
||
|
||
# This is the 2ndCommit Message:
|
||
Fix PostChecker::Post#urls
|
||
|
||
# This is the 3rdCommit Message:
|
||
# Hey kids, stop all the highlighting
|
||
|
||
```
|
||
|
||
除此之外,我们在使用 git rebase 进行操作的时候,还需要注意以下几点:
|
||
|
||
* 删除某个 commit 行,则该 commit 会丢失掉。
|
||
* 删除所有的 commit 行,则 rebase 会被终止掉。
|
||
* 可以对 commits 进行排序,git 会从上到下进行合并。
|
||
|
||
为了加深你的理解,我给你完整演示一遍合并提交。
|
||
|
||
**合并提交操作示例**
|
||
|
||
假设我们需要研发一个新的模块:user,用来在平台里进行用户的注册、登录、注销等操作,当模块完成开发和测试后,需要合并到主干分支,具体步骤如下。
|
||
|
||
**首先,我们新建一个分支**。我们需要先基于 master 分支新建并切换到 feature 分支:
|
||
|
||
```
|
||
$ git checkout -b feature/user
|
||
Switched to a new branch 'feature/user'
|
||
|
||
```
|
||
|
||
这是我们的所有 commit 历史:
|
||
|
||
```
|
||
$ git log --oneline
|
||
7157e9e docs(docs): append test line 'update3' to README.md
|
||
5a26aa2 docs(docs): append test line 'update2' to README.md
|
||
55892fa docs(docs): append test line 'update1' to README.md
|
||
89651d4 docs(doc): add README.md
|
||
|
||
```
|
||
|
||
**接着,我们在** `feature/user`分支进行功能的开发和测试,并遵循规范提交 commit,功能开发并测试完成后,Git 仓库的 commit 记录如下:
|
||
|
||
```
|
||
$ git log --oneline
|
||
4ee51d6 docs(user): update user/README.md
|
||
176ba5d docs(user): update user/README.md
|
||
5e829f8 docs(user): add README.md for user
|
||
f40929f feat(user): add delete user function
|
||
fc70a21 feat(user): add create user function
|
||
7157e9e docs(docs): append test line 'update3' to README.md
|
||
5a26aa2 docs(docs): append test line 'update2' to README.md
|
||
55892fa docs(docs): append test line 'update1' to README.md
|
||
89651d4 docs(doc): add README.md
|
||
|
||
```
|
||
|
||
可以看到我们提交了 5 个 commit。接下来,我们需要将 `feature/user`分支的改动合并到 master 分支,但是 5 个 commit 太多了,我们想将这些 commit 合并后再提交到 master 分支。
|
||
|
||
**接着,我们合并所有 commit**。在上一步中,我们知道 `fc70a21`是 `feature/user`分支的第一个 commit ID,其父 commit ID 是 `7157e9e`,我们需要将`7157e9e`之前的所有分支 进行合并,这时我们可以执行:
|
||
|
||
```
|
||
$ git rebase -i 7157e9e
|
||
|
||
```
|
||
|
||
执行命令后,我们会进入到一个交互界面,在该界面中,我们可以将需要合并的 4 个 commit,都执行 squash 操作,如下图所示:
|
||
|
||

|
||
|
||
修改完成后执行`:wq` 保存,会跳转到一个新的交互页面,在该页面,我们可以编辑 Commit Message,编辑后的内容如下图所示:
|
||
|
||
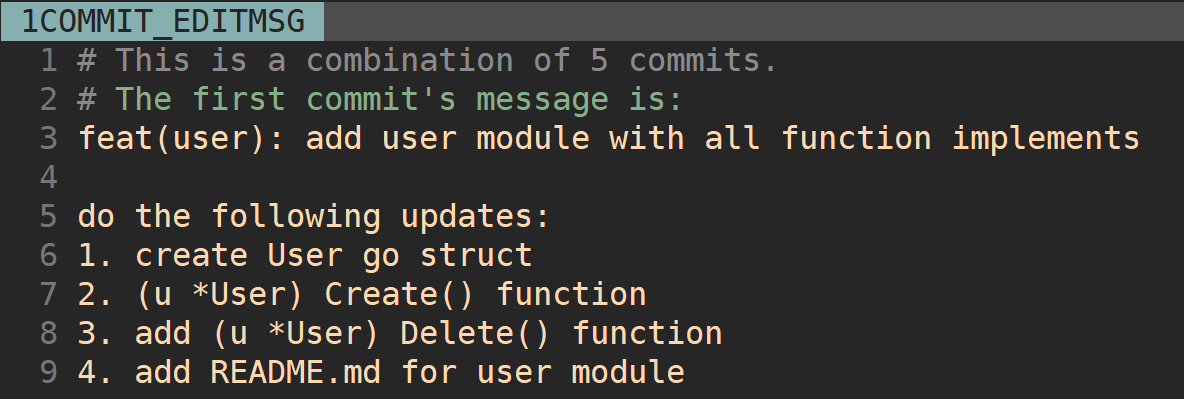
|
||
|
||
`#`开头的行是 git 的注释,我们可以忽略掉,在 rebase 后,这些行将会消失掉。修改完成后执行`:wq` 保存,就完成了合并提交操作。
|
||
|
||
除此之外,这里有 2 个点需要我们注意:
|
||
|
||
* `git rebase -i <commid ID>`这里的一定要是需要合并 commit 中最旧 commit 的父 commit ID。
|
||
* 我们希望将 feature/user 分支的 5 个 commit 合并到一个 commit,在 git rebase 时,需要保证其中最新的一个 commit 是 pick 状态,这样我们才可以将其他 4 个 commit 合并进去。
|
||
|
||
**然后,我们用如下命令来检查 commits 是否成功合并**。可以看到,我们成功将 5 个 commit 合并成为了一个 commit:`d6b17e0`。
|
||
|
||
```
|
||
$ git log --oneline
|
||
d6b17e0 feat(user): add user module with all function implements
|
||
7157e9e docs(docs): append test line 'update3' to README.md
|
||
5a26aa2 docs(docs): append test line 'update2' to README.md
|
||
55892fa docs(docs): append test line 'update1' to README.md
|
||
89651d4 docs(doc): add README.md
|
||
|
||
```
|
||
|
||
**最后,我们就可以将 feature 分支** `feature/user` 的改动合并到主干分支,从而完成新功能的开发**。**
|
||
|
||
```
|
||
$ git checkout master
|
||
$ git merge feature/user
|
||
$ git log --oneline
|
||
d6b17e0 feat(user): add user module with all function implements
|
||
7157e9e docs(docs): append test line 'update3' to README.md
|
||
5a26aa2 docs(docs): append test line 'update2' to README.md
|
||
55892fa docs(docs): append test line 'update1' to README.md
|
||
89651d4 docs(doc): add README.md
|
||
|
||
```
|
||
|
||
这里给你一个小提示,如果你有太多的 commit 需要合并,那么可以试试这种方式:先撤销过去的 commit,然后再建一个新的。
|
||
|
||
```
|
||
$ git reset HEAD~3
|
||
$ git add .
|
||
$ git commit -am "feat(user): add user resource"
|
||
|
||
```
|
||
|
||
需要说明一点:除了 commit 实在太多的时候,一般情况下我不建议用这种方法,有点粗暴,而且之前提交的 Commit Message 都要重新整理一遍。
|
||
|
||
### 修改 Commit Message
|
||
|
||
即使我们有了 Commit Message 规范,但仍然可能会遇到提交的 Commit Message 不符合规范的情况,这个时候就需要我们能够修改之前某次 commit 的 Commit Message。
|
||
|
||
具体来说,我们有两种修改方法,分别对应两种不同情况:
|
||
|
||
1. git commit --amend:修改最近一次 commit 的 message;
|
||
2. git rebase -i:修改某次 commit 的 message。
|
||
|
||
接下来,我们分别来说这两种方法。
|
||
|
||
**git commit --amend:修改最近一次 commit 的 message**
|
||
|
||
有时候,我们刚提交完一个 commit,但是发现 commit 的描述不符合规范或者需要纠正,这时候,我们可以通过 `git commit --amend` 命令来修改刚刚提交 commit 的 Commit Message。具体修改步骤如下:
|
||
|
||
1. 查看当前分支的日志记录。
|
||
|
||
```
|
||
$ git log –oneline
|
||
418bd4 docs(docs): append test line 'update$i' to README.md
|
||
89651d4 docs(doc): add README.md
|
||
|
||
```
|
||
|
||
可以看到,最近一次的 Commit Message 是 `docs(docs): append test line 'update$i' to README.md`,其中 `update$i` 正常应该是 `update1`。
|
||
|
||
2. 更新最近一次提交的 Commit Message
|
||
|
||
在当前 Git 仓库下执行命令:`git commit --amend`,后会进入一个交互界面,在交互界面中,修改最近一次的 Commit Message,如下图所示:
|
||
|
||
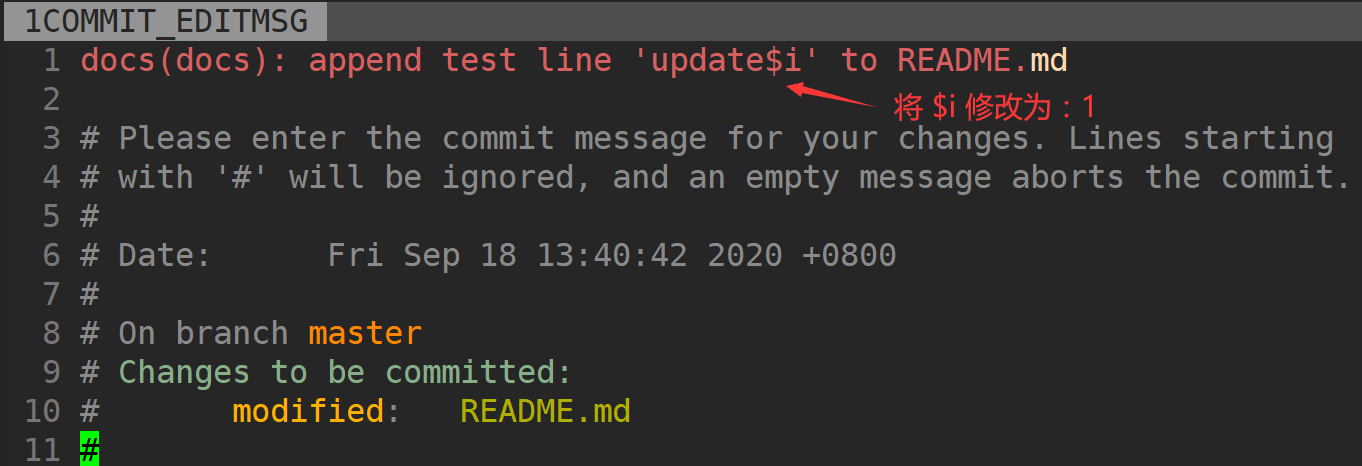
|
||
|
||
修改完成后执行:wq 保存,退出编辑器之后,会在命令行显示,该 commit 的 message 的更新结果如下:
|
||
|
||
```
|
||
[master 55892fa] docs(docs): append test line 'update1' to README.md
|
||
Date: Fri Sep 18 13:40:42 2020 +0800
|
||
1 file changed, 1 insertion(+)
|
||
|
||
```
|
||
|
||
3. 查看最近一次的 Commit Message 是否被更新
|
||
|
||
```
|
||
$ git log --oneline
|
||
55892fa docs(docs): append test line 'update1' to README.md
|
||
89651d4 docs(doc): add README.md
|
||
|
||
```
|
||
|
||
可以看到最近一次 commit 的 message 成功被修改为期望的内容。
|
||
|
||
**git rebase -i:修改某次 commit 的 message**
|
||
|
||
如果我们想修改的 Commit Message 不是最近一次的 Commit Message,可以通过 `git rebase -i <父 commit ID>`命令来修改。这个命令在实际开发中使用频率比较高,我们一定要掌握。具体来说,使用它主要分为 4 步。
|
||
|
||
1. 查看当前分支的日志记录。
|
||
|
||
```
|
||
$ git log --oneline
|
||
1d6289f docs(docs): append test line 'update3' to README.md
|
||
a38f808 docs(docs): append test line 'update$i' to README.md
|
||
55892fa docs(docs): append test line 'update1' to README.md
|
||
89651d4 docs(doc): add README.md
|
||
|
||
```
|
||
|
||
可以看到倒数第 3 次提交的 Commit Message 是:`docs(docs): append test line 'update$i' to README.md`,其中 update$i 正常应该是 update2。
|
||
|
||
2. 修改倒数第 3 次提交 commit 的 message。
|
||
|
||
在 Git 仓库下直接执行命令 `git rebase -i 55892fa`,然后会进入一个交互界面。在交互界面中,修改最近一次的 Commit Message。这里我们使用 reword 或者 r,保留倒数第3次的变更信息,但是修改其 message,如下图所示:
|
||
|
||

|
||
|
||
修改完成后执行`:wq` 保存,还会跳转到一个新的交互页面,如下图所示:
|
||
|
||

|
||
|
||
修改完成后执行`:wq` 保存,退出编辑器之后,会在命令行显示该 commit 的 message 的更新结果:
|
||
|
||
```
|
||
[detached HEAD 5a26aa2] docs(docs): append test line 'update2' to README.md
|
||
Date: Fri Sep 18 13:45:54 2020 +0800
|
||
1 file changed, 1 insertion(+)
|
||
Successfully rebased and updated refs/heads/master.
|
||
|
||
```
|
||
|
||
`Successfully rebased and updated refs/heads/master.`说明 rebase 成功,其实这里完成了两个步骤:更新 message,更新该 commit 的 HEAD 指针。
|
||
|
||
注意:这里一定要传入想要变更 Commit Message 的父 commit ID:`git rebase -i <父 commit ID>`。
|
||
|
||
3. 查看倒数第 3 次 commit 的 message 是否被更新。
|
||
|
||
```
|
||
$ git log --oneline
|
||
7157e9e docs(docs): append test line 'update3' to README.md
|
||
5a26aa2 docs(docs): append test line 'update2' to README.md
|
||
55892fa docs(docs): append test line 'update1' to README.md
|
||
89651d4 docs(doc): add README.md
|
||
|
||
```
|
||
|
||
可以看到,倒数第 3 次 commit 的 message 成功被修改为期望的内容。
|
||
|
||
这里有两点需要你注意:
|
||
|
||
* Commit Message 是 commit 数据结构中的一个属性,如果 Commit Message 有变更,则 commit ID 一定会变,`git commit --amend` 只会变更最近一次的 commit ID,但是 `git rebase -i` 会变更父 commit ID 之后所有提交的 commit ID。
|
||
* 如果当前分支有未 commit 的代码,需要先执行 `git stash` 将工作状态进行暂存,当修改完成后再执行 `git stash pop` 恢复之前的工作状态。
|
||
|
||
## Commit Message 规范自动化
|
||
|
||
其实,到这里我们也就意识到了一点:Commit Message 规范如果靠文档去约束,就会严重依赖开发者的代码素养,并不能真正保证提交的 commit 是符合规范的。
|
||
|
||
那么,有没有一种方式可以确保我们提交的 Commit Message 一定是符合规范的呢?有的,我们可以通过一些工具,来自动化地生成和检查 Commit Message 是否符合规范。
|
||
|
||
另外,既然 Commit Message 是规范的,那么我们能不能利用这些规范来实现一些更酷的功能呢?答案是有的,我将可以围绕着 Commit Message 实现的一些自动化功能绘制成了下面一张图。
|
||
|
||
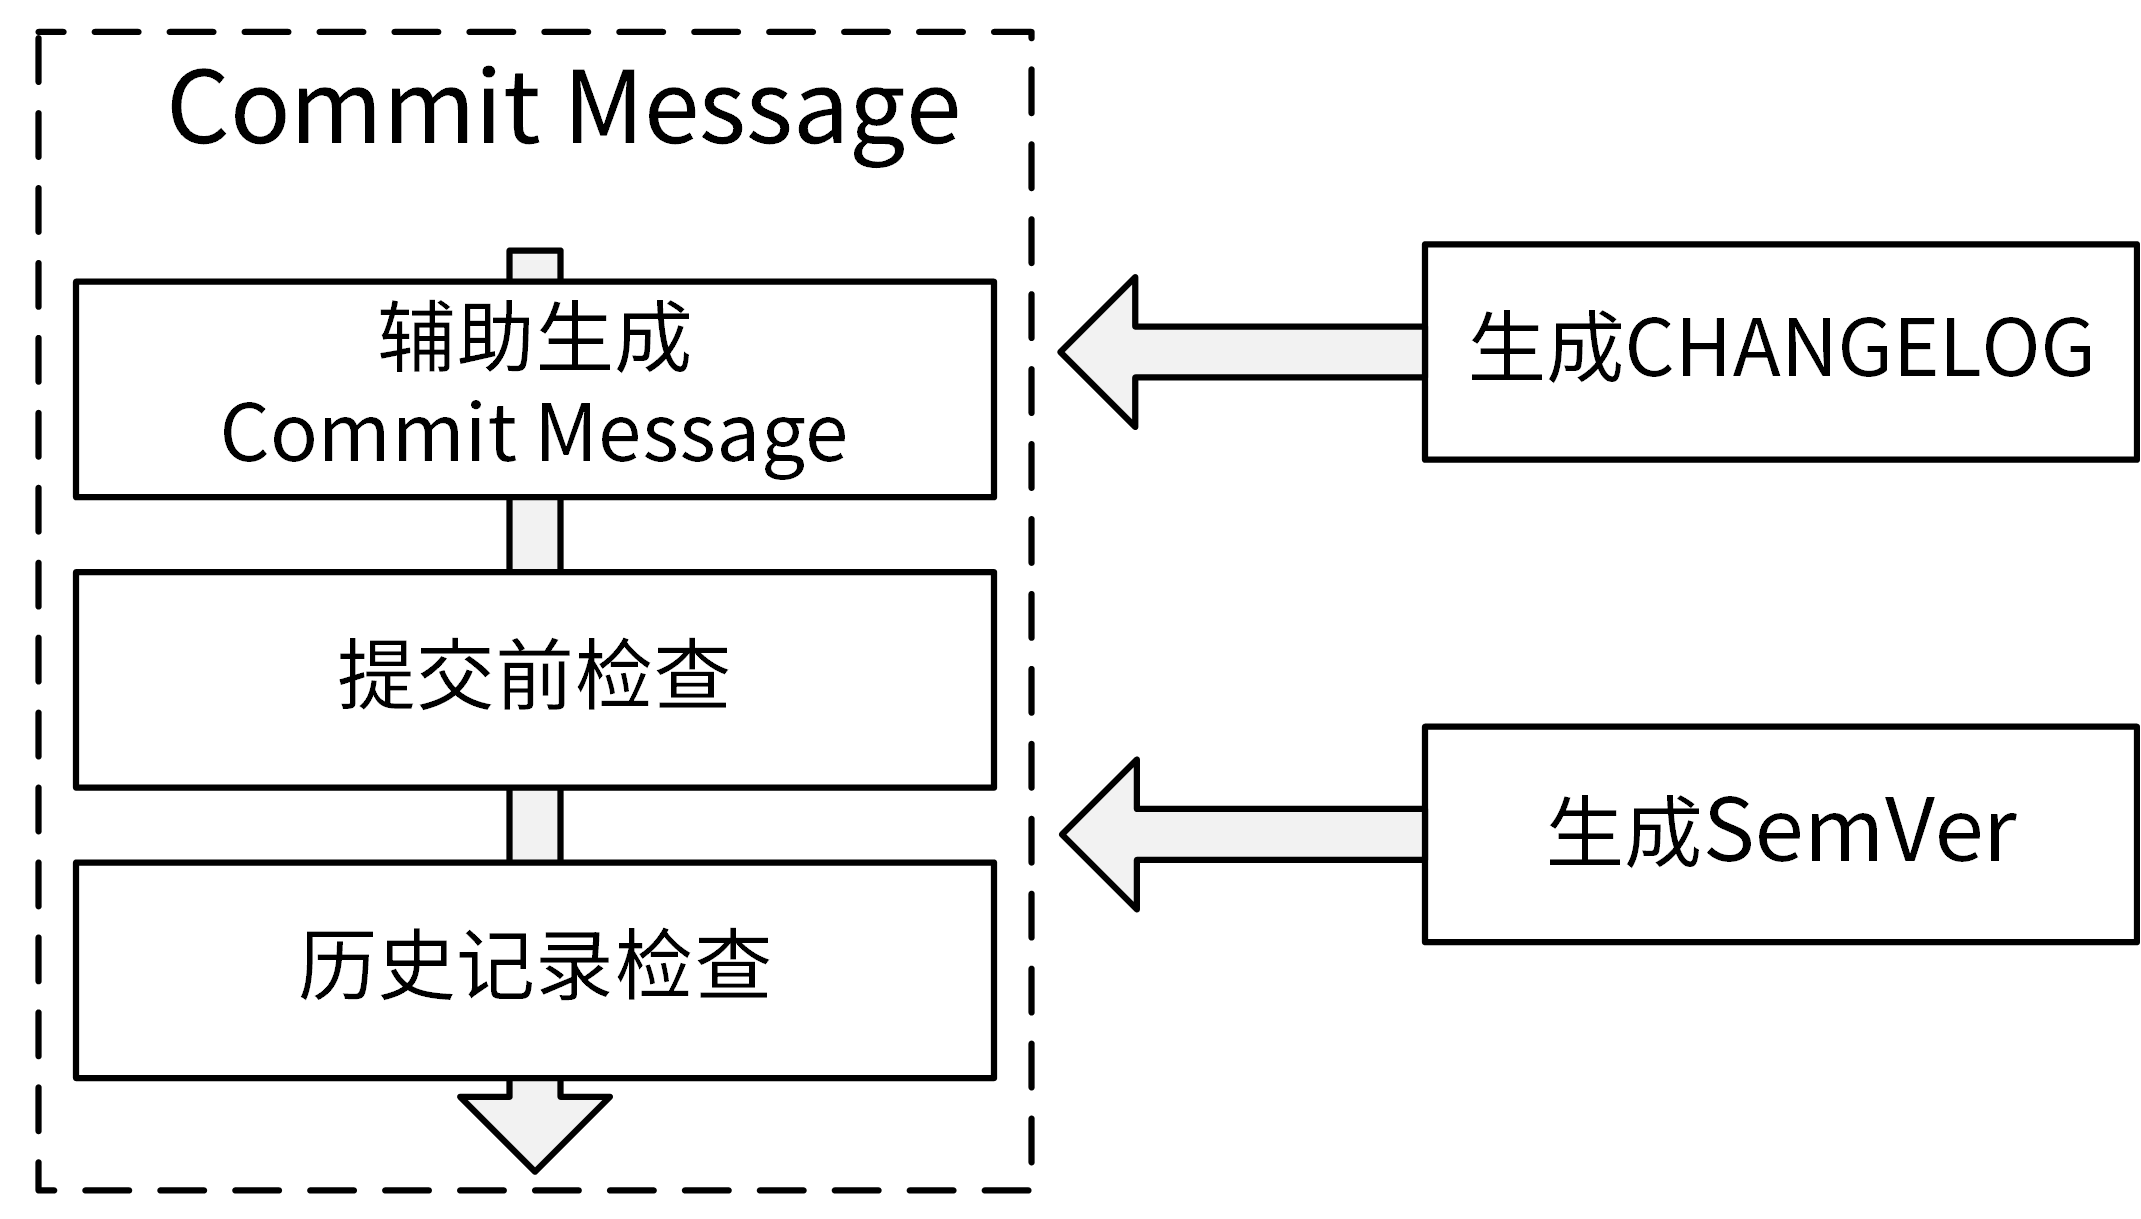
|
||
|
||
这些自动化功能可以分为以下 2 类:
|
||
|
||
* Commit Message 生成和检查功能:生成符合 Angular 规范的 Commit Message、Commit Message 提交前检查、历史 Commit Message 检查。
|
||
* 基于 Commit Message 自动生成 CHANGELOG 和 SemVer 的工具。
|
||
|
||
我们可以通过下面这 5 个工具自动的完成上面的功能:
|
||
|
||
* [commitizen-go](https://github.com/lintingzhen/commitizen-go):使你进入交互模式,并根据提示生成 Commit Message,然后提交。
|
||
* commit-msg:githooks,在 commit-msg 中,指定检查的规则,commit-msg 是个脚本,可以根据需要自己写脚本实现。这门课的 commit-msg 调用了 go-gitlint 来进行检查。
|
||
* [go-gitlint](https://github.com/llorllale/go-gitlint):检查历史提交的 Commit Message 是否符合 Angular 规范,可以将该工具添加在 CI 流程中,确保 Commit Message 都是符合规范的。
|
||
* [gsemver](https://github.com/arnaud-deprez/gsemver):语义化版本自动生成工具。
|
||
* [git-chglog](https://github.com/git-chglog/git-chglog):根据 Commit Message 生成 CHANGELOG。
|
||
|
||
这些工具你先有个印象就好了,在后面的课程内容中,我会带你通过实际使用来熟悉它们的用法。
|
||
|
||
## 总结
|
||
|
||
今天我向你介绍了 Commit Message 规范,主要讲了业界使用最多的 Angular 规范。
|
||
|
||
Angular 规范中,Commit Message 包含三个部分:Header、Body 和 Footer。Header 对 commit 做了高度概括,Body 部分是对本次 commit 的更详细描述,Footer 部分主要用来说明本次 commit 导致的后果。格式如下:
|
||
|
||
```
|
||
<type>[optional scope]: <description>
|
||
// 空行
|
||
[optional body]
|
||
// 空行
|
||
[optional footer(s)]
|
||
|
||
```
|
||
|
||
另外,我们也需要控制 commit 的提交频率,比如可以在开发完一个功能、修复完一个 bug、下班前提交 commit。
|
||
|
||
最后,我们也需要掌握一些常见的提交操作,例如通过 `git rebase -i` 来合并提交 commit,通过 `git commit --amend` 或 `git rebase -i` 来修改 commit message。
|
||
|
||
## 课后练习
|
||
|
||
1. 新建一个 git repository,提交 4 个符合 Angular 规范的 Commit Message,并合并前 2 次提交。
|
||
2. 使用 git-chglog 工具来生成 CHANGEOG,使用 gsemver 工具来生成语义化版本号。
|
||
|
||
期待在留言区看到你的思考和答案,也欢迎和我一起探讨关于规范设计的问题,我们下一讲见!
|
||
|