|
|
# 31 | 图解Channel:如何理解它的CSP通信模型?
|
|
|
|
|
|
你好,我是朱涛。今天我们来分析Channel的源码。
|
|
|
|
|
|
Kotlin的Channel是一个非常重要的组件,在它出现之前,协程之间很难进行通信,有了它以后,协程之间的通信就轻而易举了。在[第22讲](https://time.geekbang.org/column/article/493069)当中,我们甚至还借助Channel实现的Actor做到了并发安全。
|
|
|
|
|
|
那么总的来说,Channel是热的,同时它还是一个**线程安全的数据管道**。而由于Channel具有线程安全的特性,因此,它最常见的用法,就是建立CSP通信模型(Communicating Sequential Processes)。
|
|
|
|
|
|
不过你可能会觉得,CSP太抽象了不好理解,但其实,这个通信模型我们在第22讲里就接触过了。当时我们虽然是通过Actor来实现的,但却是把它当作CSP在用,它们两者的差异其实很小。
|
|
|
|
|
|
关于[CSP的理论](https://en.wikipedia.org/wiki/Communicating_sequential_processes),它的精确定义其实比较复杂,不过它的核心理念用一句话就可以概括:**不要共享内存来通信;而是要用通信来共享内存**(Don’t communicate by sharing memory; share memory by communicating)。
|
|
|
|
|
|
可是,我们为什么可以通过Channel实现CSP通信模型呢?这背后的技术细节,则需要我们通过源码来发掘了。
|
|
|
|
|
|
## Channel背后的数据结构
|
|
|
|
|
|
为了研究Channel的源代码,我们仍然是以一个简单的Demo为例,来跟踪它的代码执行流程。
|
|
|
|
|
|
```plain
|
|
|
// 代码段1
|
|
|
|
|
|
fun main() {
|
|
|
val scope = CoroutineScope(Job() + mySingleDispatcher)
|
|
|
// 1,创建管道
|
|
|
val channel = Channel<Int>()
|
|
|
|
|
|
scope.launch {
|
|
|
// 2,在一个单独的协程当中发送管道消息
|
|
|
repeat(3) {
|
|
|
channel.send(it)
|
|
|
println("Send: $it")
|
|
|
}
|
|
|
|
|
|
channel.close()
|
|
|
}
|
|
|
|
|
|
scope.launch {
|
|
|
// 3,在一个单独的协程当中接收管道消息
|
|
|
repeat(3) {
|
|
|
val result = channel.receive()
|
|
|
println("Receive ${result}")
|
|
|
}
|
|
|
}
|
|
|
|
|
|
println("end")
|
|
|
Thread.sleep(2000000L)
|
|
|
}
|
|
|
|
|
|
/*
|
|
|
输出结果:
|
|
|
end
|
|
|
Receive 0
|
|
|
Send: 0
|
|
|
Send: 1
|
|
|
Receive 1
|
|
|
Receive 2
|
|
|
Send: 2
|
|
|
*/
|
|
|
|
|
|
```
|
|
|
|
|
|
以上代码主要分为三个部分,分别是:Channel创建、发送数据、接收数据。
|
|
|
|
|
|
我们先来分析注释1处的Channel创建逻辑。我们都知道Channel其实是一个接口,它是通过组合SendChannel、ReceiveChannel得来的。而注释1处调用的Channel(),其实是一个普通的顶层函数,只是**它发挥的作用是构造函数,因此它的首字母是大写的**,这跟我们上节课分析的CoroutineScope、Job也是类似的。
|
|
|
|
|
|
```plain
|
|
|
// 代码段2
|
|
|
|
|
|
public interface Channel<E> : SendChannel<E>, ReceiveChannel<E> {
|
|
|
|
|
|
public fun <E> Channel(
|
|
|
capacity: Int = RENDEZVOUS,
|
|
|
onBufferOverflow: BufferOverflow = BufferOverflow.SUSPEND,
|
|
|
onUndeliveredElement: ((E) -> Unit)? = null
|
|
|
): Channel<E> =
|
|
|
when (capacity) {
|
|
|
RENDEZVOUS -> {
|
|
|
if (onBufferOverflow == BufferOverflow.SUSPEND)
|
|
|
RendezvousChannel(onUndeliveredElement)
|
|
|
else
|
|
|
ArrayChannel(1, onBufferOverflow, onUndeliveredElement)
|
|
|
}
|
|
|
CONFLATED -> {
|
|
|
ConflatedChannel(onUndeliveredElement)
|
|
|
}
|
|
|
UNLIMITED -> LinkedListChannel(onUndeliveredElement)
|
|
|
BUFFERED -> ArrayChannel(
|
|
|
if (onBufferOverflow == BufferOverflow.SUSPEND) CHANNEL_DEFAULT_CAPACITY else 1,
|
|
|
onBufferOverflow, onUndeliveredElement
|
|
|
)
|
|
|
else -> {
|
|
|
if (capacity == 1 && onBufferOverflow == BufferOverflow.DROP_OLDEST)
|
|
|
ConflatedChannel(onUndeliveredElement)
|
|
|
else
|
|
|
ArrayChannel(capacity, onBufferOverflow, onUndeliveredElement)
|
|
|
}
|
|
|
}
|
|
|
|
|
|
```
|
|
|
|
|
|
然后,从上面的代码里,我们可以看到,**Channel()方法的核心逻辑就是一个when表达式**,它根据传入的参数,会创建不同类型的Channel实例,包括了:RendezvousChannel、ArrayChannel、ConflatedChannel、LinkedListChannel。而这些实现类都有一个共同的父类:**AbstractChannel**。
|
|
|
|
|
|
```plain
|
|
|
// 代码段3
|
|
|
|
|
|
internal abstract class AbstractSendChannel<E>(
|
|
|
@JvmField protected val onUndeliveredElement: OnUndeliveredElement<E>?
|
|
|
) : SendChannel<E> {
|
|
|
|
|
|
protected val queue = LockFreeLinkedListHead()
|
|
|
|
|
|
// 省略
|
|
|
|
|
|
internal abstract class AbstractChannel<E>(
|
|
|
onUndeliveredElement: OnUndeliveredElement<E>?
|
|
|
) : AbstractSendChannel<E>(onUndeliveredElement), Channel<E> {}
|
|
|
}
|
|
|
|
|
|
```
|
|
|
|
|
|
可以看到,AbstractChannel其实是AbstractSendChannel的内部类,同时它也是AbstractSendChannel的子类。而Channel当中的核心逻辑,都是依靠AbstractSendChannel当中的 **LockFreeLinkedListHead** 实现的。我们接着来看下它的源代码:
|
|
|
|
|
|
```plain
|
|
|
// 代码段4
|
|
|
|
|
|
public actual open class LockFreeLinkedListHead : LockFreeLinkedListNode() {
|
|
|
public actual val isEmpty: Boolean get() = next === this
|
|
|
}
|
|
|
|
|
|
public actual open class LockFreeLinkedListNode {
|
|
|
// 1
|
|
|
private val _next = atomic<Any>(this)
|
|
|
private val _prev = atomic(this)
|
|
|
private val _removedRef = atomic<Removed?>(null)
|
|
|
}
|
|
|
|
|
|
```
|
|
|
|
|
|
可见,LockFreeLinkedListHead其实继承自 **LockFreeLinkedListNode**,而LockFreeLinkedListNode则是实现Channel核心功能的关键数据结构。整个数据结构的核心思想,来自于2004年的一篇论文:[《Lock-Free and Practical Doubly Linked List-Based Deques Using Single-Word Compare-and-Swap》](https://citeseerx.ist.psu.edu/viewdoc/download?doi=10.1.1.140.4693&rep=rep1&type=pdf)。如果你对其中的原理感兴趣,可以去看看这篇论文。这里,为了不偏离主题,我们只分析它的核心思想。
|
|
|
|
|
|
LockFreeLinkedListNode,我们可以将其区分开来看待,即LockFree和LinkedList。
|
|
|
|
|
|
第一个部分:**LockFree**,它是通过[CAS](https://zh.wikipedia.org/wiki/%E6%AF%94%E8%BE%83%E5%B9%B6%E4%BA%A4%E6%8D%A2)(Compare And Swap)的思想来实现的,比如JDK提供的java.util.concurrent.atomic。这一点,我们从上面注释1的atomic也可以看出来。
|
|
|
|
|
|
第二个部分:**LinkedList**,这说明LockFreeLinkedList本质上还是一个**链表**。简单来说,它其实是一个循环双向链表,而LockFreeLinkedListHead其实是一个**哨兵节点**,如果你熟悉链表这个数据结构,也可以将其看作是链表当中的[虚拟头结点](https://stackoverflow.com/questions/37324972/what-is-a-dummy-head),这个节点本身不会用于存储任何数据,它的next指针会指向整个链表的**头节点**,而它的prev指针会指向整个链表的**尾节点**。
|
|
|
|
|
|
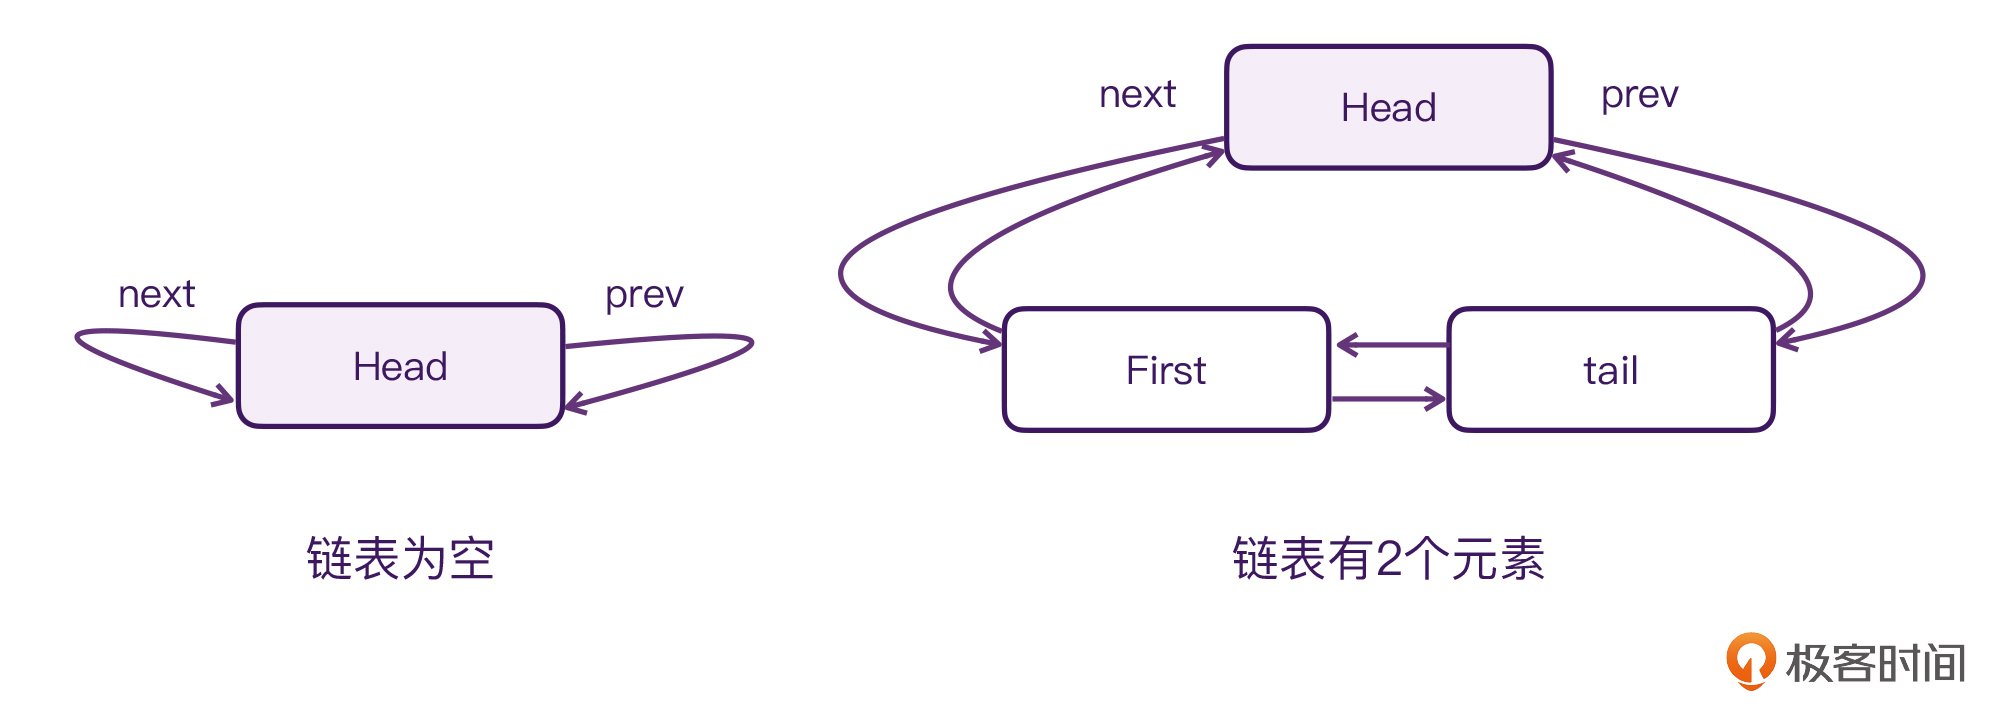
为了方便你理解,我画了一张图描述这个链表的结构:
|
|
|
|
|
|
|
|
|
|
|
|
请看图片左边的部分,**当链表为空的时候**,LockFreeLinkedListHead的next指针和prev指针,都是指向自身的。这也就意味着,这个Head节点是不会存储数据,同时,也是不会被删除的。
|
|
|
|
|
|
然后再看图片右边的部分,**当链表有2个元素的时候**,这时LockFreeLinkedListHead节点的next指针才是第一个节点,而Head的prev指针则是指向尾结点。
|
|
|
|
|
|
实际上,寻常的循环双向链表是可以在首尾添加元素的,同时也支持“正向遍历、逆向遍历”的。但Channel内部的这个数据结构只能在末尾添加,而它遍历的顺序则是从队首开始的。这样的设计,就让它的行为在变成了先进先出**单向队列**的同时,还实现了队尾添加操作,只需要O(1)的时间复杂度。
|
|
|
|
|
|
|
|
|
|
|
|
可以说,正是因为LockFreeLinkedList这个数据结构,我们才能使用Channel实现CSP通信模型。
|
|
|
|
|
|
好,在弄清楚LockFreeLinkedList这个数据结构以后,Channel后续的源码分析就很简单了。让我们来分别分析一下Channel的send()、receive()的流程。
|
|
|
|
|
|
## 发送和接收的流程
|
|
|
|
|
|
我们回过头来看代码段1当中的逻辑,我们分别启动了两个协程,在这两个协程中,我们分别发送了三次数据,也接收了三次数据。程序首先会执行send(),由于Channel在默认情况下容量是0,所以,send()首先会被挂起。让我们来看看这部分的逻辑:
|
|
|
|
|
|
```plain
|
|
|
// 代码段5
|
|
|
|
|
|
public final override suspend fun send(element: E) {
|
|
|
// 1
|
|
|
if (offerInternal(element) === OFFER_SUCCESS) return
|
|
|
// 2
|
|
|
return sendSuspend(element)
|
|
|
}
|
|
|
|
|
|
protected open fun offerInternal(element: E): Any {
|
|
|
while (true) {
|
|
|
// 3
|
|
|
val receive = takeFirstReceiveOrPeekClosed() ?: return OFFER_FAILE
|
|
|
// 省略
|
|
|
}
|
|
|
}
|
|
|
|
|
|
private suspend fun sendSuspend(element: E): Unit = suspendCancellableCoroutineReusable sc@ { cont ->
|
|
|
loop@ while (true) {
|
|
|
if (isFullImpl) {
|
|
|
// 4
|
|
|
val send = if (onUndeliveredElement == null)
|
|
|
SendElement(element, cont) else
|
|
|
SendElementWithUndeliveredHandler(element, cont, onUndeliveredElement)
|
|
|
val enqueueResult = enqueueSend(send)
|
|
|
when {
|
|
|
enqueueResult == null -> {
|
|
|
// 5
|
|
|
cont.removeOnCancellation(send)
|
|
|
return@sc
|
|
|
}
|
|
|
enqueueResult is Closed<*> -> {
|
|
|
}
|
|
|
enqueueResult === ENQUEUE_FAILED -> {}
|
|
|
enqueueResult is Receive<*> -> {}
|
|
|
else -> error("enqueueSend returned $enqueueResult")
|
|
|
}
|
|
|
}
|
|
|
// 省略
|
|
|
}
|
|
|
}
|
|
|
|
|
|
```
|
|
|
|
|
|
上面的挂起函数send()分为两个部分:
|
|
|
|
|
|
* 注释1,尝试向Channel发送数据,如果这时候Channel已经有了消费者,那么if就会为true,send()方法就会return。不过,按照代码段1的逻辑,首次调用send()的时候,Channel还不存在消费者,因此在注释3处,尝试从LockFreeLinkedList取出消费者是不可能的。所以,程序会继续执行注释2处的逻辑。
|
|
|
* 注释2,会调用挂起函数sendSuspend(),它是由高阶函数suspendCancellableCoroutineReusable{} 实现的。我们看它的名字就能知道,它跟suspendCancellableCoroutine{} 是类似的(如果你有些忘了,可以回过头去看看[加餐五](https://time.geekbang.org/column/article/497868))。另外,请留意下这个方法的注释4,它会将发送的元素封装成SendElement对象,然后调用enqueueSend()方法,将其添加到LockFreeLinkedList这个队列的末尾。如果enqueueSend()执行成功了,就会执行注释5,注册一个回调,用于将SendElement从队列中移除掉。
|
|
|
|
|
|
如果你足够细心的话,你会发现这整个流程并没有涉及到resume的调用,因此,这也意味着sendSuspend()会一直被挂起,而这就意味着send()会一直被挂起!那么,问题来了,**send()会在什么时候被恢复**?
|
|
|
|
|
|
答案当然是:**receive()被调用的时候**!
|
|
|
|
|
|
```plain
|
|
|
// 代码段6
|
|
|
|
|
|
public final override suspend fun receive(): E {
|
|
|
// 1
|
|
|
val result = pollInternal()
|
|
|
|
|
|
@Suppress("UNCHECKED_CAST")
|
|
|
if (result !== POLL_FAILED && result !is Closed<*>) return result as E
|
|
|
// 2
|
|
|
return receiveSuspend(RECEIVE_THROWS_ON_CLOSE)
|
|
|
}
|
|
|
|
|
|
protected open fun pollInternal(): Any? {
|
|
|
while (true) {
|
|
|
// 3
|
|
|
val send = takeFirstSendOrPeekClosed() ?: return POLL_FAILED
|
|
|
val token = send.tryResumeSend(null)
|
|
|
if (token != null) {
|
|
|
assert { token === RESUME_TOKEN }
|
|
|
//4
|
|
|
send.completeResumeSend()
|
|
|
return send.pollResult
|
|
|
}
|
|
|
|
|
|
send.undeliveredElement()
|
|
|
}
|
|
|
}
|
|
|
|
|
|
// CancellableContinuationImpl
|
|
|
private fun dispatchResume(mode: Int) {
|
|
|
if (tryResume()) return
|
|
|
// 5
|
|
|
dispatch(mode)
|
|
|
}
|
|
|
|
|
|
internal fun <T> DispatchedTask<T>.dispatch(mode: Int) {
|
|
|
// 省略
|
|
|
if (!undispatched && delegate is DispatchedContinuation<*> && mode.isCancellableMode == resumeMode.isCancellableMode) {
|
|
|
|
|
|
val dispatcher = delegate.dispatcher
|
|
|
val context = delegate.context
|
|
|
if (dispatcher.isDispatchNeeded(context)) {
|
|
|
// 6
|
|
|
dispatcher.dispatch(context, this)
|
|
|
} else {
|
|
|
resumeUnconfined()
|
|
|
}
|
|
|
} else {
|
|
|
// 省略
|
|
|
}
|
|
|
}
|
|
|
|
|
|
```
|
|
|
|
|
|
可以看到,挂起函数receive()的逻辑,跟代码段5当中的send()是类似的。
|
|
|
|
|
|
* 注释1,尝试从LockFree队列当中找出是否有正在被挂起的**发送方**。具体的逻辑在注释3处,它会从队首开始遍历,寻找Send节点。
|
|
|
* 接着上面的代码段1的案例分析,此时我们一定是可以从队列中找到一个Send节点的,因此程序会继续执行注释4处的代码。
|
|
|
* 注释4,completeResumeSend(),它最终会调用注释5处的dispatch(mode),而dispatch(mode)其实就是DispatchedTask的dispatch(),是不是觉得很熟悉?这个DispatchedTask其实就是我们在[第29讲](https://time.geekbang.org/column/article/500420)当中分析过的DispatchedTask,这里的dispatch()就是协程体当中的代码在线程执行的时机。最终,它会执行在Java的Executor之上。至此,我们之前被挂起的send()方法,其实就算是恢复了。
|
|
|
|
|
|
另外,你可以再留意上面的注释2,当LockFree队列当中没有正在挂起的发送方时,它会执行receiveSuspend(),而receiveSuspend()也同样会被挂起:
|
|
|
|
|
|
```plain
|
|
|
private suspend fun <R> receiveSuspend(receiveMode: Int): R = suspendCancellableCoroutineReusable sc@ { cont ->
|
|
|
val receive = if (onUndeliveredElement == null)
|
|
|
ReceiveElement(cont as CancellableContinuation<Any?>, receiveMode) else
|
|
|
ReceiveElementWithUndeliveredHandler(cont as CancellableContinuation<Any?>, receiveMode, onUndeliveredElement)
|
|
|
while (true) {
|
|
|
if (enqueueReceive(receive)) {
|
|
|
removeReceiveOnCancel(cont, receive)
|
|
|
return@sc
|
|
|
}
|
|
|
|
|
|
val result = pollInternal()
|
|
|
if (result is Closed<*>) {
|
|
|
receive.resumeReceiveClosed(result)
|
|
|
return@sc
|
|
|
}
|
|
|
if (result !== POLL_FAILED) {
|
|
|
cont.resume(receive.resumeValue(result as E), receive.resumeOnCancellationFun(result as E))
|
|
|
return@sc
|
|
|
}
|
|
|
}
|
|
|
}
|
|
|
|
|
|
```
|
|
|
|
|
|
所以,这里的逻辑其实跟之前的sendSuspend()是类似的。首先,它会封装一个ReceiveElement对象,并且将其添加到LockFree队列的末尾,如果添加成功的话,这个receiveSuspend就会继续挂起,这就意味着receive()也会被挂起。而receive()被恢复的时机,其实就对应了代码段5当中注释1的代码:offerInternal(element)。
|
|
|
|
|
|
至此,Channel的发送和接收流程,我们就都已经分析完了。按照惯例,我们还是通过一个视频来回顾代码的整体执行流程:
|
|
|
|
|
|
## 小结
|
|
|
|
|
|
通过这节课,我们知道,Channel其实是一个线程安全的管道。它最常见的用法,就是实现CSP通信模型。它的核心理念是:**不要共享内存来通信;而是要用通信来共享内存**。而Channel之所以可以用来实现CSP通信模型,主要还是因为它底层用到的数据结构:LockFreeLinkedList。
|
|
|
|
|
|
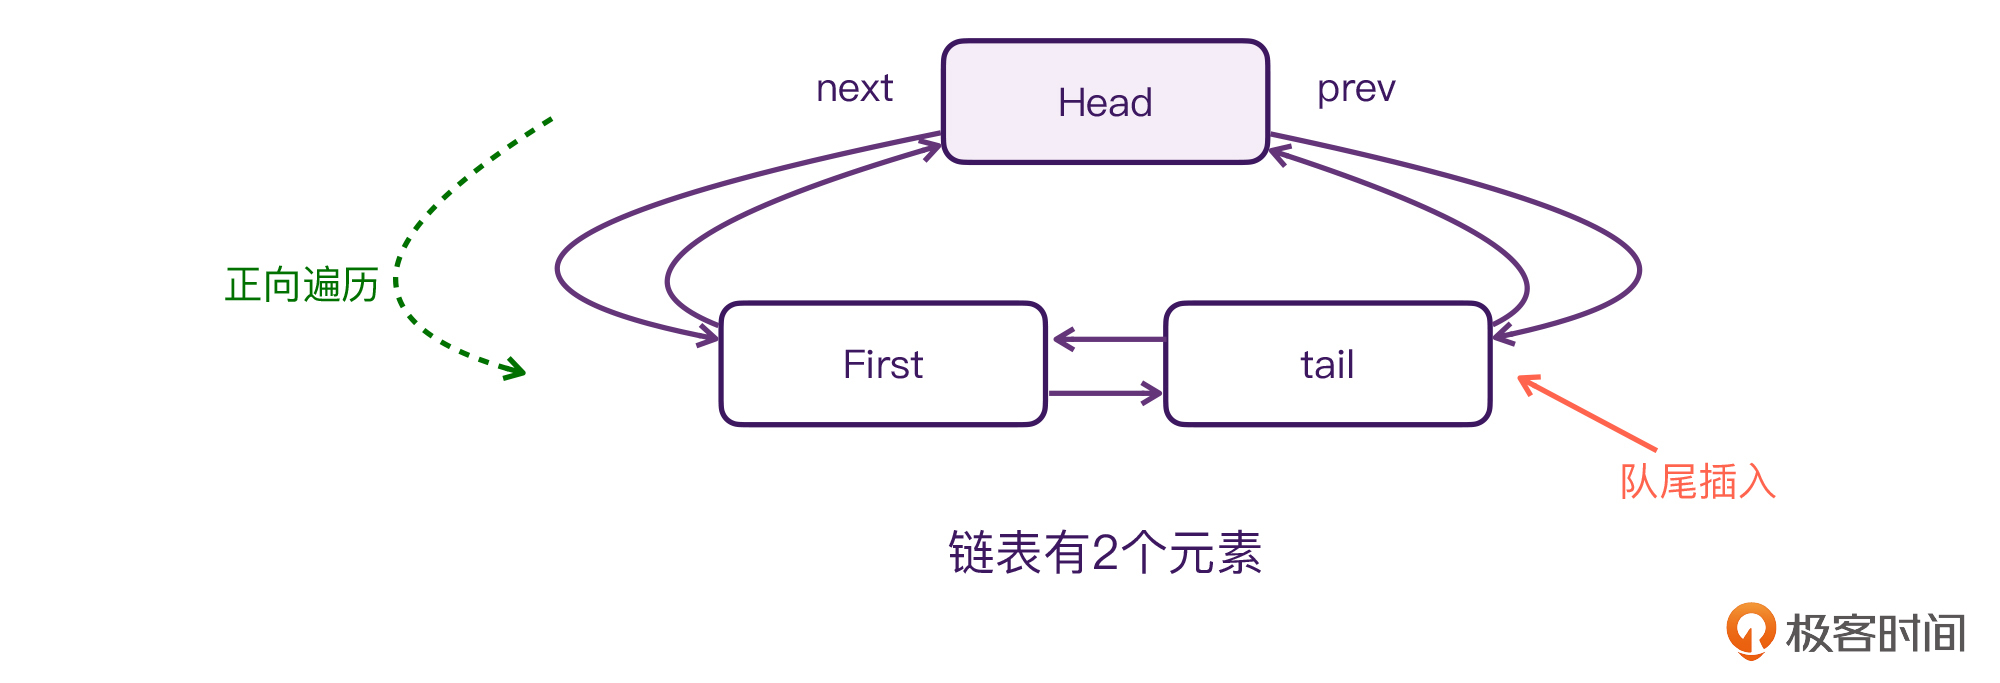
LockFreeLinkedList虽然是一个循环双向链表,但在Channel的源码中,它会被当做**先进先出**的单向队列,它只在队列末尾插入节点,而遍历则只正向遍历。
|
|
|
|
|
|
还有Channel的send(),它会分为两种情况,一种是当前的LockFree队列当中已经有被挂起的**接收方**,这时候,send()会恢复Receive节点的执行,并且将数据发送给对方。第二种情况是:当前队列当中没有被挂起的接收方,这时候send()就会被挂起,而被发送的数据会被封装成SendElement对象插入到队列的末尾,等待被下次的receive()恢复执行。
|
|
|
|
|
|
而Channel的receive(),也是分为两种情况,一种是当前的LockFree队列当中已经存在被挂起的**发送方**,这时候receive()会恢复Send节点的执行,并且取出Send节点当中带过来的数据。第二种情况是:当前队列没有被挂起的发送方,这时候receive()就会被挂起,同时它也会被封装成一个ReceiveElement对象插入到队列的末尾,等待被下次的send()恢复执行。
|
|
|
|
|
|
其实,Kotlin推崇CSP模型进行并发的原因还有很多,比如门槛低、可读性高、扩展性好,还有一点是会被很多人提到的:不容易发生死锁。
|
|
|
|
|
|
不过,这里需要特别注意的是,CSP场景下的并发模型,并非不可能发生死锁,在一些特殊场景下,它也是可能发生死锁的,比如:通信死锁(Communication Deadlock)。因此,CSP也并不是解决所有并发问题的万能解药,我们还是要具体问题具体分析。
|
|
|
|
|
|
## 思考题
|
|
|
|
|
|
在课程的开头,我们分析了Channel一共有四种实现方式:RendezvousChannel、ArrayChannel、ConflatedChannel、LinkedListChannel,请问你能结合今天学习的知识,分析LinkedListChannel的原理吗?
|
|
|
|
|
|
```plain
|
|
|
internal open class LinkedListChannel<E>(onUndeliveredElement: OnUndeliveredElement<E>?) : AbstractChannel<E>(onUndeliveredElement) {
|
|
|
protected final override val isBufferAlwaysEmpty: Boolean get() = true
|
|
|
protected final override val isBufferEmpty: Boolean get() = true
|
|
|
protected final override val isBufferAlwaysFull: Boolean get() = false
|
|
|
protected final override val isBufferFull: Boolean get() = false
|
|
|
|
|
|
protected override fun offerInternal(element: E): Any {
|
|
|
while (true) {
|
|
|
val result = super.offerInternal(element)
|
|
|
when {
|
|
|
result === OFFER_SUCCESS -> return OFFER_SUCCESS
|
|
|
result === OFFER_FAILED -> { // try to buffer
|
|
|
when (val sendResult = sendBuffered(element)) {
|
|
|
null -> return OFFER_SUCCESS
|
|
|
is Closed<*> -> return sendResult
|
|
|
}
|
|
|
// otherwise there was receiver in queue, retry super.offerInternal
|
|
|
}
|
|
|
result is Closed<*> -> return result
|
|
|
else -> error("Invalid offerInternal result $result")
|
|
|
}
|
|
|
}
|
|
|
}
|
|
|
|
|
|
protected override fun offerSelectInternal(element: E, select: SelectInstance<*>): Any {
|
|
|
while (true) {
|
|
|
val result = if (hasReceiveOrClosed)
|
|
|
super.offerSelectInternal(element, select) else
|
|
|
(select.performAtomicTrySelect(describeSendBuffered(element)) ?: OFFER_SUCCESS)
|
|
|
when {
|
|
|
result === ALREADY_SELECTED -> return ALREADY_SELECTED
|
|
|
result === OFFER_SUCCESS -> return OFFER_SUCCESS
|
|
|
result === OFFER_FAILED -> {} // retry
|
|
|
result === RETRY_ATOMIC -> {} // retry
|
|
|
result is Closed<*> -> return result
|
|
|
else -> error("Invalid result $result")
|
|
|
}
|
|
|
}
|
|
|
}
|
|
|
}
|
|
|
|
|
|
```
|
|
|
|