|
|
# 16 | 流量隔离:Redis 缓存隔离是怎么做的?
|
|
|
|
|
|
你好,我是高楼。
|
|
|
|
|
|
这节课,我们详细来讲讲如何基于微服务技术落地 Redis 缓存隔离。
|
|
|
|
|
|
在全链路压测的流量隔离中,有一个很重要的部分就是缓存隔离,即区分对应的 Cache。
|
|
|
|
|
|
说到缓存肯定离不开 Redis,因为高性能架构设计中都离不开它,在互联网和传统行业中呢,也都有它的身影。可以说,Redis 是性能项目中的必备知识点。
|
|
|
|
|
|
Redis 是一个 NoSQL 数据库,它使用的是内存存储的非关系型数据库,Redis 不使用表,使用 K-V 存储。
|
|
|
|
|
|
根据前面的经验我们知道,要改造什么就得知道它和其它组件的依赖关系,只有这样才能知道要对谁做改造。
|
|
|
|
|
|
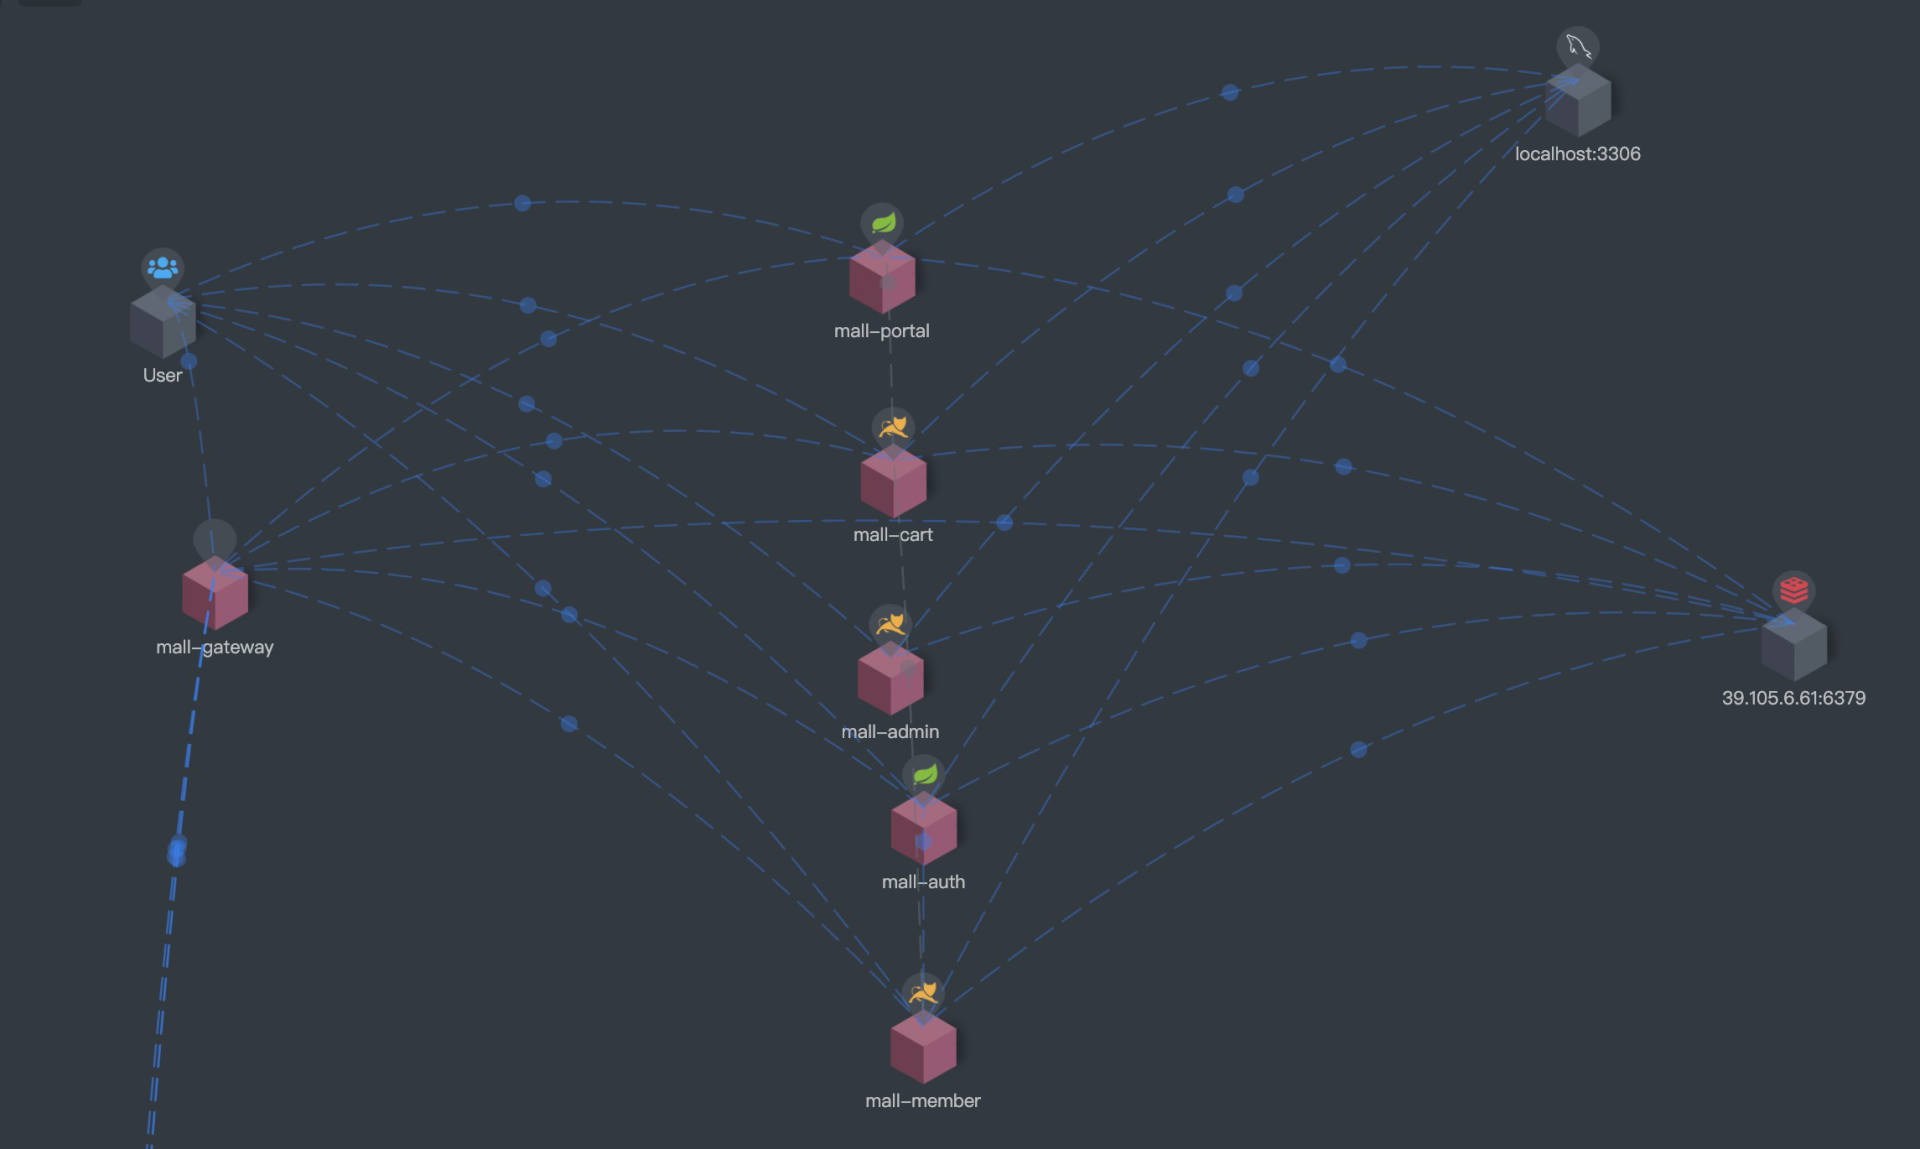
所以,我又得祭出这个项目链路图了,脑中有策,心中有图,手中有码,改造才有路。
|
|
|
|
|
|
|
|
|
|
|
|
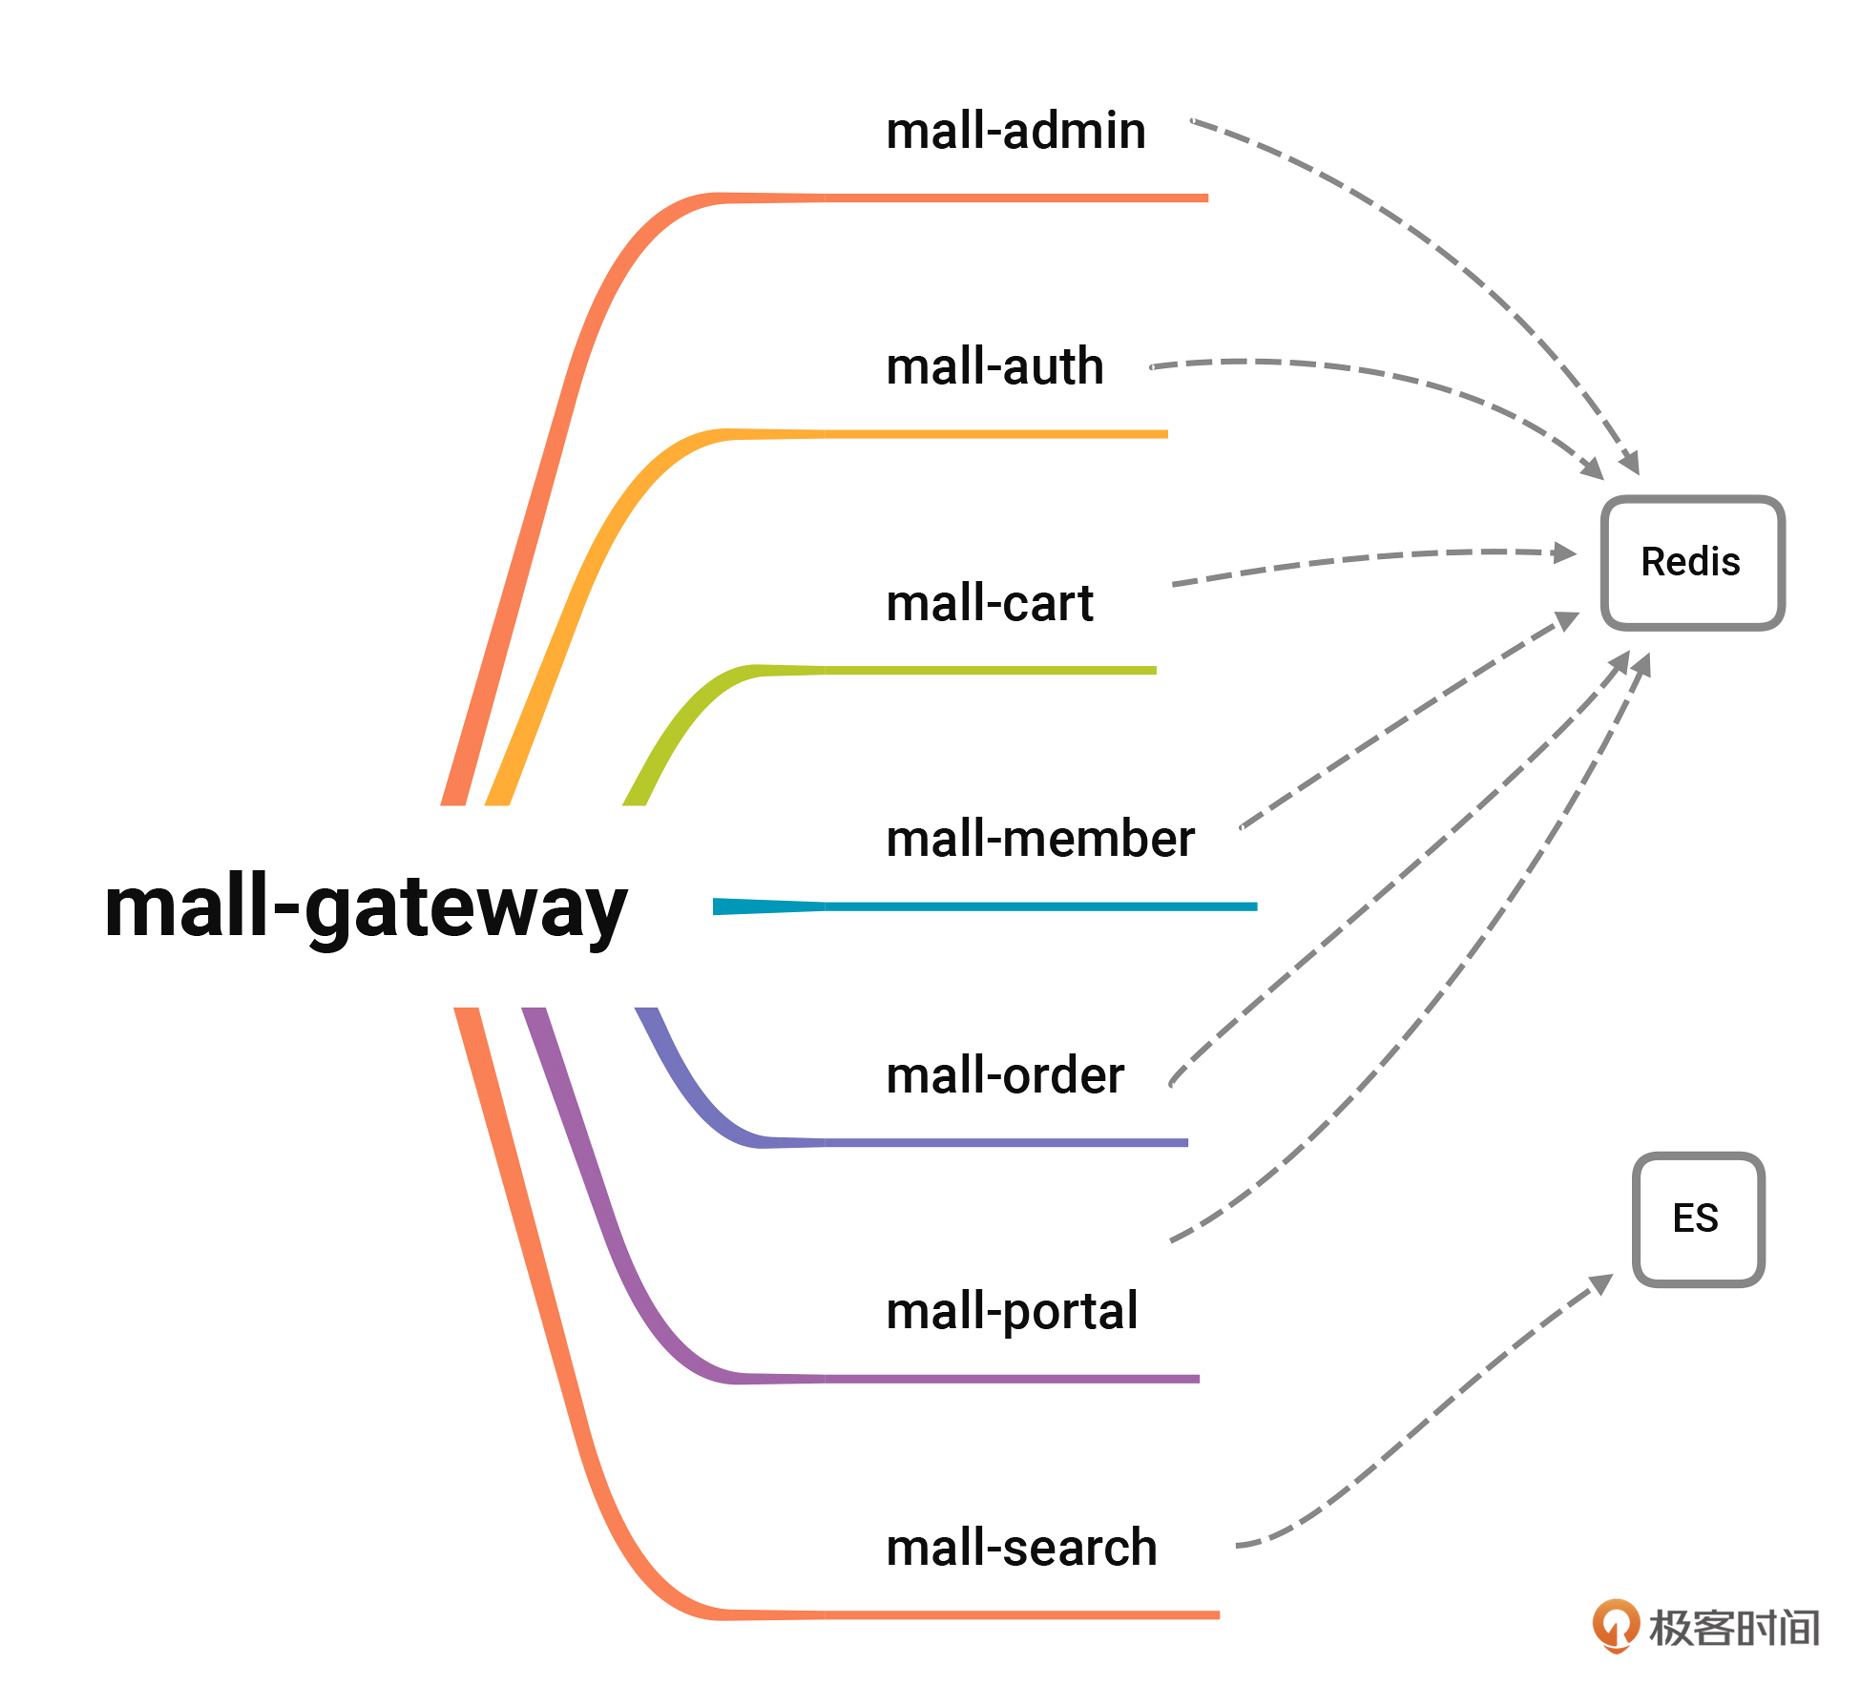
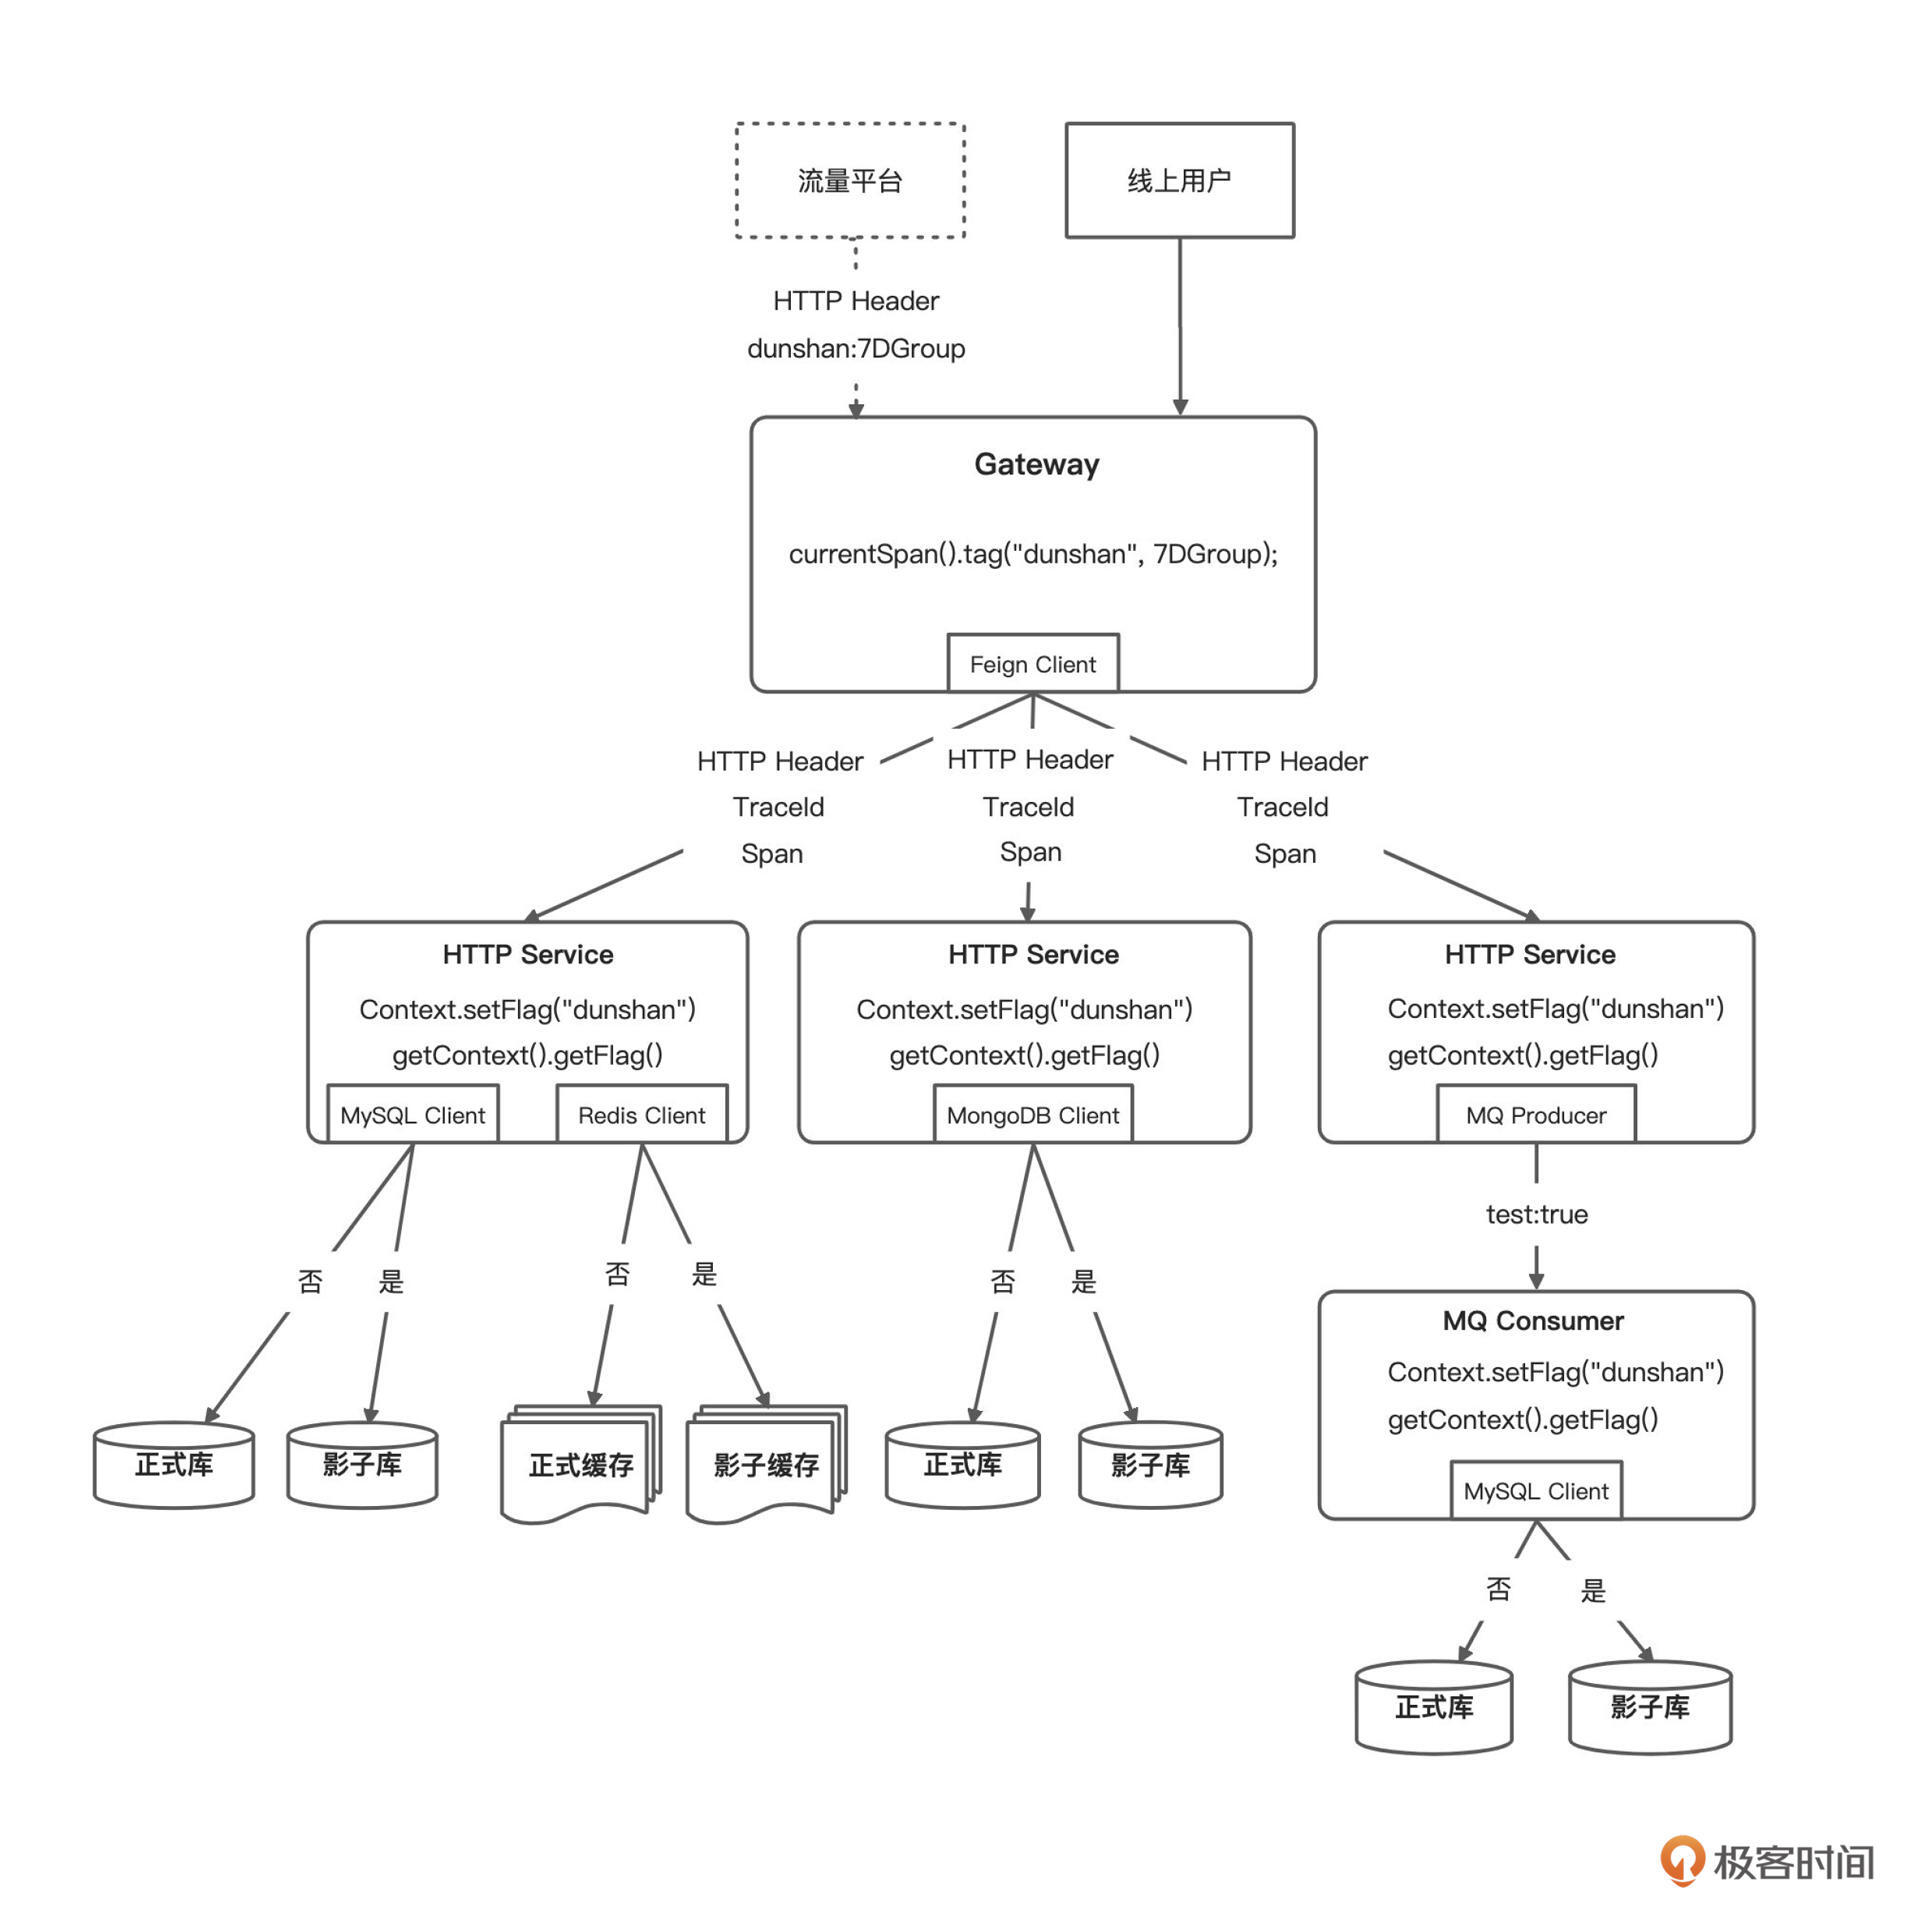
从链路图中我们可以看到,几乎所有业务系统(除了搜索)都和 Redis 组件有关系,所以,相关业务系统都得做缓存隔离改造,以保证正常流量与压测流量的缓存分离。
|
|
|
|
|
|
为了方便你更直观地理解,我给你画了个简要的思维导图。
|
|
|
|
|
|
|
|
|
|
|
|
好了,搞懂了组件间依赖关系后,我们就要进入相关技术预演了。
|
|
|
|
|
|
## 技术预演
|
|
|
|
|
|
在正式动工之前,我们先回顾一下数据库隔离的方式。上一讲我们提过, MySQL 数据库隔离通常有三种方式,分别是数据偏移、影子库、影子表,Redis 和 MySQL 数据结构不同,所以 Redis 的缓存隔离技术会有些区别。
|
|
|
|
|
|
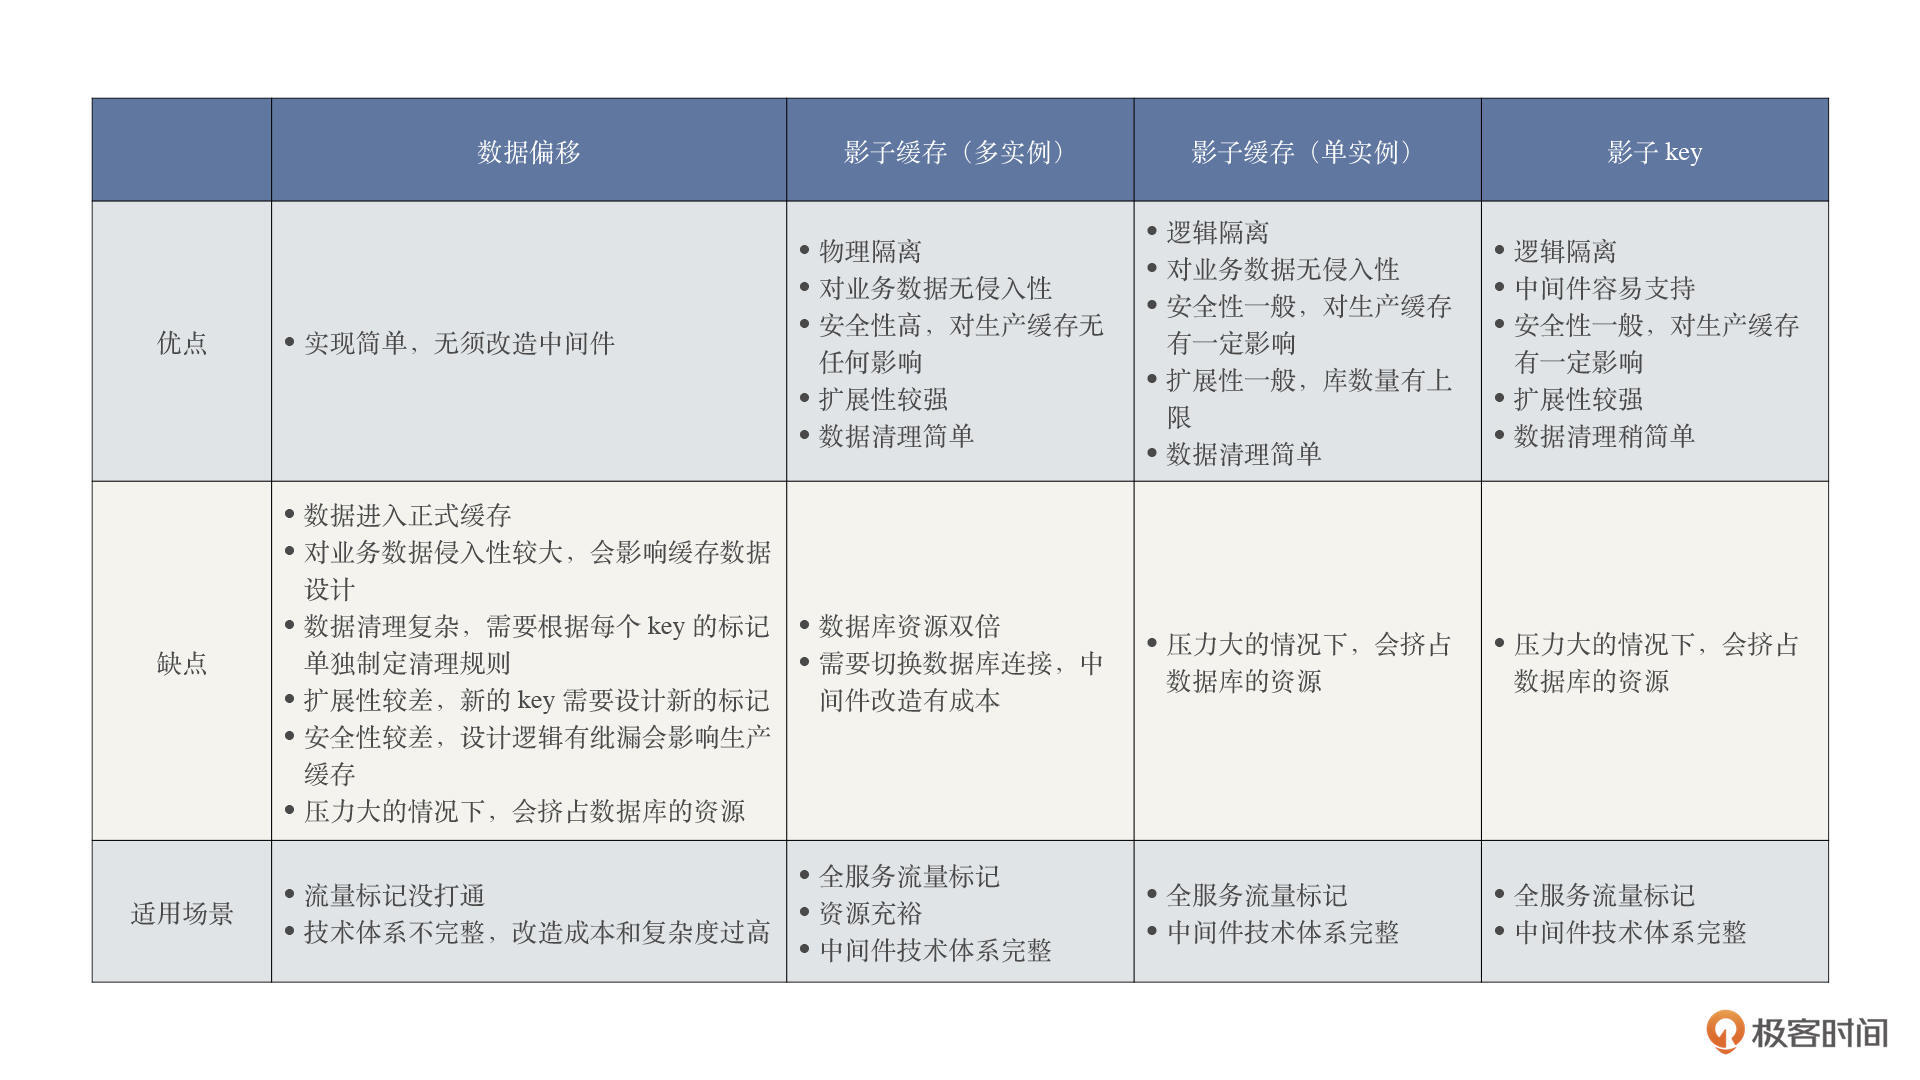
首先,我们来了解下目前业界对于缓存隔离的主要解决方案,以及它们的优缺点和适用场景。
|
|
|
|
|
|
|
|
|
|
|
|
我们可以看到,根据不同的项目情况,可以选择不同的技术方案,**这里最优、最安全的方案当然首推影子缓存(多实例)**,具体的优缺点上面表格已经写得非常清楚了。
|
|
|
|
|
|
下面我们来对缓存隔离里面的核心技术做下 demo 预演。
|
|
|
|
|
|
### 缓存隔离落地
|
|
|
|
|
|
在这里呢,我会主要介绍影子缓存和影子 key 两种方案。
|
|
|
|
|
|
* 第一种方案:影子缓存(多实例)
|
|
|
|
|
|
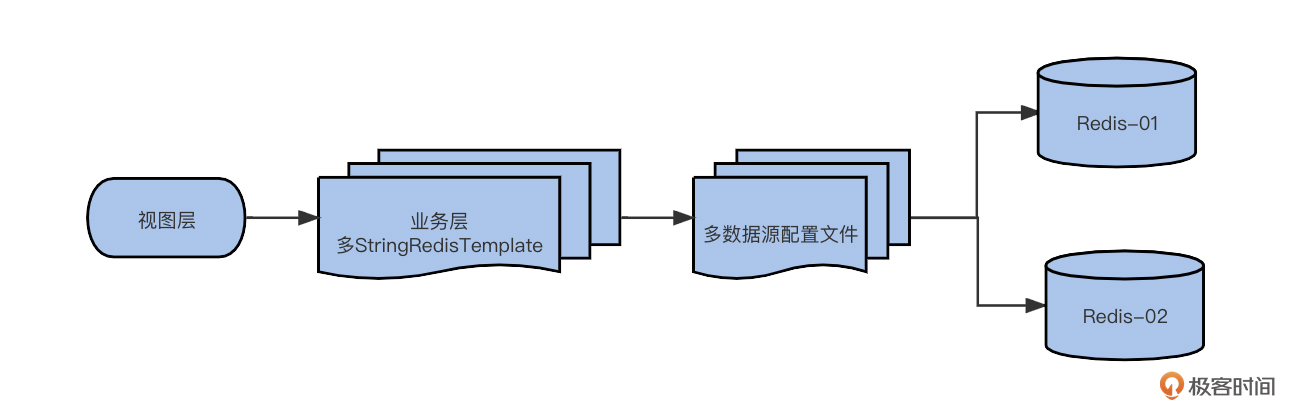
影子缓存(多实例)方案,首先要满足多数据源,然后确保它们分属两个物理上不同的Redis实例。在全链路压测过程中,业务层会识别标记,并选择对应的的 Redis 数据源,操作不同的 Redis 实例。
|
|
|
|
|
|
这里我给你画了一个简单的逻辑图:
|
|
|
|
|
|
|
|
|
|
|
|
实现的具体操作步骤是:
|
|
|
|
|
|
**第一步:添加依赖。**
|
|
|
|
|
|
在 pom 中添加相关依赖。
|
|
|
|
|
|
```xml
|
|
|
<dependency>
|
|
|
<groupId>org.springframework.boot</groupId>
|
|
|
<artifactId>spring-boot-starter-data-redis</artifactId>
|
|
|
</dependency>
|
|
|
<dependency>
|
|
|
<groupId>redis.clients</groupId>
|
|
|
<artifactId>jedis</artifactId>
|
|
|
</dependency>
|
|
|
|
|
|
```
|
|
|
|
|
|
**第二步:添加全局配置文件。**
|
|
|
|
|
|
新建工程,在配置文件 application.yml 中新增两个数据源配置,配置文件参考如下:
|
|
|
|
|
|
```yaml
|
|
|
spring:
|
|
|
redis:
|
|
|
database: 1 # Redis数据库索引(默认为0)
|
|
|
host: 9.15.21.27 # Redis服务器地址
|
|
|
port: 16379 # Redis服务器连接端口
|
|
|
password: # Redis服务器连接密码(默认为空)
|
|
|
timeout: 0 # 连接超时时间(毫秒)
|
|
|
pool:
|
|
|
max-active: -1 # 连接池最大连接数(使用负值表示没有限制)
|
|
|
max-wait: -1 # 连接池最大阻塞等待时间(使用负值表示没有限制)
|
|
|
max-idle: 8 # 连接池中的最大空闲连接
|
|
|
min-idle: 0 # 连接池中的最小空闲连接
|
|
|
redis2:
|
|
|
database: 2 # Redis数据库索引(默认为0)
|
|
|
host: 19.15.201.27 # Redis服务器地址
|
|
|
port: 16379 # Redis服务器连接端口
|
|
|
password: # Redis服务器连接密码(默认为空)
|
|
|
timeout: 0 # 连接超时时间(毫秒)
|
|
|
pool:
|
|
|
max-active: -1 # 连接池最大连接数(使用负值表示没有限制)
|
|
|
max-wait: -1 # 连接池最大阻塞等待时间(使用负值表示没有限制)
|
|
|
max-idle: 8 # 连接池中的最大空闲连接
|
|
|
min-idle: 0 # 连接池中的最小空闲连接
|
|
|
|
|
|
```
|
|
|
|
|
|
**第三步:添加读取配置类。**
|
|
|
|
|
|
再创建两个方法读取不同的数据源配置,参考代码如下:
|
|
|
|
|
|
```java
|
|
|
import org.springframework.beans.factory.annotation.Value;
|
|
|
import org.springframework.cache.annotation.EnableCaching;
|
|
|
import org.springframework.context.annotation.Bean;
|
|
|
import org.springframework.context.annotation.Configuration;
|
|
|
import org.springframework.context.annotation.Primary;
|
|
|
import org.springframework.data.redis.connection.RedisConnectionFactory;
|
|
|
import org.springframework.data.redis.connection.jedis.JedisConnectionFactory;
|
|
|
import org.springframework.data.redis.core.StringRedisTemplate;
|
|
|
import redis.clients.jedis.JedisPoolConfig;
|
|
|
|
|
|
/**
|
|
|
* @description:
|
|
|
* @author: dunshan
|
|
|
* @create: 2021-08-19 23:18
|
|
|
**/
|
|
|
@EnableCaching
|
|
|
@Configuration
|
|
|
public class RedisDevConfiguration {
|
|
|
@Primary
|
|
|
@Bean(name = "slaveDataSource")
|
|
|
public StringRedisTemplate slaveDataSource(@Value("${spring.redis.host}") String hostName,
|
|
|
@Value("${spring.redis.port}") int port, @Value("${spring.redis.password}") String password,
|
|
|
@Value("${spring.redis.pool.max-idle}") int maxIdle, @Value("${spring.redis.pool.max-active}") int maxTotal,
|
|
|
@Value("${spring.redis.database}") int index, @Value("${spring.redis.pool.max-wait}") long maxWaitMillis, @Value("${spring.redis.pool.min-idle}") int minIdle) {
|
|
|
StringRedisTemplate temple = new StringRedisTemplate();
|
|
|
temple.setConnectionFactory(connectionFactory(hostName, port, password, maxIdle, maxTotal, index, maxWaitMillis, minIdle));
|
|
|
return temple;
|
|
|
}
|
|
|
|
|
|
@Bean(name = "masterDataSource")
|
|
|
public StringRedisTemplate masterDataSource(@Value("${spring.redis2.host}") String hostName,
|
|
|
@Value("${spring.redis2.port}") int port, @Value("${spring.redis2.password}") String password,
|
|
|
@Value("${spring.redis.pool.max-idle}") int maxIdle, @Value("${spring.redis.pool.max-active}") int maxTotal,
|
|
|
@Value("${spring.redis2.database}") int index, @Value("${spring.redis.pool.max-wait}") long maxWaitMillis, @Value("${spring.redis.pool.min-idle}") int minIdle) {
|
|
|
StringRedisTemplate temple = new StringRedisTemplate();
|
|
|
temple.setConnectionFactory(
|
|
|
connectionFactory(hostName, port, password, maxIdle, maxTotal, index, maxWaitMillis, minIdle));
|
|
|
return temple;
|
|
|
}
|
|
|
public RedisConnectionFactory connectionFactory(String hostName, int port, String password, int maxIdle,
|
|
|
int maxTotal, int index, long maxWaitMillis, int minIdle) {
|
|
|
JedisConnectionFactory jedis = new JedisConnectionFactory();
|
|
|
jedis.setHostName(hostName);
|
|
|
jedis.setPort(port);
|
|
|
if (password != null) {
|
|
|
jedis.setPassword(password);
|
|
|
}
|
|
|
if (index != 0) {
|
|
|
jedis.setDatabase(index);
|
|
|
}
|
|
|
jedis.setPoolConfig(poolCofig(maxIdle, maxTotal, maxWaitMillis, minIdle));
|
|
|
// 初始化连接pool
|
|
|
jedis.afterPropertiesSet();
|
|
|
RedisConnectionFactory factory = jedis;
|
|
|
return factory;
|
|
|
}
|
|
|
public JedisPoolConfig poolCofig(int maxIdle, int maxTotal, long maxWaitMillis, int minIdle) {
|
|
|
JedisPoolConfig poolCofig = new JedisPoolConfig();
|
|
|
poolCofig.setMaxIdle(maxIdle);
|
|
|
poolCofig.setMaxTotal(maxTotal);
|
|
|
poolCofig.setMaxWaitMillis(maxWaitMillis);
|
|
|
poolCofig.setMinIdle(minIdle);
|
|
|
return poolCofig;
|
|
|
}
|
|
|
}
|
|
|
|
|
|
```
|
|
|
|
|
|
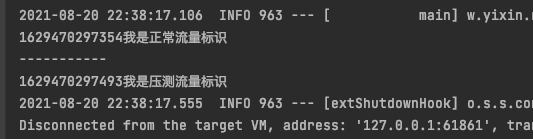
**第四步:验证结果。**
|
|
|
|
|
|
为了验证 Redis 的配置是否生效,我们新建一个测试类,在类里面中注入两个数据源:
|
|
|
|
|
|
```java
|
|
|
@Resource(name = "slaveDataSource")
|
|
|
private StringRedisTemplate slavetemplate;
|
|
|
|
|
|
@Resource(name = "masterDataSource")
|
|
|
private StringRedisTemplate masterTemplate;
|
|
|
|
|
|
@Test
|
|
|
void contextLoads() {
|
|
|
slavetemplate.opsForValue().set("one", System.currentTimeMillis() + "我是正常流量标记");
|
|
|
System.out.println(slavetemplate.opsForValue().get("one"));
|
|
|
System.out.println("-----------");
|
|
|
masterTemplate.opsForValue().set("two", System.currentTimeMillis() + "我是压测流量标记");
|
|
|
System.out.println(masterTemplate.opsForValue().get("two"));
|
|
|
}
|
|
|
|
|
|
```
|
|
|
|
|
|
最后,我们就可以把整个工程运行起来了,你可以参考文稿中的运行结果。
|
|
|
|
|
|
|
|
|
|
|
|
需要说明是,影子缓存(单实例)方案跟上面的实现逻辑是一致的,只不过单实例的数据库数量是有上限的,一般为 16 个。
|
|
|
|
|
|
|
|
|
|
|
|
不过在正式线上压测的时候,我还是推荐你使用多实例,这样能从物理上完全隔离掉生产缓存。
|
|
|
|
|
|
到这里,我们的第一种方案就已经验证通过了。接下来我们再来看看第二种方案。
|
|
|
|
|
|
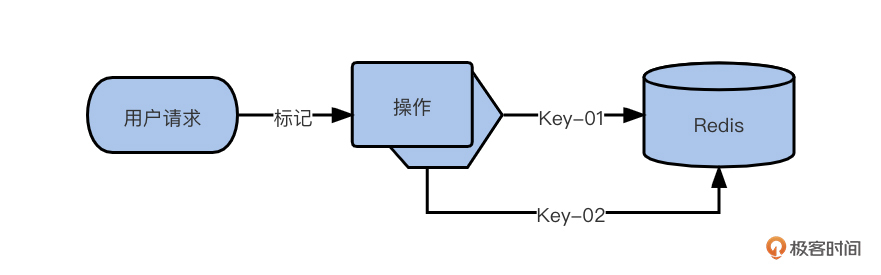
* 第二种方案:影子 key
|
|
|
|
|
|
所谓影子 key,就是在同一个库中,用不同的 key 存储不同的 value。
|
|
|
|
|
|
它大致的逻辑是下面的样子。
|
|
|
|
|
|
|
|
|
|
|
|
你可以看一下我给出的demo 代码。
|
|
|
|
|
|
```java
|
|
|
@Autowired
|
|
|
private RedisTemplate redisTemplate;
|
|
|
|
|
|
@GetMapping("/redis/{key}")
|
|
|
public void setRedisDemo(HttpServletRequest request,@PathVariable String key) {
|
|
|
String header = request.getHeader("7d");
|
|
|
if (header!= null &&"7dGroup".equals(header)) {
|
|
|
redisTemplate.opsForValue().set(key, "压测流量");
|
|
|
log.info("压测流量");
|
|
|
} else {
|
|
|
redisTemplate.opsForValue().set(key, "线上流量");
|
|
|
}
|
|
|
}
|
|
|
|
|
|
```
|
|
|
|
|
|
它的基本原理就是,接口在 Header 信息中携带“ 7DGroup” 压测标记。然后,后台通过 HttpRequest 获取 Header 信息,业务层通过 Header 标记判断用对应 key 来操作缓存。
|
|
|
|
|
|
### 数据源上下文实现
|
|
|
|
|
|
上一节课,我们采用 AOP 技术完成了 MySQL 数据库的切换,你可以思考一下, Redis 是不是也可以用这种方式完成数据源切换。
|
|
|
|
|
|
其实确实是可以的。下面,我们就来演示怎么通过 AOP 技术完成 Redis 数据源的切换。
|
|
|
|
|
|
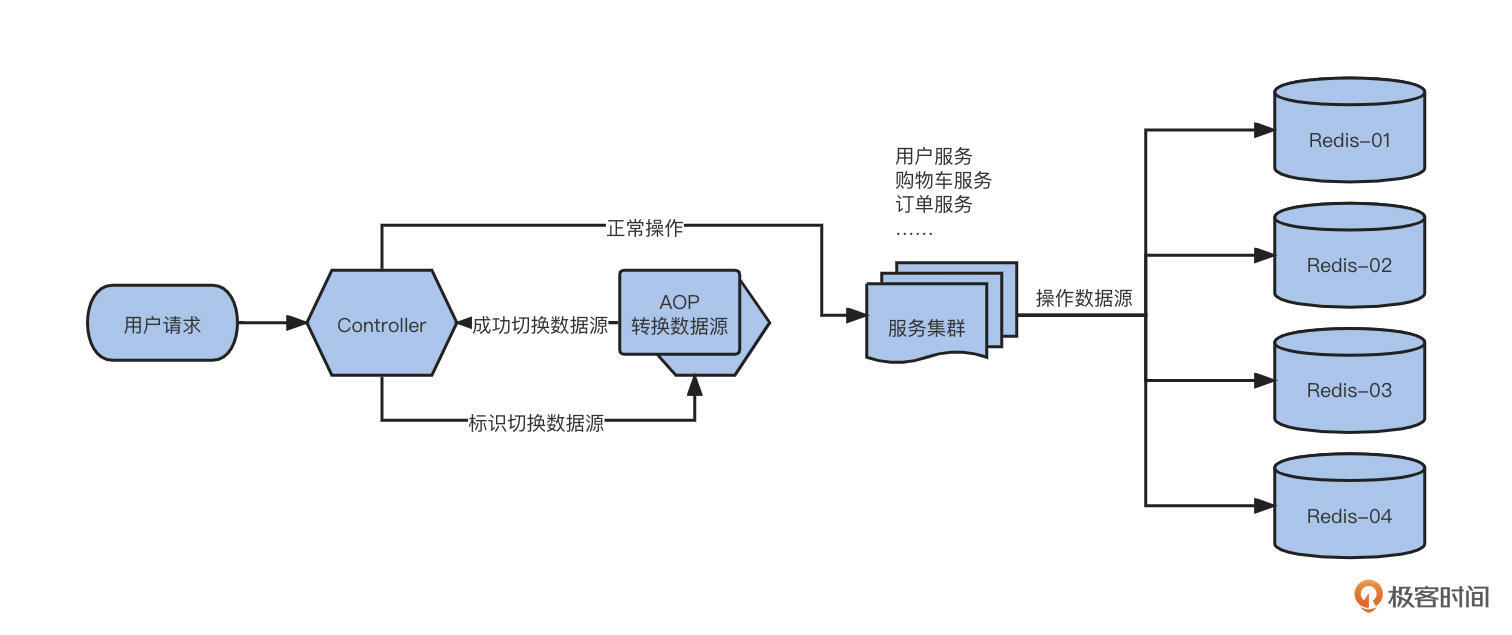
下面是一张简单的逻辑图:
|
|
|
|
|
|
|
|
|
|
|
|
**第一步:添加全局配置文件。**
|
|
|
|
|
|
新建工程,在配置文件中添加数据源配置,参考代码如下:
|
|
|
|
|
|
```yaml
|
|
|
spring:
|
|
|
http:
|
|
|
multipart:
|
|
|
max-file-size: 100MB
|
|
|
max-request-size: 100MB
|
|
|
enabled: true
|
|
|
redis:
|
|
|
database: 3
|
|
|
host: 9.105.1.27
|
|
|
port: 16379
|
|
|
password: # 密码(默认为空)
|
|
|
timeout: 6000ms # 连接超时时长(毫秒)
|
|
|
jedis:
|
|
|
pool:
|
|
|
max-active: 1000 # 连接池最大连接数(使用负值表示没有限制)
|
|
|
max-wait: -1ms # 连接池最大阻塞等待时间(使用负值表示没有限制)
|
|
|
max-idle: 10 # 连接池中的最大空闲连接
|
|
|
min-idle: 5 # 连接池中的最小空闲连接
|
|
|
cache:
|
|
|
type: none
|
|
|
|
|
|
resar:
|
|
|
oneDatabase: 5 #压测数据库
|
|
|
|
|
|
```
|
|
|
|
|
|
**第二步:创建读取Redis配置文件类。**
|
|
|
|
|
|
有了配置文件,还得有读取配置文件类,只有这样才能正常读取自定义配置信息:
|
|
|
|
|
|
```java
|
|
|
import org.springframework.boot.autoconfigure.AutoConfigureAfter;
|
|
|
import org.springframework.boot.autoconfigure.data.redis.RedisAutoConfiguration;
|
|
|
import org.springframework.boot.autoconfigure.data.redis.RedisProperties;
|
|
|
import org.springframework.boot.context.properties.EnableConfigurationProperties;
|
|
|
import org.springframework.context.annotation.Bean;
|
|
|
import org.springframework.context.annotation.Configuration;
|
|
|
import org.springframework.context.annotation.Primary;
|
|
|
import org.springframework.data.redis.connection.RedisPassword;
|
|
|
import org.springframework.data.redis.connection.RedisStandaloneConfiguration;
|
|
|
import org.springframework.data.redis.connection.jedis.JedisClientConfiguration;
|
|
|
import org.springframework.data.redis.connection.jedis.JedisConnectionFactory;
|
|
|
import redis.clients.jedis.JedisPoolConfig;
|
|
|
|
|
|
import java.time.Duration;
|
|
|
|
|
|
/**
|
|
|
* @description:读取数据源配置
|
|
|
* @author: dunshan
|
|
|
* @create: 2021-08-21 12:02
|
|
|
**/
|
|
|
@Configuration
|
|
|
@AutoConfigureAfter(RedisAutoConfiguration.class)// 自动获取application.yml中的配置
|
|
|
@EnableConfigurationProperties(RedisProperties.class)
|
|
|
public class RedisConfig {
|
|
|
private RedisProperties properties;
|
|
|
|
|
|
public RedisConfig(RedisProperties properties){
|
|
|
this.properties = properties;
|
|
|
}
|
|
|
|
|
|
@Bean
|
|
|
@Primary
|
|
|
public JedisConnectionFactory jedisConnectionFactory(){
|
|
|
RedisStandaloneConfiguration config = new RedisStandaloneConfiguration();
|
|
|
config.setHostName(properties.getHost());
|
|
|
config.setPort(properties.getPort());
|
|
|
config.setPassword(RedisPassword.of(properties.getPassword()));
|
|
|
config.setDatabase(properties.getDatabase());
|
|
|
return new JedisConnectionFactory(config, getJedisClientConfiguration());
|
|
|
}
|
|
|
|
|
|
private JedisClientConfiguration getJedisClientConfiguration() {
|
|
|
JedisClientConfiguration.JedisClientConfigurationBuilder builder = JedisClientConfiguration.builder();
|
|
|
if (properties.isSsl()) {
|
|
|
builder.useSsl();
|
|
|
}
|
|
|
if (properties.getTimeout() != null) {
|
|
|
Duration timeout = properties.getTimeout();
|
|
|
builder.readTimeout(timeout).connectTimeout(timeout);
|
|
|
}
|
|
|
RedisProperties.Pool pool = properties.getJedis().getPool();
|
|
|
if (pool != null) {
|
|
|
builder.usePooling().poolConfig(jedisPoolConfig(pool));
|
|
|
}
|
|
|
return builder.build();
|
|
|
}
|
|
|
|
|
|
private JedisPoolConfig jedisPoolConfig(RedisProperties.Pool pool) {
|
|
|
JedisPoolConfig config = new JedisPoolConfig();
|
|
|
config.setMaxTotal(pool.getMaxActive());
|
|
|
config.setMaxIdle(pool.getMaxIdle());
|
|
|
config.setMinIdle(pool.getMinIdle());
|
|
|
if (pool.getMaxWait() != null) {
|
|
|
config.setMaxWaitMillis(pool.getMaxWait().toMillis());
|
|
|
}
|
|
|
return config;
|
|
|
}
|
|
|
|
|
|
@Bean(name = "redisTemplate")
|
|
|
@Primary
|
|
|
public SelectableRedisTemplate redisTemplate() {
|
|
|
SelectableRedisTemplate redisTemplate = new SelectableRedisTemplate();
|
|
|
redisTemplate.setConnectionFactory(jedisConnectionFactory());
|
|
|
return redisTemplate;
|
|
|
}
|
|
|
}
|
|
|
|
|
|
```
|
|
|
|
|
|
**第三步:创建数据源上下文类**
|
|
|
|
|
|
我们这个场景还是使用 TransmittableThreadLocal 来保存数据源对象信息。这个在 [第13讲](https://time.geekbang.org/column/article/444794) 已经讲得很清楚了,我就不多赘述了。
|
|
|
|
|
|
```java
|
|
|
/**
|
|
|
* @description: 数据源上下文
|
|
|
* @author: dunshan
|
|
|
* @create: 2021-08-21 11:50
|
|
|
**/
|
|
|
public class RedisSelectSupport {
|
|
|
private static final TransmittableThreadLocal<Integer> SELECT_CONTEXT = new TransmittableThreadLocal<>();
|
|
|
|
|
|
public static void select(int db){
|
|
|
SELECT_CONTEXT.set(db);
|
|
|
}
|
|
|
|
|
|
public static Integer getSelect(){
|
|
|
return SELECT_CONTEXT.get();
|
|
|
}
|
|
|
}
|
|
|
|
|
|
```
|
|
|
|
|
|
**第四步:编写StringRedisTemplate 继承类。**
|
|
|
|
|
|
我们实现一个 RedisTemplate 来创建对应的 Redis 连接。
|
|
|
|
|
|
关键代码参考如下:
|
|
|
|
|
|
```java
|
|
|
import org.springframework.data.redis.connection.RedisConnection;
|
|
|
import org.springframework.data.redis.core.StringRedisTemplate;
|
|
|
|
|
|
/**
|
|
|
* @description: 创建数据源连接
|
|
|
* @author: dunshan
|
|
|
* @create: 2021-08-21 11:49
|
|
|
**/
|
|
|
public class SelectableRedisTemplate extends StringRedisTemplate {
|
|
|
|
|
|
@Override
|
|
|
protected RedisConnection createRedisConnectionProxy(RedisConnection pm) {
|
|
|
return super.createRedisConnectionProxy(pm);
|
|
|
}
|
|
|
|
|
|
@Override
|
|
|
protected RedisConnection preProcessConnection(RedisConnection connection, boolean existingConnection) {
|
|
|
Integer db;
|
|
|
if((db = RedisSelectSupport.getSelect()) != null){
|
|
|
connection.select(db);
|
|
|
}
|
|
|
return super.preProcessConnection(connection, existingConnection);
|
|
|
}
|
|
|
|
|
|
}
|
|
|
|
|
|
|
|
|
```
|
|
|
|
|
|
做好以上这些准备工作后,我们就可以开始实现后续的标记识别和缓存隔离动作了。
|
|
|
|
|
|
### 标记数据上下文实现
|
|
|
|
|
|
在做数据上下文的改造实现之前,我们还是先来回顾以下标记透传架构图。
|
|
|
|
|
|
|
|
|
|
|
|
我们在 [14 讲](https://time.geekbang.org/column/article/446320)已经把标记透传逻辑讲得很清楚了,所以接下来,我们基于上面的标记透传方案,在业务层使用 AOP 拦截请求,做对应的数据源上下文设置即可。
|
|
|
|
|
|
这里使用的 demo 工程还是 14 讲的示例,主要包括网关、会员系统、购物车系统和订单系统 4 个服务:
|
|
|
|
|
|

|
|
|
|
|
|
首先,我们还是需要实现一个全局 Filter 过滤器,用它获取标记信息,然后将标记存放到数据上下文中。
|
|
|
|
|
|

|
|
|
|
|
|
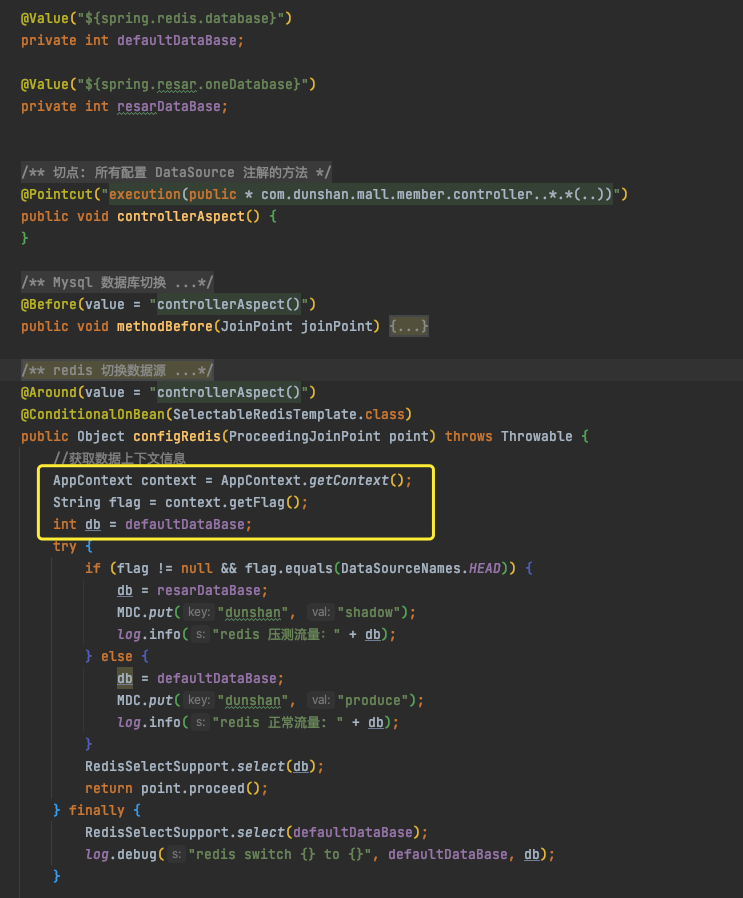
标记存放到数据上下文后,我们就可以使用 AOP 拦截请求和判断对应的目标数据源了。
|
|
|
|
|
|
关键代码如下:
|
|
|
|
|
|
```java
|
|
|
@Value("${spring.redis.master.database}")
|
|
|
private int defaultDataBase;
|
|
|
@Value("${spring.redis.shadow.database}")
|
|
|
private int shadowDataBase;
|
|
|
|
|
|
/**
|
|
|
* 拦截入口下所有的 public方法
|
|
|
*/
|
|
|
@Pointcut("execution(public * com.dunshan.order.controller..*(..))")
|
|
|
public void pointCutAround() {
|
|
|
}
|
|
|
|
|
|
/**
|
|
|
* @param point
|
|
|
* @throws Throwable
|
|
|
*/
|
|
|
@Around(value = "pointCutAround()")
|
|
|
@ConditionalOnBean(SelectableRedisTemplate.class)
|
|
|
public Object configRedis(ProceedingJoinPoint point) throws Throwable {
|
|
|
AppContext context = AppContext.getContext();
|
|
|
String flag = context.getFlag();
|
|
|
int db = defaultDataBase;
|
|
|
try {
|
|
|
if (flag != null && flag.equals(DataSourceNames.HEAD)) {
|
|
|
db = shadowDataBase;
|
|
|
log.info("redis 压测流量:" + db);
|
|
|
} else {
|
|
|
db = defaultDataBase;
|
|
|
log.info("redis 正常流量: " + db);
|
|
|
}
|
|
|
RedisSelectSupport.select(db);
|
|
|
return point.proceed();
|
|
|
} finally {
|
|
|
RedisSelectSupport.select(defaultDataBase);
|
|
|
log.debug("redis switch {} to {}", defaultDataBase, db);
|
|
|
}
|
|
|
}
|
|
|
|
|
|
```
|
|
|
|
|
|
之所以说这段代码关键,是因为它能让我们从 AppContext.getContext() (数据上下文)中获取标记,从而判断是使用正式缓存还是影子缓存。
|
|
|
改造完成后,我们就可以验证缓存隔离效果是否达到预期了。
|
|
|
|
|
|
这里,我们测试同一个接口,切换对应两个不同的数据库,同 key 但不同 value ,具体而言:
|
|
|
|
|
|
* 正式缓存:db0,value为线上流量;
|
|
|
* 影子缓存:db5,value为压测流量。
|
|
|
|
|
|
Redis 查询结果如下:
|
|
|
|
|
|
```shell
|
|
|
127.0.0.1:6379[5]> select 5
|
|
|
OK
|
|
|
127.0.0.1:6379[5]> get 7d
|
|
|
"\xe5\x8e\x8b\xe6\xb5\x8b\xe6\xb5\x81\xe9\x87\x8f"
|
|
|
127.0.0.1:6379[5]> select 0
|
|
|
OK
|
|
|
127.0.0.1:6379> get 7d
|
|
|
"\xe7\xba\xbf\xe4\xb8\x8a\xe6\xb5\x81\xe9\x87\x8f"
|
|
|
127.0.0.1:6379>
|
|
|
|
|
|
```
|
|
|
|
|
|
这里,我们还是使用 JMeter 做下接口测试。
|
|
|
|
|
|
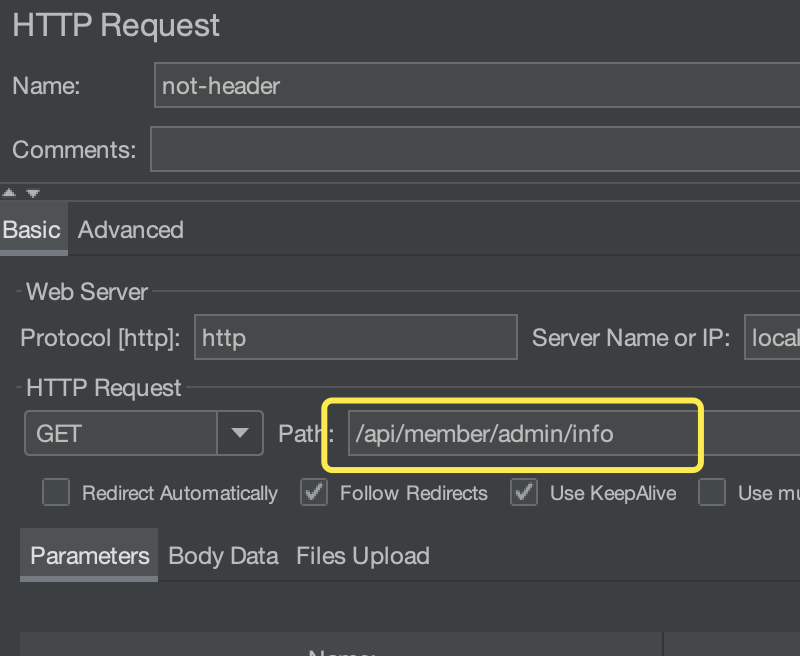
* 正常流量(不带 Header 标记)
|
|
|
|
|
|
脚本中不设置 Header 信息。
|
|
|
|
|
|
|
|
|
|
|
|
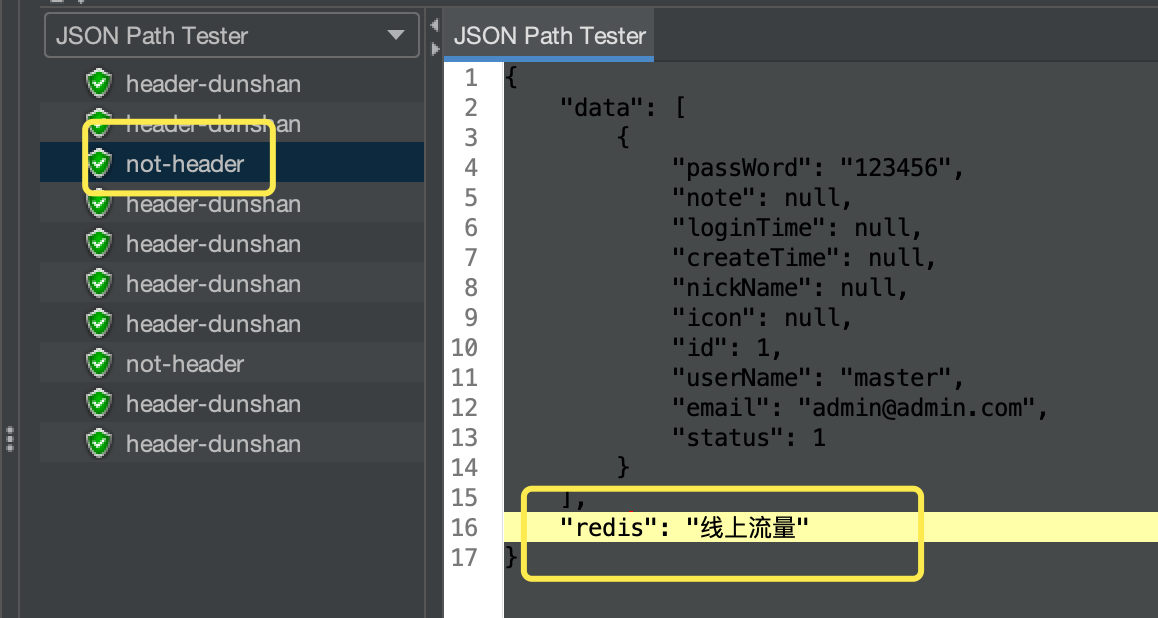
测试完成后,查看测试结果数据,可以看到,返回的结果为“线上流量”。
|
|
|
|
|
|
|
|
|
|
|
|
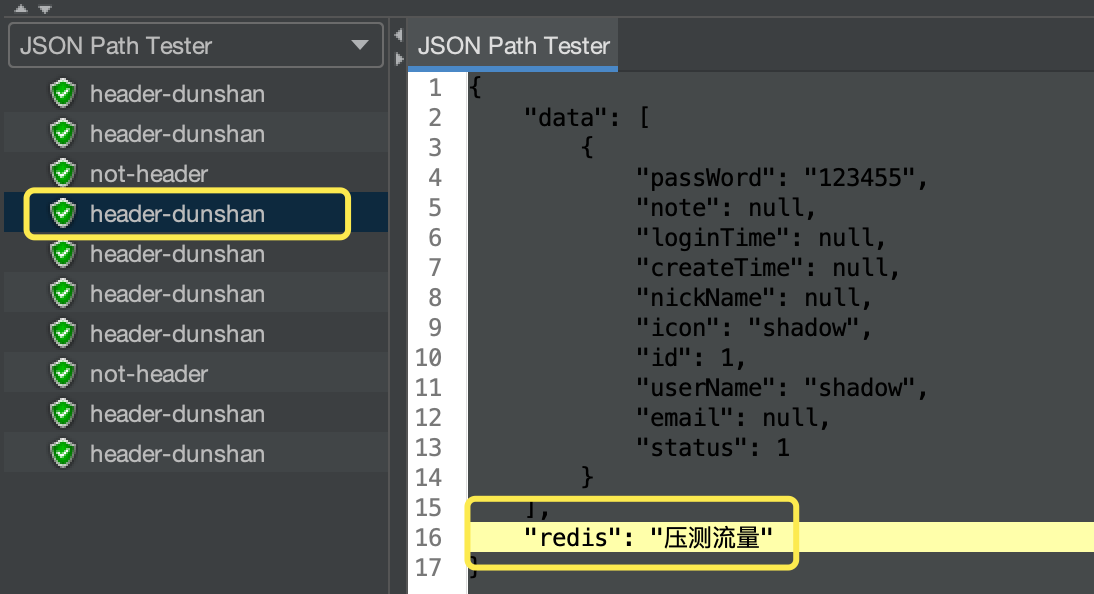
* 压测流量(带 Header 标记)
|
|
|
|
|
|
脚本中设置 Header, 具体为 “dunshan:7DGroup”:
|
|
|
|
|
|

|
|
|
|
|
|
测试完成后,查看测试结果数据,我们看到返回的结果为“压测流量”。
|
|
|
|
|
|
|
|
|
|
|
|
最后,我们打开订单服务查看日志,从日志可以看到打印 Redis 数据库切换成功。
|
|
|
|
|
|

|
|
|
|
|
|
之前已经说过了,只要 demo 能完成数据源切换,并且数据隔离正常,那么就可以把目前的配置文件和相关类移植到真实系统中去了。
|
|
|
|
|
|
## 真实系统改造
|
|
|
|
|
|
我们先来对 mall-member(会员系统) 进行改造验证,如果改造并验证成功,我们就可以同步到其他系统了。
|
|
|
|
|
|
### **第一步:移植代码**
|
|
|
|
|
|
打开工程,选择 mall-member 模块,在配置文件新建一个包,然后把目前调试成功的配置文件复制到该工程中。
|
|
|
|
|
|
如果你仔细看一下就可以发现,系统在 mall-common 中有封装 Redis 公共模块,非常方便供其他模块调用。所以,我们可以把 RedisSelectSupport 与SelectableRedisTemplate 两个类放到公共配置类中:
|
|
|
|
|
|

|
|
|
|
|
|
把上面两个类放到公共配置后,我们还要配置下 AOP 切面:
|
|
|
|
|
|
|
|
|
|
|
|
这里要注意哦, public 中的包名路径需要修改正确,不然拦截不会生效。
|
|
|
|
|
|
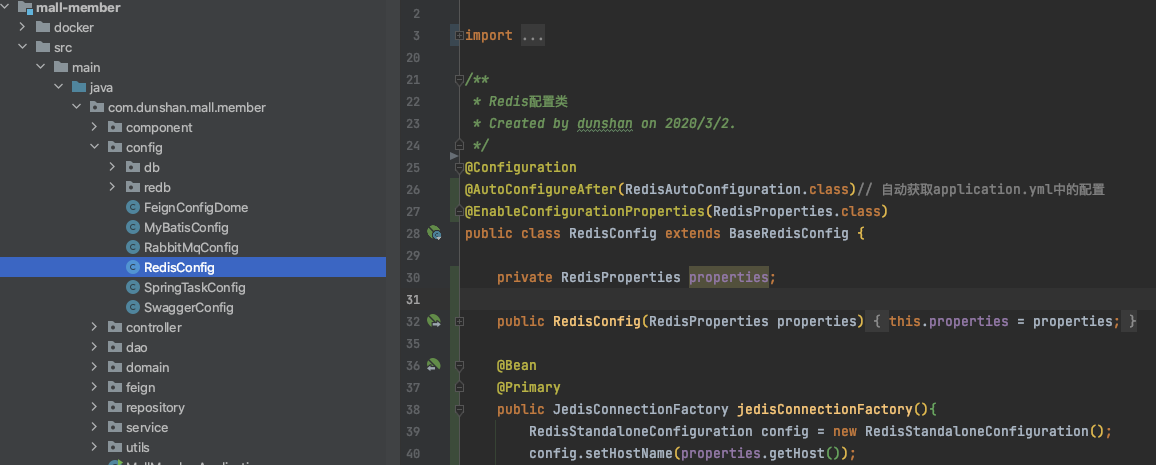
紧接着,我们把 RedisConfig 类移植到工程中去:
|
|
|
|
|
|
|
|
|
|
|
|
为了方便验证结果,我们还需要在 Controller 中添加一个测试接口,代码参考如下:
|
|
|
|
|
|
```java
|
|
|
/**
|
|
|
* @author 7DGroup
|
|
|
* @program: dunshan-mall
|
|
|
* @description:
|
|
|
* @date 2021-08-22 11:05:24
|
|
|
*/
|
|
|
@Log4j2
|
|
|
@Controller
|
|
|
@RequestMapping("/index")
|
|
|
public class IndexController {
|
|
|
|
|
|
@Autowired
|
|
|
private StringRedisTemplate redisTemplate;
|
|
|
|
|
|
@GetMapping("/test/{name}")
|
|
|
@ResponseBody
|
|
|
public Object set(@PathVariable String name) {
|
|
|
System.out.println("参数" + name);
|
|
|
redisTemplate.opsForValue().set("student", name);
|
|
|
HashMap<String, Object> map = new HashMap<>();
|
|
|
map.put("ok", "调试");
|
|
|
map.put("data", redisTemplate.opsForValue().get("student"));
|
|
|
return map;
|
|
|
}
|
|
|
}
|
|
|
|
|
|
```
|
|
|
|
|
|
上面是一个很简单的 Get 请求的写接口,主要演示的是当流量过来的时候,如何生成对应的 Cache。
|
|
|
|
|
|
### **第二步:测试接口验证**
|
|
|
|
|
|
改造完成后,我们还是使用 JMeter 来做下接口测试,验证改造是否达到预期吧。
|
|
|
|
|
|
验证步骤主要有四个:
|
|
|
|
|
|
1、配置好数据源;
|
|
|
|
|
|
2、核实初始化 Cache;
|
|
|
|
|
|
3、通过 JMeter 接口测试;
|
|
|
|
|
|
4、验证日志及生成的 Cache。
|
|
|
|
|
|
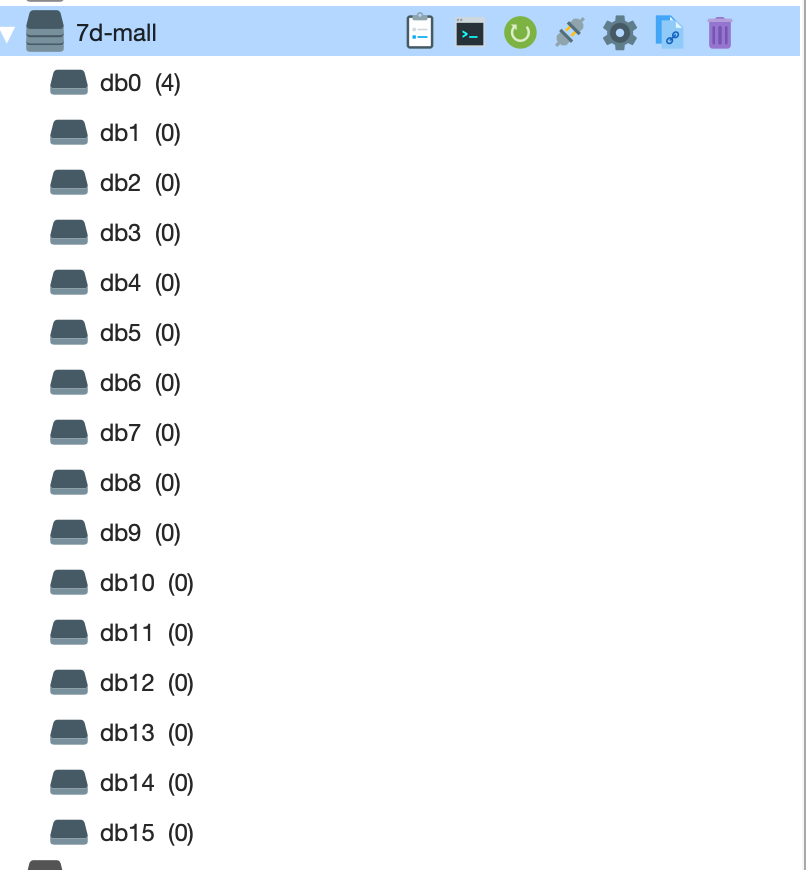
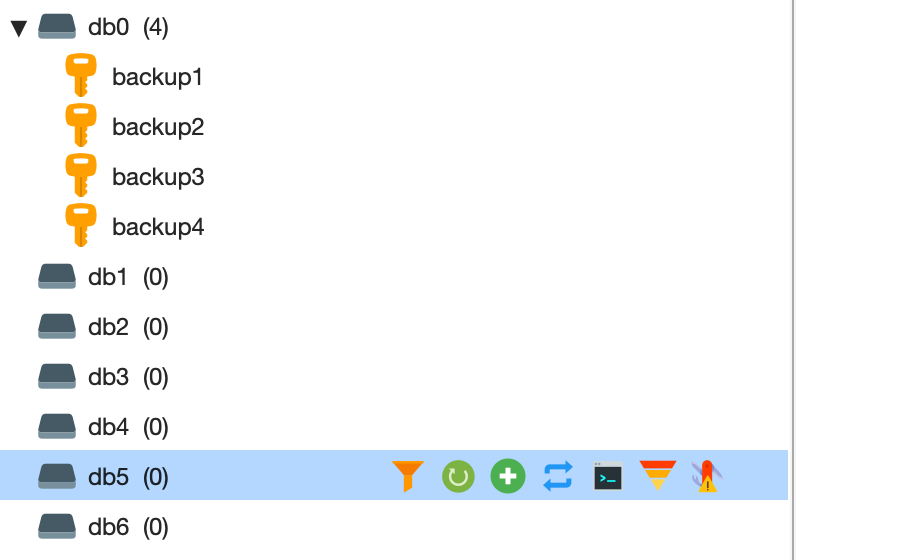
首先,配置好对应的数据源,这里 db1 为正式缓存,db5 为影子缓存。
|
|
|
|
|
|
```plain
|
|
|
database: 0 # Redis数据库索引(默认为0)
|
|
|
port: 6379 # Redis服务器连接端口
|
|
|
password: # Redis服务器连接密码(默认为空)
|
|
|
timeout: 3000ms # 连接超时时间(毫秒)
|
|
|
resar:
|
|
|
oneDatabase: 5
|
|
|
|
|
|
```
|
|
|
|
|
|
接下来,我们核实下数据。可以看到,这两个库的 key 的都没有 student 。
|
|
|
|
|
|
|
|
|
接下来,我们通过 JMeter 来做下接口测试验证。
|
|
|
|
|
|
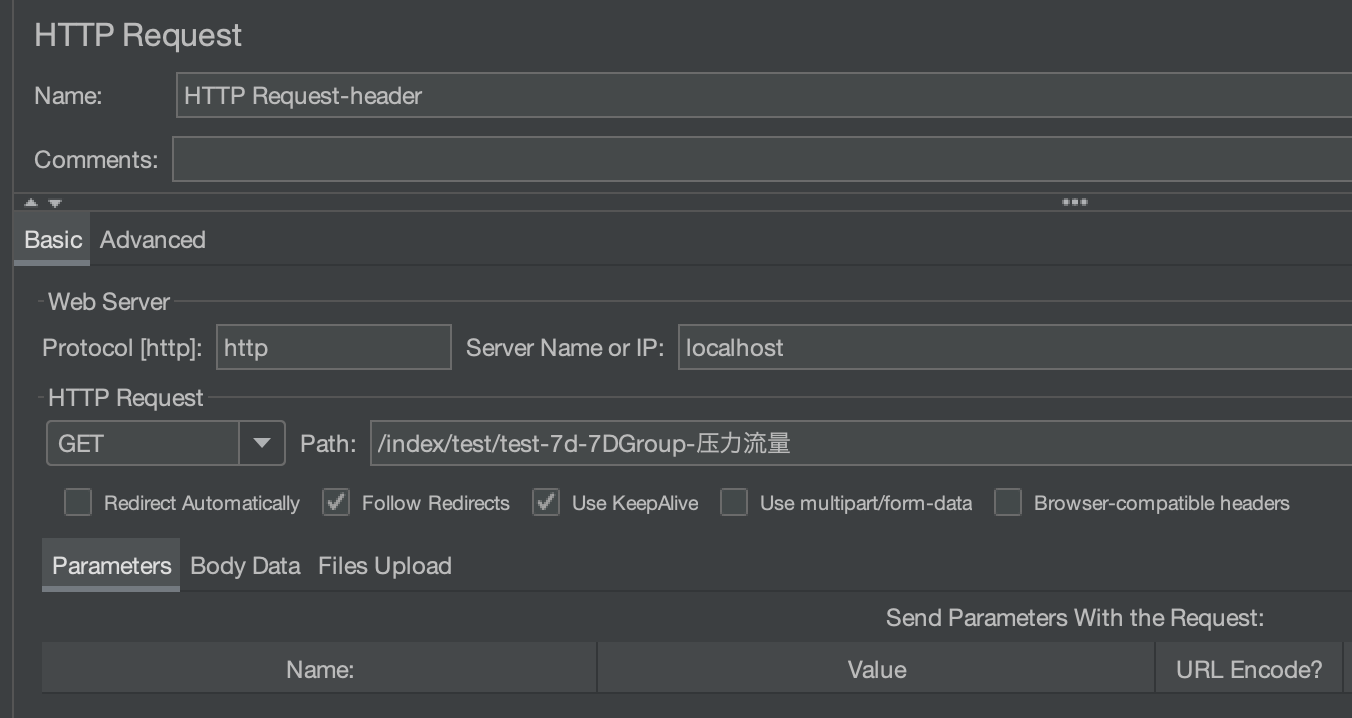
* **压测流量(带Header标记)**
|
|
|
|
|
|
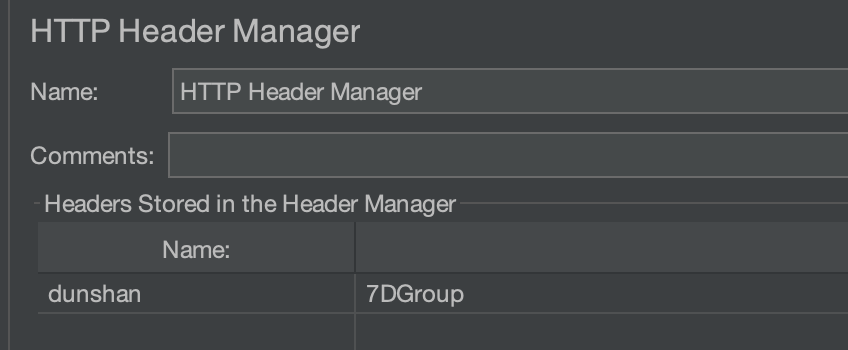
开发第一个请求脚本,在 HTTP Header Manager 里面添加压测标记。
|
|
|
|
|
|
|
|
|
|
|
|
注意,JMeter 中的 Header 标记需要与代码中判断的标记保持一致。
|
|
|
|
|
|
|
|
|
|
|
|
然后我们打开JMeter 结果查看树,点击第一个请求日志查看响应结果。可以看到提示已经成功了。
|
|
|
|
|
|

|
|
|
|
|
|
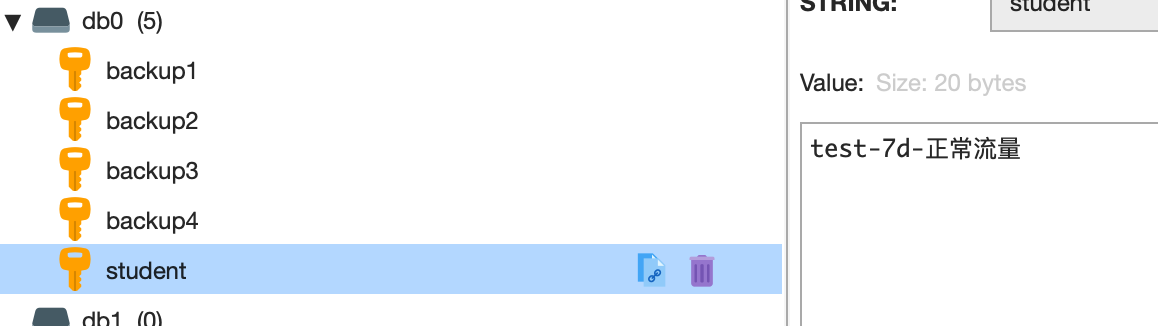
我们再打开 Redis 客户端工具查看 db0 ,显示的结果也与预期一致。
|
|
|
|
|
|
|
|
|
|
|
|
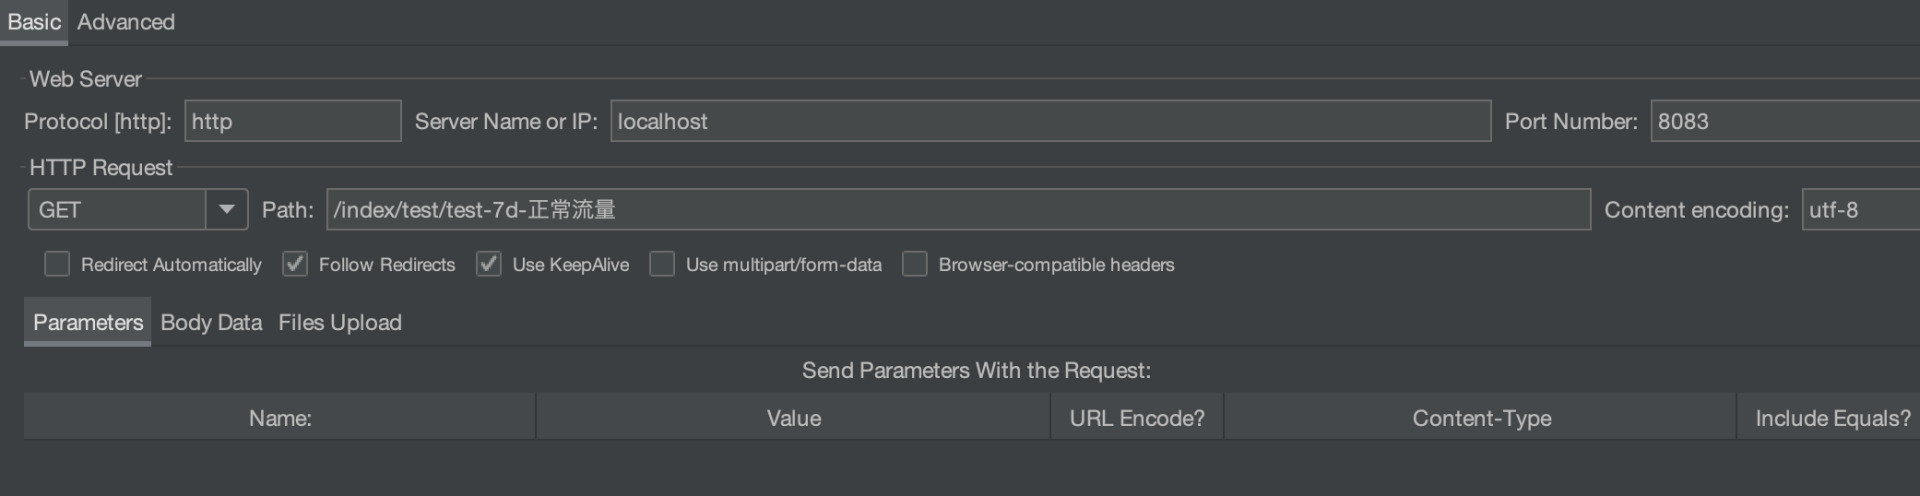
* **正式流量(不带Header标记)**
|
|
|
|
|
|
我们在 JMeter 脚本中去掉 HTTP Header Manager 组件。
|
|
|
|
|
|
|
|
|
|
|
|
同样还是打开JMeter 结果查看树,点击第二个请求日志查看响应结果。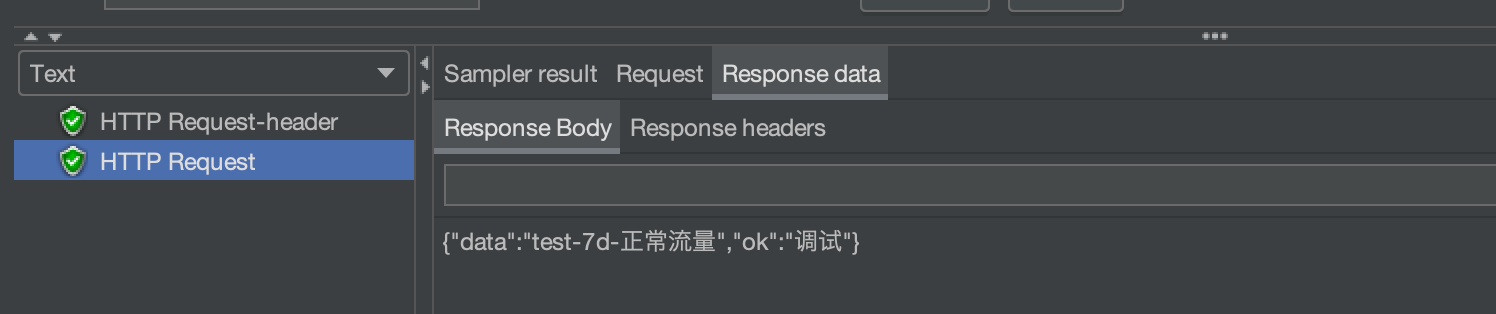
|
|
|
|
|
|
然后我们再打开 Redis db5,显示数据与请求数据也是一致的。
|
|
|
|
|
|
|
|
|
|
|
|
好了,测试接口验证通过之后,我们就可以验证真实接口是否有效了。
|
|
|
|
|
|
### **第三步:真实接口验证**
|
|
|
|
|
|
这里我们验证的接口为【会员登录】接口,使用的工具还是 JMeter 。
|
|
|
|
|
|
* **压测流量(带 Header 标记)**
|
|
|
|
|
|
这里需要注意的是,要提前在脚本增加对应的 Header 标记。
|
|
|
|
|
|

|
|
|
|
|
|
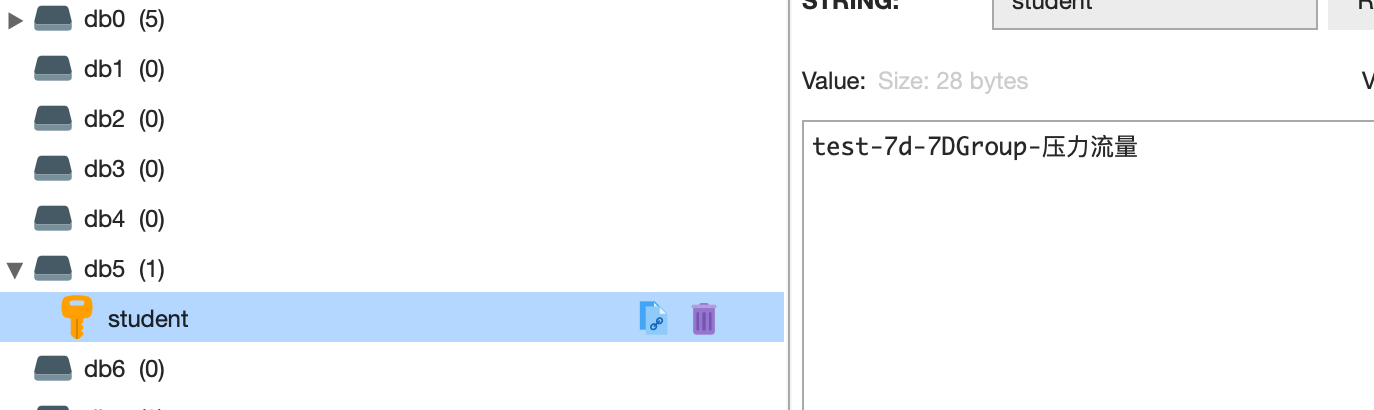
我们可以看到压测流量已经成功了,在 db5(影子缓存)中生成了对应的数据。
|
|
|
|
|
|
* **正式流量(不带 Header 标记)**
|
|
|
|
|
|
Redis 中 db0(正式缓存) 的数据也生成正常:
|
|
|
|
|
|

|
|
|
|
|
|
到这里,我们的真实接口测试验证也通过了。
|
|
|
|
|
|
刚才,我们演示了 mall-member 模块的改造过程,通过区分正常流量和压测流量生成对应的Cache,我们知道这部分系统改造已经成功了。
|
|
|
|
|
|
有了上面的改造经验之后,其他模块我们也可以按这个步骤来进行。我建议你一步一步地改造,这样能让改造的风险处于更加可控的范围内。
|
|
|
|
|
|
## 总结
|
|
|
|
|
|
好了,到这里,我们就把整个缓存隔离的改造介绍完了。这节课的要点有下面三个:
|
|
|
|
|
|
1、隔离方案选型:做好复杂度识别、风险管控、成本计算等前置工作。由于全链路压测本来就是在压力大的前提下产生的需求,所以缓存的隔离,使用多实例物理分离的方式来做隔离方案是最为合理的。
|
|
|
|
|
|
2、demo 预演:在技术预演中,我们也给出了两种实现方案,那就是根据�Header识别和根据数据上下文识别。
|
|
|
|
|
|
3、真实系统改造:主要涉及到移植代码和验证两大环节。
|
|
|
|
|
|
大家都知道现在处理集中的大访问量的一些常见手段:缓存、队列、限流、熔断、降级等。而缓存作为一个系统大幅提升性能的重要手段,在全链路压测的逻辑中是绝对不能忽视的。这也是我这节课讲得这么详细的原因。我希望你能从文本中看到在全链路压测中,具体每一步的改造过程。
|
|
|
|
|
|
因为改造涉及的代码比较多,在这个专栏结束之后,我也会把所有改造过的代码都公布出来,方便大家一起交流讨论。
|
|
|
|
|
|
## 思考题
|
|
|
|
|
|
在这节课结束之前,我还是给你留两道思考题 :
|
|
|
|
|
|
1、Redis 缓存隔离和 MySQL 隔离方案上有什么区别?
|
|
|
|
|
|
2、如果线上做了 Redis 缓存隔离,压测的时候我们需要注意些什么?
|
|
|
|
|
|
欢迎你在留言区与我交流讨论,我们下节课再见!
|
|
|
|