521 lines
30 KiB
Markdown
521 lines
30 KiB
Markdown
# 特别放送 | IAM排障指南
|
||
|
||
你好,我是孔令飞。
|
||
|
||
今天我们更新一期特别放送作为加餐。在部署和使用IAM的过程中,难免会出现一些异常(也称为故障、问题)。这时候,就需要我们能够定位故障,并修复故障。这里,我总结了一些IAM的排障方法,以及一些常见故障的解决方法,供你参考。
|
||
|
||
## 如何排障?
|
||
|
||
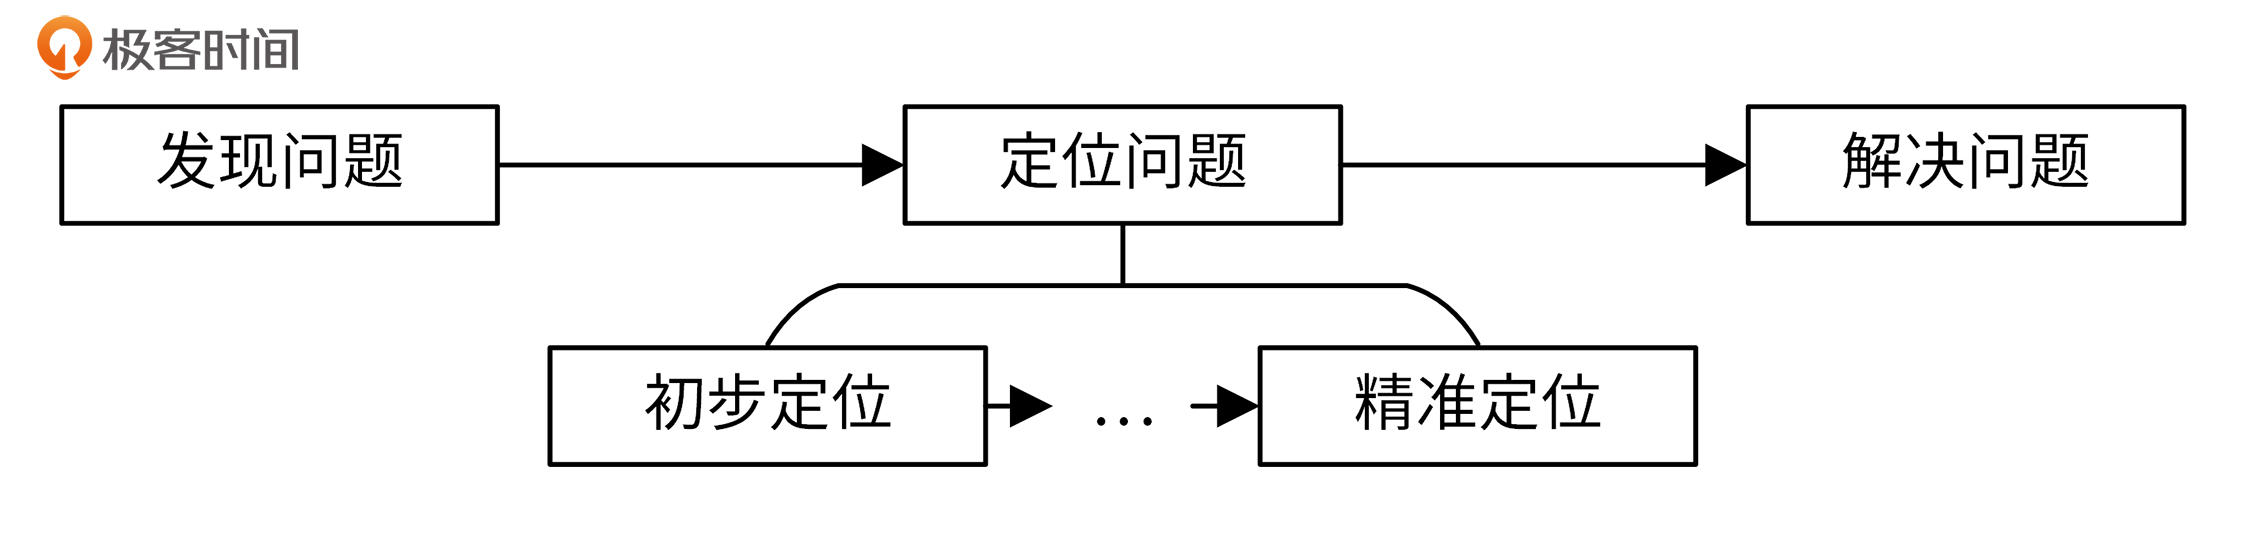
首先,我们需要发现问题,然后定位问题。我们可能需要经过多轮分析排查才能定位到问题的根因,最后去解决问题。排障流程如下图所示:
|
||
|
||
|
||
|
||
如果想排查问题并解决问题,你还需要具备这两个基本能力:能够理解错误日志的内容;根据错误日志,找出解决方案。
|
||
|
||
我们举个例子来说吧。有以下错误:
|
||
|
||
```bash
|
||
[going@dev iam]$ mysql -h127.0.0.1 -uroot -p'iam59!z$'
|
||
bash: /usr/bin/mysql: 没有那个文件或目录
|
||
[going@dev iam]$
|
||
|
||
```
|
||
|
||
对于这个错误,我们首先来理解错误内容:mysql命令没有找到,说明没有安装mysql,或者安装mysql失败。
|
||
|
||
那么,我们的解决方案就是重新执行 [03讲](https://time.geekbang.org/column/article/378082) 中安装MariaDB的步骤:
|
||
|
||
```bash
|
||
$ cd $IAM_ROOT
|
||
$ ./scripts/install/mariadb.sh iam::mariadb::install
|
||
|
||
```
|
||
|
||
接下来,我会以`iam-apiserver`服务为例,给你演示下具体如何排障并解决问题。
|
||
|
||
### 发现问题
|
||
|
||
要排障,首先我们需要发现问题。我们通常用下面这几种方式来发现问题。
|
||
|
||
* 检查服务状态:启动iam-apiserver服务后,执行`systemctl status iam-apiserver` 发现iam-apiserver启动失败,即`Active`的值不为`active (running)`。
|
||
* 功能异常:访问iam-apiserver服务,功能异常或者报错,例如接口返回值跟预期不一样等。
|
||
* 日志报错:在iam-apiserver的日志中发现一些`WARN`、`ERROR`、`PANIC`、`FATAL`等级别的错误日志。
|
||
|
||
### 定位问题
|
||
|
||
发现问题之后,就需要我们定位出问题的根本原因。我们可以通过下面这三种方式来定位问题。
|
||
|
||
* 查看日志,它是最简单的排障方式。
|
||
* 使用Go调试工具Delve来定位问题。
|
||
* 添加Debug日志,从程序入口处跟读代码,在关键位置处打印Debug日志,来定位问题。
|
||
|
||
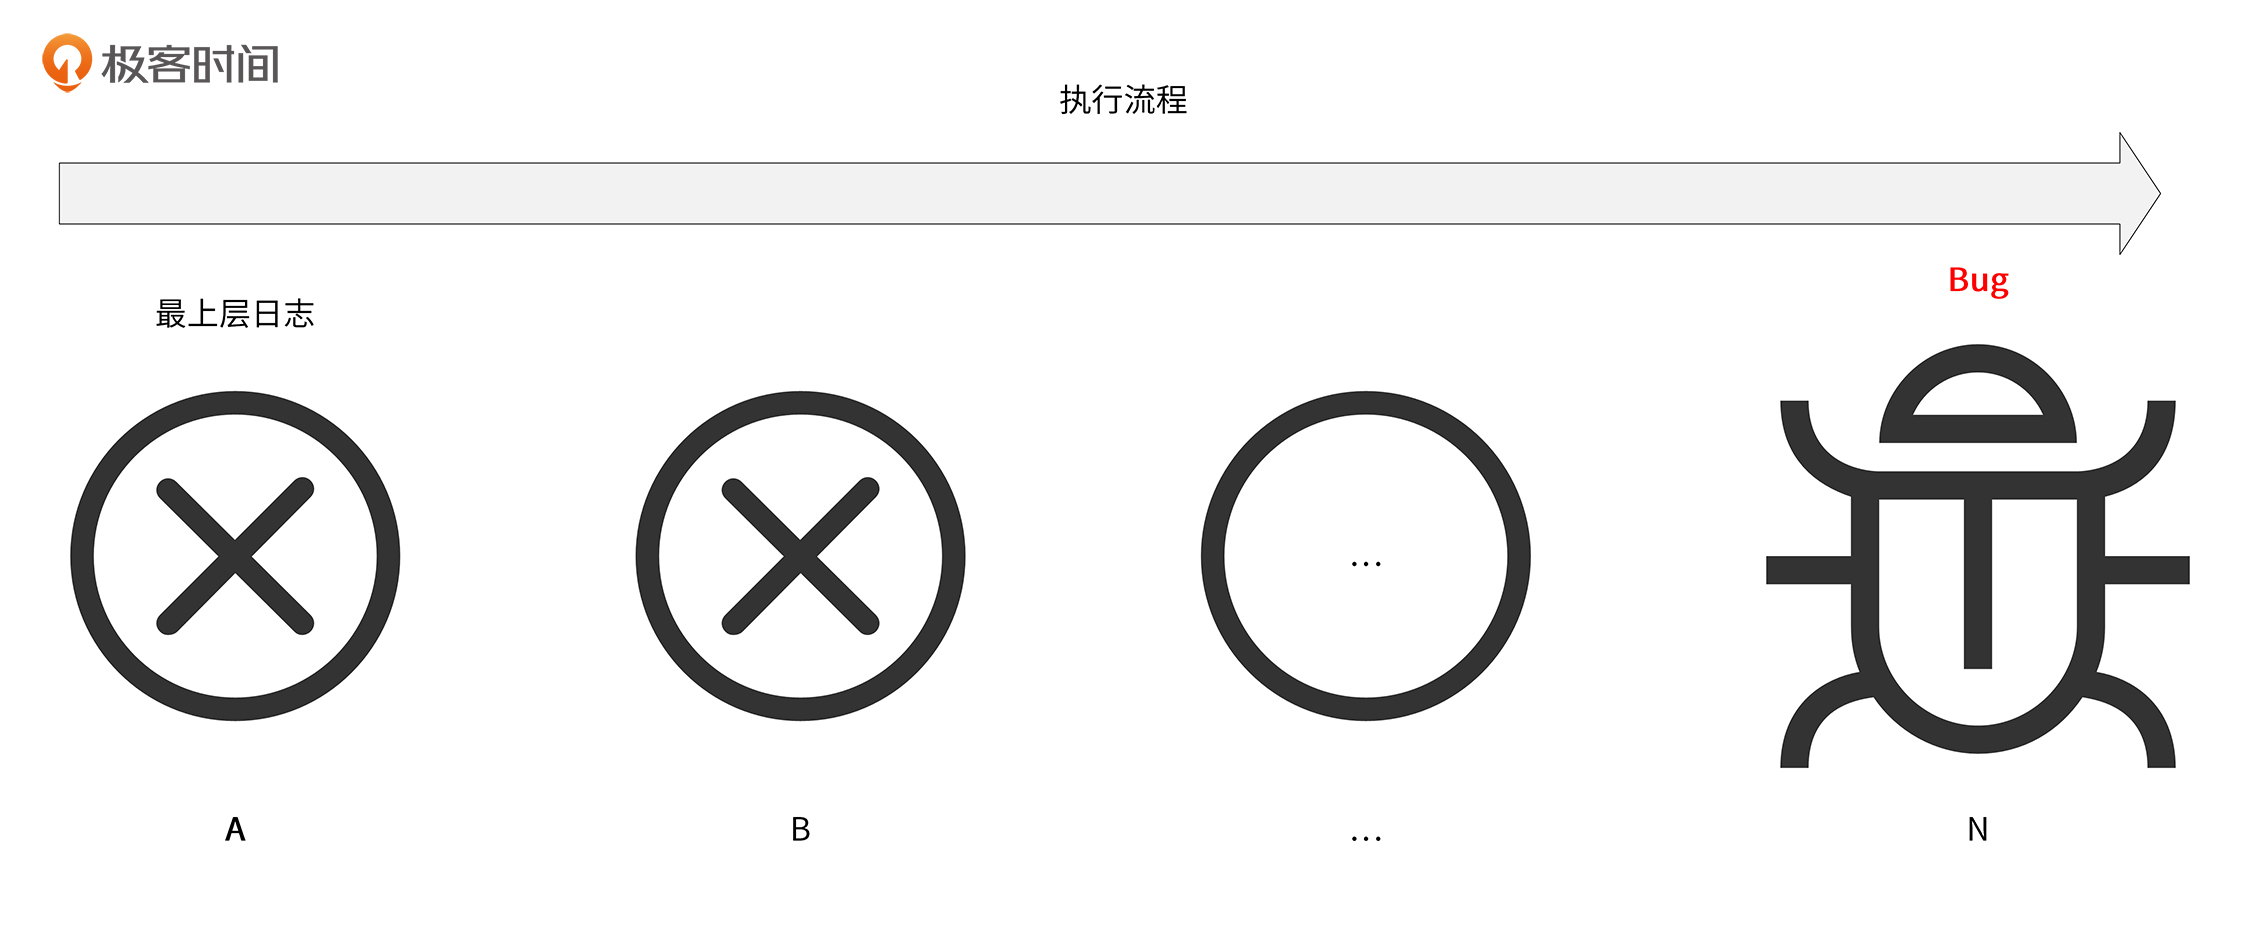
在定位问题的过程中,我们可以采用“顺藤摸瓜”的思路去排查问题。比如,我们的程序执行流程是:A -> B -> … -> N。其中A、B、N都可以理解为一个排查点。所谓的排查点,就是需要在该处定位问题的点,这些点可能是导致问题的根因所在。
|
||
|
||
在排障过程中,你可以根据最上层的日志报错,找到下一个排查点B。如果经过定位,发现B没有问题,那继续根据程序执行流程,找下一个排查点排查问题。如此反复,直到找到最终的排查点,也就是出问题的根因N,N即为Bug点。执行流程如下图所示:
|
||
|
||
|
||
|
||
下面,我们来具体看看这三种定位问题的方法。
|
||
|
||
#### 查看日志定位问题
|
||
|
||
我们首先应该通过日志来定位问题,这是最简单高效的方式。要通过日志来定位问题,你不仅要会看日志,还要能读懂日志,也就是理解日志报错的原因。
|
||
|
||
下面我来具体讲解用这种方法定位问题的步骤。
|
||
|
||
**第一步,确保服务运行正常。**
|
||
|
||
你可以通过执行 `systemctl status` 命令来查看服务的运行状况:
|
||
|
||
```bash
|
||
$ systemctl status iam-apiserver
|
||
● iam-apiserver.service - IAM APIServer
|
||
Loaded: loaded (/etc/systemd/system/iam-apiserver.service; enabled; vendor preset: disabled)
|
||
Active: activating (auto-restart) (Result: exit-code) since Thu 2021-09-09 13:47:56 CST; 2s ago
|
||
Docs: https://github.com/marmotedu/iam/blob/master/init/README.md
|
||
Process: 119463 ExecStart=/opt/iam/bin/iam-apiserver --config=/etc/iam/iam-apiserver.yaml (code=exited, status=1/FAILURE)
|
||
Process: 119461 ExecStartPre=/usr/bin/mkdir -p /var/log/iam (code=exited, status=0/SUCCESS)
|
||
Process: 119460 ExecStartPre=/usr/bin/mkdir -p /data/iam/iam-apiserver (code=exited, status=0/SUCCESS)
|
||
Main PID: 119463 (code=exited, status=1/FAILURE)
|
||
|
||
```
|
||
|
||
可以看到,`Active`不是`active (running)`,说明iam-apiserver服务没有正常运行。从上面输出中的`Process: 119463 ExecStart=/opt/iam/bin/iam-apiserver --config=/etc/iam/iam-apiserver.yaml (code=exited, status=1/FAILURE)`信息中,我们可以获取以下信息:
|
||
|
||
* iam-apiserver服务启动命令为`/opt/iam/bin/iam-apiserver --config=/etc/iam/iam-apiserver.yaml`。
|
||
* `/opt/iam/bin/iam-apiserver`加载的配置文件为`/etc/iam/iam-apiserver.yaml`。
|
||
* `/opt/iam/bin/iam-apiserver`命令执行失败,退出码为1,其进程ID为`119463`。
|
||
|
||
这里注意,`systemctl status`会将超过一定长度的行的后半部分用省略号替代,如果想查看完整的信息,可以追加`-l`参数,也就是`systemctl status -l`来查看。
|
||
|
||
既然iam-apiserver命令启动失败,那我们就需要查看iam-apiserver启动时的日志,看看有没有一些报错日志。
|
||
|
||
接下来,就进入**第二步,查看**`iam-apiserver`**运行日志。**
|
||
|
||
这里提一句,如果你对systemd不了解,也可以趁机恶补一波。你可以参考阮一峰大佬的两篇博客:[Systemd 入门教程:命令篇](https://www.ruanyifeng.com/blog/2016/03/systemd-tutorial-commands.html)和[Systemd 入门教程:实战篇](https://www.ruanyifeng.com/blog/2016/03/systemd-tutorial-part-two.html)。
|
||
|
||
那么如何查看呢?我们有3种查看方式,我在下面按优先级顺序排列了下。你在定位问题和查看日志时,按优先级3选1即可,1 > 2 > 3。
|
||
|
||
1. 通过`journalctl -u iam-apiserver`查看。
|
||
2. 通过iam-apiserver日志文件查看。
|
||
3. 通过console查看。
|
||
|
||
下面我来分别介绍下这三种查看方式。
|
||
|
||
先来看优先级最高的方式,通过`journalctl -u iam-apiserver`查看。
|
||
|
||
systemd 提供了自己的日志系统,称为 journal。我们可以使用`journalctl`命令来读取journal日志。`journalctl`提供了`-u`选项来查看某个 Unit 的日志,提供了`_PID`来查看指定进程ID的日志。在**第一步**中,我们知道服务启动失败的进程ID为`119463`。执行以下命令来查看这次启动的日志:
|
||
|
||
```bash
|
||
$ sudo journalctl _PID=119463
|
||
-- Logs begin at Thu 2021-09-09 09:12:25 CST, end at Thu 2021-09-09 14:40:48 CST. --
|
||
...
|
||
Sep 09 13:47:56 VM-200-70-centos iam-apiserver[119463]: 2021-09-09 13:47:56.727 INFO apiserver gorm@v1.21.12/gorm.go:202 mysql/mysql.go:75[error] faile>
|
||
Sep 09 13:47:56 VM-200-70-centos iam-apiserver[119463]: 2021-09-09 13:47:56.727 FATAL apiserver apiserver/server.go:139 Failed to get cache instance: g>
|
||
Sep 09 13:47:56 VM-200-70-centos iam-apiserver[119463]: github.com/marmotedu/iam/internal/apiserver.(*completedExtraConfig).New
|
||
Sep 09 13:47:56 VM-200-70-centos iam-apiserver[119463]: /home/going/workspace/golang/src/github.com/marmotedu/iam/internal/apiserver/server.go:139
|
||
Sep 09 13:47:56 VM-200-70-centos iam-apiserver[119463]: github.com/marmotedu/iam/internal/apiserver.createAPIServer
|
||
Sep 09 13:47:56 VM-200-70-centos iam-apiserver[119463]: /home/going/workspace/golang/src/github.com/marmotedu/iam/internal/apiserver/server.go:66
|
||
Sep 09 13:47:56 VM-200-70-centos iam-apiserver[119463]: github.com/marmotedu/iam/internal/apiserver.Run
|
||
Sep 09 13:47:56 VM-200-70-centos iam-apiserver[119463]: /home/going/workspace/golang/src/github.com/marmotedu/iam/internal/apiserver/run.go:11
|
||
Sep 09 13:47:56 VM-200-70-centos iam-apiserver[119463]: github.com/marmotedu/iam/internal/apiserver.run.func1
|
||
Sep 09 13:47:56 VM-200-70-centos iam-apiserver[119463]: /home/going/workspace/golang/src/github.com/marmotedu/iam/internal/apiserver/app.go:46
|
||
Sep 09 13:47:56 VM-200-70-centos iam-apiserver[119463]: github.com/marmotedu/iam/pkg/app.(*App).runCommand
|
||
Sep 09 13:47:56 VM-200-70-centos iam-apiserver[119463]: /home/going/workspace/golang/src/github.com/marmotedu/iam/pkg/app/app.go:278
|
||
Sep 09 13:47:56 VM-200-70-centos iam-apiserver[119463]: github.com/spf13/cobra.(*Command).execute
|
||
Sep 09 13:47:56 VM-200-70-centos iam-apiserver[119463]: /home/going/workspace/golang/pkg/mod/github.com/spf13/cobra@v1.2.1/command.go:856
|
||
Sep 09 13:47:56 VM-200-70-centos iam-apiserver[119463]: github.com/spf13/cobra.(*Command).ExecuteC
|
||
Sep 09 13:47:56 VM-200-70-centos iam-apiserver[119463]: /home/going/workspace/golang/pkg/mod/github.com/spf13/cobra@v1.2.1/command.go:974
|
||
Sep 09 13:47:56 VM-200-70-centos iam-apiserver[119463]: github.com/spf13/cobra.(*Command).Execute
|
||
Sep 09 13:47:56 VM-200-70-centos iam-apiserver[119463]: /home/going/workspace/golang/pkg/mod/github.com/spf13/cobra@v1.2.1/command.go:902
|
||
Sep 09 13:47:56 VM-200-70-centos iam-apiserver[119463]: github.com/marmotedu/iam/pkg/app.(*App).Run
|
||
Sep 09 13:47:56 VM-200-70-centos iam-apiserver[119463]: /home/going/workspace/golang/src/github.com/marmotedu/iam/pkg/app/app.go:233
|
||
Sep 09 13:47:56 VM-200-70-centos iam-apiserver[119463]: main.main
|
||
Sep 09 13:47:56 VM-200-70-centos iam-apiserver[119463]: /home/going/workspace/golang/src/github.com/marmotedu/iam/cmd/iam-apiserver/apiserver.go:24
|
||
Sep 09 13:47:56 VM-200-70-centos iam-apiserver[119463]: runtime.main
|
||
Sep 09 13:47:56 VM-200-70-centos iam-apiserver[119463]: /home/going/go/go1.16.2/src/runtime/proc.go:225
|
||
lines 10-54/54 (END)
|
||
|
||
```
|
||
|
||
从上面的日志中,我们找到了服务启动失败的原因:`iam-apiserver`启动时,发生了`FATAL`级别的错误。到这里,你已经初步定位到问题原因了。
|
||
|
||
我们再来看通过iam-apiserver日志文件查看的方式。
|
||
|
||
作为一个企业级的实战项目,iam-apiserver的日志当然是会记录到日志文件中的。在**第一步**中,我们通过`systemctl status iam-apiserver`输出的信息,知道了iam-apiserver启动时加载的配置文件为`/etc/iam/iam-apiserver.yaml`。所以,我们可以通过iam-apiserver的配置文件iam-apiserver.yaml中的`log.output-paths`配置项,查看记录日志文件的位置:
|
||
|
||
```yaml
|
||
log:
|
||
name: apiserver # Logger的名字
|
||
development: true # 是否是开发模式。如果是开发模式,会对DPanicLevel进行堆栈跟踪。
|
||
level: debug # 日志级别,优先级从低到高依次为:debug, info, warn, error, dpanic, panic, fatal。
|
||
format: console # 支持的日志输出格式,目前支持console和json两种。console其实就是text格式。
|
||
enable-color: true # 是否开启颜色输出,true:是,false:否
|
||
disable-caller: false # 是否开启 caller,如果开启会在日志中显示调用日志所在的文件、函数和行号
|
||
disable-stacktrace: false # 是否在panic及以上级别禁止打印堆栈信息
|
||
output-paths: /var/log/iam/iam-apiserver.log,stdout # 支持输出到多个输出,逗号分开。支持输出到标准输出(stdout)和文件。
|
||
error-output-paths: /var/log/iam/iam-apiserver.error.log # zap内部(非业务)错误日志输出路径,多个输出,逗号分开
|
||
|
||
```
|
||
|
||
可以看到,iam-apiserver将日志分别记录到了`/var/log/iam/iam-apiserver.log`和`stdout`中。所以,我们可以通过查看`/var/log/iam/iam-apiserver.log`日志文件,来查看报错信息:
|
||
|
||
```bash
|
||
$ tail -25 /var/log/iam/iam-apiserver.log
|
||
...
|
||
2021-09-09 15:42:35.231 INFO apiserver server/genericapiserver.go:88 GET /version --> github.com/marmotedu/iam/internal/pkg/server.(*GenericAPIServer).InstallAPIs.func2 (10 handlers)
|
||
2021-09-09 15:42:35.232 INFO apiserver gorm@v1.21.12/gorm.go:202 mysql/mysql.go:75[error] failed to initialize database, got error dial tcp 127.0.0.1:3309: connect: connection refused
|
||
2021-09-09 15:42:35.232 FATAL apiserver apiserver/server.go:139 Failed to get cache instance: got nil cache server
|
||
github.com/marmotedu/iam/internal/apiserver.(*completedExtraConfig).New
|
||
/home/going/workspace/golang/src/github.com/marmotedu/iam/internal/apiserver/server.go:139
|
||
github.com/marmotedu/iam/internal/apiserver.createAPIServer
|
||
/home/going/workspace/golang/src/github.com/marmotedu/iam/internal/apiserver/server.go:66
|
||
github.com/marmotedu/iam/internal/apiserver.Run
|
||
/home/going/workspace/golang/src/github.com/marmotedu/iam/internal/apiserver/run.go:11
|
||
github.com/marmotedu/iam/internal/apiserver.run.func1
|
||
/home/going/workspace/golang/src/github.com/marmotedu/iam/internal/apiserver/app.go:46
|
||
github.com/marmotedu/iam/pkg/app.(*App).runCommand
|
||
/home/going/workspace/golang/src/github.com/marmotedu/iam/pkg/app/app.go:278
|
||
github.com/spf13/cobra.(*Command).execute
|
||
/home/going/workspace/golang/pkg/mod/github.com/spf13/cobra@v1.2.1/command.go:856
|
||
github.com/spf13/cobra.(*Command).ExecuteC
|
||
/home/going/workspace/golang/pkg/mod/github.com/spf13/cobra@v1.2.1/command.go:974
|
||
github.com/spf13/cobra.(*Command).Execute
|
||
/home/going/workspace/golang/pkg/mod/github.com/spf13/cobra@v1.2.1/command.go:902
|
||
github.com/marmotedu/iam/pkg/app.(*App).Run
|
||
/home/going/workspace/golang/src/github.com/marmotedu/iam/pkg/app/app.go:233
|
||
main.main
|
||
/home/going/workspace/golang/src/github.com/marmotedu/iam/cmd/iam-apiserver/apiserver.go:24
|
||
runtime.main
|
||
/home/going/go/go1.16.2/src/runtime/proc.go:225
|
||
|
||
```
|
||
|
||
我们再来看最后一种查看方式,通过console查看。
|
||
|
||
当然,我们也可以直接通过console来看日志,这就需要我们在Linux终端前台运行iam-apiserver(在**第一步**中,我们已经知道了启动命令):
|
||
|
||
```bash
|
||
$ sudo /opt/iam/bin/iam-apiserver --config=/etc/iam/iam-apiserver.yaml
|
||
...
|
||
2021-09-09 15:47:00.660 INFO apiserver server/genericapiserver.go:88 GET /debug/pprof/mutex --> github.com/gin-contrib/pprof.pprofHandler.func1 (10 handlers)
|
||
2021-09-09 15:47:00.660 INFO apiserver server/genericapiserver.go:88 GET /debug/pprof/threadcreate --> github.com/gin-contrib/pprof.pprofHandler.func1 (10 handlers)
|
||
2021-09-09 15:47:00.660 INFO apiserver server/genericapiserver.go:88 GET /version --> github.com/marmotedu/iam/internal/pkg/server.(*GenericAPIServer).InstallAPIs.func2 (10 handlers)
|
||
2021-09-09 15:47:00.661 INFO apiserver gorm@v1.21.12/gorm.go:202 mysql/mysql.go:75[error] failed to initialize database, got error dial tcp 127.0.0.1:3309: connect: connection refused
|
||
2021-09-09 15:47:00.661 FATAL apiserver apiserver/server.go:139 Failed to get cache instance: got nil cache server
|
||
github.com/marmotedu/iam/internal/apiserver.(*completedExtraConfig).New
|
||
/home/going/workspace/golang/src/github.com/marmotedu/iam/internal/apiserver/server.go:139
|
||
github.com/marmotedu/iam/internal/apiserver.createAPIServer
|
||
/home/going/workspace/golang/src/github.com/marmotedu/iam/internal/apiserver/server.go:66
|
||
github.com/marmotedu/iam/internal/apiserver.Run
|
||
/home/going/workspace/golang/src/github.com/marmotedu/iam/internal/apiserver/run.go:11
|
||
github.com/marmotedu/iam/internal/apiserver.run.func1
|
||
/home/going/workspace/golang/src/github.com/marmotedu/iam/internal/apiserver/app.go:46
|
||
github.com/marmotedu/iam/pkg/app.(*App).runCommand
|
||
/home/going/workspace/golang/src/github.com/marmotedu/iam/pkg/app/app.go:278
|
||
github.com/spf13/cobra.(*Command).execute
|
||
/home/going/workspace/golang/pkg/mod/github.com/spf13/cobra@v1.2.1/command.go:856
|
||
github.com/spf13/cobra.(*Command).ExecuteC
|
||
/home/going/workspace/golang/pkg/mod/github.com/spf13/cobra@v1.2.1/command.go:974
|
||
github.com/spf13/cobra.(*Command).Execute
|
||
/home/going/workspace/golang/pkg/mod/github.com/spf13/cobra@v1.2.1/command.go:902
|
||
github.com/marmotedu/iam/pkg/app.(*App).Run
|
||
/home/going/workspace/golang/src/github.com/marmotedu/iam/pkg/app/app.go:233
|
||
main.main
|
||
/home/going/workspace/golang/src/github.com/marmotedu/iam/cmd/iam-apiserver/apiserver.go:24
|
||
runtime.main
|
||
/home/going/go/go1.16.2/src/runtime/proc.go:225
|
||
|
||
```
|
||
|
||
通过上面这3种查看方式,我们均能初步定位到服务异常的原因。
|
||
|
||
#### 使用Go调试工具Delve来定位问题
|
||
|
||
查看日志是最简单的排障方式,通过查看日志,我们可能定位出问题的根本原因,这种情况下问题就能得到快速的解决。但有些情况下,我们通过日志并不一定能定位出问题,例如:
|
||
|
||
* 程序异常,但是没有错误日志。
|
||
* 日志有报错,但只能判断问题的面,还不能精准找到问题的根因。
|
||
|
||
遇到上面这两种情况,我们都需要再进一步地定位问题。这时候,我们可以使用Delve调试工具来尝试定位问题。Delve工具的用法你可以参考 [Delve使用详解](https://github.com/marmotedu/geekbang-go/blob/master/Delve%E4%BD%BF%E7%94%A8%E8%AF%A6%E8%A7%A3.md)。
|
||
|
||
#### 添加Debug日志定位问题
|
||
|
||
如果使用 Delve 工具仍然没有定位出问题,接下来你可以尝试最原始的方法:添加Debug日志来定位问题。这种方法具体可以分为两个步骤。
|
||
|
||
**第一步,在关键代码段添加Debug日志。**
|
||
|
||
你需要根据自己对代码的理解来决定关键代码段。如果不确定哪段代码出问题,可以从请求入口处添加Debug日志,然后跟着代码流程一步步往下排查,并在需要的地方添加Debug日志。
|
||
|
||
例如,通过排查日志,我们定位到`internal/apiserver/server.go:139`位置的代码导致程序FATAL,FATAL原因是`Failed to get cache instance: got nil cache server`。`cache server`是`nil`,说明`cache server`没有被初始化。查看`cache server`初始化函数:
|
||
|
||
```go
|
||
func GetCacheInsOr(store store.Factory) (*Cache, error) {
|
||
if store != nil {
|
||
once.Do(func() {
|
||
cacheServer = &Cache{store}
|
||
})
|
||
}
|
||
|
||
if cacheServer == nil {
|
||
return nil, fmt.Errorf("got nil cache server")
|
||
}
|
||
|
||
return cacheServer, nil
|
||
}
|
||
|
||
```
|
||
|
||
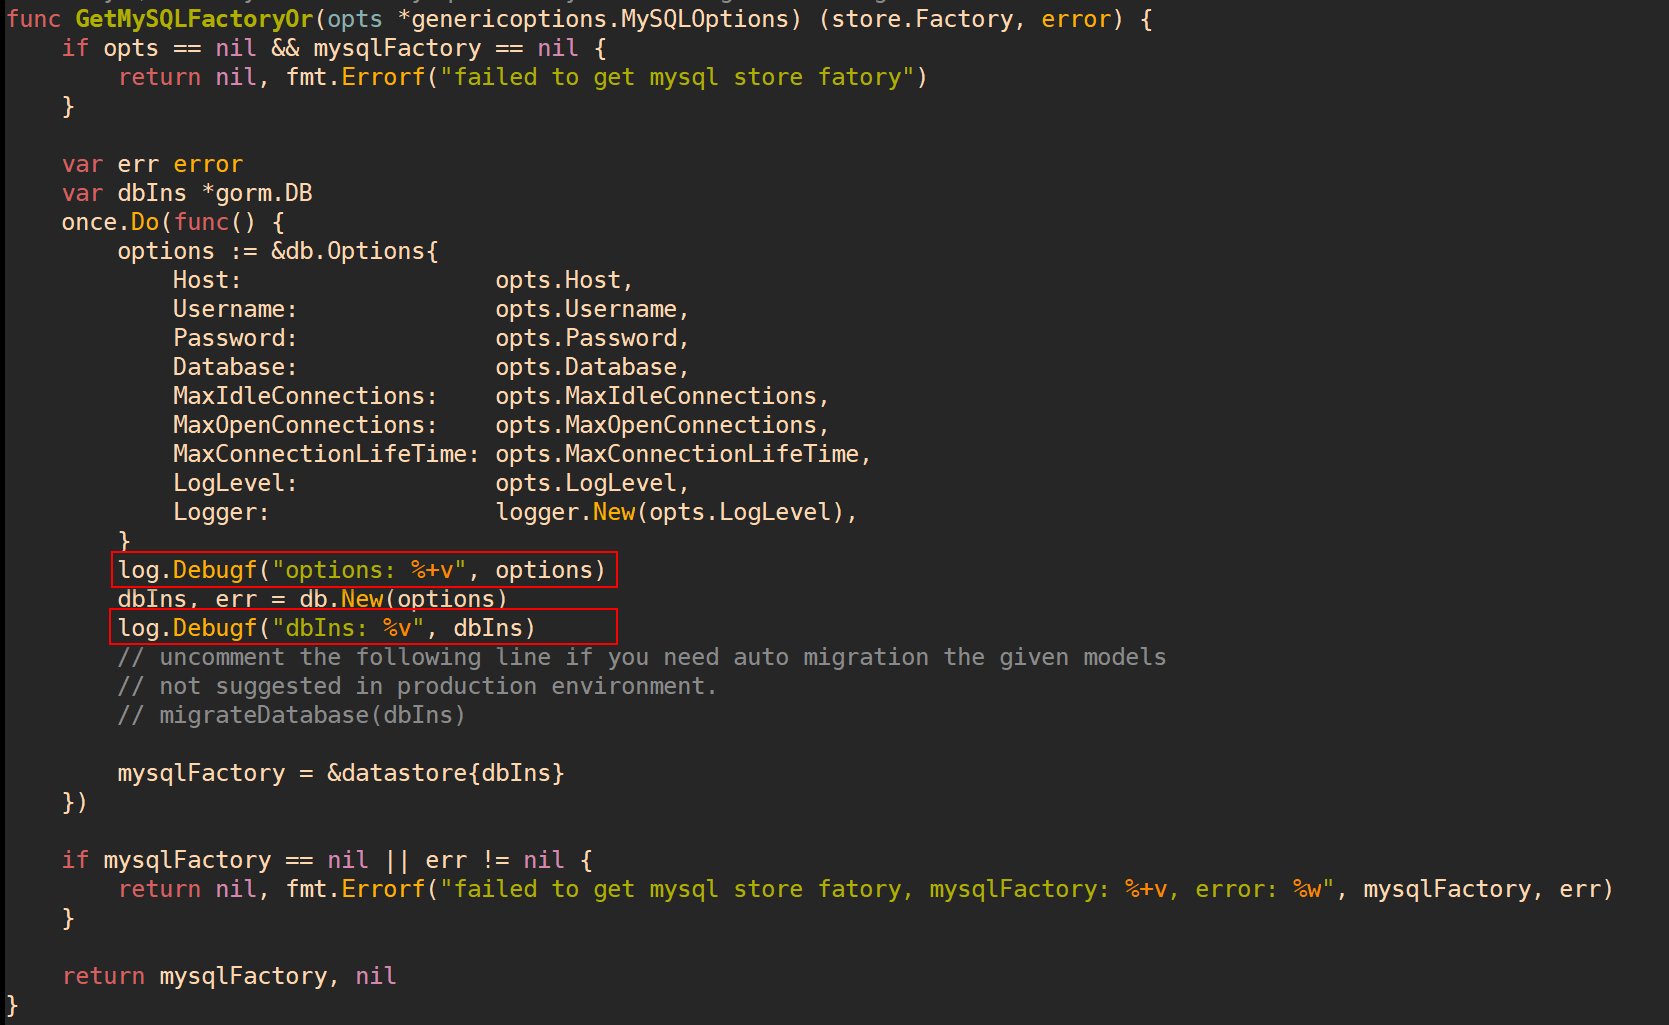
我们不难分析出,是`store == nil`导致`cacheServer`没有被初始化。再来看下store的初始化代码,并加一些Debug日志,如下图所示:
|
||
|
||
|
||
|
||
我们添加完Debug代码后,就可以重新编译并运行程序了。
|
||
|
||
这里有个小技巧:可以在错误返回的位置添加Debug日志,这样能大概率帮助你定位到出错的位置,例如:
|
||
|
||
```go
|
||
if err != nil {
|
||
log.Debugf("DEBUG POINT - 1: %v", err)
|
||
return err
|
||
}
|
||
|
||
```
|
||
|
||
**第二步,重新编译源码,并启动。**
|
||
|
||
这里为了调试、看日志方便,我们直接在Linux终端的前端运行iam-apiserver:
|
||
|
||
```bash
|
||
$ sudo /opt/iam/bin/iam-apiserver --config=/etc/iam/iam-apiserver.yaml
|
||
|
||
```
|
||
|
||
查看我们添加的Debug日志打印的内容,如下图所示:
|
||
|
||

|
||
|
||
从Debug日志中,可以看到用来创建MySQL实例的端口是错误的,正确的端口应该是`3306`,而不是`3309`。MySQL服务器的端口是在iam-apiserver.yaml中配置的。修改iam-apiserver.yaml为正确的配置,并启动:
|
||
|
||
```bash
|
||
$ sudo /opt/iam/bin/iam-apiserver --config=/etc/iam/iam-apiserver.yaml
|
||
|
||
```
|
||
|
||
再次查看console日志,如下图所示:
|
||
|
||

|
||
|
||
可以看到问题已经修复,`dbIns`不为`nil`,程序正常运行:
|
||
|
||
```bash
|
||
$ systemctl status iam-apiserver
|
||
● iam-apiserver.service - IAM APIServer
|
||
Loaded: loaded (/etc/systemd/system/iam-apiserver.service; enabled; vendor preset: disabled)
|
||
Active: active (running) since Thu 2021-09-09 20:48:18 CST; 17s ago
|
||
Docs: https://github.com/marmotedu/iam/blob/master/init/README.md
|
||
Process: 255648 ExecStartPre=/usr/bin/mkdir -p /var/log/iam (code=exited, status=0/SUCCESS)
|
||
Process: 255647 ExecStartPre=/usr/bin/mkdir -p /data/iam/iam-apiserver (code=exited, status=0/SUCCESS)
|
||
Main PID: 255650 (iam-apiserver)
|
||
Tasks: 5 (limit: 23724)
|
||
Memory: 7.3M
|
||
CGroup: /system.slice/iam-apiserver.service
|
||
└─255650 /opt/iam/bin/iam-apiserver --config=/etc/iam/iam-apiserver.yaml
|
||
|
||
```
|
||
|
||
在这里,`Active`为`active (running)`状态。
|
||
|
||
因为这些Debug日志能够协助你定位问题,从侧面说明这些日志是有用的,所以你可以保留这些Debug日志调用代码。
|
||
|
||
### 解决问题
|
||
|
||
在定位问题阶段,我们已经找到了问题的原因,接下来就可以根据自己对业务、底层代码实现的掌握和理解,修复这个问题了。至于怎么修复,你需要结合具体情况来判断,并没有统一的流程和方法论,这里就不多介绍了。
|
||
|
||
上面,我介绍了排查问题的思路和方法。接下来,我来向你展示9个在部署和使用IAM系统时容易遇到的问题,并提供解决方法。这些问题基本上都是由服务器环境引起的。
|
||
|
||
## IAM常见故障及解决办法
|
||
|
||
**问题一:**安装neovim,报 `No match for argument: neovim` 错误。
|
||
|
||
解决方法是安装 EPEL 源:
|
||
|
||
```bash
|
||
$ sudo yum install https://dl.fedoraproject.org/pub/epel/epel-release-latest-8.noarch.rpm
|
||
|
||
```
|
||
|
||
**问题二:**安装protoc-gen-go失败(超时、报错等)。
|
||
|
||
这个故障出现,可能是因为你当前服务器所在的网络环境无法访问`github.com`,或者访问`github.com`速度太慢。
|
||
|
||
解决方法是手动编译安装,方法如下:
|
||
|
||
```bash
|
||
$ git clone --depth 1 https://github.com/golang/protobuf $GOPATH/src/github.com/golang/protobuf
|
||
$ cd $GOPATH/src/github.com/golang/protobuf/protoc-gen-go
|
||
$ go install -v .
|
||
|
||
```
|
||
|
||
**问题三:**遇到`xxx: permission denied`这类的错误。
|
||
|
||
出现这种错误,是因为你没有权限执行当前的操作。解决方法是排查自己是否有权限执行当前操作。如果没有权限,需要你切换到有权限的用户,或者放弃执行当前操作。
|
||
|
||
为了说明问题,这里我举一个错误例子,并给出排查思路。例子的错误日志如下:
|
||
|
||
```bash
|
||
[going@VM-8-9-centos /]$ go get -u github.com/golang/protobuf/protoc-gen-go
|
||
go: could not create module cache: mkdir /golang: permission denied
|
||
[going@VM-8-9-centos /]$ sudo go get -u github.com/golang/protobuf/protoc-gen-go
|
||
sudo: go: command not found
|
||
|
||
```
|
||
|
||
上述错误中, 一共报了两个错误,分别是`mkdir /golang: permission denied`和`sudo: go: command not found`。我们先来看`mkdir /golang: permission denied`错误。
|
||
|
||
通过命令行提示符`$`可以知道,当前登陆用户是普通用户;通过报错`mkdir /golang: permission denied`可以知道`go get -u github.com/golang/protobuf/protoc-gen-go`命令底层执行了`mkdir /golang`,因为普通用户没有写`/` 目录的权限,所以会报权限错误。解决方法是切换到用户的目录下,执行`go get -u`命令。
|
||
|
||
我们再来看下`sudo: go: command not found`错误。`sudo`命令会将命令执行的环境切换到`root`用户,`root`用户显然是没有安装`go`命令的,所以会导致`command not found`错误。解决方式是去掉 `sudo` ,直接执行 `$ go get -u xxx` 。
|
||
|
||
**问题四:**VimIDE使用过程中,报各类错误。
|
||
|
||
这里的报错原因跟环境有关系,安装VimIDE时的系统环境、包的版本等等,都可能会导致使用VimIDE报错。因为错误类型太多,没法一一说明,所以我建议你忽略这些错误,其实完全不影响后面的学习。
|
||
|
||
**问题五:**访问iam-authz-server的`/v1/authz`接口报`{"code":100202,"message":"Signature is invalid"}`。
|
||
|
||
这时可能是签发的Token有问题,建议重新执行以下5个步骤:
|
||
|
||
1. 重新登陆系统,并获取访问令牌:
|
||
|
||
```bash
|
||
$ token=`curl -s -XPOST -H'Content-Type: application/json' -d'{"username":"admin","password":"Admin@2021"}' http://127.0.0.1:8080/login | jq -r .token`
|
||
|
||
```
|
||
|
||
如果没有安装`jq`命令,可以执行`sudo yum -y install jq`命令来安装。
|
||
|
||
2. 创建授权策略:
|
||
|
||
```bash
|
||
$ curl -s -XPOST -H"Content-Type: application/json" -H"Authorization: Bearer $token" -d'{"metadata":{"name":"authztest"},"policy":{"description":"One policy to rule them all.","subjects":["users:<peter|ken>","users:maria","groups:admins"],"actions":["delete","<create|update>"],"effect":"allow","resources":["resources:articles:<.*>","resources:printer"],"conditions":{"remoteIPAddress":{"type":"CIDRCondition","options":{"cidr":"192.168.0.1/16"}}}}}' http://127.0.0.1:8080/v1/policies
|
||
|
||
```
|
||
|
||
3. 创建密钥,并从命令的输出中提取secretID 和 secretKey:
|
||
|
||
```bash
|
||
$ curl -s -XPOST -H"Content-Type: application/json" -H"Authorization: Bearer $token" -d'{"metadata":{"name":"authztest"},"expires":0,"description":"admin secret"}' http://127.0.0.1:8080/v1/secrets
|
||
{"metadata":{"id":23,"name":"authztest","createdAt":"2021-04-08T07:24:50.071671422+08:00","updatedAt":"2021-04-08T07:24:50.071671422+08:00"},"username":"admin","secretID":"ZuxvXNfG08BdEMqkTaP41L2DLArlE6Jpqoox","secretKey":"7Sfa5EfAPIwcTLGCfSvqLf0zZGCjF3l8","expires":0,"description":"admin secret"}
|
||
|
||
```
|
||
|
||
4. 生成访问 iam-authz-server 的 Token
|
||
|
||
iamctl 提供了 `jwt sigin` 命令,你可以根据 `secretID` 和 `secretKey` 签发 Token,方便你使用。签发Token的具体命令如下:
|
||
|
||
```bash
|
||
$ iamctl jwt sign ZuxvXNfG08BdEMqkTaP41L2DLArlE6Jpqoox 7Sfa5EfAPIwcTLGCfSvqLf0zZGCjF3l8 # iamctl jwt sign $secretID $secretKey
|
||
eyJhbGciOiJIUzI1NiIsImtpZCI6Ilp1eHZYTmZHMDhCZEVNcWtUYVA0MUwyRExBcmxFNkpwcW9veCIsInR5cCI6IkpXVCJ9.eyJhdWQiOiJpYW0uYXV0aHoubWFybW90ZWR1LmNvbSIsImV4cCI6MTYxNzg0NTE5NSwiaWF0IjoxNjE3ODM3OTk1LCJpc3MiOiJpYW1jdGwiLCJuYmYiOjE2MTc4Mzc5OTV9.za9yLM7lHVabPAlVQLCqXEaf8sTU6sodAsMXnmpXjMQ
|
||
|
||
```
|
||
|
||
5. 测试资源授权是否通过:
|
||
|
||
```bash
|
||
$ curl -s -XPOST -H'Content-Type: application/json' -H'Authorization: Bearer eyJhbGciOiJIUzI1NiIsImtpZCI6Ilp1eHZYTmZHMDhCZEVNcWtUYVA0MUwyRExBcmxFNkpwcW9veCIsInR5cCI6IkpXVCJ9.eyJhdWQiOiJpYW0uYXV0aHoubWFybW90ZWR1LmNvbSIsImV4cCI6MTYxNzg0NTE5NSwiaWF0IjoxNjE3ODM3OTk1LCJpc3MiOiJpYW1jdGwiLCJuYmYiOjE2MTc4Mzc5OTV9.za9yLM7lHVabPAlVQLCqXEaf8sTU6sodAsMXnmpXjMQ' -d'{"subject":"users:maria","action":"delete","resource":"resources:articles:ladon-introduction","context":{"remoteIPAddress":"192.168.0.5"}}' http://127.0.0.1:9090/v1/authz
|
||
{"allowed":true}
|
||
|
||
```
|
||
|
||
**问题六:**执行`iamctl user list`报`error: {"code":100207,"message":"Permission denied"}`。
|
||
|
||
出现这种情况,可能是密码没有配置正确。
|
||
|
||
你可以看下`$HOME/.iam/iamctl.yaml`配置文件中的用户名和密码配置的是不是admin,以及admin的密码是否是`Admin@2021`。
|
||
|
||
**问题七:**在创建用户时报`{"code":100101,"message":"Database error"}`错误。
|
||
|
||
出现这种情况,可能是用户名重了,建议换个新的用户名再次创建。
|
||
|
||
**问题八:**报`No such file or directory`、`command not found`、`permission denied`错误。
|
||
|
||
遇到这类错误,要根据提示排查和解决问题。
|
||
|
||
* `No such file or directory`:确认文件是否存在,不存在的原因是什么。
|
||
* `command not found`:确认命令是否存在,如果不存在,可以重新安装命令。
|
||
* `permission denied`:确认是否有操作权限,如果没有,要切换到有权限的用户或者目录。
|
||
|
||
**问题九:**报`iam-apiserver.service`、`/opt/iam/bin/iam-apiserver`、`/etc/iam/iam-apiserver.yaml`文件不存在。
|
||
|
||
我来介绍下这些文件的作用。
|
||
|
||
* `/etc/systemd/system/iam-apiserver.service`:iam-apiserver的sysmted Unit文件。
|
||
* `/opt/iam/bin/iam-apiserver`:iam-apiserver的二进制启动命令。
|
||
* `/etc/iam/iam-apiserver.yaml`:iam-apiserver的配置文件。
|
||
|
||
如果某个文件不存在,那就需要你重新安装这些文件。我来分别介绍这三个文件的安装方法。
|
||
|
||
`/etc/systemd/system/iam-apiserver.service`安装方法:
|
||
|
||
```bash
|
||
$ cd $IAM_ROOT
|
||
$ ./scripts/genconfig.sh scripts/install/environment.sh init/iam-apiserver.service > iam-apiserver.service
|
||
$ sudo mv iam-apiserver.service /etc/systemd/system/
|
||
|
||
```
|
||
|
||
`/opt/iam/bin/iam-apiserver`安装方法:
|
||
|
||
```bash
|
||
$ cd $IAM_ROOT
|
||
$ source scripts/install/environment.sh
|
||
$ make build BINS=iam-apiserver
|
||
$ sudo cp _output/platforms/linux/amd64/iam-apiserver ${IAM_INSTALL_DIR}/bin
|
||
|
||
```
|
||
|
||
`/etc/iam/iam-apiserver.yaml`安装方法:
|
||
|
||
```bash
|
||
$ cd $IAM_ROOT
|
||
$ ./scripts/genconfig.sh scripts/install/environment.sh configs/iam-apiserver.yaml > iam-apiserver.yaml
|
||
$ sudo mv iam-apiserver.yaml ${IAM_CONFIG_DIR}
|
||
|
||
```
|
||
|
||
## 总结
|
||
|
||
这一讲,我以`iam-apiserver`服务为例,向你介绍了排障的基本流程:发现问题 -> 定位问题 -> 解决问题。
|
||
|
||
你可以通过三种方式来发现问题。
|
||
|
||
* 检查服务状态:启动iam-apiserver服务后,执行`systemctl status iam-apiserver` 发现iam-apiserver启动失败,即`Active`的值不为`active (running)`。
|
||
* 功能异常:访问iam-apiserver服务,功能异常或者报错,例如接口返回值跟预期不一样;接口报错。
|
||
* 日志报错:在iam-apiserver的日志中发现一些`WARN`、`ERROR`、`PANIC`、`FATAL`等高级别的错误日志。
|
||
|
||
发现问题之后,你可以通过查看日志、使用Go调试工具Delve和添加Debug日志这三种方式来定位问题。
|
||
|
||
* 查看日志:查看日志是最简单的排障方式。
|
||
* 使用Go调试工具Delve来定位问题。
|
||
* 添加Debug日志:从程序入口处跟读代码,在关键位置处打印Debug日志,来定位问题。
|
||
|
||
找到问题根因之后,就要解决问题。你需要根据自己对业务、底层代码实现的掌握和理解,解决这个问题。
|
||
|
||
最后,我向你展示了9个在部署和使用IAM系统时容易遇到的问题,并提供了解决方法,希望能给你一些切实的帮助。
|
||
|
||
## 课后练习
|
||
|
||
1. 思考下,如何查找iam-apiserver的systemd Unit文件的路径?
|
||
2. 执行以下命令:
|
||
|
||
```bash
|
||
$ token=`curl -s -XPOST -H'Content-Type: application/json' -d'{"username":"admin","password":"Admin@2021"}' http://127.0.0.1:8080/login | jq -r .token`
|
||
$ echo $token
|
||
|
||
```
|
||
|
||
可以获取`token`,但发现`token`值为空。请给出你的排障流程和方法。
|
||
|
||
欢迎你在留言区与我交流讨论,我们下一讲见。
|
||
|