|
|
# 34 | SDK 设计(下):IAM项目Go SDK设计和实现
|
|
|
|
|
|
你好,我是孔令飞。
|
|
|
|
|
|
上一讲,我介绍了公有云厂商普遍采用的SDK设计方式。其实,还有一些比较优秀的SDK设计方式,比如 Kubernetes的 [client-go](https://github.com/kubernetes/client-go) SDK设计方式。IAM项目参考client-go,也实现了client-go风格的SDK:[marmotedu-sdk-go](https://github.com/marmotedu/marmotedu-sdk-go)。
|
|
|
|
|
|
和 [33讲](https://time.geekbang.org/column/article/406389) 介绍的SDK设计方式相比,client-go风格的SDK具有以下优点:
|
|
|
|
|
|
* 大量使用了Go interface特性,将接口的定义和实现解耦,可以支持多种实现方式。
|
|
|
* 接口调用层级跟资源的层级相匹配,调用方式更加友好。
|
|
|
* 多版本共存。
|
|
|
|
|
|
所以,我更推荐你使用marmotedu-sdk-go。接下来,我们就来看下marmotedu-sdk-go是如何设计和实现的。
|
|
|
|
|
|
## marmotedu-sdk-go设计
|
|
|
|
|
|
和medu-sdk-go相比,marmotedu-sdk-go的设计和实现要复杂一些,但功能更强大,使用体验也更好。
|
|
|
|
|
|
这里,我们先来看一个使用SDK调用iam-authz-server `/v1/authz` 接口的示例,代码保存在 [marmotedu-sdk-go/examples/authz\_clientset/main.go](https://github.com/marmotedu/marmotedu-sdk-go/blob/v1.0.3/examples/authz_clientset/main.go)文件中:
|
|
|
|
|
|
```go
|
|
|
package main
|
|
|
|
|
|
import (
|
|
|
"context"
|
|
|
"flag"
|
|
|
"fmt"
|
|
|
"path/filepath"
|
|
|
|
|
|
"github.com/ory/ladon"
|
|
|
|
|
|
metav1 "github.com/marmotedu/component-base/pkg/meta/v1"
|
|
|
"github.com/marmotedu/component-base/pkg/util/homedir"
|
|
|
|
|
|
"github.com/marmotedu/marmotedu-sdk-go/marmotedu"
|
|
|
"github.com/marmotedu/marmotedu-sdk-go/tools/clientcmd"
|
|
|
)
|
|
|
|
|
|
func main() {
|
|
|
var iamconfig *string
|
|
|
if home := homedir.HomeDir(); home != "" {
|
|
|
iamconfig = flag.String(
|
|
|
"iamconfig",
|
|
|
filepath.Join(home, ".iam", "config"),
|
|
|
"(optional) absolute path to the iamconfig file",
|
|
|
)
|
|
|
} else {
|
|
|
iamconfig = flag.String("iamconfig", "", "absolute path to the iamconfig file")
|
|
|
}
|
|
|
flag.Parse()
|
|
|
|
|
|
// use the current context in iamconfig
|
|
|
config, err := clientcmd.BuildConfigFromFlags("", *iamconfig)
|
|
|
if err != nil {
|
|
|
panic(err.Error())
|
|
|
}
|
|
|
|
|
|
// create the clientset
|
|
|
clientset, err := marmotedu.NewForConfig(config)
|
|
|
if err != nil {
|
|
|
panic(err.Error())
|
|
|
}
|
|
|
|
|
|
request := &ladon.Request{
|
|
|
Resource: "resources:articles:ladon-introduction",
|
|
|
Action: "delete",
|
|
|
Subject: "users:peter",
|
|
|
Context: ladon.Context{
|
|
|
"remoteIP": "192.168.0.5",
|
|
|
},
|
|
|
}
|
|
|
|
|
|
// Authorize the request
|
|
|
fmt.Println("Authorize request...")
|
|
|
ret, err := clientset.Iam().AuthzV1().Authz().Authorize(context.TODO(), request, metav1.AuthorizeOptions{})
|
|
|
if err != nil {
|
|
|
panic(err.Error())
|
|
|
}
|
|
|
|
|
|
fmt.Printf("Authorize response: %s.\n", ret.ToString())
|
|
|
}
|
|
|
|
|
|
```
|
|
|
|
|
|
在上面的代码示例中,包含了下面的操作。
|
|
|
|
|
|
* 首先,调用 `BuildConfigFromFlags` 函数,创建出SDK的配置实例config;
|
|
|
* 接着,调用 `marmotedu.NewForConfig(config)` 创建了IAM项目的客户端 `clientset` ;
|
|
|
* 最后,调用以下代码请求 `/v1/authz` 接口执行资源授权请求:
|
|
|
|
|
|
```go
|
|
|
ret, err := clientset.Iam().AuthzV1().Authz().Authorize(context.TODO(), request, metav1.AuthorizeOptions{})
|
|
|
if err != nil {
|
|
|
panic(err.Error())
|
|
|
}
|
|
|
|
|
|
fmt.Printf("Authorize response: %s.\n", ret.ToString())
|
|
|
|
|
|
```
|
|
|
|
|
|
调用格式为`项目客户端.应用客户端.服务客户端.资源名.接口` 。
|
|
|
|
|
|
所以,上面的代码通过创建项目级别的客户端、应用级别的客户端和服务级别的客户端,来调用资源的API接口。接下来,我们来看下如何创建这些客户端。
|
|
|
|
|
|
### marmotedu-sdk-go客户端设计
|
|
|
|
|
|
在讲客户端创建之前,我们先来看下客户端的设计思路。
|
|
|
|
|
|
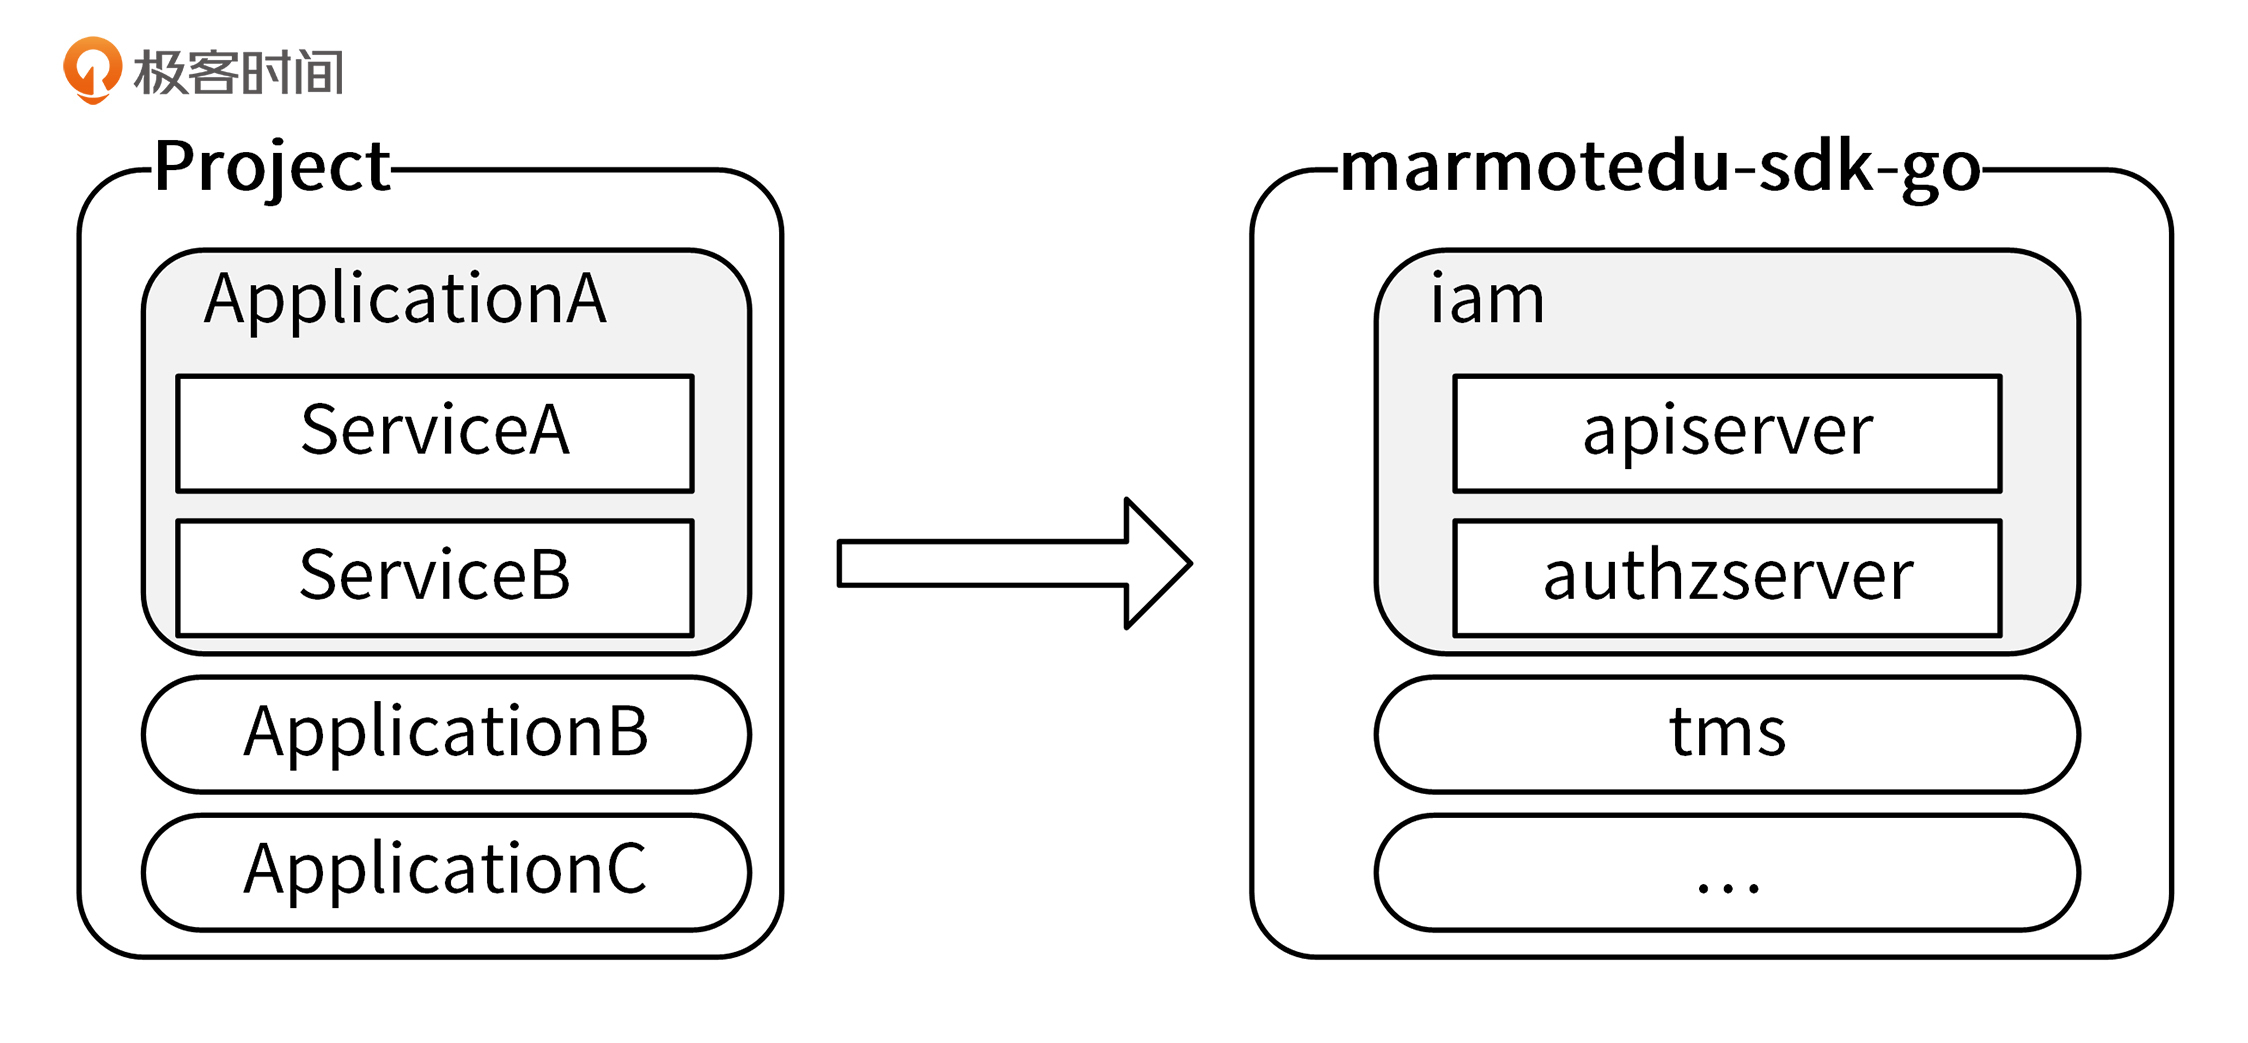
Go项目的组织方式是有层级的:**Project -> Application -> Service**。marmotedu-sdk-go很好地体现了这种层级关系,使得SDK的调用更加易懂、易用。marmotedu-sdk-go的层级关系如下图所示:
|
|
|
|
|
|
|
|
|
|
|
|
marmotedu-sdk-go定义了3类接口,分别代表了项目、应用和服务级别的API接口:
|
|
|
|
|
|
```go
|
|
|
// 项目级别的接口
|
|
|
type Interface interface {
|
|
|
Iam() iam.IamInterface
|
|
|
Tms() tms.TmsInterface
|
|
|
}
|
|
|
|
|
|
// 应用级别的接口
|
|
|
type IamInterface interface {
|
|
|
APIV1() apiv1.APIV1Interface
|
|
|
AuthzV1() authzv1.AuthzV1Interface
|
|
|
}
|
|
|
|
|
|
// 服务级别的接口
|
|
|
type APIV1Interface interface {
|
|
|
RESTClient() rest.Interface
|
|
|
SecretsGetter
|
|
|
UsersGetter
|
|
|
PoliciesGetter
|
|
|
}
|
|
|
|
|
|
// 资源级别的客户端
|
|
|
type SecretsGetter interface {
|
|
|
Secrets() SecretInterface
|
|
|
}
|
|
|
|
|
|
// 资源的接口定义
|
|
|
type SecretInterface interface {
|
|
|
Create(ctx context.Context, secret *v1.Secret, opts metav1.CreateOptions) (*v1.Secret, error)
|
|
|
Update(ctx context.Context, secret *v1.Secret, opts metav1.UpdateOptions) (*v1.Secret, error)
|
|
|
Delete(ctx context.Context, name string, opts metav1.DeleteOptions) error
|
|
|
DeleteCollection(ctx context.Context, opts metav1.DeleteOptions, listOpts metav1.ListOptions) error
|
|
|
Get(ctx context.Context, name string, opts metav1.GetOptions) (*v1.Secret, error)
|
|
|
List(ctx context.Context, opts metav1.ListOptions) (*v1.SecretList, error)
|
|
|
SecretExpansion
|
|
|
}
|
|
|
|
|
|
```
|
|
|
|
|
|
`Interface` 代表了项目级别的接口,里面包含了 `Iam` 和 `Tms` 两个应用; `IamInterface` 代表了应用级别的接口,里面包含了api(iam-apiserver)和authz(iam-authz-server)两个服务级别的接口。api和authz服务中,又包含了各自服务中REST资源的CURD接口。
|
|
|
|
|
|
marmotedu-sdk-go通过 `XxxV1` 这种命名方式来支持不同版本的API接口,好处是可以在程序中同时调用同一个API接口的不同版本,例如:
|
|
|
|
|
|
`clientset.Iam().AuthzV1().Authz().Authorize()` 、`clientset.Iam().AuthzV2().Authz().Authorize()` 分别调用了 `/v1/authz` 和 `/v2/authz` 两个版本的API接口。
|
|
|
|
|
|
上述关系也可以从目录结构中反映出来,marmotedu-sdk-go目录设计如下(只列出了一些重要的文件):
|
|
|
|
|
|
```bash
|
|
|
├── examples # 存放SDK的使用示例
|
|
|
├── Makefile # 管理SDK源码,静态代码检查、代码格式化、测试、添加版权信息等
|
|
|
├── marmotedu
|
|
|
│ ├── clientset.go # clientset实现,clientset中包含多个应用,多个服务的API接口
|
|
|
│ ├── fake # clientset的fake实现,主要用于单元测试
|
|
|
│ └── service # 按应用进行分类,存放应用中各服务API接口的具体实现
|
|
|
│ ├── iam # iam应用的API接口实现,包含多个服务
|
|
|
│ │ ├── apiserver # iam应用中,apiserver服务的API接口,包含多个版本
|
|
|
│ │ │ └── v1 # apiserver v1版本API接口
|
|
|
│ │ ├── authz # iam应用中,authz服务的API接口
|
|
|
│ │ │ └── v1 # authz服务v1版本接口
|
|
|
│ │ └── iam_client.go # iam应用的客户端,包含了apiserver和authz 2个服务的客户端
|
|
|
│ └── tms # tms应用的API接口实现
|
|
|
├── pkg # 存放一些共享包,可对外暴露
|
|
|
├── rest # HTTP请求的底层实现
|
|
|
├── third_party # 存放修改过的第三方包,例如:gorequest
|
|
|
└── tools
|
|
|
└── clientcmd # 一些函数用来帮助创建rest.Config配置
|
|
|
|
|
|
```
|
|
|
|
|
|
每种类型的客户端,都可以通过以下相似的方式来创建:
|
|
|
|
|
|
```go
|
|
|
config, err := clientcmd.BuildConfigFromFlags("", "/root/.iam/config")
|
|
|
clientset, err := xxxx.NewForConfig(config)
|
|
|
|
|
|
```
|
|
|
|
|
|
`/root/.iam/config` 为配置文件,里面包含了服务的地址和认证信息。`BuildConfigFromFlags` 函数加载配置文件,创建并返回 `rest.Config` 类型的配置变量,并通过 `xxxx.NewForConfig` 函数创建需要的客户端。`xxxx` 是所在层级的client包,例如 iam、tms。
|
|
|
|
|
|
marmotedu-sdk-go客户端定义了3类接口,这可以带来两个好处。
|
|
|
|
|
|
第一,API接口调用格式规范,层次清晰,可以使API接口调用更加清晰易记。
|
|
|
|
|
|
第二,可以根据需要,自行选择客户端类型,调用灵活。举个例子,在A服务中需要同时用到iam-apiserver 和 iam-authz-server提供的接口,就可以创建应用级别的客户端IamClient,然后通过 `iamclient.APIV1()` 和 `iamclient.AuthzV1()` ,来切换调用不同服务的API接口。
|
|
|
|
|
|
接下来,我们来看看如何创建三个不同级别的客户端。
|
|
|
|
|
|
### 项目级别客户端创建
|
|
|
|
|
|
`Interface` 对应的客户端实现为[Clientset](https://github.com/marmotedu/marmotedu-sdk-go/blob/v1.0.2/marmotedu/clientset.go#L20-L23),所在的包为 [marmotedu-sdk-go/marmotedu](https://github.com/marmotedu/marmotedu-sdk-go/tree/v1.0.2/marmotedu),Clientset客户端的创建方式为:
|
|
|
|
|
|
```go
|
|
|
config, err := clientcmd.BuildConfigFromFlags("", "/root/.iam/config")
|
|
|
clientset, err := marmotedu.NewForConfig(config)
|
|
|
|
|
|
```
|
|
|
|
|
|
调用方式为 `clientset.应用.服务.资源名.接口` ,例如:
|
|
|
|
|
|
```go
|
|
|
rsp, err := clientset.Iam().AuthzV1().Authz().Authorize()
|
|
|
|
|
|
```
|
|
|
|
|
|
参考示例为 [marmotedu-sdk-go/examples/authz\_clientset/main.go](https://github.com/marmotedu/marmotedu-sdk-go/blob/v1.0.3/examples/authz_clientset/main.go)。
|
|
|
|
|
|
### 应用级别客户端创建
|
|
|
|
|
|
`IamInterface` 对应的客户端实现为[IamClient](https://github.com/marmotedu/marmotedu-sdk-go/blob/v1.0.2/marmotedu/service/iam/iam_client.go#L22-L25),所在的包为 [marmotedu-sdk-go/marmotedu/service/iam](https://github.com/marmotedu/marmotedu-sdk-go/tree/v1.0.2/marmotedu/service/iam),IamClient客户端的创建方式为:
|
|
|
|
|
|
```go
|
|
|
config, err := clientcmd.BuildConfigFromFlags("", "/root/.iam/config")
|
|
|
iamclient,, err := iam.NewForConfig(config)
|
|
|
|
|
|
```
|
|
|
|
|
|
调用方式为 `iamclient.服务.资源名.接口` ,例如:
|
|
|
|
|
|
```go
|
|
|
rsp, err := iamclient.AuthzV1().Authz().Authorize()
|
|
|
|
|
|
```
|
|
|
|
|
|
参考示例为 [marmotedu-sdk-go/examples/authz\_iam/main.go](https://github.com/marmotedu/marmotedu-sdk-go/blob/v1.0.2/examples/authz_iam/main.go)。
|
|
|
|
|
|
### 服务级别客户端创建
|
|
|
|
|
|
`AuthzV1Interface` 对应的客户端实现为[AuthzV1Client](https://github.com/marmotedu/marmotedu-sdk-go/blob/v1.0.2/marmotedu/service/iam/authz/v1/authz_client.go#L21-L23),所在的包为 [marmotedu-sdk-go/marmotedu/service/iam/authz/v1](https://github.com/marmotedu/marmotedu-sdk-go/tree/v1.0.2/marmotedu/service/iam/authz/v1),AuthzV1Client客户端的创建方式为:
|
|
|
|
|
|
```go
|
|
|
config, err := clientcmd.BuildConfigFromFlags("", "/root/.iam/config")
|
|
|
client, err := v1.NewForConfig(config)
|
|
|
|
|
|
```
|
|
|
|
|
|
调用方式为 `client.资源名.接口` ,例如:
|
|
|
|
|
|
```go
|
|
|
rsp, err := client.Authz().Authorize()
|
|
|
|
|
|
```
|
|
|
|
|
|
参考示例为 [marmotedu-sdk-go/examples/authz/main.go](https://github.com/marmotedu/marmotedu-sdk-go/blob/v1.0.3/examples/authz/main.go)。
|
|
|
|
|
|
上面我介绍了marmotedu-sdk-go的客户端创建方法,接下来我们再来看下,这些客户端具体是如何执行REST API请求的。
|
|
|
|
|
|
## marmotedu-sdk-go的实现
|
|
|
|
|
|
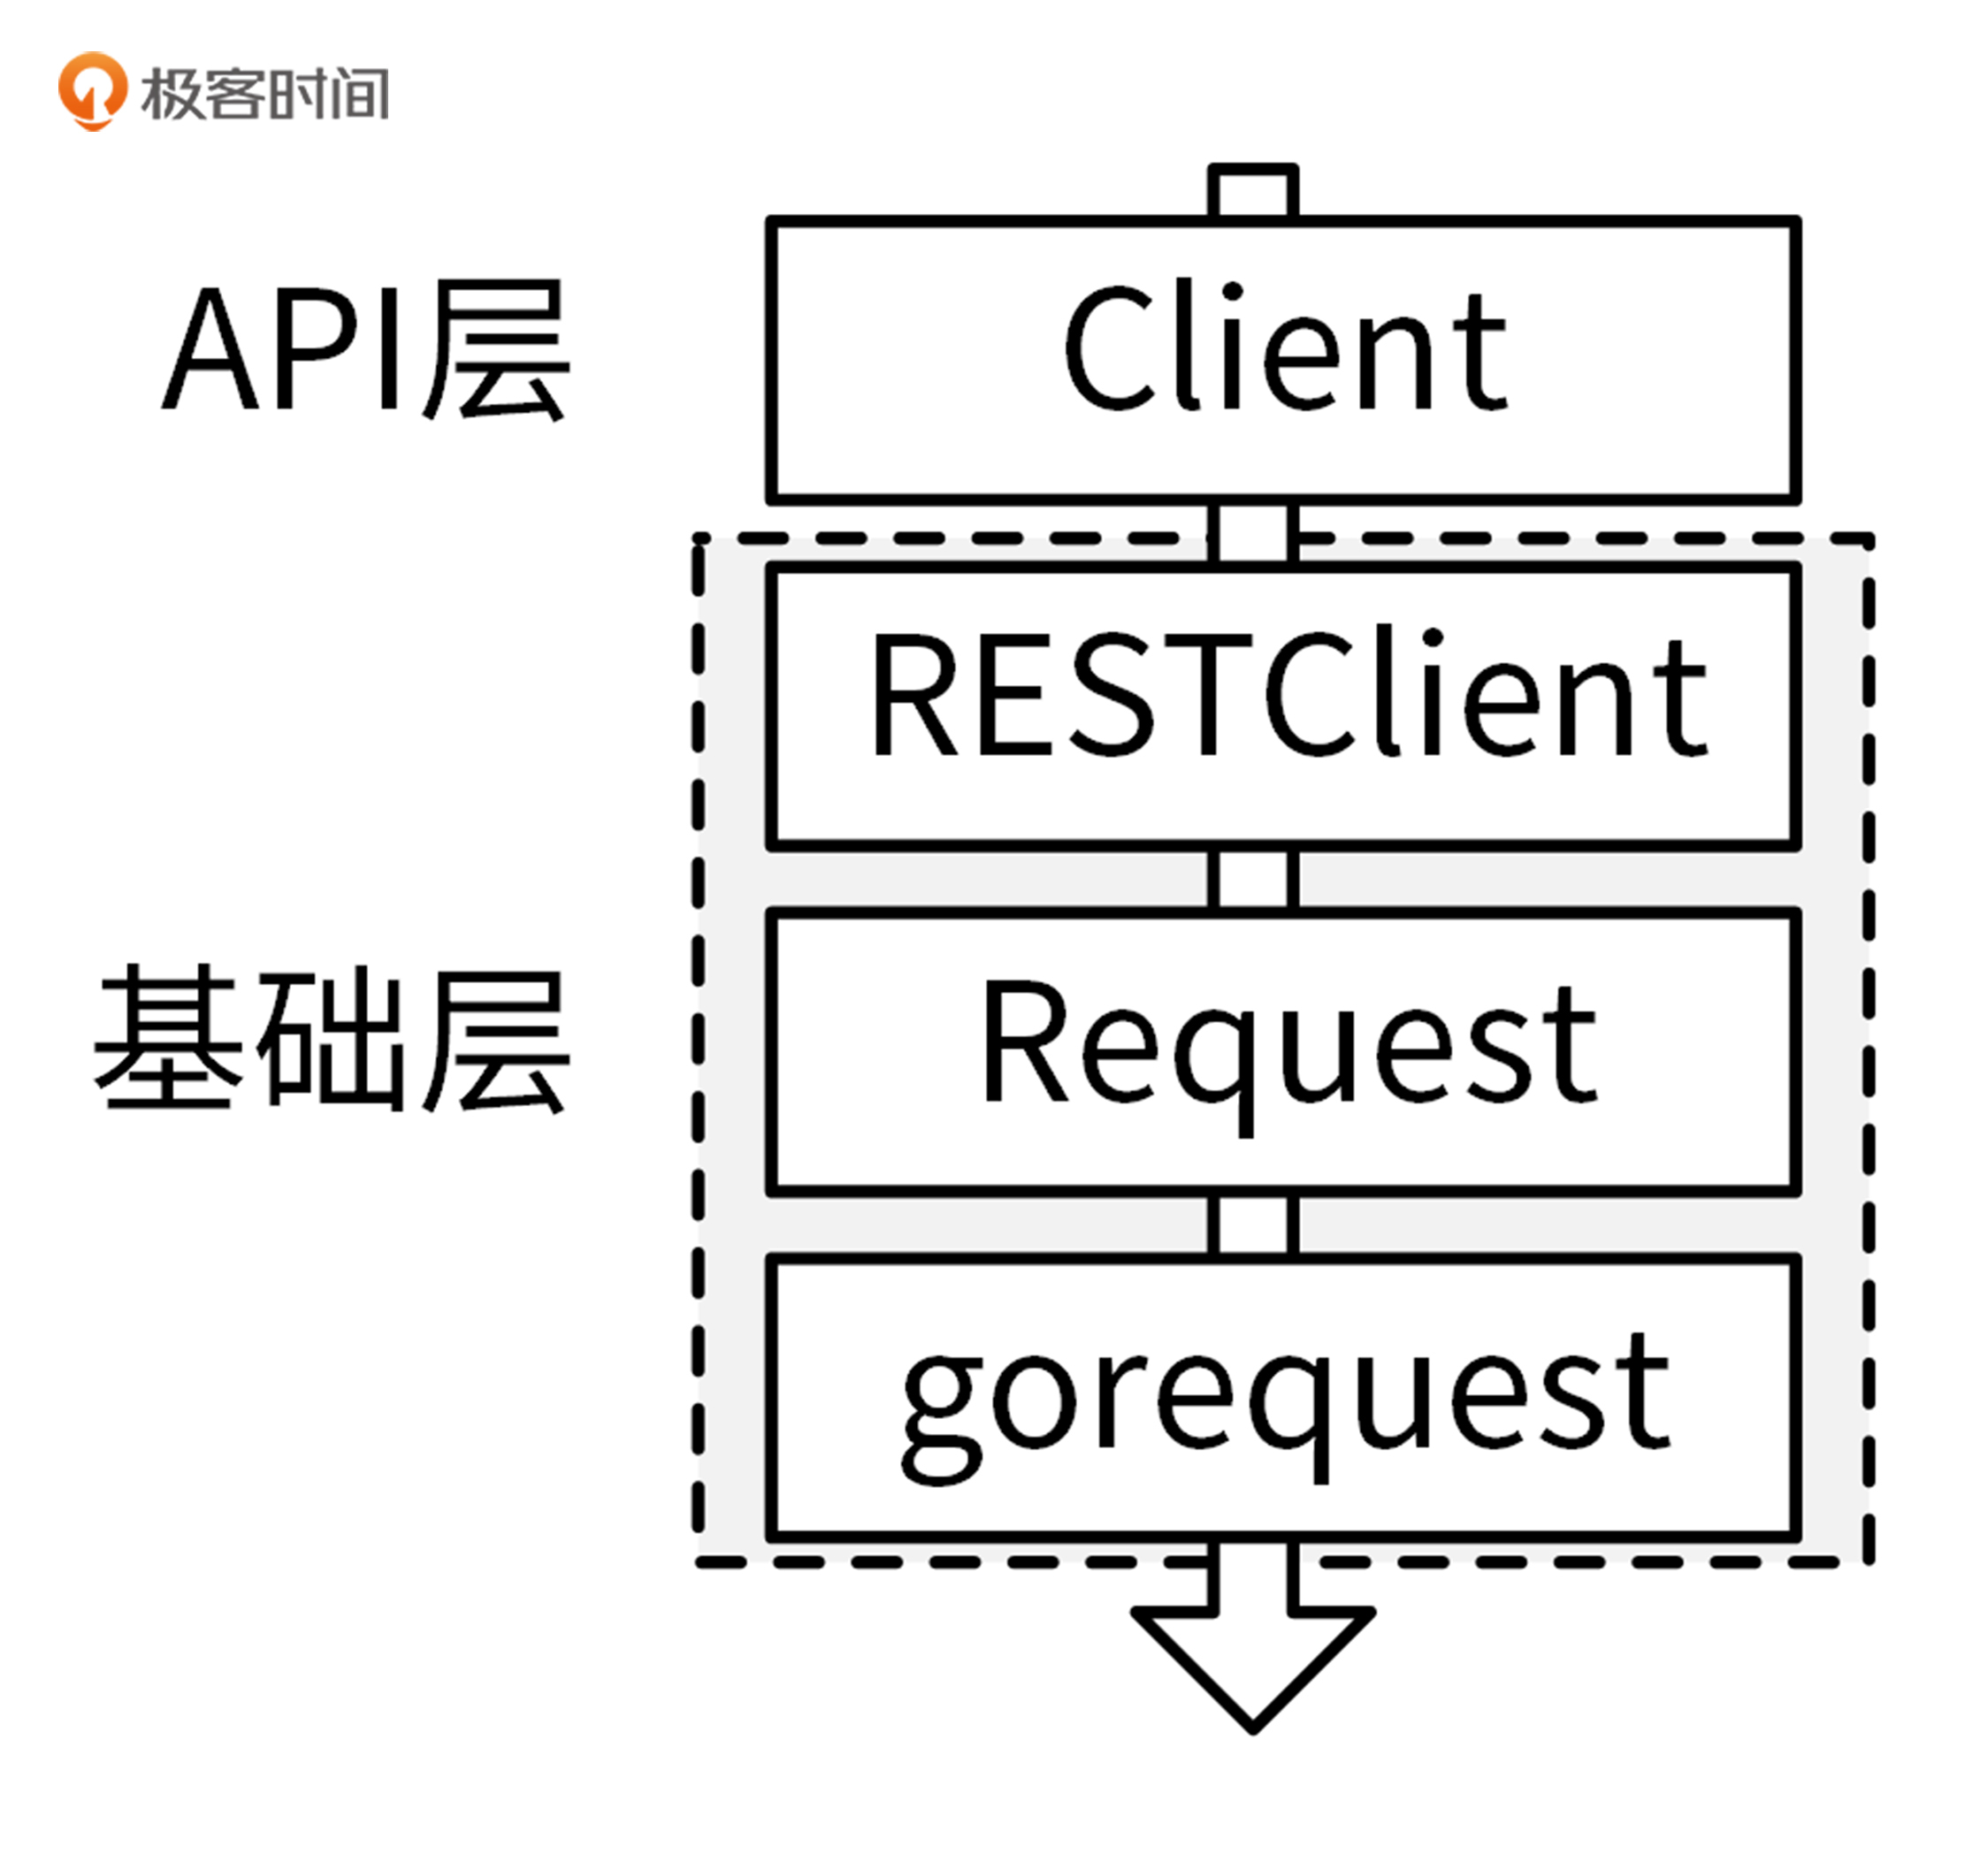
marmotedu-sdk-go的实现和medu-sdk-go一样,也是采用分层结构,分为API层和基础层。如下图所示:
|
|
|
|
|
|
|
|
|
|
|
|
[RESTClient](https://github.com/marmotedu/marmotedu-sdk-go/blob/v1.0.2/rest/client.go#L95-L105)是整个SDK的核心,RESTClient向下通过调用[Request](https://github.com/marmotedu/marmotedu-sdk-go/blob/v1.0.2/rest/request.go#L28-L50)模块,来完成HTTP请求方法、请求路径、请求体、认证信息的构建。Request模块最终通过调用[gorequest](https://github.com/parnurzeal/gorequest)包提供的方法,完成HTTP的POST、PUT、GET、DELETE等请求,获取HTTP返回结果,并解析到指定的结构体中。RESTClient向上提供 `Post()` 、 `Put()` 、 `Get()` 、 `Delete()` 等方法来供客户端完成HTTP请求。
|
|
|
|
|
|
marmotedu-sdk-go提供了两类客户端,分别是RESTClient客户端和基于RESTClient封装的客户端。
|
|
|
|
|
|
* RESTClient:Raw类型的客户端,可以通过指定HTTP的请求方法、请求路径、请求参数等信息,直接发送HTTP请求,例如 `client.Get().AbsPath("/version").Do().Into()` 。
|
|
|
* 基于RESTClient封装的客户端:例如AuthzV1Client、APIV1Client等,执行特定REST资源、特定API接口的请求,方便开发者调用。
|
|
|
|
|
|
接下来,我们具体看下如何创建RESTClient客户端,以及Request模块的实现。
|
|
|
|
|
|
### RESTClient客户端实现
|
|
|
|
|
|
我通过下面两个步骤,实现了RESTClient客户端。
|
|
|
|
|
|
**第一步,创建**[rest.Config](https://github.com/marmotedu/marmotedu-sdk-go/blob/v1.0.2/rest/config.go#L29-L60)**类型的变量。**
|
|
|
|
|
|
[BuildConfigFromFlags](https://github.com/marmotedu/marmotedu-sdk-go/blob/v1.0.2/tools/clientcmd/client_config.go#L190-L203)函数通过加载yaml格式的配置文件,来创建 `rest.Config` 类型的变量,加载的yaml格式配置文件内容为:
|
|
|
|
|
|
```yaml
|
|
|
apiVersion: v1
|
|
|
user:
|
|
|
#token: # JWT Token
|
|
|
username: admin # iam 用户名
|
|
|
password: Admin@2020 # iam 密码
|
|
|
#secret-id: # 密钥 ID
|
|
|
#secret-key: # 密钥 Key
|
|
|
client-certificate: /home/colin/.iam/cert/admin.pem # 用于 TLS 的客户端证书文件路径
|
|
|
client-key: /home/colin/.iam/cert/admin-key.pem # 用于 TLS 的客户端 key 文件路径
|
|
|
#client-certificate-data:
|
|
|
#client-key-data:
|
|
|
|
|
|
server:
|
|
|
address: https://127.0.0.1:8443 # iam api-server 地址
|
|
|
timeout: 10s # 请求 api-server 超时时间
|
|
|
#max-retries: # 最大重试次数,默认为 0
|
|
|
#retry-interval: # 重试间隔,默认为 1s
|
|
|
#tls-server-name: # TLS 服务器名称
|
|
|
#insecure-skip-tls-verify: # 设置为 true 表示跳过 TLS 安全验证模式,将使得 HTTPS 连接不安全
|
|
|
certificate-authority: /home/colin/.iam/cert/ca.pem # 用于 CA 授权的 cert 文件路径
|
|
|
#certificate-authority-data:
|
|
|
|
|
|
```
|
|
|
|
|
|
在配置文件中,我们可以指定服务的地址、用户名/密码、密钥、TLS证书、超时时间、重试次数等信息。
|
|
|
|
|
|
创建方法如下:
|
|
|
|
|
|
```go
|
|
|
config, err := clientcmd.BuildConfigFromFlags("", *iamconfig)
|
|
|
if err != nil {
|
|
|
panic(err.Error())
|
|
|
}
|
|
|
|
|
|
```
|
|
|
|
|
|
这里的代码中,`*iamconfig` 是yaml格式的配置文件路径。`BuildConfigFromFlags` 函数中,调用[LoadFromFile](https://github.com/marmotedu/marmotedu-sdk-go/blob/v1.0.3/tools/clientcmd/loader.go#L32-L56)函数来解析yaml配置文件。LoadFromFile最终是通过 `yaml.Unmarshal` 的方式来解析yaml格式的配置文件的。
|
|
|
|
|
|
**第二步,根据rest.Config类型的变量,创建RESTClient客户端。**
|
|
|
|
|
|
通过[RESTClientFor](https://github.com/marmotedu/marmotedu-sdk-go/blob/v1.0.2/rest/config.go#L191-L237)函数来创建RESTClient客户端:
|
|
|
|
|
|
```go
|
|
|
func RESTClientFor(config *Config) (*RESTClient, error) {
|
|
|
...
|
|
|
baseURL, versionedAPIPath, err := defaultServerURLFor(config)
|
|
|
if err != nil {
|
|
|
return nil, err
|
|
|
}
|
|
|
|
|
|
// Get the TLS options for this client config
|
|
|
tlsConfig, err := TLSConfigFor(config)
|
|
|
if err != nil {
|
|
|
return nil, err
|
|
|
}
|
|
|
|
|
|
// Only retry when get a server side error.
|
|
|
client := gorequest.New().TLSClientConfig(tlsConfig).Timeout(config.Timeout).
|
|
|
Retry(config.MaxRetries, config.RetryInterval, http.StatusInternalServerError)
|
|
|
// NOTICE: must set DoNotClearSuperAgent to true, or the client will clean header befor http.Do
|
|
|
client.DoNotClearSuperAgent = true
|
|
|
|
|
|
...
|
|
|
|
|
|
clientContent := ClientContentConfig{
|
|
|
Username: config.Username,
|
|
|
Password: config.Password,
|
|
|
SecretID: config.SecretID,
|
|
|
SecretKey: config.SecretKey,
|
|
|
...
|
|
|
}
|
|
|
|
|
|
return NewRESTClient(baseURL, versionedAPIPath, clientContent, client)
|
|
|
}
|
|
|
|
|
|
```
|
|
|
|
|
|
RESTClientFor函数调用[defaultServerURLFor(config)](https://github.com/marmotedu/marmotedu-sdk-go/blob/v1.0.2/rest/url_utils.go#L69-L81)生成基本的HTTP请求路径:baseURL=http://127.0.0.1:8080,versionedAPIPath=/v1。然后,通过[TLSConfigFor](https://github.com/marmotedu/marmotedu-sdk-go/blob/v1.0.2/rest/config.go#L241-L298)函数生成TLS配置,并调用 `gorequest.New()` 创建gorequest客户端,将客户端配置信息保存在变量中。最后,调用[NewRESTClient](https://github.com/marmotedu/marmotedu-sdk-go/blob/v1.0.2/rest/client.go#L109-L130)函数创建RESTClient客户端。
|
|
|
|
|
|
RESTClient客户端提供了以下方法,来供调用者完成HTTP请求:
|
|
|
|
|
|
```go
|
|
|
func (c *RESTClient) APIVersion() scheme.GroupVersion
|
|
|
func (c *RESTClient) Delete() *Request
|
|
|
func (c *RESTClient) Get() *Request
|
|
|
func (c *RESTClient) Post() *Request
|
|
|
func (c *RESTClient) Put() *Request
|
|
|
func (c *RESTClient) Verb(verb string) *Request
|
|
|
|
|
|
```
|
|
|
|
|
|
可以看到,RESTClient提供了 `Delete` 、 `Get` 、 `Post` 、 `Put` 方法,分别用来执行HTTP的DELETE、GET、POST、PUT方法,提供的 `Verb` 方法可以灵活地指定HTTP方法。这些方法都返回了 `Request` 类型的变量。`Request` 类型的变量提供了一些方法,用来完成具体的HTTP请求,例如:
|
|
|
|
|
|
```go
|
|
|
type Response struct {
|
|
|
Allowed bool `json:"allowed"`
|
|
|
Denied bool `json:"denied,omitempty"`
|
|
|
Reason string `json:"reason,omitempty"`
|
|
|
Error string `json:"error,omitempty"`
|
|
|
}
|
|
|
|
|
|
func (c *authz) Authorize(ctx context.Context, request *ladon.Request, opts metav1.AuthorizeOptions) (result *Response, err error) {
|
|
|
result = &Response{}
|
|
|
err = c.client.Post().
|
|
|
Resource("authz").
|
|
|
VersionedParams(opts).
|
|
|
Body(request).
|
|
|
Do(ctx).
|
|
|
Into(result)
|
|
|
|
|
|
return
|
|
|
}
|
|
|
|
|
|
```
|
|
|
|
|
|
上面的代码中, `c.client` 是RESTClient客户端,通过调用RESTClient客户端的 `Post` 方法,返回了 `*Request` 类型的变量。
|
|
|
|
|
|
`*Request` 类型的变量提供了 `Resource` 和 `VersionedParams` 方法,来构建请求HTTP URL中的路径 `/v1/authz` ;通过 `Body` 方法,指定了HTTP请求的Body。
|
|
|
|
|
|
到这里,我们分别构建了HTTP请求需要的参数:HTTP Method、请求URL、请求Body。所以,之后就可以调用 `Do` 方法来执行HTTP请求,并将返回结果通过 `Into` 方法保存在传入的result变量中。
|
|
|
|
|
|
### Request模块实现
|
|
|
|
|
|
RESTClient客户端的方法会返回Request类型的变量,Request类型的变量提供了一系列的方法用来构建HTTP请求参数,并执行HTTP请求。
|
|
|
|
|
|
所以,Request模块可以理解为最底层的通信层,我们来看下Request模块具体是如何完成HTTP请求的。
|
|
|
|
|
|
我们先来看下[Request结构体](https://github.com/marmotedu/marmotedu-sdk-go/blob/v1.0.3/rest/request.go#L28-L50)的定义:
|
|
|
|
|
|
```go
|
|
|
type RESTClient struct {
|
|
|
// base is the root URL for all invocations of the client
|
|
|
base *url.URL
|
|
|
// group stand for the client group, eg: iam.api, iam.authz
|
|
|
group string
|
|
|
// versionedAPIPath is a path segment connecting the base URL to the resource root
|
|
|
versionedAPIPath string
|
|
|
// content describes how a RESTClient encodes and decodes responses.
|
|
|
content ClientContentConfig
|
|
|
Client *gorequest.SuperAgent
|
|
|
}
|
|
|
|
|
|
type Request struct {
|
|
|
c *RESTClient
|
|
|
|
|
|
timeout time.Duration
|
|
|
|
|
|
// generic components accessible via method setters
|
|
|
verb string
|
|
|
pathPrefix string
|
|
|
subpath string
|
|
|
params url.Values
|
|
|
headers http.Header
|
|
|
|
|
|
// structural elements of the request that are part of the IAM API conventions
|
|
|
// namespace string
|
|
|
// namespaceSet bool
|
|
|
resource string
|
|
|
resourceName string
|
|
|
subresource string
|
|
|
|
|
|
// output
|
|
|
err error
|
|
|
body interface{}
|
|
|
}
|
|
|
|
|
|
```
|
|
|
|
|
|
再来看下Request结构体提供的方法:
|
|
|
|
|
|
```go
|
|
|
func (r *Request) AbsPath(segments ...string) *Request
|
|
|
func (r *Request) Body(obj interface{}) *Request
|
|
|
func (r *Request) Do(ctx context.Context) Result
|
|
|
func (r *Request) Name(resourceName string) *Request
|
|
|
func (r *Request) Param(paramName, s string) *Request
|
|
|
func (r *Request) Prefix(segments ...string) *Request
|
|
|
func (r *Request) RequestURI(uri string) *Request
|
|
|
func (r *Request) Resource(resource string) *Request
|
|
|
func (r *Request) SetHeader(key string, values ...string) *Request
|
|
|
func (r *Request) SubResource(subresources ...string) *Request
|
|
|
func (r *Request) Suffix(segments ...string) *Request
|
|
|
func (r *Request) Timeout(d time.Duration) *Request
|
|
|
func (r *Request) URL() *url.URL
|
|
|
func (r *Request) Verb(verb string) *Request
|
|
|
func (r *Request) VersionedParams(v interface{}) *Request
|
|
|
|
|
|
```
|
|
|
|
|
|
通过Request结构体的定义和使用方法,我们不难猜测出:Request模块通过 `Name` 、 `Resource` 、 `Body` 、 `SetHeader` 等方法来设置Request结构体中的各个字段。这些字段最终用来构建出一个HTTP请求,并通过 `Do` 方法来执行HTTP请求。
|
|
|
|
|
|
那么,如何构建并执行一个HTTP请求呢?我们可以通过以下5步,来构建并执行HTTP请求:
|
|
|
|
|
|
1. 构建HTTP URL;
|
|
|
2. 构建HTTP Method;
|
|
|
3. 构建HTTP Body;
|
|
|
4. 执行HTTP请求;
|
|
|
5. 保存HTTP返回结果。
|
|
|
|
|
|
接下来,我们就来具体看下Request模块是如何构建这些请求参数,并发送HTTP请求的。
|
|
|
|
|
|
**第一步,构建HTTP URL。**
|
|
|
|
|
|
首先,通过[defaultServerURLFor](https://github.com/marmotedu/marmotedu-sdk-go/blob/v1.0.3/rest/url_utils.go#L69-L81)函数返回了`http://iam.api.marmotedu.com:8080` 和 `/v1` ,并将二者分别保存在了Request类型结构体变量中 `c` 字段的 `base` 字段和 `versionedAPIPath` 字段中。
|
|
|
|
|
|
通过 [Do](https://github.com/marmotedu/marmotedu-sdk-go/blob/v1.0.3/rest/request.go#L379-L416) 方法执行HTTP时,会调用[r.URL()](https://github.com/marmotedu/marmotedu-sdk-go/blob/v1.0.3/rest/request.go#L392)方法来构建请求URL。 `r.URL` 方法中,通过以下代码段构建了HTTP请求URL:
|
|
|
|
|
|
```go
|
|
|
func (r *Request) URL() *url.URL {
|
|
|
p := r.pathPrefix
|
|
|
if len(r.resource) != 0 {
|
|
|
p = path.Join(p, strings.ToLower(r.resource))
|
|
|
}
|
|
|
|
|
|
if len(r.resourceName) != 0 || len(r.subpath) != 0 || len(r.subresource) != 0 {
|
|
|
p = path.Join(p, r.resourceName, r.subresource, r.subpath)
|
|
|
}
|
|
|
|
|
|
finalURL := &url.URL{}
|
|
|
if r.c.base != nil {
|
|
|
*finalURL = *r.c.bas
|
|
|
}
|
|
|
|
|
|
finalURL.Path = p
|
|
|
...
|
|
|
}
|
|
|
|
|
|
```
|
|
|
|
|
|
`p := r.pathPrefix` 和 `r.c.base` ,是通过 `defaultServerURLFor` 调用返回的 `v1` 和 `http://iam.api.marmotedu.com:8080` 来构建的。
|
|
|
|
|
|
`resourceName` 通过 `func (r *Request) Resource(resource string) *Request` 来指定,例如 `authz` 。
|
|
|
|
|
|
所以,最终我们构建的请求URL为 `http://iam.api.marmotedu.com:8080/v1/authz` 。
|
|
|
|
|
|
**第二步,构建HTTP Method。**
|
|
|
|
|
|
HTTP Method通过RESTClient提供的 `Post` 、`Delete` 、`Get` 等方法来设置,例如:
|
|
|
|
|
|
```go
|
|
|
func (c *RESTClient) Post() *Request {
|
|
|
return c.Verb("POST")
|
|
|
}
|
|
|
|
|
|
func (c *RESTClient) Verb(verb string) *Request {
|
|
|
return NewRequest(c).Verb(verb)
|
|
|
}
|
|
|
|
|
|
```
|
|
|
|
|
|
`NewRequest(c).Verb(verb)` 最终设置了Request结构体的 `verb` 字段,供 `Do` 方法使用。
|
|
|
|
|
|
**第三步,构建HTTP Body。**
|
|
|
|
|
|
HTTP Body通过Request结构体提供的Body方法来指定:
|
|
|
|
|
|
```go
|
|
|
func (r *Request) Body(obj interface{}) *Request {
|
|
|
if v := reflect.ValueOf(obj); v.Kind() == reflect.Struct {
|
|
|
r.SetHeader("Content-Type", r.c.content.ContentType)
|
|
|
}
|
|
|
|
|
|
r.body = obj
|
|
|
|
|
|
return r
|
|
|
}
|
|
|
|
|
|
```
|
|
|
|
|
|
**第四步,执行HTTP请求。**
|
|
|
|
|
|
通过Request结构体提供的Do方法来执行具体的HTTP请求,代码如下:
|
|
|
|
|
|
```go
|
|
|
func (r *Request) Do(ctx context.Context) Result {
|
|
|
client := r.c.Client
|
|
|
client.Header = r.headers
|
|
|
|
|
|
if r.timeout > 0 {
|
|
|
var cancel context.CancelFunc
|
|
|
ctx, cancel = context.WithTimeout(ctx, r.timeout)
|
|
|
|
|
|
defer cancel()
|
|
|
}
|
|
|
|
|
|
client.WithContext(ctx)
|
|
|
|
|
|
resp, body, errs := client.CustomMethod(r.verb, r.URL().String()).Send(r.body).EndBytes()
|
|
|
if err := combineErr(resp, body, errs); err != nil {
|
|
|
return Result{
|
|
|
response: &resp,
|
|
|
err: err,
|
|
|
body: body,
|
|
|
}
|
|
|
}
|
|
|
|
|
|
decoder, err := r.c.content.Negotiator.Decoder()
|
|
|
if err != nil {
|
|
|
return Result{
|
|
|
response: &resp,
|
|
|
err: err,
|
|
|
body: body,
|
|
|
decoder: decoder,
|
|
|
}
|
|
|
}
|
|
|
|
|
|
return Result{
|
|
|
response: &resp,
|
|
|
body: body,
|
|
|
decoder: decoder,
|
|
|
}
|
|
|
}
|
|
|
|
|
|
```
|
|
|
|
|
|
在Do方法中,使用了Request结构体变量中各个字段的值,通过 `client.CustomMethod` 来执行HTTP请求。 `client` 是 `*gorequest.SuperAgent` 类型的客户端。
|
|
|
|
|
|
**第五步,保存HTTP返回结果。**
|
|
|
|
|
|
通过Request结构体的 `Into` 方法来保存HTTP返回结果:
|
|
|
|
|
|
```go
|
|
|
func (r Result) Into(v interface{}) error {
|
|
|
if r.err != nil {
|
|
|
return r.Error()
|
|
|
}
|
|
|
|
|
|
if r.decoder == nil {
|
|
|
return fmt.Errorf("serializer doesn't exist")
|
|
|
}
|
|
|
|
|
|
if err := r.decoder.Decode(r.body, &v); err != nil {
|
|
|
return err
|
|
|
}
|
|
|
|
|
|
return nil
|
|
|
}
|
|
|
|
|
|
```
|
|
|
|
|
|
`r.body` 是在Do方法中,执行完HTTP请求后设置的,它的值为HTTP请求返回的Body。
|
|
|
|
|
|
### 请求认证
|
|
|
|
|
|
接下来,我再来介绍下marmotedu-sdk-go另外一个比较核心的功能:请求认证。
|
|
|
|
|
|
marmotedu-sdk-go支持两种认证方式:
|
|
|
|
|
|
* Basic认证:通过给请求添加 `Authorization: Basic xxxx` 来实现。
|
|
|
* Bearer认证:通过给请求添加 `Authorization: Bearer xxxx` 来实现。这种方式又支持直接指定JWT Token,或者通过指定密钥对由SDK自动生成JWT Token。
|
|
|
|
|
|
Basic认证和Bearer认证,我在 [25讲](https://time.geekbang.org/column/article/398410)介绍过,你可以返回查看下。
|
|
|
|
|
|
认证头是RESTClient客户端发送HTTP请求时指定的,具体实现位于[NewRequest](https://github.com/marmotedu/marmotedu-sdk-go/blob/v1.0.2/rest/request.go#L53-L102)函数中:
|
|
|
|
|
|
```go
|
|
|
switch {
|
|
|
case c.content.HasTokenAuth():
|
|
|
r.SetHeader("Authorization", fmt.Sprintf("Bearer %s", c.content.BearerToken))
|
|
|
case c.content.HasKeyAuth():
|
|
|
tokenString := auth.Sign(c.content.SecretID, c.content.SecretKey, "marmotedu-sdk-go", c.group+".marmotedu.com")
|
|
|
r.SetHeader("Authorization", fmt.Sprintf("Bearer %s", tokenString))
|
|
|
case c.content.HasBasicAuth():
|
|
|
// TODO: get token and set header
|
|
|
r.SetHeader("Authorization", "Basic "+basicAuth(c.content.Username, c.content.Password))
|
|
|
}
|
|
|
|
|
|
```
|
|
|
|
|
|
上面的代码会根据配置信息,自动判断使用哪种认证方式。
|
|
|
|
|
|
## 总结
|
|
|
|
|
|
这一讲中,我介绍了Kubernetes client-go风格的SDK实现方式。和公有云厂商的SDK设计相比,client-go风格的SDK设计有很多优点。
|
|
|
|
|
|
marmotedu-sdk-go在设计时,通过接口实现了3类客户端,分别是项目级别的客户端、应用级别的客户端和服务级别的客户端。开发人员可以根据需要,自行创建客户端类型。
|
|
|
|
|
|
marmotedu-sdk-go通过[RESTClientFor](https://github.com/marmotedu/marmotedu-sdk-go/blob/v1.0.2/rest/config.go#L191-L237),创建了RESTClient类型的客户端,RESTClient向下通过调用[Request](https://github.com/marmotedu/marmotedu-sdk-go/blob/v1.0.2/rest/request.go#L28-L50)模块,来完成HTTP请求方法、请求路径、请求体、认证信息的构建。Request模块最终通过调用[gorequest](https://github.com/parnurzeal/gorequest)包提供的方法,完成HTTP的POST、PUT、GET、DELETE等请求,获取HTTP返回结果,并解析到指定的结构体中。RESTClient向上提供 `Post()` 、 `Put()` 、 `Get()` 、 `Delete()` 等方法,来供客户端完成HTTP请求。
|
|
|
|
|
|
## 课后练习
|
|
|
|
|
|
1. 阅读[defaultServerURLFor](https://github.com/marmotedu/marmotedu-sdk-go/blob/v1.0.3/rest/url_utils.go#L69-L81)源码,思考下defaultServerURLFor是如何构建请求地址 `http://iam.api.marmotedu.com:8080` 和API版本 `/v1` 的。
|
|
|
2. 使用[gorequest](https://github.com/parnurzeal/gorequest)包,编写一个可以执行以下HTTP请求的示例:
|
|
|
|
|
|
```bash
|
|
|
curl -XPOST http://example.com/v1/user -d '{"username":"colin","address":"shenzhen"}'
|
|
|
|
|
|
```
|
|
|
|
|
|
欢迎你在留言区与我交流讨论,我们下一讲见。
|
|
|
|