19 KiB
34 | 自己动手写高性能HTTP服务器(三):TCP字节流处理和HTTP协议实现
你好,我是盛延敏,这里是网络编程实战第34讲,欢迎回来。
这一讲,我们延续第33讲的话题,继续解析高性能网络编程框架的字节流处理部分,并为网络编程框架增加HTTP相关的功能,在此基础上完成HTTP高性能服务器的编写。
buffer对象
你肯定在各种语言、各种框架里面看到过不同的buffer对象,buffer,顾名思义,就是一个缓冲区对象,缓存了从套接字接收来的数据以及需要发往套接字的数据。
如果是从套接字接收来的数据,事件处理回调函数在不断地往buffer对象增加数据,同时,应用程序需要不断把buffer对象中的数据处理掉,这样,buffer对象才可以空出新的位置容纳更多的数据。
如果是发往套接字的数据,应用程序不断地往buffer对象增加数据,同时,事件处理回调函数不断调用套接字上的发送函数将数据发送出去,减少buffer对象中的写入数据。
可见,buffer对象是同时可以作为输入缓冲(input buffer)和输出缓冲(output buffer)两个方向使用的,只不过,在两种情形下,写入和读出的对象是有区别的。
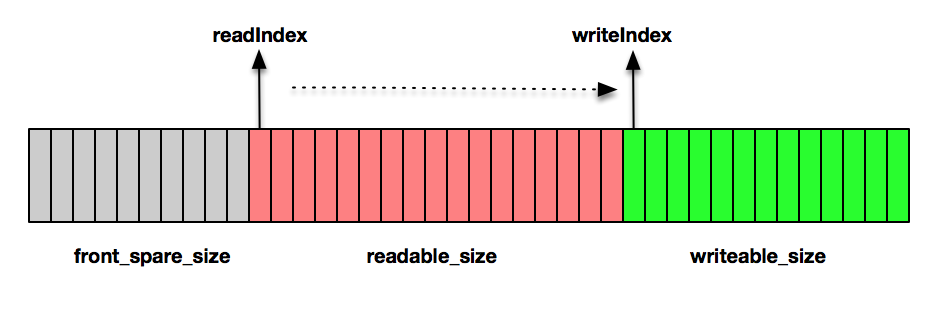
这张图描述了buffer对象的设计。
下面是buffer对象的数据结构。
//数据缓冲区
struct buffer {
    char *data;          //实际缓冲
    int readIndex;       //缓冲读取位置
    int writeIndex;      //缓冲写入位置
    int total_size;      //总大小
};
buffer对象中的writeIndex标识了当前可以写入的位置;readIndex标识了当前可以读出的数据位置,图中红色部分从readIndex到writeIndex的区域是需要读出数据的部分,而绿色部分从writeIndex到缓存的最尾端则是可以写出的部分。
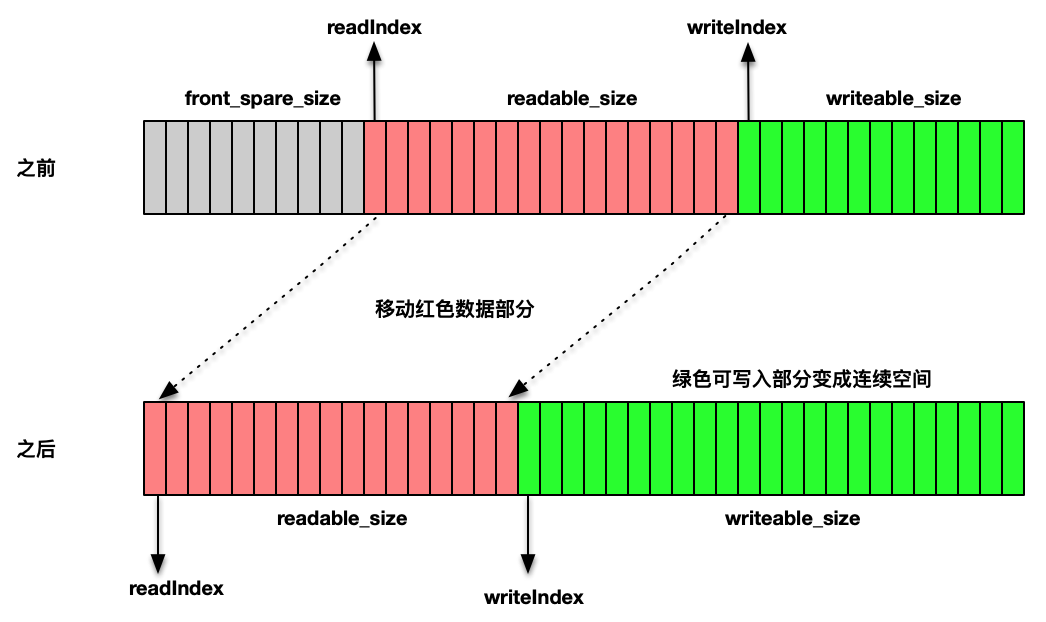
随着时间的推移,当readIndex和writeIndex越来越靠近缓冲的尾端时,前面部分的front_space_size区域变得会很大,而这个区域的数据已经是旧数据,在这个时候,就需要调整一下整个buffer对象的结构,把红色部分往左侧移动,与此同时,绿色部分也会往左侧移动,整个缓冲区的可写部分就会变多了。
make_room函数就是起这个作用的,如果右边绿色的连续空间不足以容纳新的数据,而最左边灰色部分加上右边绿色部分一起可以容纳下新数据,就会触发这样的移动拷贝,最终红色部分占据了最左边,绿色部分占据了右边,右边绿色的部分成为一个连续的可写入空间,就可以容纳下新的数据。下面的一张图解释了这个过程。
下面是make_room的具体实现。
void make_room(struct buffer *buffer, int size) {
    if (buffer_writeable_size(buffer) >= size) {
        return;
    }
    //如果front_spare和writeable的大小加起来可以容纳数据,则把可读数据往前面拷贝
    if (buffer_front_spare_size(buffer) + buffer_writeable_size(buffer) >= size) {
        int readable = buffer_readable_size(buffer);
        int i;
        for (i = 0; i < readable; i++) {
            memcpy(buffer->data + i, buffer->data + buffer->readIndex + i, 1);
        }
        buffer->readIndex = 0;
        buffer->writeIndex = readable;
    } else {
        //扩大缓冲区
        void *tmp = realloc(buffer->data, buffer->total_size + size);
        if (tmp == NULL) {
            return;
        }
        buffer->data = tmp;
        buffer->total_size += size;
    }
}
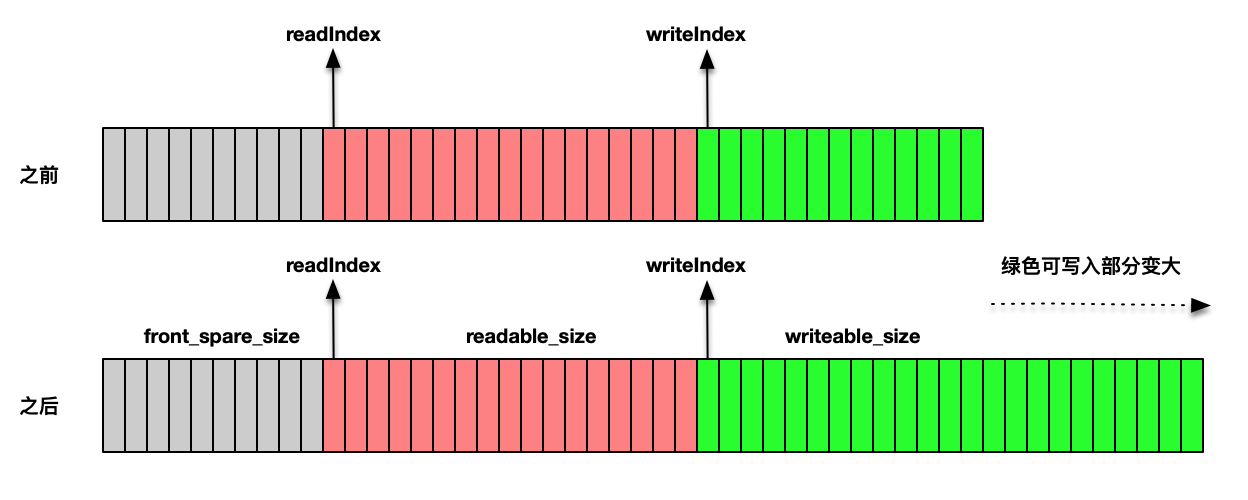
当然,如果红色部分占据过大,可写部分不够,会触发缓冲区的扩大操作。这里我通过调用realloc函数来完成缓冲区的扩容。
下面这张图对此做了解释。
套接字接收数据处理
套接字接收数据是在tcp_connection.c中的handle_read来完成的。在这个函数里,通过调用buffer_socket_read函数接收来自套接字的数据流,并将其缓冲到buffer对象中。之后你可以看到,我们将buffer对象和tcp_connection对象传递给应用程序真正的处理函数messageCallBack来进行报文的解析工作。这部分的样例在HTTP报文解析中会展开。
int handle_read(void *data) {
    struct tcp_connection *tcpConnection = (struct tcp_connection *) data;
    struct buffer *input_buffer = tcpConnection->input_buffer;
    struct channel *channel = tcpConnection->channel;

    if (buffer_socket_read(input_buffer, channel->fd) > 0) {
        //应用程序真正读取Buffer里的数据
        if (tcpConnection->messageCallBack != NULL) {
            tcpConnection->messageCallBack(input_buffer, tcpConnection);
        }
    } else {
        handle_connection_closed(tcpConnection);
    }
}
在buffer_socket_read函数里,调用readv往两个缓冲区写入数据,一个是buffer对象,另外一个是这里的additional_buffer,之所以这样做,是担心buffer对象没办法容纳下来自套接字的数据流,而且也没有办法触发buffer对象的扩容操作。通过使用额外的缓冲,一旦判断出从套接字读取的数据超过了buffer对象里的实际最大可写大小,就可以触发buffer对象的扩容操作,这里buffer_append函数会调用前面介绍的make_room函数,完成buffer对象的扩容。
int buffer_socket_read(struct buffer *buffer, int fd) {
    char additional_buffer[INIT_BUFFER_SIZE];
    struct iovec vec[2];
    int max_writable = buffer_writeable_size(buffer);
    vec[0].iov_base = buffer->data + buffer->writeIndex;
    vec[0].iov_len = max_writable;
    vec[1].iov_base = additional_buffer;
    vec[1].iov_len = sizeof(additional_buffer);
    int result = readv(fd, vec, 2);
    if (result < 0) {
        return -1;
    } else if (result <= max_writable) {
        buffer->writeIndex += result;
    } else {
        buffer->writeIndex = buffer->total_size;
        buffer_append(buffer, additional_buffer, result - max_writable);
    }
    return result;
}
套接字发送数据处理
当应用程序需要往套接字发送数据时,即完成了read-decode-compute-encode过程后,通过往buffer对象里写入encode以后的数据,调用tcp_connection_send_buffer,将buffer里的数据通过套接字缓冲区发送出去。
int tcp_connection_send_buffer(struct tcp_connection *tcpConnection, struct buffer *buffer) {
    int size = buffer_readable_size(buffer);
    int result = tcp_connection_send_data(tcpConnection, buffer->data + buffer->readIndex, size);
    buffer->readIndex += size;
    return result;
}
如果发现当前channel没有注册WRITE事件,并且当前tcp_connection对应的发送缓冲无数据需要发送,就直接调用write函数将数据发送出去。如果这一次发送不完,就将剩余需要发送的数据拷贝到当前tcp_connection对应的发送缓冲区中,并向event_loop注册WRITE事件。这样数据就由框架接管,应用程序释放这部分数据。
//应用层调用入口
int tcp_connection_send_data(struct tcp_connection *tcpConnection, void *data, int size) {
    size_t nwrited = 0;
    size_t nleft = size;
    int fault = 0;

    struct channel *channel = tcpConnection->channel;
    struct buffer *output_buffer = tcpConnection->output_buffer;

    //先往套接字尝试发送数据
    if (!channel_write_event_registered(channel) && buffer_readable_size(output_buffer) == 0) {
        nwrited = write(channel->fd, data, size);
        if (nwrited >= 0) {
            nleft = nleft - nwrited;
        } else {
            nwrited = 0;
            if (errno != EWOULDBLOCK) {
                if (errno == EPIPE || errno == ECONNRESET) {
                    fault = 1;
                }
            }
        }
    }

    if (!fault && nleft > 0) {
        //拷贝到Buffer中,Buffer的数据由框架接管
        buffer_append(output_buffer, data + nwrited, nleft);
        if (!channel_write_event_registered(channel)) {
            channel_write_event_add(channel);
        }
    }

    return nwrited;
}
HTTP协议实现
下面,我们在TCP的基础上,加入HTTP的功能。
为此,我们首先定义了一个http_server结构,这个http_server本质上就是一个TCPServer,只不过暴露给应用程序的回调函数更为简单,只需要看到http_request和http_response结构。
typedef int (*request_callback)(struct http_request *httpRequest, struct http_response *httpResponse);

struct http_server {
    struct TCPserver *tcpServer;
    request_callback requestCallback;
};
在http_server里面,重点是需要完成报文的解析,将解析的报文转化为http_request对象,这件事情是通过http_onMessage回调函数来完成的。在http_onMessage函数里,调用的是parse_http_request完成报文解析。
// buffer是框架构建好的,并且已经收到部分数据的情况下
// 注意这里可能没有收到全部数据,所以要处理数据不够的情形
int http_onMessage(struct buffer *input, struct tcp_connection *tcpConnection) {
    yolanda_msgx("get message from tcp connection %s", tcpConnection->name);

    struct http_request *httpRequest = (struct http_request *) tcpConnection->request;
    struct http_server *httpServer = (struct http_server *) tcpConnection->data;

    if (parse_http_request(input, httpRequest) == 0) {
        char *error_response = "HTTP/1.1 400 Bad Request\r\n\r\n";
        tcp_connection_send_data(tcpConnection, error_response, sizeof(error_response));
        tcp_connection_shutdown(tcpConnection);
    }

    //处理完了所有的request数据,接下来进行编码和发送
    if (http_request_current_state(httpRequest) == REQUEST_DONE) {
        struct http_response *httpResponse = http_response_new();

        //httpServer暴露的requestCallback回调
        if (httpServer->requestCallback != NULL) {
            httpServer->requestCallback(httpRequest, httpResponse);
        }

        //将httpResponse发送到套接字发送缓冲区中
        struct buffer *buffer = buffer_new();
        http_response_encode_buffer(httpResponse, buffer);
        tcp_connection_send_buffer(tcpConnection, buffer);

        if (http_request_close_connection(httpRequest)) {
            tcp_connection_shutdown(tcpConnection);
            http_request_reset(httpRequest);
        }
    }
}
还记得第16讲中讲到的HTTP协议吗?我们从16讲得知,HTTP通过设置回车符、换行符作为HTTP报文协议的边界。

parse_http_request的思路就是寻找报文的边界,同时记录下当前解析工作所处的状态。根据解析工作的前后顺序,把报文解析的工作分成REQUEST_STATUS、REQUEST_HEADERS、REQUEST_BODY和REQUEST_DONE四个阶段,每个阶段解析的方法各有不同。
在解析状态行时,先通过定位CRLF回车换行符的位置来圈定状态行,进入状态行解析时,再次通过查找空格字符来作为分隔边界。
在解析头部设置时,也是先通过定位CRLF回车换行符的位置来圈定一组key-value对,再通过查找冒号字符来作为分隔边界。
最后,如果没有找到冒号字符,说明解析头部的工作完成。
parse_http_request函数完成了HTTP报文解析的四个阶段:
int parse_http_request(struct buffer *input, struct http_request *httpRequest) {
    int ok = 1;
    while (httpRequest->current_state != REQUEST_DONE) {
        if (httpRequest->current_state == REQUEST_STATUS) {
            char *crlf = buffer_find_CRLF(input);
            if (crlf) {
                int request_line_size = process_status_line(input->data + input->readIndex, crlf, httpRequest);
                if (request_line_size) {
                    input->readIndex += request_line_size;  // request line size
                    input->readIndex += 2;  //CRLF size
                    httpRequest->current_state = REQUEST_HEADERS;
                }
            }
        } else if (httpRequest->current_state == REQUEST_HEADERS) {
            char *crlf = buffer_find_CRLF(input);
            if (crlf) {
                /**
                 *    <start>-------<colon>:-------<crlf>
                 */
                char *start = input->data + input->readIndex;
                int request_line_size = crlf - start;
                char *colon = memmem(start, request_line_size, ": ", 2);
                if (colon != NULL) {
                    char *key = malloc(colon - start + 1);
                    strncpy(key, start, colon - start);
                    key[colon - start] = '\0';
                    char *value = malloc(crlf - colon - 2 + 1);
                    strncpy(value, colon + 1, crlf - colon - 2);
                    value[crlf - colon - 2] = '\0';

                    http_request_add_header(httpRequest, key, value);

                    input->readIndex += request_line_size;  //request line size
                    input->readIndex += 2;  //CRLF size
                } else {
                    //读到这里说明:没找到,就说明这个是最后一行
                    input->readIndex += 2;  //CRLF size
                    httpRequest->current_state = REQUEST_DONE;
                }
            }
        }
    }
    return ok;
}
处理完了所有的request数据,接下来进行编码和发送的工作。为此,创建了一个http_response对象,并调用了应用程序提供的编码函数requestCallback,接下来,创建了一个buffer对象,函数http_response_encode_buffer用来将http_response中的数据,根据HTTP协议转换为对应的字节流。
可以看到,http_response_encode_buffer设置了如Content-Length等http_response头部,以及http_response的body部分数据。
void http_response_encode_buffer(struct http_response *httpResponse, struct buffer *output) {
    char buf[32];
    snprintf(buf, sizeof buf, "HTTP/1.1 %d ", httpResponse->statusCode);
    buffer_append_string(output, buf);
    buffer_append_string(output, httpResponse->statusMessage);
    buffer_append_string(output, "\r\n");

    if (httpResponse->keep_connected) {
        buffer_append_string(output, "Connection: close\r\n");
    } else {
        snprintf(buf, sizeof buf, "Content-Length: %zd\r\n", strlen(httpResponse->body));
        buffer_append_string(output, buf);
        buffer_append_string(output, "Connection: Keep-Alive\r\n");
    }

    if (httpResponse->response_headers != NULL && httpResponse->response_headers_number > 0) {
        for (int i = 0; i < httpResponse->response_headers_number; i++) {
            buffer_append_string(output, httpResponse->response_headers[i].key);
            buffer_append_string(output, ": ");
            buffer_append_string(output, httpResponse->response_headers[i].value);
            buffer_append_string(output, "\r\n");
        }
    }

    buffer_append_string(output, "\r\n");
    buffer_append_string(output, httpResponse->body);
}
完整的HTTP服务器例子
现在,编写一个HTTP服务器例子就变得非常简单。
在这个例子中,最主要的部分是onRequest callback函数,这里,onRequest方法已经在parse_http_request之后,可以根据不同的http_request的信息,进行计算和处理。例子程序里的逻辑非常简单,根据http request的URL path,返回了不同的http_response类型。比如,当请求为根目录时,返回的是200和HTML格式。
#include <lib/acceptor.h>
#include <lib/http_server.h>
#include "lib/common.h"
#include "lib/event_loop.h"

//数据读到buffer之后的callback
int onRequest(struct http_request *httpRequest, struct http_response *httpResponse) {
    char *url = httpRequest->url;
    char *question = memmem(url, strlen(url), "?", 1);
    char *path = NULL;
    if (question != NULL) {
        path = malloc(question - url);
        strncpy(path, url, question - url);
    } else {
        path = malloc(strlen(url));
        strncpy(path, url, strlen(url));
    }

    if (strcmp(path, "/") == 0) {
        httpResponse->statusCode = OK;
        httpResponse->statusMessage = "OK";
        httpResponse->contentType = "text/html";
        httpResponse->body = "<html><head><title>This is network programming</title></head><body><h1>Hello, network programming</h1></body></html>";
    } else if (strcmp(path, "/network") == 0) {
        httpResponse->statusCode = OK;
        httpResponse->statusMessage = "OK";
        httpResponse->contentType = "text/plain";
        httpResponse->body = "hello, network programming";
    } else {
        httpResponse->statusCode = NotFound;
        httpResponse->statusMessage = "Not Found";
        httpResponse->keep_connected = 1;
    }

    return 0;
}


int main(int c, char **v) {
    //主线程event_loop
    struct event_loop *eventLoop = event_loop_init();

    //初始tcp_server,可以指定线程数目,如果线程是0,就是在这个线程里acceptor+i/o;如果是1,有一个I/O线程
    //tcp_server自己带一个event_loop
    struct http_server *httpServer = http_server_new(eventLoop, SERV_PORT, onRequest, 2);
    http_server_start(httpServer);

    // main thread for acceptor
    event_loop_run(eventLoop);
}
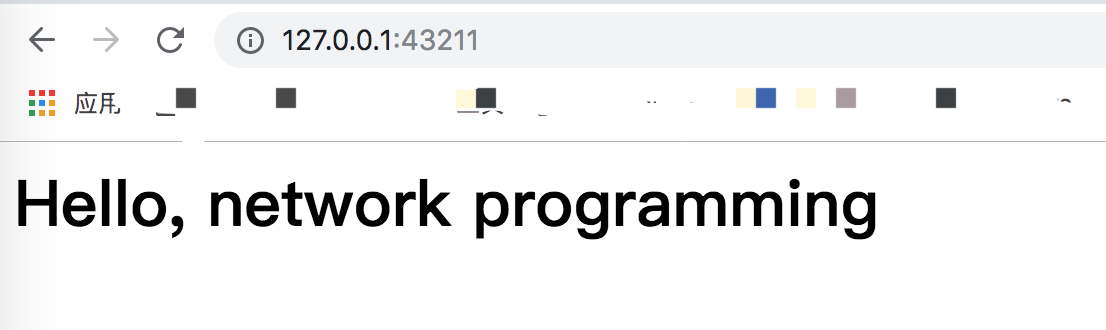
运行这个程序之后,我们可以通过浏览器和curl命令来访问它。你可以同时开启多个浏览器和curl命令,这也证明了我们的程序是可以满足高并发需求的。
$curl -v http://127.0.0.1:43211/
*   Trying 127.0.0.1...
* TCP_NODELAY set
* Connected to 127.0.0.1 (127.0.0.1) port 43211 (#0)
> GET / HTTP/1.1
> Host: 127.0.0.1:43211
> User-Agent: curl/7.54.0
> Accept: */*
>
< HTTP/1.1 200 OK
< Content-Length: 116
< Connection: Keep-Alive
<
* Connection #0 to host 127.0.0.1 left intact
<html><head><title>This is network programming</title></head><body><h1>Hello, network programming</h1></body></html>%
总结
这一讲我们主要讲述了整个编程框架的字节流处理能力,引入了buffer对象,并在此基础上通过增加HTTP的特性,包括http_server、http_request、http_response,完成了HTTP高性能服务器的编写。实例程序利用框架提供的能力,编写了一个简单的HTTP服务器程序。
思考题
和往常一样,给你布置两道思考题:
第一道, 你可以试着在HTTP服务器中增加MIME的处理能力,当用户请求/photo路径时,返回一张图片。
第二道,在我们的开发中,已经有很多面向对象的设计,你可以仔细研读代码,说说你对这部分的理解。
欢迎你在评论区写下你的思考,也欢迎把这篇文章分享给你的朋友或者同事,一起交流一下。