|
|
|
|
|
# 23|答疑现场:Spring 补充篇思考题合集
|
|
|
|
|
|
|
|
|
|
|
|
你好,我是傅健。
|
|
|
|
|
|
|
|
|
|
|
|
欢迎来到第三次答疑现场,恭喜你,到了这,终点已近在咫尺。到今天为止,我们已经解决了 50 个线上问题,是不是很有成就感了?但要想把学习所得真正为你所用还要努力练习呀,这就像理论与实践之间永远有道鸿沟需要我们去跨越一样。那么接下来,话不多说,我们就开始逐一解答第三章的课后思考题了,有任何想法欢迎到留言区补充。
|
|
|
|
|
|
|
|
|
|
|
|
## **[第18课](https://time.geekbang.org/column/article/380565)**
|
|
|
|
|
|
|
|
|
|
|
|
在案例 1 中使用 Spring Data Redis 时,我们提到了 StringRedisTemplate 和 RedisTemplate。那么它们是如何被创建起来的呢?
|
|
|
|
|
|
|
|
|
|
|
|
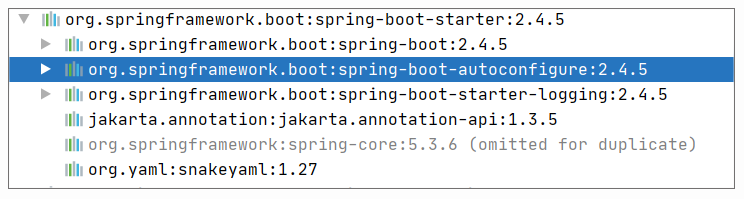
实际上,当我们依赖 spring-boot-starter 时,我们就间接依赖了 spring-boot -autoconfigure。
|
|
|
|
|
|
|
|
|
|
|
|
|
|
|
|
|
|
|
|
|
|
|
|
在这个 JAR 中,存在下面这样的一个类,即 RedisAutoConfiguration。
|
|
|
|
|
|
|
|
|
|
|
|
```
|
|
|
|
|
|
|
|
|
|
|
|
@Configuration(proxyBeanMethods = false)
|
|
|
|
|
|
@ConditionalOnClass(RedisOperations.class)
|
|
|
|
|
|
@EnableConfigurationProperties(RedisProperties.class)
|
|
|
|
|
|
@Import({ LettuceConnectionConfiguration.class, JedisConnectionConfiguration.class })
|
|
|
|
|
|
public class RedisAutoConfiguration {
|
|
|
|
|
|
|
|
|
|
|
|
@Bean
|
|
|
|
|
|
@ConditionalOnMissingBean(name = "redisTemplate")
|
|
|
|
|
|
@ConditionalOnSingleCandidate(RedisConnectionFactory.class)
|
|
|
|
|
|
public RedisTemplate<Object, Object> redisTemplate(RedisConnectionFactory redisConnectionFactory) {
|
|
|
|
|
|
RedisTemplate<Object, Object> template = new RedisTemplate<>();
|
|
|
|
|
|
template.setConnectionFactory(redisConnectionFactory);
|
|
|
|
|
|
return template;
|
|
|
|
|
|
}
|
|
|
|
|
|
|
|
|
|
|
|
@Bean
|
|
|
|
|
|
@ConditionalOnMissingBean
|
|
|
|
|
|
@ConditionalOnSingleCandidate(RedisConnectionFactory.class)
|
|
|
|
|
|
public StringRedisTemplate stringRedisTemplate(RedisConnectionFactory redisConnectionFactory) {
|
|
|
|
|
|
StringRedisTemplate template = new StringRedisTemplate();
|
|
|
|
|
|
template.setConnectionFactory(redisConnectionFactory);
|
|
|
|
|
|
return template;
|
|
|
|
|
|
}
|
|
|
|
|
|
|
|
|
|
|
|
}
|
|
|
|
|
|
|
|
|
|
|
|
```
|
|
|
|
|
|
|
|
|
|
|
|
从上述代码可以看出,当存在RedisOperations这个类时,就会创建 StringRedisTemplate 和 RedisTemplate 这两个 Bean。顺便说句,这个 RedisOperations 是位于 Spring Data Redis 这个 JAR 中。
|
|
|
|
|
|
|
|
|
|
|
|
再回到开头,RedisAutoConfiguration 是如何被发现的呢?实际上,它被配置在
|
|
|
|
|
|
|
|
|
|
|
|
spring-boot-autoconfigure 的 META-INF/spring.factories 中,示例如下:
|
|
|
|
|
|
|
|
|
|
|
|
```
|
|
|
|
|
|
org.springframework.boot.autoconfigure.EnableAutoConfiguration=\
|
|
|
|
|
|
org.springframework.boot.autoconfigure.admin.SpringApplicationAdminJmxAutoConfiguration,\
|
|
|
|
|
|
org.springframework.boot.autoconfigure.aop.AopAutoConfiguration,\
|
|
|
|
|
|
org.springframework.boot.autoconfigure.amqp.RabbitAutoConfiguration,\
|
|
|
|
|
|
org.springframework.boot.autoconfigure.data.r2dbc.R2dbcRepositoriesAutoConfiguration,\
|
|
|
|
|
|
org.springframework.boot.autoconfigure.data.redis.RedisAutoConfiguration,\
|
|
|
|
|
|
|
|
|
|
|
|
```
|
|
|
|
|
|
|
|
|
|
|
|
那么它是如何被加载进去的呢?我们的应用启动程序标记了@SpringBootApplication,这个注解继承了下面这个注解:
|
|
|
|
|
|
|
|
|
|
|
|
```
|
|
|
|
|
|
//省略其他非关键代码
|
|
|
|
|
|
@Import(AutoConfigurationImportSelector.class)
|
|
|
|
|
|
public @interface EnableAutoConfiguration {
|
|
|
|
|
|
//省略其他非关键代码
|
|
|
|
|
|
}
|
|
|
|
|
|
|
|
|
|
|
|
```
|
|
|
|
|
|
|
|
|
|
|
|
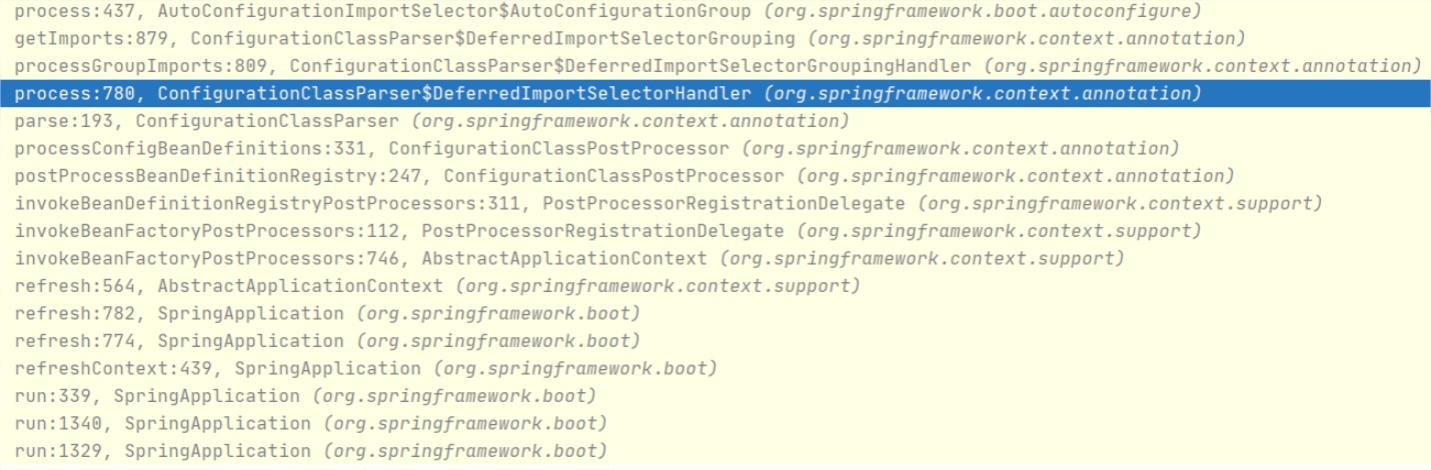
当它使用了 AutoConfigurationImportSelector 这个类,这个类就会导入在META-INF/spring.factories定义的 RedisAutoConfiguration。那么 import 动作是什么时候执行的呢?实际上是在启动应用程序时触发的,调用堆栈信息如下:
|
|
|
|
|
|
|
|
|
|
|
|
|
|
|
|
|
|
|
|
|
|
|
|
结合上面的堆栈和相关源码,我们不妨可以总结下 RedisTemplate 被创建的过程。
|
|
|
|
|
|
|
|
|
|
|
|
当 Spring 启动时,会通过 ConfigurationClassPostProcessor 尝试处理所有标记@Configuration 的类,具体到每个配置类的处理是通过 ConfigurationClassParser 来完成的。
|
|
|
|
|
|
|
|
|
|
|
|
在这个完成过程中,它会使用 ConfigurationClassParser.DeferredImportSelectorHandler 来完成对 Import 的处理。AutoConfigurationImportSelector 就是其中一种Import,它被 @EnableAutoConfiguration 这个注解间接引用。它会加载"META-INF/spring.factories"中定义的 RedisAutoConfiguration,此时我们就会发现 StringRedisTemplate 和 RedisTemplate 这两个 Bean 了。
|
|
|
|
|
|
|
|
|
|
|
|
## **[第19课](https://time.geekbang.org/column/article/381193)**
|
|
|
|
|
|
|
|
|
|
|
|
RuntimeException 是 Exception 的子类,如果用 rollbackFor=Exception.class,那对 RuntimeException 也会生效。如果我们需要对 Exception 执行回滚操作,但对于 RuntimeException 不执行回滚操作,应该怎么做呢?
|
|
|
|
|
|
|
|
|
|
|
|
我们可以同时为 @Transactional 指定rollbackFor 和noRollbackFor 属性,具体代码示例如下:
|
|
|
|
|
|
|
|
|
|
|
|
```
|
|
|
|
|
|
@Transactional(rollbackFor = Exception.class, noRollbackFor = RuntimeException.class)
|
|
|
|
|
|
public void doSaveStudent(Student student) throws Exception {
|
|
|
|
|
|
studentMapper.saveStudent(student);
|
|
|
|
|
|
if (student.getRealname().equals("小明")) {
|
|
|
|
|
|
throw new RuntimeException("该用户已存在");
|
|
|
|
|
|
}
|
|
|
|
|
|
}
|
|
|
|
|
|
|
|
|
|
|
|
```
|
|
|
|
|
|
|
|
|
|
|
|
## **[第20课](https://time.geekbang.org/column/article/382150)**
|
|
|
|
|
|
|
|
|
|
|
|
结合案例2,请你思考这样一个问题:在这个案例中,我们在 CardService类方法上声明了这样的事务传播属性,@Transactional(propagation = Propagation.REQUIRES\_NEW),如果使用 Spring 的默认声明行不行,为什么?
|
|
|
|
|
|
|
|
|
|
|
|
答案是不行。我们前面说过,Spring 默认的事务传播类型是 REQUIRED,在有外部事务的情况下,内部事务则会加入原有的事务。如果我们声明成 REQUIRED,当我们要操作 card 数据的时候,持有的依然还会是原来的 DataSource。
|
|
|
|
|
|
|
|
|
|
|
|
## **[第21课](https://time.geekbang.org/column/article/382710)**
|
|
|
|
|
|
|
|
|
|
|
|
当我们比较案例 1 和案例 2,你会发现不管使用的是查询(Query)参数还是表单(Form)参数,我们的接口定义并没有什么变化,风格如下:
|
|
|
|
|
|
|
|
|
|
|
|
```
|
|
|
|
|
|
@RestController
|
|
|
|
|
|
public class HelloWorldController {
|
|
|
|
|
|
@RequestMapping(path = "hi", method = RequestMethod.GET)
|
|
|
|
|
|
public String hi(@RequestParam("para1") String para1){
|
|
|
|
|
|
return "helloworld:" + para1;
|
|
|
|
|
|
};
|
|
|
|
|
|
|
|
|
|
|
|
}
|
|
|
|
|
|
|
|
|
|
|
|
```
|
|
|
|
|
|
|
|
|
|
|
|
那是不是 @RequestParam 本身就能处理这两种数据呢?
|
|
|
|
|
|
|
|
|
|
|
|
不考虑实现原理,如果我们仔细看下 @RequestParam 的 API 文档,你就会发现@RequestParam 不仅能处理表单参数,也能处理查询参数。API 文档如下:
|
|
|
|
|
|
|
|
|
|
|
|
> In Spring MVC, "request parameters" map to query parameters, form data, and parts in multipart requests. This is because the Servlet API combines query parameters and form data into a single map called "parameters", and that includes automatic parsing of the request body.
|
|
|
|
|
|
|
|
|
|
|
|
稍微深入一点的话,我们还可以从源码上看看具体实现。
|
|
|
|
|
|
|
|
|
|
|
|
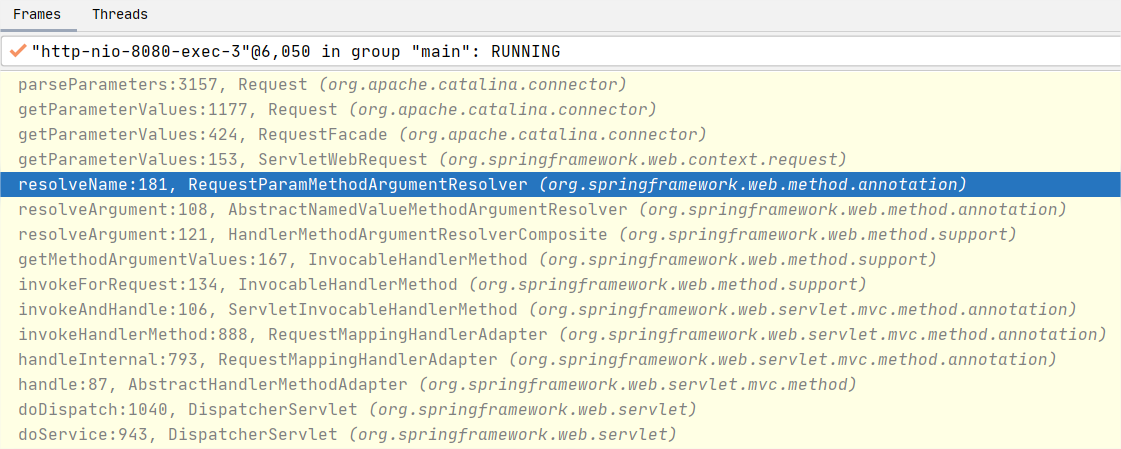
不管是使用 Query 参数还是用 Form 参数来访问,对于案例程序而言,解析的关键逻辑都是类似的,都是通过下面的调用栈完成参数的解析:
|
|
|
|
|
|
|
|
|
|
|
|
|
|
|
|
|
|
|
|
|
|
|
|
这里可以看出,负责解析的都是 RequestParamMethodArgumentResolver,解析最后的调用也都是一样的方法。在 org.apache.catalina.connector.Request#parseParameters 这个方法中,对于 From 的解析是这样的:
|
|
|
|
|
|
|
|
|
|
|
|
```
|
|
|
|
|
|
if (!("application/x-www-form-urlencoded".equals(contentType))) {
|
|
|
|
|
|
success = true;
|
|
|
|
|
|
return;
|
|
|
|
|
|
}
|
|
|
|
|
|
|
|
|
|
|
|
//走到这里,说明是 Form: "application/x-www-form-urlencoded"
|
|
|
|
|
|
int len = getContentLength();
|
|
|
|
|
|
|
|
|
|
|
|
if (len > 0) {
|
|
|
|
|
|
int maxPostSize = connector.getMaxPostSize();
|
|
|
|
|
|
if ((maxPostSize >= 0) && (len > maxPostSize)) {
|
|
|
|
|
|
//省略非关键代码
|
|
|
|
|
|
}
|
|
|
|
|
|
byte[] formData = null;
|
|
|
|
|
|
if (len < CACHED_POST_LEN) {
|
|
|
|
|
|
if (postData == null) {
|
|
|
|
|
|
postData = new byte[CACHED_POST_LEN];
|
|
|
|
|
|
}
|
|
|
|
|
|
formData = postData;
|
|
|
|
|
|
} else {
|
|
|
|
|
|
formData = new byte[len];
|
|
|
|
|
|
}
|
|
|
|
|
|
try {
|
|
|
|
|
|
if (readPostBody(formData, len) != len) {
|
|
|
|
|
|
parameters.setParseFailedReason(FailReason.REQUEST_BODY_INCOMPLETE);
|
|
|
|
|
|
return;
|
|
|
|
|
|
}
|
|
|
|
|
|
} catch (IOException e) {
|
|
|
|
|
|
//省略非关键代码
|
|
|
|
|
|
}
|
|
|
|
|
|
//把 Form 数据添加到 parameter 里面去
|
|
|
|
|
|
parameters.processParameters(formData, 0, len);
|
|
|
|
|
|
|
|
|
|
|
|
```
|
|
|
|
|
|
|
|
|
|
|
|
Form 的数据最终存储在 Parameters#paramHashValues 中。
|
|
|
|
|
|
|
|
|
|
|
|
而对于查询参数的处理,同样是在 org.apache.catalina.connector.Request#parseParameters 中,不过处理它的代码行在 Form 前面一些,关键调用代码行如下:
|
|
|
|
|
|
|
|
|
|
|
|
```
|
|
|
|
|
|
parameters.handleQueryParameters();
|
|
|
|
|
|
|
|
|
|
|
|
```
|
|
|
|
|
|
|
|
|
|
|
|
最终它也是通过 org.apache.tomcat.util.http.Parameters#processParameters 来完成数据的添加。自然,它存储的位置也是 Parameters#paramHashValues 中。
|
|
|
|
|
|
|
|
|
|
|
|
综上可知,虽然使用的是一个固定的注解 @RequestParam,但是它能处理表单和查询参数,因为它们都会存储在同一个位置:Parameters#paramHashValues。
|
|
|
|
|
|
|
|
|
|
|
|
## **[第22课](https://time.geekbang.org/column/article/383756)**
|
|
|
|
|
|
|
|
|
|
|
|
在案例 1 中,我们解释了为什么测试程序加载不到 spring.xml 文件,根源在于当使用下面的语句加载文件时,它们是采用不同的 Resource 形式来加载的:
|
|
|
|
|
|
|
|
|
|
|
|
```
|
|
|
|
|
|
@ImportResource(locations = {"spring.xml"})
|
|
|
|
|
|
|
|
|
|
|
|
```
|
|
|
|
|
|
|
|
|
|
|
|
具体而言,应用程序加载使用的是 ClassPathResource,测试加载使用的是 ServletContextResource,那么这是怎么造成的呢?
|
|
|
|
|
|
|
|
|
|
|
|
实际上,以何种类型的Resource加载是由 DefaultResourceLoader#getResource 来决定的:
|
|
|
|
|
|
|
|
|
|
|
|
```
|
|
|
|
|
|
@Override
|
|
|
|
|
|
public Resource getResource(String location) {
|
|
|
|
|
|
//省略非关键代码
|
|
|
|
|
|
if (location.startsWith("/")) {
|
|
|
|
|
|
return getResourceByPath(location);
|
|
|
|
|
|
}
|
|
|
|
|
|
else if (location.startsWith(CLASSPATH_URL_PREFIX)) {
|
|
|
|
|
|
return new ClassPathResource(location.substring(CLASSPATH_URL_PREFIX.length()), getClassLoader());
|
|
|
|
|
|
}
|
|
|
|
|
|
else {
|
|
|
|
|
|
try {
|
|
|
|
|
|
// Try to parse the location as a URL...
|
|
|
|
|
|
URL url = new URL(location);
|
|
|
|
|
|
return (ResourceUtils.isFileURL(url) ? new FileUrlResource(url) : new UrlResource(url));
|
|
|
|
|
|
}
|
|
|
|
|
|
catch (MalformedURLException ex) {
|
|
|
|
|
|
// No URL -> resolve as resource path.
|
|
|
|
|
|
return getResourceByPath(location);
|
|
|
|
|
|
}
|
|
|
|
|
|
}
|
|
|
|
|
|
}
|
|
|
|
|
|
|
|
|
|
|
|
```
|
|
|
|
|
|
|
|
|
|
|
|
结合上述代码,你可以看出,当使用下面语句时:
|
|
|
|
|
|
|
|
|
|
|
|
```
|
|
|
|
|
|
@ImportResource(locations = {"classpath:spring.xml"})
|
|
|
|
|
|
|
|
|
|
|
|
```
|
|
|
|
|
|
|
|
|
|
|
|
走入的分支是:
|
|
|
|
|
|
|
|
|
|
|
|
```
|
|
|
|
|
|
//CLASSPATH_URL_PREFIX:classpath
|
|
|
|
|
|
else if (location.startsWith(CLASSPATH_URL_PREFIX)) {
|
|
|
|
|
|
return new ClassPathResource(location.substring(CLASSPATH_URL_PREFIX.length()), getClassLoader());
|
|
|
|
|
|
}
|
|
|
|
|
|
|
|
|
|
|
|
```
|
|
|
|
|
|
|
|
|
|
|
|
即创建的是 ClassPathResource。
|
|
|
|
|
|
|
|
|
|
|
|
而当使用下面语句时:
|
|
|
|
|
|
|
|
|
|
|
|
```
|
|
|
|
|
|
@ImportResource(locations = {"spring.xml"})
|
|
|
|
|
|
|
|
|
|
|
|
```
|
|
|
|
|
|
|
|
|
|
|
|
走入的分支是:
|
|
|
|
|
|
|
|
|
|
|
|
```
|
|
|
|
|
|
try {
|
|
|
|
|
|
// 按 URL 加载
|
|
|
|
|
|
URL url = new URL(location);
|
|
|
|
|
|
return (ResourceUtils.isFileURL(url) ? new FileUrlResource(url) : new UrlResource(url));
|
|
|
|
|
|
}
|
|
|
|
|
|
catch (MalformedURLException ex) {
|
|
|
|
|
|
// 按路径加载
|
|
|
|
|
|
return getResourceByPath(location);
|
|
|
|
|
|
}
|
|
|
|
|
|
|
|
|
|
|
|
```
|
|
|
|
|
|
|
|
|
|
|
|
先尝试按 URL 加载,很明显这里会失败,因为字符串spring.xml并非一个 URL。随后使用 getResourceByPath()来加载,它会执行到下面的 WebApplicationContextResourceLoader#getResourceByPath():
|
|
|
|
|
|
|
|
|
|
|
|
```
|
|
|
|
|
|
private static class WebApplicationContextResourceLoader extends ClassLoaderFilesResourcePatternResolver.ApplicationContextResourceLoader {
|
|
|
|
|
|
private final WebApplicationContext applicationContext;
|
|
|
|
|
|
//省略非关键代码
|
|
|
|
|
|
protected Resource getResourceByPath(String path) {
|
|
|
|
|
|
return (Resource)(this.applicationContext.getServletContext() != null ? new ServletContextResource(this.applicationContext.getServletContext(), path) : super.getResourceByPath(path));
|
|
|
|
|
|
}
|
|
|
|
|
|
}
|
|
|
|
|
|
|
|
|
|
|
|
```
|
|
|
|
|
|
|
|
|
|
|
|
可以看出,这个时候其实已经和 ApplicationContext 息息相关了。在我们的案例中,最终返回的是 ServletContextResource。
|
|
|
|
|
|
|
|
|
|
|
|
相信看到这里,你就能明白为什么一个小小的改动会导致生成的Resource不同了。无非还是因为你定义了不同的格式,不同的格式创建的资源不同,加载逻辑也不同。至于后续是如何加载的,你可以回看全文。
|
|
|
|
|
|
|
|
|
|
|
|
以上就是这次答疑的全部内容,我们下节课再见!
|
|
|
|
|
|
|