|
|
|
|
|
# 07|Spring事件常见错误
|
|
|
|
|
|
|
|
|
|
|
|
你好,我是傅健,这节课我们聊聊Spring事件上的常见错误。
|
|
|
|
|
|
|
|
|
|
|
|
前面的几讲中,我们介绍了Spring依赖注入、AOP等核心功能点上的常见错误。而作为Spring 的关键功能支撑,Spring事件是一个相对独立的点。或许你从没有在自己的项目中使用过Spring事件,但是你一定见过它的相关日志。而且在未来的编程实践中,你会发现,一旦你用上了Spring事件,往往完成的都是一些有趣的、强大的功能,例如动态配置。那么接下来我就来讲讲Spring事件上都有哪些常见的错误。
|
|
|
|
|
|
|
|
|
|
|
|
## 案例1:试图处理并不会抛出的事件
|
|
|
|
|
|
|
|
|
|
|
|
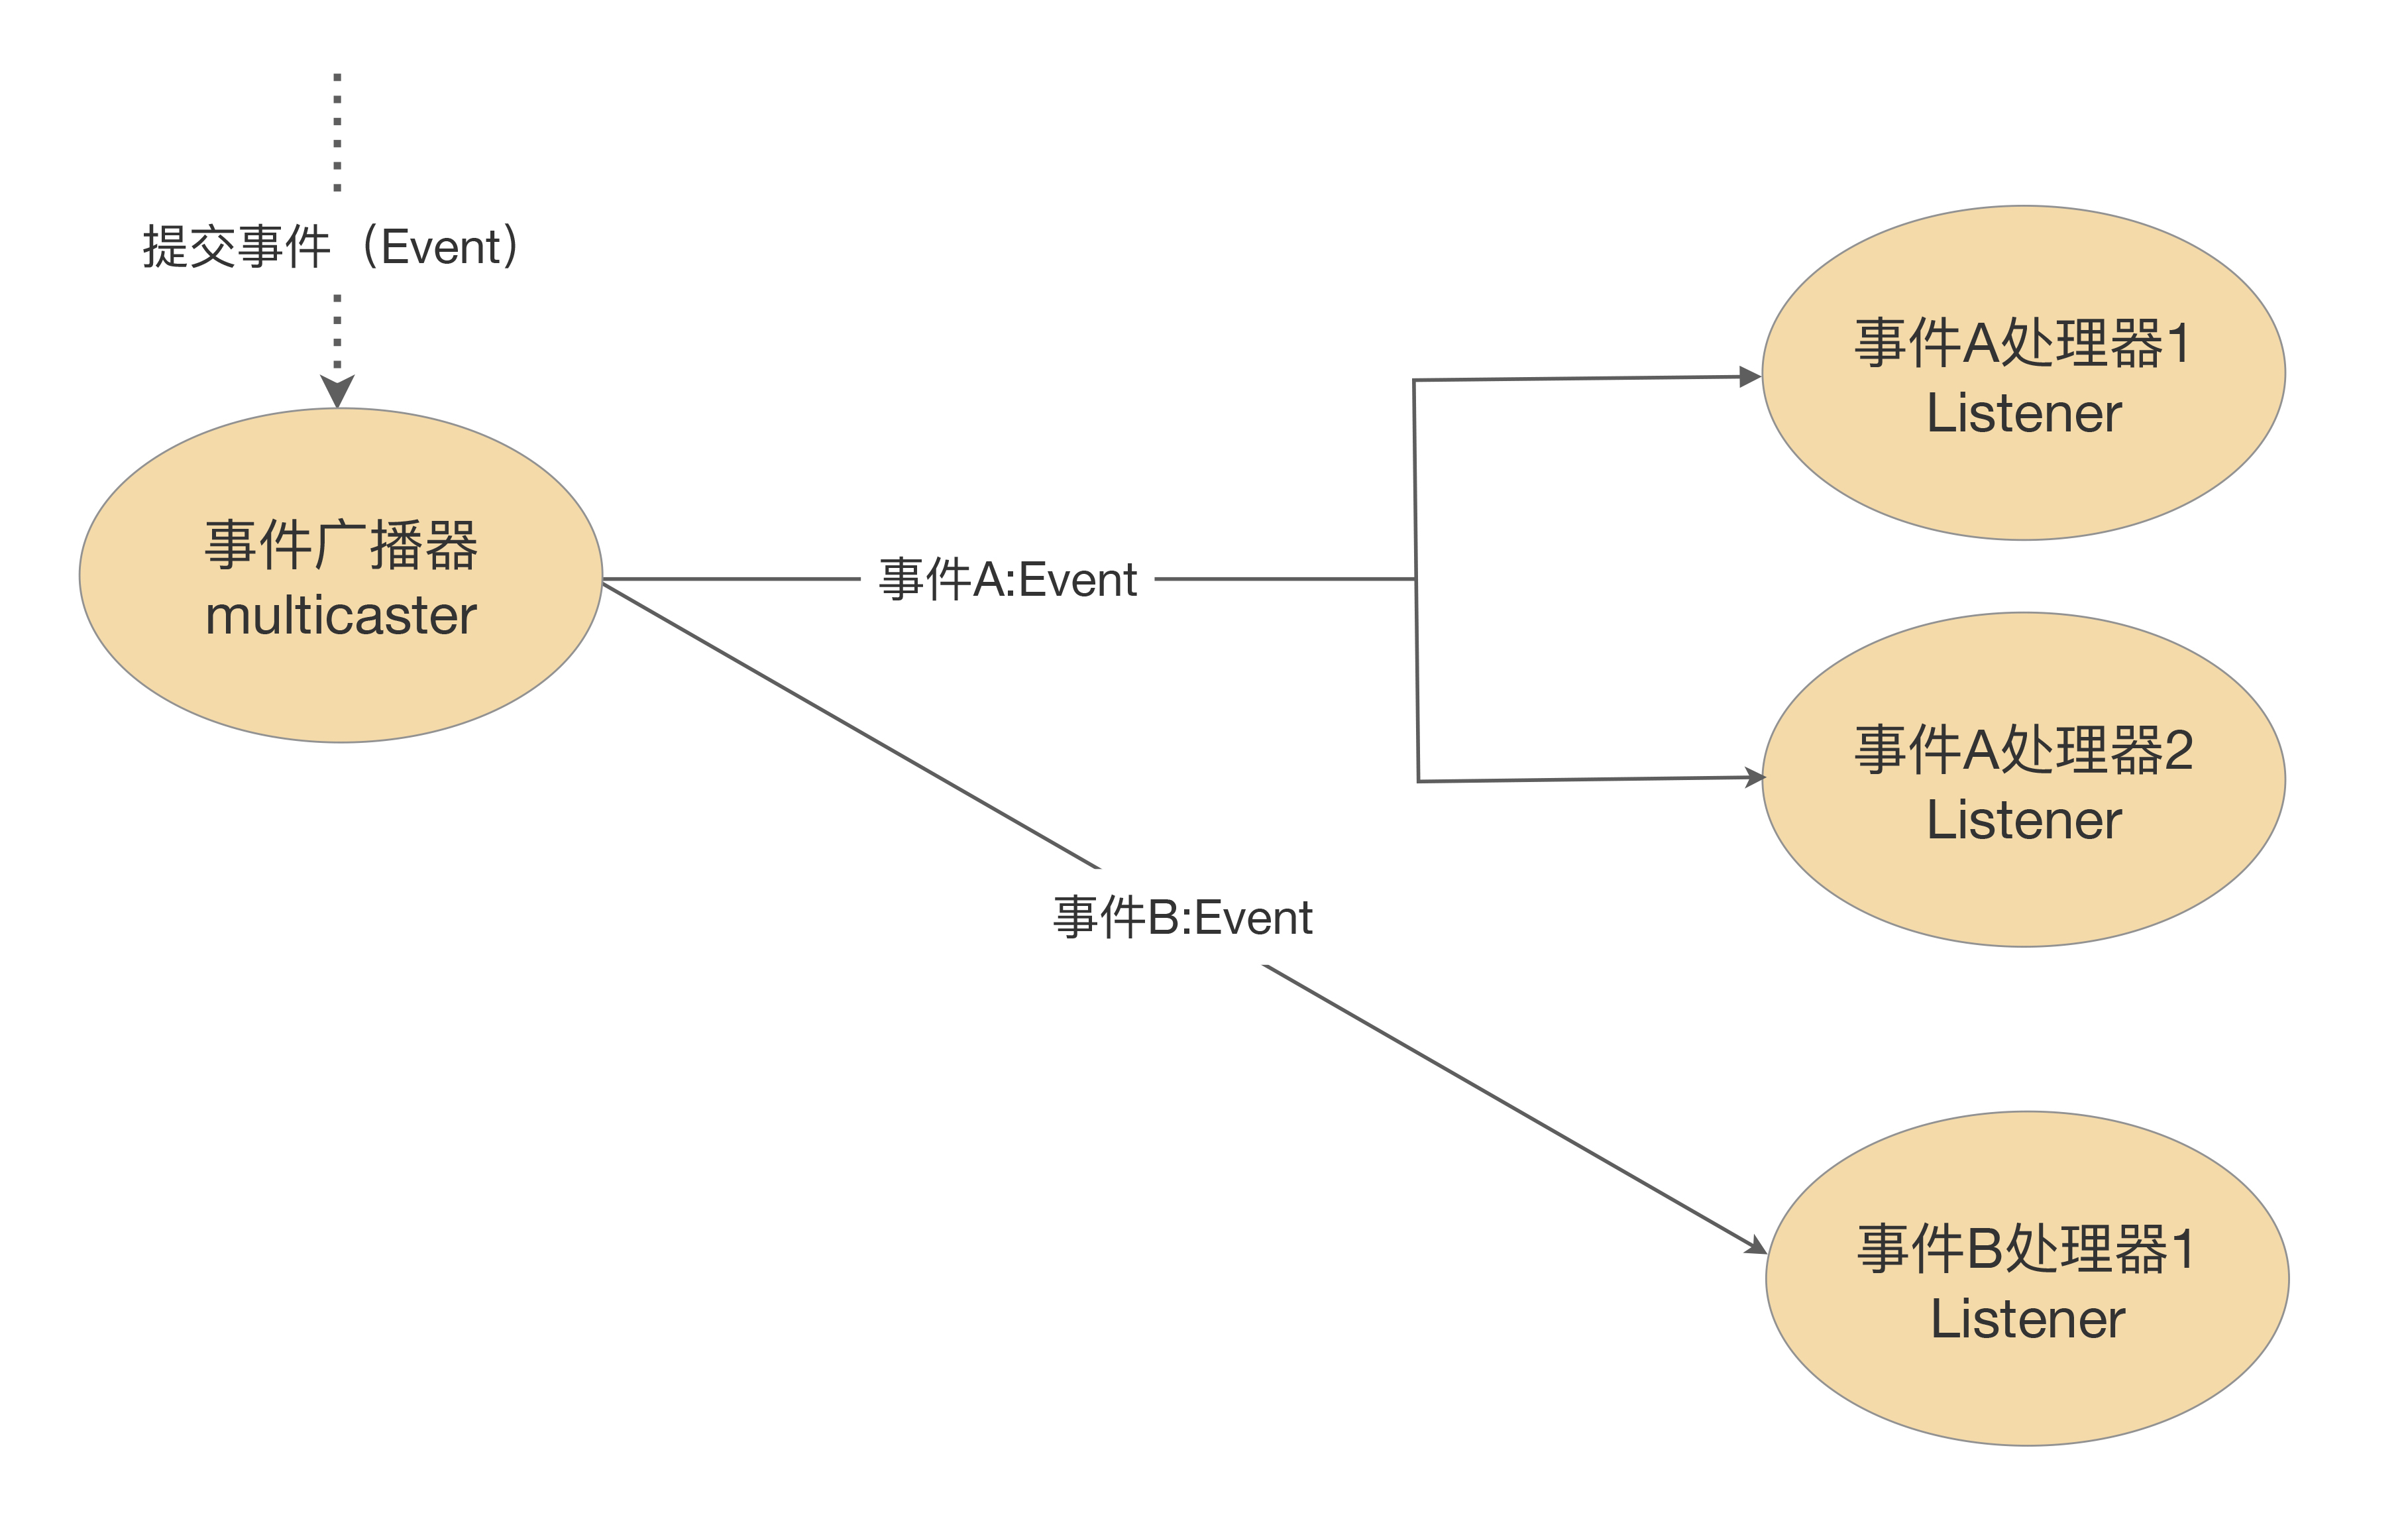
Spring事件的设计比较简单。说白了,就是监听器设计模式在Spring中的一种实现,参考下图:
|
|
|
|
|
|
|
|
|
|
|
|
|
|
|
|
|
|
|
|
|
|
|
|
从图中我们可以看出,Spring事件包含以下三大组件。
|
|
|
|
|
|
|
|
|
|
|
|
1. 事件(Event):用来区分和定义不同的事件,在Spring中,常见的如ApplicationEvent和AutoConfigurationImportEvent,它们都继承于java.util.EventObject。
|
|
|
|
|
|
2. 事件广播器(Multicaster):负责发布上述定义的事件。例如,负责发布ApplicationEvent 的ApplicationEventMulticaster就是Spring中一种常见的广播器。
|
|
|
|
|
|
3. 事件监听器(Listener):负责监听和处理广播器发出的事件,例如ApplicationListener就是用来处理ApplicationEventMulticaster发布的ApplicationEvent,它继承于JDK的 EventListener,我们可以看下它的定义来验证这个结论:
|
|
|
|
|
|
|
|
|
|
|
|
> public interface ApplicationListener<E extends ApplicationEvent> extends EventListener {
|
|
|
|
|
|
> void onApplicationEvent(E event);
|
|
|
|
|
|
> }
|
|
|
|
|
|
|
|
|
|
|
|
当然,虽然在上述组件中,任何一个都是缺一不可的,但是功能模块命名不见得完全贴合上述提及的关键字,例如发布AutoConfigurationImportEvent的广播器就不含有Multicaster字样。它的发布是由AutoConfigurationImportSelector来完成的。
|
|
|
|
|
|
|
|
|
|
|
|
对这些基本概念和实现有了一定的了解后,我们就可以开始解析那些常见的错误。闲话少说,我们先来看下面这段基于Spring Boot技术栈的代码:
|
|
|
|
|
|
|
|
|
|
|
|
```
|
|
|
|
|
|
@Slf4j
|
|
|
|
|
|
@Component
|
|
|
|
|
|
public class MyContextStartedEventListener implements ApplicationListener<ContextStartedEvent> {
|
|
|
|
|
|
|
|
|
|
|
|
public void onApplicationEvent(final ContextStartedEvent event) {
|
|
|
|
|
|
log.info("{} received: {}", this.toString(), event);
|
|
|
|
|
|
}
|
|
|
|
|
|
|
|
|
|
|
|
}
|
|
|
|
|
|
|
|
|
|
|
|
```
|
|
|
|
|
|
|
|
|
|
|
|
很明显,这段代码定义了一个监听器MyContextStartedEventListener,试图拦截ContextStartedEvent。因为在很多Spring初级开发者眼中,Spring运转的核心就是一个Context的维护,那么启动Spring自然会启动Context,于是他们是很期待出现类似下面的日志的:
|
|
|
|
|
|
|
|
|
|
|
|
> 2021-03-07 07:08:21.197 INFO 2624 --- \[nio-8080-exec-1\] c.s.p.l.e.MyContextStartedEventListener : com.spring.puzzle.class7.example1.MyContextStartedEventListener@d33d5a **received**: org.springframework.context.event.**ContextStartedEvent**\[source=org.springframework.boot.web.servlet.context.AnnotationConfigServletWebServerApplicationContext@19b56c0, started on Sun Mar 07 07:07:57 CST 2021\]
|
|
|
|
|
|
|
|
|
|
|
|
但是当我们启动Spring Boot后,会发现并不会拦截到这个事件,如何理解这个错误呢?
|
|
|
|
|
|
|
|
|
|
|
|
### 案例解析
|
|
|
|
|
|
|
|
|
|
|
|
在Spring事件运用上,这是一个常见的错误,就是不假思索地认为一个框架只要定义了一个事件,那么一定会抛出来。例如,在本案例中,ContextStartedEvent就是Spring内置定义的事件,而Spring Boot本身会创建和运维Context,表面看起来这个事件的抛出是必然的,但是这个事件一定会在Spring Boot启动时抛出来么?
|
|
|
|
|
|
|
|
|
|
|
|
答案明显是否定的,我们首先看下要抛出这个事件需要调用的方法是什么?在Spring Boot中,这个事件的抛出只发生在一处,即位于方法AbstractApplicationContext#start中。
|
|
|
|
|
|
|
|
|
|
|
|
```
|
|
|
|
|
|
@Override
|
|
|
|
|
|
public void start() {
|
|
|
|
|
|
getLifecycleProcessor().start();
|
|
|
|
|
|
publishEvent(new ContextStartedEvent(this));
|
|
|
|
|
|
}
|
|
|
|
|
|
|
|
|
|
|
|
```
|
|
|
|
|
|
|
|
|
|
|
|
也就是说,只有上述方法被调用,才会抛出ContextStartedEvent,但是这个方法在Spring Boot启动时会被调用么?我们可以查看Spring启动方法中围绕Context的关键方法调用,代码如下:
|
|
|
|
|
|
|
|
|
|
|
|
```
|
|
|
|
|
|
public ConfigurableApplicationContext run(String... args) {
|
|
|
|
|
|
//省略非关键代码
|
|
|
|
|
|
context = createApplicationContext();
|
|
|
|
|
|
//省略非关键代码
|
|
|
|
|
|
prepareContext(context, environment, listeners, applicationArguments, printedBanner);
|
|
|
|
|
|
refreshContext(context);
|
|
|
|
|
|
//省略非关键代码
|
|
|
|
|
|
return context;
|
|
|
|
|
|
}
|
|
|
|
|
|
|
|
|
|
|
|
```
|
|
|
|
|
|
|
|
|
|
|
|
我们发现围绕Context、Spring Boot的启动只做了两个关键工作:创建Context和Refresh Context。其中Refresh的关键代码如下:
|
|
|
|
|
|
|
|
|
|
|
|
```
|
|
|
|
|
|
protected void refresh(ApplicationContext applicationContext) {
|
|
|
|
|
|
Assert.isInstanceOf(AbstractApplicationContext.class, applicationContext);
|
|
|
|
|
|
((AbstractApplicationContext) applicationContext).refresh();
|
|
|
|
|
|
}
|
|
|
|
|
|
|
|
|
|
|
|
```
|
|
|
|
|
|
|
|
|
|
|
|
很明显,Spring启动最终调用的是AbstractApplicationContext#refresh,并不是 AbstractApplicationContext#start。在这样的残酷现实下,ContextStartedEvent自然不会被抛出,不抛出,自然也不可能被捕获。所以这样的错误也就自然发生了。
|
|
|
|
|
|
|
|
|
|
|
|
### 问题修正
|
|
|
|
|
|
|
|
|
|
|
|
针对这个案例,有了源码的剖析,我们可以很快找到问题发生的原因,但是修正这个问题还要去追溯我们到底想要的是什么?我们可以分两种情况来考虑。
|
|
|
|
|
|
|
|
|
|
|
|
**1\. 假设我们是误读了ContextStartedEvent。**
|
|
|
|
|
|
|
|
|
|
|
|
针对这种情况,往往是因为我们确实想在Spring Boot启动时拦截一个启动事件,但是我们粗略扫视相关事件后,误以为ContextStartedEvent就是我们想要的。针对这种情况,我们只需要把监听事件的类型修改成真正发生的事件即可,例如在本案例中,我们可以修正如下:
|
|
|
|
|
|
|
|
|
|
|
|
```
|
|
|
|
|
|
@Component
|
|
|
|
|
|
public class MyContextRefreshedEventListener implements ApplicationListener<ContextRefreshedEvent> {
|
|
|
|
|
|
|
|
|
|
|
|
public void onApplicationEvent(final ContextRefreshedEvent event) {
|
|
|
|
|
|
log.info("{} received: {}", this.toString(), event);
|
|
|
|
|
|
}
|
|
|
|
|
|
|
|
|
|
|
|
}
|
|
|
|
|
|
|
|
|
|
|
|
```
|
|
|
|
|
|
|
|
|
|
|
|
我们监听ContextRefreshedEvent而非ContextStartedEvent。ContextRefreshedEvent的抛出可以参考方法AbstractApplicationContext#finishRefresh,它本身正好是Refresh操作中的一步。
|
|
|
|
|
|
|
|
|
|
|
|
```
|
|
|
|
|
|
protected void finishRefresh() {
|
|
|
|
|
|
//省略非关键代码
|
|
|
|
|
|
initLifecycleProcessor();
|
|
|
|
|
|
// Propagate refresh to lifecycle processor first.
|
|
|
|
|
|
getLifecycleProcessor().onRefresh();
|
|
|
|
|
|
// Publish the final event.
|
|
|
|
|
|
publishEvent(new ContextRefreshedEvent(this));
|
|
|
|
|
|
//省略非关键代码
|
|
|
|
|
|
}
|
|
|
|
|
|
|
|
|
|
|
|
```
|
|
|
|
|
|
|
|
|
|
|
|
**2\. 假设我们就是想要处理ContextStartedEvent。**
|
|
|
|
|
|
|
|
|
|
|
|
这种情况下,我们真的需要去调用AbstractApplicationContext#start方法。例如,我们可以使用下面的代码来让这个事件抛出:
|
|
|
|
|
|
|
|
|
|
|
|
```
|
|
|
|
|
|
@RestController
|
|
|
|
|
|
public class HelloWorldController {
|
|
|
|
|
|
|
|
|
|
|
|
@Autowired
|
|
|
|
|
|
private AbstractApplicationContext applicationContext;
|
|
|
|
|
|
|
|
|
|
|
|
@RequestMapping(path = "publishEvent", method = RequestMethod.GET)
|
|
|
|
|
|
public String notifyEvent(){
|
|
|
|
|
|
applicationContext.start();
|
|
|
|
|
|
return "ok";
|
|
|
|
|
|
};
|
|
|
|
|
|
}
|
|
|
|
|
|
|
|
|
|
|
|
```
|
|
|
|
|
|
|
|
|
|
|
|
我们随便找一处来Autowired一个AbstractApplicationContext,然后直接调用其start()就能让事件抛出来。
|
|
|
|
|
|
|
|
|
|
|
|
很明显,这种抛出并不难,但是作为题外话,我们可以思考下为什么要去调用start()呢?start()本身在Spring Boot中有何作用?
|
|
|
|
|
|
|
|
|
|
|
|
如果我们去翻阅这个方法,我们会发现start()是org.springframework.context.Lifecycle定义的方法,而它在Spring Boot的默认实现中是去执行所有Lifecycle Bean的启动方法,这点可以参考DefaultLifecycleProcessor#startBeans方法来验证:
|
|
|
|
|
|
|
|
|
|
|
|
```
|
|
|
|
|
|
private void startBeans(boolean autoStartupOnly) {
|
|
|
|
|
|
Map<String, Lifecycle> lifecycleBeans = getLifecycleBeans();
|
|
|
|
|
|
Map<Integer, LifecycleGroup> phases = new HashMap<>();
|
|
|
|
|
|
lifecycleBeans.forEach((beanName, bean) -> {
|
|
|
|
|
|
if (!autoStartupOnly || (bean instanceof SmartLifecycle && ((SmartLifecycle) bean).isAutoStartup())) {
|
|
|
|
|
|
int phase = getPhase(bean);
|
|
|
|
|
|
LifecycleGroup group = phases.get(phase);
|
|
|
|
|
|
if (group == null) {
|
|
|
|
|
|
group = new LifecycleGroup(phase, this.timeoutPerShutdownPhase, lifecycleBeans, autoStartupOnly);
|
|
|
|
|
|
phases.put(phase, group);
|
|
|
|
|
|
}
|
|
|
|
|
|
group.add(beanName, bean);
|
|
|
|
|
|
}
|
|
|
|
|
|
});
|
|
|
|
|
|
if (!phases.isEmpty()) {
|
|
|
|
|
|
List<Integer> keys = new ArrayList<>(phases.keySet());
|
|
|
|
|
|
Collections.sort(keys);
|
|
|
|
|
|
for (Integer key : keys) {
|
|
|
|
|
|
phases.get(key).start();
|
|
|
|
|
|
}
|
|
|
|
|
|
}
|
|
|
|
|
|
}
|
|
|
|
|
|
|
|
|
|
|
|
```
|
|
|
|
|
|
|
|
|
|
|
|
说起来比较抽象,我们可以去写一个Lifecycle Bean,代码如下:
|
|
|
|
|
|
|
|
|
|
|
|
```
|
|
|
|
|
|
@Component
|
|
|
|
|
|
@Slf4j
|
|
|
|
|
|
public class MyLifeCycle implements Lifecycle {
|
|
|
|
|
|
|
|
|
|
|
|
private volatile boolean running = false;
|
|
|
|
|
|
|
|
|
|
|
|
@Override
|
|
|
|
|
|
public void start() {
|
|
|
|
|
|
log.info("lifecycle start");
|
|
|
|
|
|
running = true;
|
|
|
|
|
|
}
|
|
|
|
|
|
|
|
|
|
|
|
@Override
|
|
|
|
|
|
public void stop() {
|
|
|
|
|
|
log.info("lifecycle stop");
|
|
|
|
|
|
running = false;
|
|
|
|
|
|
}
|
|
|
|
|
|
|
|
|
|
|
|
@Override
|
|
|
|
|
|
public boolean isRunning() {
|
|
|
|
|
|
return running;
|
|
|
|
|
|
}
|
|
|
|
|
|
|
|
|
|
|
|
}
|
|
|
|
|
|
|
|
|
|
|
|
```
|
|
|
|
|
|
|
|
|
|
|
|
当我们再次运行Spring Boot时,只要执行了AbstractApplicationContext的start(),就会输出上述代码定义的行为:输出LifeCycle start日志。
|
|
|
|
|
|
|
|
|
|
|
|
通过这个Lifecycle Bean的使用,AbstractApplicationContext的start要做的事,我们就清楚多了。它和Refresh()不同,Refresh()是初始化和加载所有需要管理的Bean,而start只有在有Lifecycle Bean时才有被调用的价值。那么我们自定义Lifecycle Bean一般是用来做什么呢?例如,可以用它来实现运行中的启停。这里不再拓展,你可以自己做更深入的探索。
|
|
|
|
|
|
|
|
|
|
|
|
通过这个案例,我们搞定了第一类错误。而从这个错误中,我们也得出了一个启示:**当一个事件拦截不了时,我们第一个要查的是拦截的事件类型对不对,执行的代码能不能抛出它。**把握好这点,也就事半功倍了。
|
|
|
|
|
|
|
|
|
|
|
|
## 案例2:监听事件的体系不对
|
|
|
|
|
|
|
|
|
|
|
|
通过案例1的学习,我们可以保证事件的抛出,但是抛出的事件就一定能被我们监听到么?我们再来看这样一个案例,首先上代码:
|
|
|
|
|
|
|
|
|
|
|
|
```
|
|
|
|
|
|
@Slf4j
|
|
|
|
|
|
@Component
|
|
|
|
|
|
public class MyApplicationEnvironmentPreparedEventListener implements ApplicationListener<ApplicationEnvironmentPreparedEvent > {
|
|
|
|
|
|
|
|
|
|
|
|
public void onApplicationEvent(final ApplicationEnvironmentPreparedEvent event) {
|
|
|
|
|
|
log.info("{} received: {}", this.toString(), event);
|
|
|
|
|
|
}
|
|
|
|
|
|
|
|
|
|
|
|
}
|
|
|
|
|
|
|
|
|
|
|
|
```
|
|
|
|
|
|
|
|
|
|
|
|
这里我们试图处理ApplicationEnvironmentPreparedEvent。期待出现拦截事件的日志如下:
|
|
|
|
|
|
|
|
|
|
|
|
> 2021-03-07 09:12:08.886 INFO 27064 --- \[ restartedMain\] licationEnvironmentPreparedEventListener : com.spring.puzzle.class7.example2.MyApplicationEnvironmentPreparedEventListener@2b093d received: org.springframework.boot.context.event.ApplicationEnvironmentPreparedEvent\[source=org.springframework.boot.SpringApplication@122b9e6\]
|
|
|
|
|
|
|
|
|
|
|
|
有了案例1的经验,首先我们就可以查看下这个事件的抛出会不会存在问题。这个事件在Spring中是由EventPublishingRunListener#environmentPrepared方法抛出,代码如下:
|
|
|
|
|
|
|
|
|
|
|
|
```
|
|
|
|
|
|
@Override
|
|
|
|
|
|
public void environmentPrepared(ConfigurableEnvironment environment) {
|
|
|
|
|
|
this.initialMulticaster
|
|
|
|
|
|
.multicastEvent(new ApplicationEnvironmentPreparedEvent(this.application, this.args, environment));
|
|
|
|
|
|
}
|
|
|
|
|
|
|
|
|
|
|
|
```
|
|
|
|
|
|
|
|
|
|
|
|
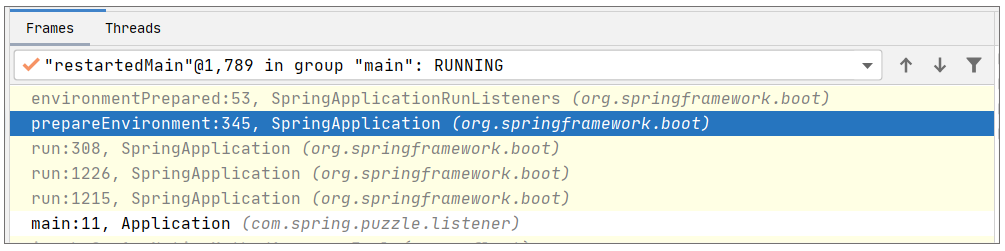
现在我们调试下代码,你会发现这个方法在Spring启动时一定经由SpringApplication#prepareEnvironment方法调用,调试截图如下:
|
|
|
|
|
|
|
|
|
|
|
|
|
|
|
|
|
|
|
|
|
|
|
|
表面上看,既然代码会被调用,事件就会抛出,那么我们在最开始定义的监听器就能处理,但是我们真正去运行程序时会发现,效果和案例1是一样的,都是监听器的处理并不执行,即拦截不了。这又是为何?
|
|
|
|
|
|
|
|
|
|
|
|
### 案例解析
|
|
|
|
|
|
|
|
|
|
|
|
实际上,这是在Spring事件处理上非常容易犯的一个错误,即监听的体系不一致。通俗点说,就是“驴头不对马嘴”。我们首先来看下关于ApplicationEnvironmentPreparedEvent的处理,它相关的两大组件是什么?
|
|
|
|
|
|
|
|
|
|
|
|
1. 广播器:这个事件的广播器是EventPublishingRunListener的initialMulticaster,代码参考如下:
|
|
|
|
|
|
|
|
|
|
|
|
```
|
|
|
|
|
|
public class EventPublishingRunListener implements SpringApplicationRunListener, Ordered {
|
|
|
|
|
|
//省略非关键代码
|
|
|
|
|
|
private final SimpleApplicationEventMulticaster initialMulticaster;
|
|
|
|
|
|
|
|
|
|
|
|
public EventPublishingRunListener(SpringApplication application, String[] args) {
|
|
|
|
|
|
//省略非关键代码
|
|
|
|
|
|
this.initialMulticaster = new SimpleApplicationEventMulticaster();
|
|
|
|
|
|
for (ApplicationListener<?> listener : application.getListeners()) {
|
|
|
|
|
|
this.initialMulticaster.addApplicationListener(listener);
|
|
|
|
|
|
}
|
|
|
|
|
|
}
|
|
|
|
|
|
}
|
|
|
|
|
|
|
|
|
|
|
|
```
|
|
|
|
|
|
|
|
|
|
|
|
2. 监听器:这个事件的监听器同样位于EventPublishingRunListener中,获取方式参考关键代码行:
|
|
|
|
|
|
|
|
|
|
|
|
> this.initialMulticaster.addApplicationListener(listener);
|
|
|
|
|
|
|
|
|
|
|
|
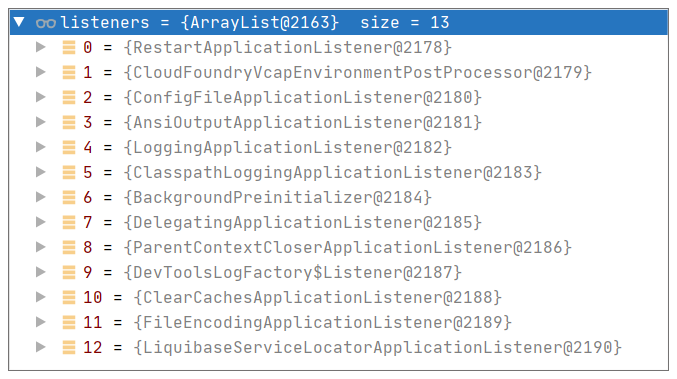
如果继续查看代码,我们会发现这个事件的监听器就存储在SpringApplication#Listeners中,调试下就可以找出所有的监听器,截图如下:
|
|
|
|
|
|
|
|
|
|
|
|
|
|
|
|
|
|
|
|
|
|
|
|
从中我们可以发现并不存在我们定义的MyApplicationEnvironmentPreparedEventListener,这是为何?
|
|
|
|
|
|
|
|
|
|
|
|
还是查看代码,当Spring Boot被构建时,会使用下面的方法去寻找上述监听器:
|
|
|
|
|
|
|
|
|
|
|
|
> setListeners((Collection) getSpringFactoriesInstances(ApplicationListener.class));
|
|
|
|
|
|
|
|
|
|
|
|
而上述代码最终寻找Listeners的候选者,参考代码 SpringFactoriesLoader#loadSpringFactories中的关键行:
|
|
|
|
|
|
|
|
|
|
|
|
> //下面的FACTORIES\_RESOURCE\_LOCATION定义为 "META-INF/spring.factories"
|
|
|
|
|
|
> classLoader.getResources(FACTORIES\_RESOURCE\_LOCATION) :
|
|
|
|
|
|
|
|
|
|
|
|
我们可以寻找下这样的文件(spring.factories),确实可以发现类似的定义:
|
|
|
|
|
|
|
|
|
|
|
|
```
|
|
|
|
|
|
org.springframework.context.ApplicationListener=\
|
|
|
|
|
|
org.springframework.boot.ClearCachesApplicationListener,\
|
|
|
|
|
|
org.springframework.boot.builder.ParentContextCloserApplicationListener,\
|
|
|
|
|
|
org.springframework.boot.cloud.CloudFoundryVcapEnvironmentPostProcessor,\
|
|
|
|
|
|
//省略其他监听器
|
|
|
|
|
|
|
|
|
|
|
|
```
|
|
|
|
|
|
|
|
|
|
|
|
说到这里,相信你已经意识到本案例的问题所在。我们定义的监听器并没有被放置在META-INF/spring.factories中,实际上,我们的监听器监听的体系是另外一套,其关键组件如下:
|
|
|
|
|
|
|
|
|
|
|
|
1. 广播器:即AbstractApplicationContext#applicationEventMulticaster;
|
|
|
|
|
|
2. 监听器:由上述提及的META-INF/spring.factories中加载的监听器以及扫描到的 ApplicationListener类型的Bean共同组成。
|
|
|
|
|
|
|
|
|
|
|
|
这样比较后,我们可以得出一个结论:**我们定义的监听器并不能监听到initialMulticaster广播出的ApplicationEnvironmentPreparedEvent。**
|
|
|
|
|
|
|
|
|
|
|
|
### 问题修正
|
|
|
|
|
|
|
|
|
|
|
|
现在就到了解决问题的时候了,我们可以把自定义监听器注册到initialMulticaster广播体系中,这里提供两种方法修正问题。
|
|
|
|
|
|
|
|
|
|
|
|
1. 在构建Spring Boot时,添加MyApplicationEnvironmentPreparedEventListener:
|
|
|
|
|
|
|
|
|
|
|
|
```
|
|
|
|
|
|
@SpringBootApplication
|
|
|
|
|
|
public class Application {
|
|
|
|
|
|
public static void main(String[] args) {
|
|
|
|
|
|
MyApplicationEnvironmentPreparedEventListener myApplicationEnvironmentPreparedEventListener = new MyApplicationEnvironmentPreparedEventListener();
|
|
|
|
|
|
SpringApplication springApplication = new SpringApplicationBuilder(Application.class).listeners(myApplicationEnvironmentPreparedEventListener).build();
|
|
|
|
|
|
springApplication.run(args);
|
|
|
|
|
|
}
|
|
|
|
|
|
}
|
|
|
|
|
|
|
|
|
|
|
|
```
|
|
|
|
|
|
|
|
|
|
|
|
2. 使用META-INF/spring.factories,即在/src/main/resources下面新建目录META-INF,然后新建一个对应的spring.factories文件:
|
|
|
|
|
|
|
|
|
|
|
|
```
|
|
|
|
|
|
org.springframework.context.ApplicationListener=\
|
|
|
|
|
|
com.spring.puzzle.listener.example2.MyApplicationEnvironmentPreparedEventListener
|
|
|
|
|
|
|
|
|
|
|
|
```
|
|
|
|
|
|
|
|
|
|
|
|
通过上述两种修改方式,即可完成事件的监听,很明显第二种方式要优于第一种,至少完全用原生的方式去解决,而不是手工实例化一个MyApplicationEnvironmentPreparedEventListener。这点还是挺重要的。
|
|
|
|
|
|
|
|
|
|
|
|
反思这个案例的错误,结论就是**对于事件一定要注意“驴头”(监听器)对上“马嘴”(广播)**。
|
|
|
|
|
|
|
|
|
|
|
|
## 案例3:部分事件监听器失效
|
|
|
|
|
|
|
|
|
|
|
|
通过前面案例的解析,我们可以确保事件在合适的时机被合适的监听器所捕获。但是理想总是与现实有差距,有些时候,我们可能还会发现部分事件监听器一直失效或偶尔失效。这里我们可以写一段代码来模拟偶尔失效的场景,首先我们完成一个自定义事件和两个监听器,代码如下:
|
|
|
|
|
|
|
|
|
|
|
|
```
|
|
|
|
|
|
public class MyEvent extends ApplicationEvent {
|
|
|
|
|
|
public MyEvent(Object source) {
|
|
|
|
|
|
super(source);
|
|
|
|
|
|
}
|
|
|
|
|
|
}
|
|
|
|
|
|
|
|
|
|
|
|
@Component
|
|
|
|
|
|
@Order(1)
|
|
|
|
|
|
public class MyFirstEventListener implements ApplicationListener<MyEvent> {
|
|
|
|
|
|
|
|
|
|
|
|
Random random = new Random();
|
|
|
|
|
|
|
|
|
|
|
|
@Override
|
|
|
|
|
|
public void onApplicationEvent(MyEvent event) {
|
|
|
|
|
|
log.info("{} received: {}", this.toString(), event);
|
|
|
|
|
|
//模拟部分失效
|
|
|
|
|
|
if(random.nextInt(10) % 2 == 1)
|
|
|
|
|
|
throw new RuntimeException("exception happen on first listener");
|
|
|
|
|
|
}
|
|
|
|
|
|
}
|
|
|
|
|
|
|
|
|
|
|
|
@Component
|
|
|
|
|
|
@Order(2)
|
|
|
|
|
|
public class MySecondEventListener implements ApplicationListener<MyEvent> {
|
|
|
|
|
|
@Override
|
|
|
|
|
|
public void onApplicationEvent(MyEvent event) {
|
|
|
|
|
|
log.info("{} received: {}", this.toString(), event);
|
|
|
|
|
|
}
|
|
|
|
|
|
}
|
|
|
|
|
|
|
|
|
|
|
|
|
|
|
|
|
|
```
|
|
|
|
|
|
|
|
|
|
|
|
这里监听器MyFirstEventListener的优先级稍高,且执行过程中会有50%的概率抛出异常。然后我们再写一个Controller来触发事件的发送:
|
|
|
|
|
|
|
|
|
|
|
|
```
|
|
|
|
|
|
@RestController
|
|
|
|
|
|
@Slf4j
|
|
|
|
|
|
public class HelloWorldController {
|
|
|
|
|
|
|
|
|
|
|
|
@Autowired
|
|
|
|
|
|
private AbstractApplicationContext applicationContext;
|
|
|
|
|
|
|
|
|
|
|
|
@RequestMapping(path = "publishEvent", method = RequestMethod.GET)
|
|
|
|
|
|
public String notifyEvent(){
|
|
|
|
|
|
log.info("start to publish event");
|
|
|
|
|
|
applicationContext.publishEvent(new MyEvent(UUID.randomUUID()));
|
|
|
|
|
|
return "ok";
|
|
|
|
|
|
};
|
|
|
|
|
|
}
|
|
|
|
|
|
|
|
|
|
|
|
```
|
|
|
|
|
|
|
|
|
|
|
|
完成这些代码后,我们就可以使用[http://localhost:8080/publishEvent](http://localhost:8080/publishEvent) 来测试监听器的接收和执行了。观察测试结果,我们会发现监听器MySecondEventListener有一半的概率并没有接收到任何事件。可以说,我们使用了最简化的代码模拟出了部分事件监听器偶尔失效的情况。当然在实际项目中,抛出异常这个根本原因肯定不会如此明显,但还是可以借机举一反三的。那么如何理解这个问题呢?
|
|
|
|
|
|
|
|
|
|
|
|
### 案例解析
|
|
|
|
|
|
|
|
|
|
|
|
这个案例非常简易,如果你稍微有些开发经验的话,大概也能推断出原因:处理器的执行是顺序执行的,在执行过程中,如果一个监听器执行抛出了异常,则后续监听器就得不到被执行的机会了。这里我们可以通过Spring源码看下事件是如何被执行的?
|
|
|
|
|
|
|
|
|
|
|
|
具体而言,当广播一个事件,执行的方法参考 SimpleApplicationEventMulticaster#multicastEvent(ApplicationEvent):
|
|
|
|
|
|
|
|
|
|
|
|
```
|
|
|
|
|
|
@Override
|
|
|
|
|
|
public void multicastEvent(final ApplicationEvent event, @Nullable ResolvableType eventType) {
|
|
|
|
|
|
ResolvableType type = (eventType != null ? eventType : resolveDefaultEventType(event));
|
|
|
|
|
|
Executor executor = getTaskExecutor();
|
|
|
|
|
|
for (ApplicationListener<?> listener : getApplicationListeners(event, type)) {
|
|
|
|
|
|
if (executor != null) {
|
|
|
|
|
|
executor.execute(() -> invokeListener(listener, event));
|
|
|
|
|
|
}
|
|
|
|
|
|
else {
|
|
|
|
|
|
invokeListener(listener, event);
|
|
|
|
|
|
}
|
|
|
|
|
|
}
|
|
|
|
|
|
}
|
|
|
|
|
|
|
|
|
|
|
|
```
|
|
|
|
|
|
|
|
|
|
|
|
上述方法通过Event类型等信息调用getApplicationListeners获取了具有执行资格的所有监听器(在本案例中,即为MyFirstEventListener和MySecondEventListener),然后按顺序去执行。最终每个监听器的执行是通过invokeListener()来触发的,调用的是接口方法 ApplicationListener#onApplicationEvent。执行逻辑可参考如下代码:
|
|
|
|
|
|
|
|
|
|
|
|
```
|
|
|
|
|
|
protected void invokeListener(ApplicationListener<?> listener, ApplicationEvent event) {
|
|
|
|
|
|
ErrorHandler errorHandler = getErrorHandler();
|
|
|
|
|
|
if (errorHandler != null) {
|
|
|
|
|
|
try {
|
|
|
|
|
|
doInvokeListener(listener, event);
|
|
|
|
|
|
}
|
|
|
|
|
|
catch (Throwable err) {
|
|
|
|
|
|
errorHandler.handleError(err);
|
|
|
|
|
|
}
|
|
|
|
|
|
}
|
|
|
|
|
|
else {
|
|
|
|
|
|
doInvokeListener(listener, event);
|
|
|
|
|
|
}
|
|
|
|
|
|
}
|
|
|
|
|
|
|
|
|
|
|
|
private void doInvokeListener(ApplicationListener listener, ApplicationEvent event) {
|
|
|
|
|
|
try {
|
|
|
|
|
|
listener.onApplicationEvent(event);
|
|
|
|
|
|
}
|
|
|
|
|
|
catch (ClassCastException ex) {
|
|
|
|
|
|
//省略非关键代码
|
|
|
|
|
|
}
|
|
|
|
|
|
else {
|
|
|
|
|
|
throw ex;
|
|
|
|
|
|
}
|
|
|
|
|
|
}
|
|
|
|
|
|
}
|
|
|
|
|
|
|
|
|
|
|
|
```
|
|
|
|
|
|
|
|
|
|
|
|
这里我们并没有去设置什么org.springframework.util.ErrorHandler,也没有绑定什么Executor 来执行任务,所以针对本案例的情况,我们可以看出:**最终事件的执行是由同一个线程按顺序来完成的,任何一个报错,都会导致后续的监听器执行不了。**
|
|
|
|
|
|
|
|
|
|
|
|
### 问题修正
|
|
|
|
|
|
|
|
|
|
|
|
怎么解决呢?好办,我提供两种方案给你。
|
|
|
|
|
|
|
|
|
|
|
|
**1\. 确保监听器的执行不会抛出异常。**
|
|
|
|
|
|
|
|
|
|
|
|
既然我们使用多个监听器,我们肯定是希望它们都能执行的,所以我们一定要保证每个监听器的执行不会被其他监听器影响。基于这个思路,我们修改案例代码如下:
|
|
|
|
|
|
|
|
|
|
|
|
```
|
|
|
|
|
|
@Component
|
|
|
|
|
|
@Order(1)
|
|
|
|
|
|
public class MyFirstEventListener implements ApplicationListener<MyEvent> {
|
|
|
|
|
|
@Override
|
|
|
|
|
|
public void onApplicationEvent(MyEvent event) {
|
|
|
|
|
|
try {
|
|
|
|
|
|
// 省略事件处理相关代码
|
|
|
|
|
|
}catch(Throwable throwable){
|
|
|
|
|
|
//write error/metric to alert
|
|
|
|
|
|
}
|
|
|
|
|
|
|
|
|
|
|
|
}
|
|
|
|
|
|
}
|
|
|
|
|
|
|
|
|
|
|
|
```
|
|
|
|
|
|
|
|
|
|
|
|
**2\. 使用org.springframework.util.ErrorHandler。**
|
|
|
|
|
|
|
|
|
|
|
|
通过上面的案例解析,我们发现,假设我们设置了一个ErrorHandler,那么就可以用这个ErrorHandler去处理掉异常,从而保证后续事件监听器处理不受影响。我们可以使用下面的代码来修正问题:
|
|
|
|
|
|
|
|
|
|
|
|
```
|
|
|
|
|
|
SimpleApplicationEventMulticaster simpleApplicationEventMulticaster = applicationContext.getBean(APPLICATION_EVENT_MULTICASTER_BEAN_NAME, SimpleApplicationEventMulticaster.class);
|
|
|
|
|
|
simpleApplicationEventMulticaster.setErrorHandler(TaskUtils.LOG_AND_SUPPRESS_ERROR_HANDLER);
|
|
|
|
|
|
|
|
|
|
|
|
```
|
|
|
|
|
|
|
|
|
|
|
|
其中LOG\_AND\_SUPPRESS\_ERROR\_HANDLER的实现如下:
|
|
|
|
|
|
|
|
|
|
|
|
```
|
|
|
|
|
|
public static final ErrorHandler LOG_AND_SUPPRESS_ERROR_HANDLER = new LoggingErrorHandler();
|
|
|
|
|
|
|
|
|
|
|
|
private static class LoggingErrorHandler implements ErrorHandler {
|
|
|
|
|
|
|
|
|
|
|
|
private final Log logger = LogFactory.getLog(LoggingErrorHandler.class);
|
|
|
|
|
|
|
|
|
|
|
|
@Override
|
|
|
|
|
|
public void handleError(Throwable t) {
|
|
|
|
|
|
logger.error("Unexpected error occurred in scheduled task", t);
|
|
|
|
|
|
}
|
|
|
|
|
|
}
|
|
|
|
|
|
|
|
|
|
|
|
```
|
|
|
|
|
|
|
|
|
|
|
|
对比下方案1,使用ErrorHandler有一个很大的优势,就是我们不需要在某个监听器中都重复类似下面的代码了:
|
|
|
|
|
|
|
|
|
|
|
|
```
|
|
|
|
|
|
try {
|
|
|
|
|
|
//省略事件处理过程
|
|
|
|
|
|
}catch(Throwable throwable){
|
|
|
|
|
|
//write error/metric to alert
|
|
|
|
|
|
}
|
|
|
|
|
|
|
|
|
|
|
|
```
|
|
|
|
|
|
|
|
|
|
|
|
这么看的话,其实Spring的设计还是很全面的,它考虑了各种各样的情况。但是Spring使用者往往都不会去了解其内部实现,这样就会遇到各种各样的问题。相反,如果你对其实现有所了解的话,也对常见错误有一个感知,则大概率是可以快速避坑的,项目也可以运行得更加平稳顺畅。
|
|
|
|
|
|
|
|
|
|
|
|
## 重点回顾
|
|
|
|
|
|
|
|
|
|
|
|
今天我们粗略地了解了Spring事件处理的基本流程。其实,抛开Spring框架,我们去设计一个通用的事件处理框架,常常也会犯这三种错误:
|
|
|
|
|
|
|
|
|
|
|
|
1. 误读事件本身含义;
|
|
|
|
|
|
2. 监听错了事件的传播系统;
|
|
|
|
|
|
3. 事件处理之间互相影响,导致部分事件处理无法完成。
|
|
|
|
|
|
|
|
|
|
|
|
这三种错误正好对应了我们这节课讲解的三个案例。
|
|
|
|
|
|
|
|
|
|
|
|
此外,在Spring事件处理过程中,我们也学习到了监听器加载的特殊方式,即使用SPI的方式直接从配置文件META-INF/spring.factories中加载。这种方式或者说思想非常值得你去学习,因为它在许多Java应用框架中都有所使用,例如Dubbo,就是使用增强版的SPI来配置编解码器的。
|
|
|
|
|
|
|
|
|
|
|
|
## 思考题
|
|
|
|
|
|
|
|
|
|
|
|
在案例3中,我们提到默认的事件执行是在同一个线程中执行的,即事件发布者使用的线程。参考如下日志佐证这个结论:
|
|
|
|
|
|
|
|
|
|
|
|
> 2021-03-09 09:10:33.052 INFO 18104 --- \[nio-8080-exec-1\] c.s.p.listener.HelloWorldController : start to publish event
|
|
|
|
|
|
> 2021-03-09 09:10:33.055 INFO 18104 --- \[nio-8080-exec-1\] c.s.p.l.example3.MyFirstEventListener : com.spring.puzzle.class7.example3.MyFirstEventListener@18faf0 received: com.spring.puzzle.class7.example3.MyEvent\[source=df42b08f-8ee2-44df-a957-d8464ff50c88\]
|
|
|
|
|
|
|
|
|
|
|
|
通过日志可以看出,事件的发布和执行使用的都是nio-8080-exec-1线程,但是在事件比较多时,我们往往希望事件执行得更快些,或者希望事件的执行可以异步化不影响主线程。此时应该怎么做呢?
|
|
|
|
|
|
|
|
|
|
|
|
期待在留言区看到你的回复,我们下节课见!
|
|
|
|
|
|
|