|
|
|
|
|
# 32|实操项目:使用PyO3开发Python3模块
|
|
|
|
|
|
|
|
|
|
|
|
你好,我是陈天。
|
|
|
|
|
|
|
|
|
|
|
|
上一讲介绍了 FFI 的基本用法,今天我们就趁热打铁来做个实操项目,体验一下如何把 Rust 生态中优秀的库介绍到 Python/Node.js 的社区。
|
|
|
|
|
|
|
|
|
|
|
|
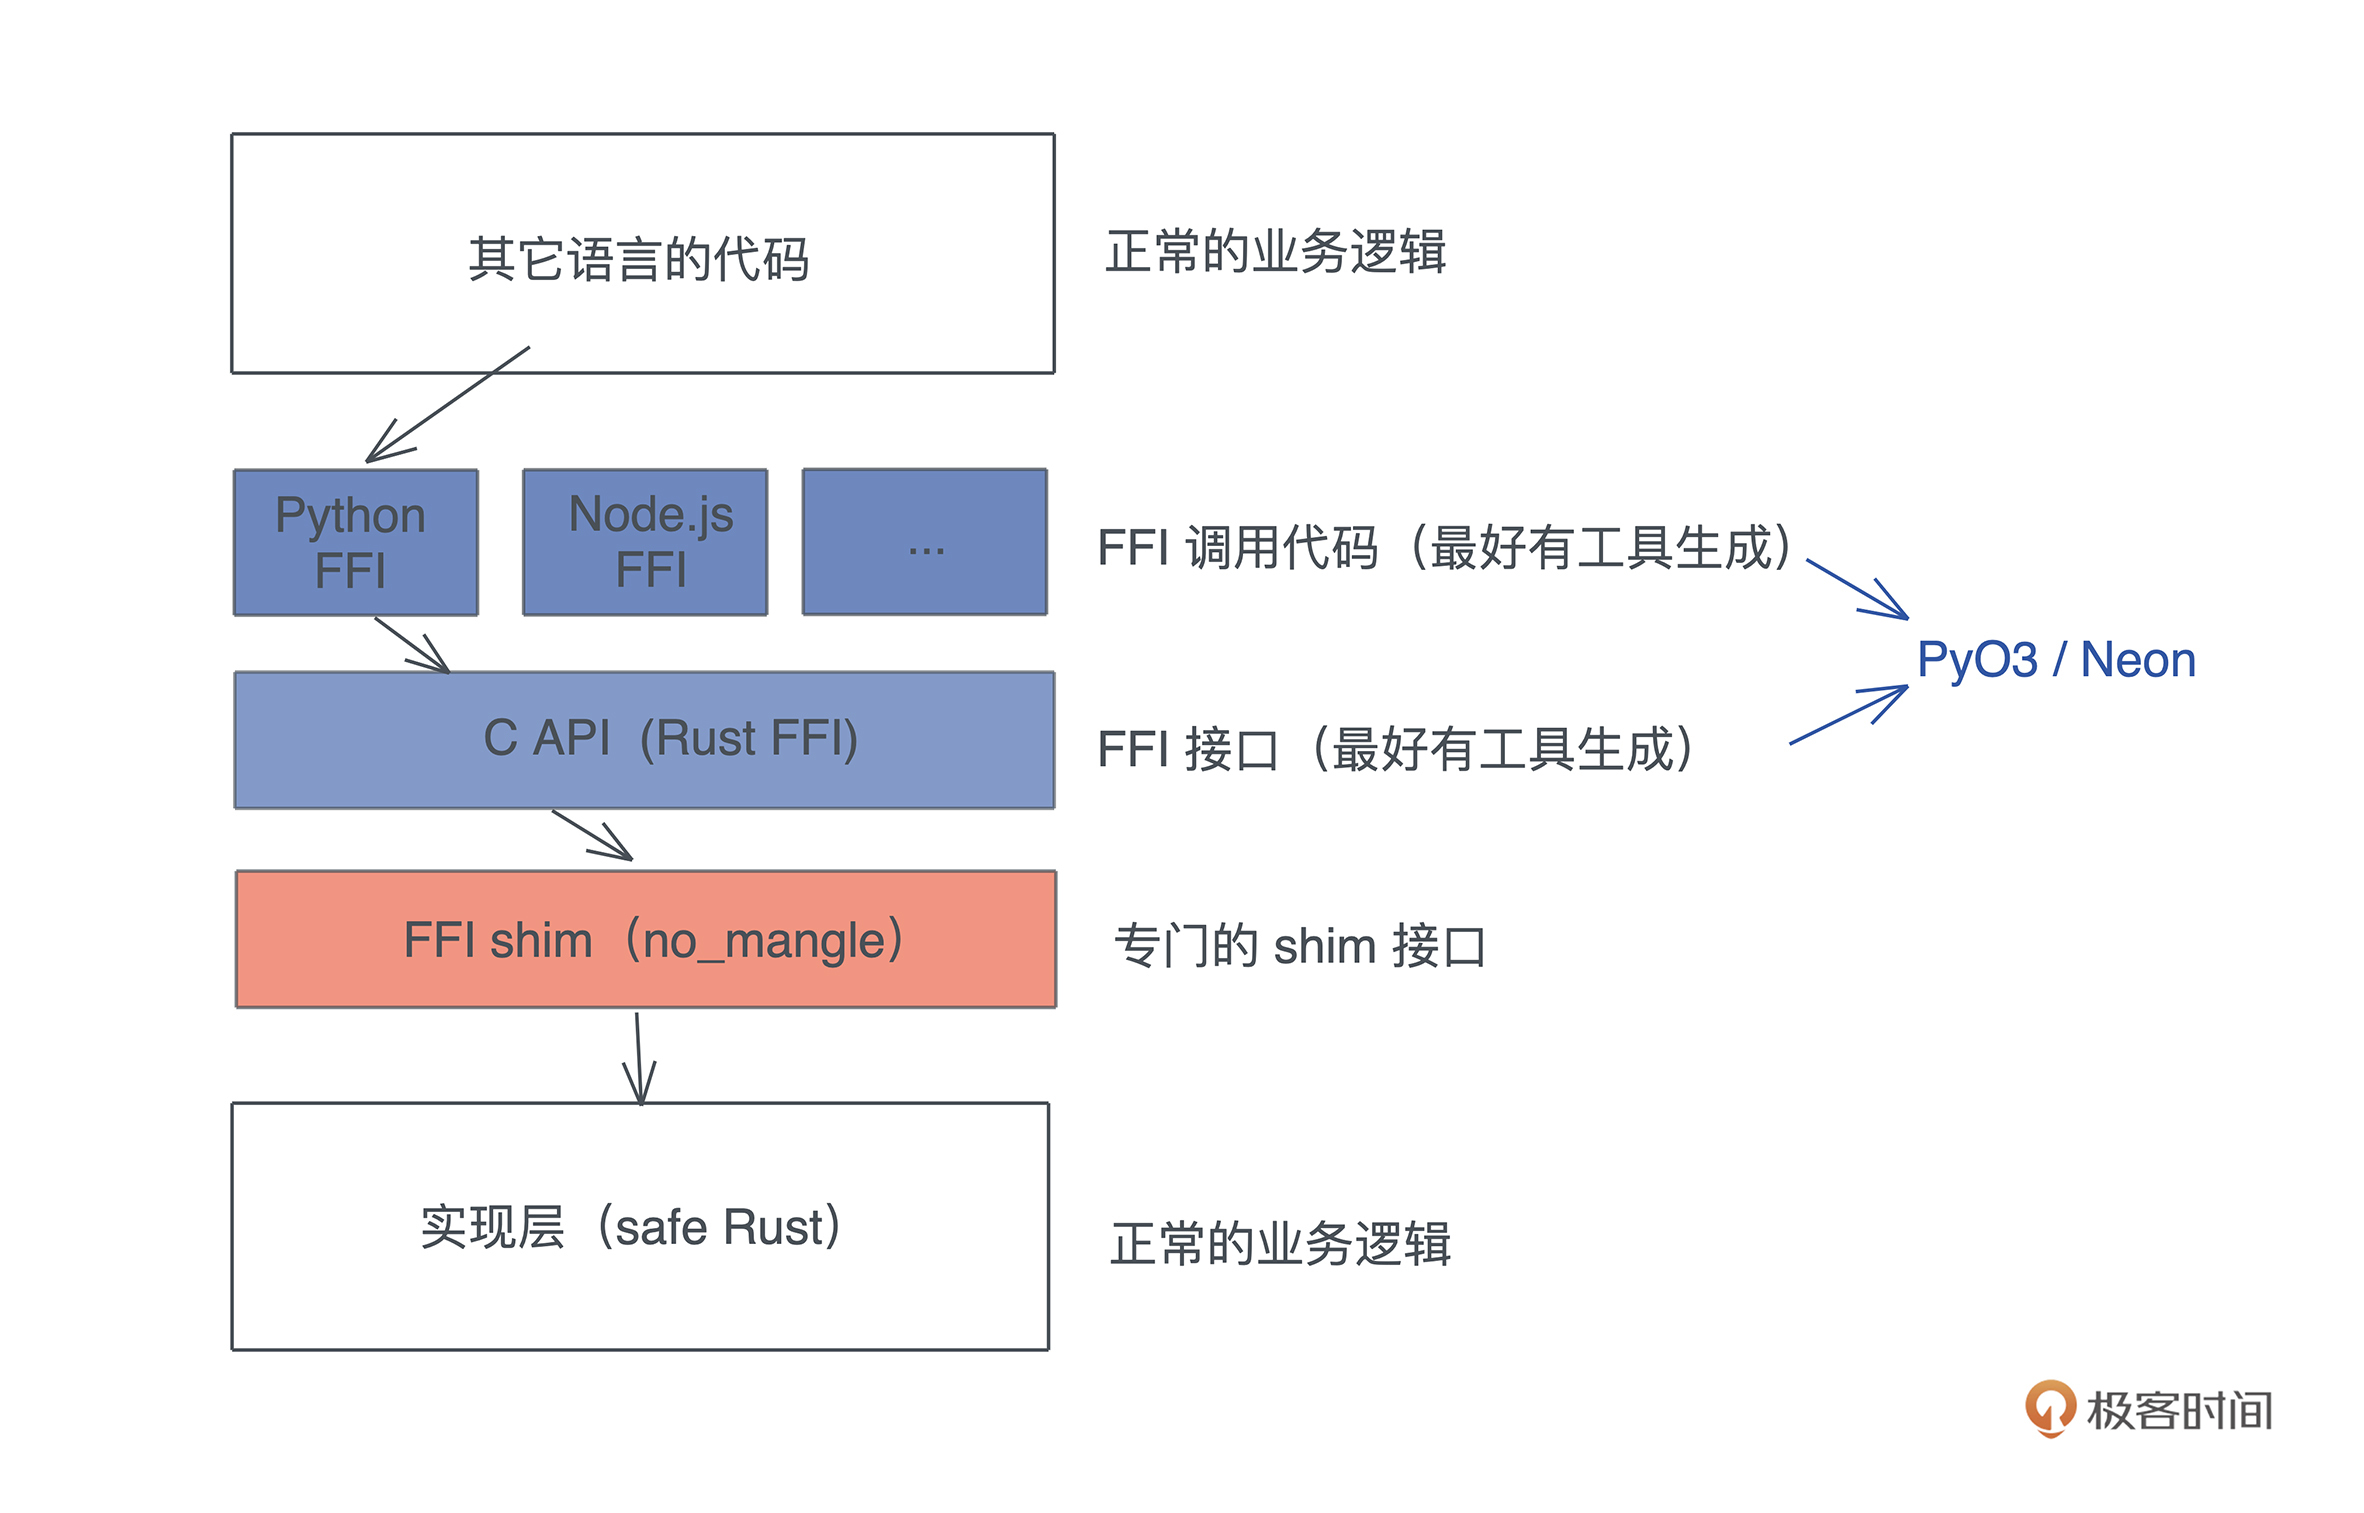
由于社区里已经有 PyO3 和 Neon 这样的工具,我们并不需要处理 Rust 代码兼容 C ABI 的细节,这些工具就可以直接处理。所以,今天会主要撰写 FFI shim 这一层的代码:
|
|
|
|
|
|
|
|
|
|
|
|
|
|
|
|
|
|
另外,PyO3和Neon的基本操作都是一样的,你会用一个,另一个的使用也就很容易理解了。这一讲我们就以 PyO3 为例。
|
|
|
|
|
|
|
|
|
|
|
|
那么,做个什么库提供给 Python 呢?
|
|
|
|
|
|
|
|
|
|
|
|
思来想去,我觉得 **Python 社区里可以内嵌在程序中的搜索引擎**,目前还是一块短板。我所知道的 [whoosh](https://github.com/mchaput/whoosh) 已经好多年没有更新了,[pylucene](https://lucene.apache.org/pylucene/) 需要在 Python 里运行个 JVM,总是让人有种说不出的不舒服。虽然 Node.js 的 [flexsearch](https://github.com/nextapps-de/flexsearch) 看上去还不错(我没有用过),但整体来说,这两个社区都需要有更强大的搜索引擎。
|
|
|
|
|
|
|
|
|
|
|
|
Rust 下,嵌入式的搜索引擎有 [tantivy](https://github.com/quickwit-inc/tantivy),我们就使用它来提供搜索引擎的功能。
|
|
|
|
|
|
|
|
|
|
|
|
不过,tanvity 的接口比较复杂,今天的主题也不是学习如何使用一个搜索引擎的接口,所以我做了基于 tanvity 的 crate [xunmi](https://github.com/tyrchen/xunmi),提供一套非常简单的接口,**今天,我们的目标就是:为这些接口提供对应的 Python 接口,并且让使用起来的感觉和 Python 一致**。
|
|
|
|
|
|
|
|
|
|
|
|
下面是 xunmi 用 Rust 调用的例子:
|
|
|
|
|
|
|
|
|
|
|
|
```rust
|
|
|
|
|
|
use std::{str::FromStr, thread, time::Duration};
|
|
|
|
|
|
use xunmi::*;
|
|
|
|
|
|
|
|
|
|
|
|
fn main() {
|
|
|
|
|
|
// 可以通过 yaml 格式的配置文件加载定义好的 schema
|
|
|
|
|
|
let config = IndexConfig::from_str(include_str!("../fixtures/config.yml")).unwrap();
|
|
|
|
|
|
|
|
|
|
|
|
// 打开或者创建 index
|
|
|
|
|
|
let indexer = Indexer::open_or_create(config).unwrap();
|
|
|
|
|
|
|
|
|
|
|
|
// 要 index 的数据,可以是 xml / yaml / json
|
|
|
|
|
|
let content = include_str!("../fixtures/wiki_00.xml");
|
|
|
|
|
|
|
|
|
|
|
|
// 我们使用的 wikipedia dump 是 xml 格式的,所以 InputType::Xml
|
|
|
|
|
|
// 这里,wikipedia 的数据结构 id 是字符串,但 index 的 schema 里是 u64
|
|
|
|
|
|
// wikipedia 里没有 content 字段,节点的内容($value)相当于 content
|
|
|
|
|
|
// 所以我们需要对数据定义一些格式转换
|
|
|
|
|
|
let config = InputConfig::new(
|
|
|
|
|
|
InputType::Xml,
|
|
|
|
|
|
vec![("$value".into(), "content".into())],
|
|
|
|
|
|
vec![("id".into(), (ValueType::String, ValueType::Number))],
|
|
|
|
|
|
);
|
|
|
|
|
|
|
|
|
|
|
|
// 获得 index 的 updater,用于更新 index
|
|
|
|
|
|
let mut updater = indexer.get_updater();
|
|
|
|
|
|
// 你可以使用多个 updater 在不同上下文更新同一个 index
|
|
|
|
|
|
let mut updater1 = indexer.get_updater();
|
|
|
|
|
|
|
|
|
|
|
|
// 可以通过 add / update 来更新 index,add 直接添加,update 会删除已有的 doc
|
|
|
|
|
|
// 然后添加新的
|
|
|
|
|
|
updater.update(content, &config).unwrap();
|
|
|
|
|
|
// 你可以添加多组数据,最后统一 commit
|
|
|
|
|
|
updater.commit().unwrap();
|
|
|
|
|
|
|
|
|
|
|
|
// 在其他上下文下更新 index
|
|
|
|
|
|
thread::spawn(move || {
|
|
|
|
|
|
let config = InputConfig::new(InputType::Yaml, vec![], vec![]);
|
|
|
|
|
|
let text = include_str!("../fixtures/test.yml");
|
|
|
|
|
|
|
|
|
|
|
|
updater1.update(text, &config).unwrap();
|
|
|
|
|
|
updater1.commit().unwrap();
|
|
|
|
|
|
});
|
|
|
|
|
|
|
|
|
|
|
|
// indexer 默认会自动在每次 commit 后重新加载,但这会有上百毫秒的延迟
|
|
|
|
|
|
// 在这个例子里我们会等一段时间再查询
|
|
|
|
|
|
while indexer.num_docs() == 0 {
|
|
|
|
|
|
thread::sleep(Duration::from_millis(100));
|
|
|
|
|
|
}
|
|
|
|
|
|
|
|
|
|
|
|
println!("total: {}", indexer.num_docs());
|
|
|
|
|
|
|
|
|
|
|
|
// 你可以提供查询来获取搜索结果
|
|
|
|
|
|
let result = indexer.search("历史", &["title", "content"], 5, 0).unwrap();
|
|
|
|
|
|
for (score, doc) in result.iter() {
|
|
|
|
|
|
// 因为 schema 里 content 只索引不存储,所以输出里没有 content
|
|
|
|
|
|
println!("score: {}, doc: {:?}", score, doc);
|
|
|
|
|
|
}
|
|
|
|
|
|
}
|
|
|
|
|
|
|
|
|
|
|
|
```
|
|
|
|
|
|
|
|
|
|
|
|
以下是索引的配置文件的样子:
|
|
|
|
|
|
|
|
|
|
|
|
```yaml
|
|
|
|
|
|
---
|
|
|
|
|
|
path: /tmp/searcher_index # 索引路径
|
|
|
|
|
|
schema: # 索引的 schema,对于文本,使用 CANG_JIE 做中文分词
|
|
|
|
|
|
- name: id
|
|
|
|
|
|
type: u64
|
|
|
|
|
|
options:
|
|
|
|
|
|
indexed: true
|
|
|
|
|
|
fast: single
|
|
|
|
|
|
stored: true
|
|
|
|
|
|
- name: url
|
|
|
|
|
|
type: text
|
|
|
|
|
|
options:
|
|
|
|
|
|
indexing: ~
|
|
|
|
|
|
stored: true
|
|
|
|
|
|
- name: title
|
|
|
|
|
|
type: text
|
|
|
|
|
|
options:
|
|
|
|
|
|
indexing:
|
|
|
|
|
|
record: position
|
|
|
|
|
|
tokenizer: CANG_JIE
|
|
|
|
|
|
stored: true
|
|
|
|
|
|
- name: content
|
|
|
|
|
|
type: text
|
|
|
|
|
|
options:
|
|
|
|
|
|
indexing:
|
|
|
|
|
|
record: position
|
|
|
|
|
|
tokenizer: CANG_JIE
|
|
|
|
|
|
stored: false # 对于 content,我们只索引,不存储
|
|
|
|
|
|
text_lang:
|
|
|
|
|
|
chinese: true # 如果是 true,自动做繁体到简体的转换
|
|
|
|
|
|
writer_memory: 100000000
|
|
|
|
|
|
|
|
|
|
|
|
```
|
|
|
|
|
|
|
|
|
|
|
|
目标是,使用 PyO3 让 Rust 代码可以这样在 Python 中使用:
|
|
|
|
|
|
|
|
|
|
|
|
|
|
|
|
|
|
好,废话不多说,我们开始今天的项目挑战。
|
|
|
|
|
|
|
|
|
|
|
|
首先 `cargo new xunmi-py --lib` 创建一个新的项目,在 Cargo.toml 中添入:
|
|
|
|
|
|
|
|
|
|
|
|
```bash
|
|
|
|
|
|
[package]
|
|
|
|
|
|
name = "xunmi-py"
|
|
|
|
|
|
version = "0.1.0"
|
|
|
|
|
|
edition = "2021"
|
|
|
|
|
|
|
|
|
|
|
|
[lib]
|
|
|
|
|
|
name = "xunmi"
|
|
|
|
|
|
crate-type = ["cdylib"]
|
|
|
|
|
|
|
|
|
|
|
|
[dependencies]
|
|
|
|
|
|
pyo3 = {version = "0.14", features = ["extension-module"]}
|
|
|
|
|
|
serde_json = "1"
|
|
|
|
|
|
xunmi = "0.2"
|
|
|
|
|
|
|
|
|
|
|
|
[build-dependencies]
|
|
|
|
|
|
pyo3-build-config = "0.14"
|
|
|
|
|
|
|
|
|
|
|
|
```
|
|
|
|
|
|
|
|
|
|
|
|
要定义好 lib 的名字和类型。lib 的名字,我们就定义成 xunmi,这样在 Python 中 import 时就用这个名称;crate-type 是 cdylib,我们需要 pyo3-build-config 这个 crate 来做编译时的一些简单处理([macOS 需要](https://docs.rs/pyo3-build-config/0.14.5/pyo3_build_config/fn.add_extension_module_link_args.html))。
|
|
|
|
|
|
|
|
|
|
|
|
## 准备工作
|
|
|
|
|
|
|
|
|
|
|
|
接下来在写代码之前,还要做一些准备工作,主要是 build 脚本和 Makefile,让我们能方便地生成 Python 库。
|
|
|
|
|
|
|
|
|
|
|
|
创建 build.rs,并添入:
|
|
|
|
|
|
|
|
|
|
|
|
```rust
|
|
|
|
|
|
fn main() {
|
|
|
|
|
|
println!("cargo:rerun-if-changed=build.rs");
|
|
|
|
|
|
pyo3_build_config::add_extension_module_link_args();
|
|
|
|
|
|
}
|
|
|
|
|
|
|
|
|
|
|
|
```
|
|
|
|
|
|
|
|
|
|
|
|
它会在编译的时候添加一些编译选项。如果你不想用 build.rs 来额外处理,也可以创建 .cargo/config,然后添加:
|
|
|
|
|
|
|
|
|
|
|
|
```rust
|
|
|
|
|
|
[target.x86_64-apple-darwin]
|
|
|
|
|
|
rustflags = [
|
|
|
|
|
|
"-C", "link-arg=-undefined",
|
|
|
|
|
|
"-C", "link-arg=dynamic_lookup",
|
|
|
|
|
|
]
|
|
|
|
|
|
|
|
|
|
|
|
```
|
|
|
|
|
|
|
|
|
|
|
|
二者的作用是等价的。
|
|
|
|
|
|
|
|
|
|
|
|
然后我们创建一个目录 xunmi,再创建 xunmi/\__init_\_.py,添入:
|
|
|
|
|
|
|
|
|
|
|
|
```python
|
|
|
|
|
|
from .xunmi import *
|
|
|
|
|
|
|
|
|
|
|
|
```
|
|
|
|
|
|
|
|
|
|
|
|
最后创建一个 Makefile,添入:
|
|
|
|
|
|
|
|
|
|
|
|
```makefile
|
|
|
|
|
|
# 如果你的 BUILD_DIR 不同,可以 make BUILD_DIR=<your-dir>
|
|
|
|
|
|
BUILD_DIR := target/release
|
|
|
|
|
|
|
|
|
|
|
|
SRCS := $(wildcard src/*.rs) Cargo.toml
|
|
|
|
|
|
NAME = xunmi
|
|
|
|
|
|
TARGET = lib$(NAME)
|
|
|
|
|
|
BUILD_FILE = $(BUILD_DIR)/$(TARGET).dylib
|
|
|
|
|
|
BUILD_FILE1 = $(BUILD_DIR)/$(TARGET).so
|
|
|
|
|
|
TARGET_FILE = $(NAME)/$(NAME).so
|
|
|
|
|
|
|
|
|
|
|
|
all: $(TARGET_FILE)
|
|
|
|
|
|
|
|
|
|
|
|
test: $(TARGET_FILE)
|
|
|
|
|
|
python3 -m pytest
|
|
|
|
|
|
|
|
|
|
|
|
$(TARGET_FILE): $(BUILD_FILE1)
|
|
|
|
|
|
@cp $(BUILD_FILE1) $(TARGET_FILE)
|
|
|
|
|
|
|
|
|
|
|
|
$(BUILD_FILE1): $(SRCS)
|
|
|
|
|
|
@cargo build --release
|
|
|
|
|
|
@mv $(BUILD_FILE) $(BUILD_FILE1)|| true
|
|
|
|
|
|
|
|
|
|
|
|
PHONY: test all
|
|
|
|
|
|
|
|
|
|
|
|
```
|
|
|
|
|
|
|
|
|
|
|
|
这个 Makefile 可以帮我们自动化一些工作,基本上,就是把编译出来的 .dylib 或者 .so 拷贝到 xunmi 目录下,被 python 使用。
|
|
|
|
|
|
|
|
|
|
|
|
## 撰写代码
|
|
|
|
|
|
|
|
|
|
|
|
接下来就是如何撰写 FFI shim 代码了。PyO3 为我们提供了一系列宏,可以很方便地把 Rust 的数据结构、函数、数据结构的方法,以及错误类型,映射成 Python 的类、函数、类的方法,以及异常。我们来一个个看。
|
|
|
|
|
|
|
|
|
|
|
|
### 将 Rust struct 注册为 Python class
|
|
|
|
|
|
|
|
|
|
|
|
之前在[第 6 讲](https://time.geekbang.org/column/article/414478),我们简单介绍了函数是如何被引入到 pymodule 中的:
|
|
|
|
|
|
|
|
|
|
|
|
```rust
|
|
|
|
|
|
use pyo3::{exceptions, prelude::*};
|
|
|
|
|
|
|
|
|
|
|
|
#[pyfunction]
|
|
|
|
|
|
pub fn example_sql() -> PyResult<String> {
|
|
|
|
|
|
Ok(queryer::example_sql())
|
|
|
|
|
|
}
|
|
|
|
|
|
|
|
|
|
|
|
#[pyfunction]
|
|
|
|
|
|
pub fn query(sql: &str, output: Option<&str>) -> PyResult<String> {
|
|
|
|
|
|
let rt = tokio::runtime::Runtime::new().unwrap();
|
|
|
|
|
|
let data = rt.block_on(async { queryer::query(sql).await.unwrap() });
|
|
|
|
|
|
match output {
|
|
|
|
|
|
Some("csv") | None => Ok(data.to_csv().unwrap()),
|
|
|
|
|
|
Some(v) => Err(exceptions::PyTypeError::new_err(format!(
|
|
|
|
|
|
"Output type {} not supported",
|
|
|
|
|
|
v
|
|
|
|
|
|
))),
|
|
|
|
|
|
}
|
|
|
|
|
|
}
|
|
|
|
|
|
|
|
|
|
|
|
#[pymodule]
|
|
|
|
|
|
fn queryer_py(_py: Python, m: &PyModule) -> PyResult<()> {
|
|
|
|
|
|
m.add_function(wrap_pyfunction!(query, m)?)?;
|
|
|
|
|
|
m.add_function(wrap_pyfunction!(example_sql, m)?)?;
|
|
|
|
|
|
Ok(())
|
|
|
|
|
|
}
|
|
|
|
|
|
|
|
|
|
|
|
```
|
|
|
|
|
|
|
|
|
|
|
|
使用了 #\[pymodule\] 宏,来提供 python module 入口函数,它负责注册这个 module 下的类和函数。通过 `m.add_function` 可以注册函数,之后,在 Python 里就可以这么调用:
|
|
|
|
|
|
|
|
|
|
|
|
```python
|
|
|
|
|
|
import queryer_py
|
|
|
|
|
|
queryer_py.query("select * from file:///test.csv")
|
|
|
|
|
|
|
|
|
|
|
|
```
|
|
|
|
|
|
|
|
|
|
|
|
但当时我们想暴露出来的接口功能很简单,让用户传入一个 SQL 字符串和输出类型的字符串,返回一个按照 SQL 查询处理过的、符合输出类型的字符串。所以为 Python 模块提供了两个接口 example\_sql 和 query。
|
|
|
|
|
|
|
|
|
|
|
|
不过,我们今天要做的事情远比第 6 讲中对 PyO3 的使用复杂。比如说要在两门语言中传递数据结构,让 Python 类可以使用 Rust 方法等,所以需要注册一些类以及对应的类方法。
|
|
|
|
|
|
|
|
|
|
|
|
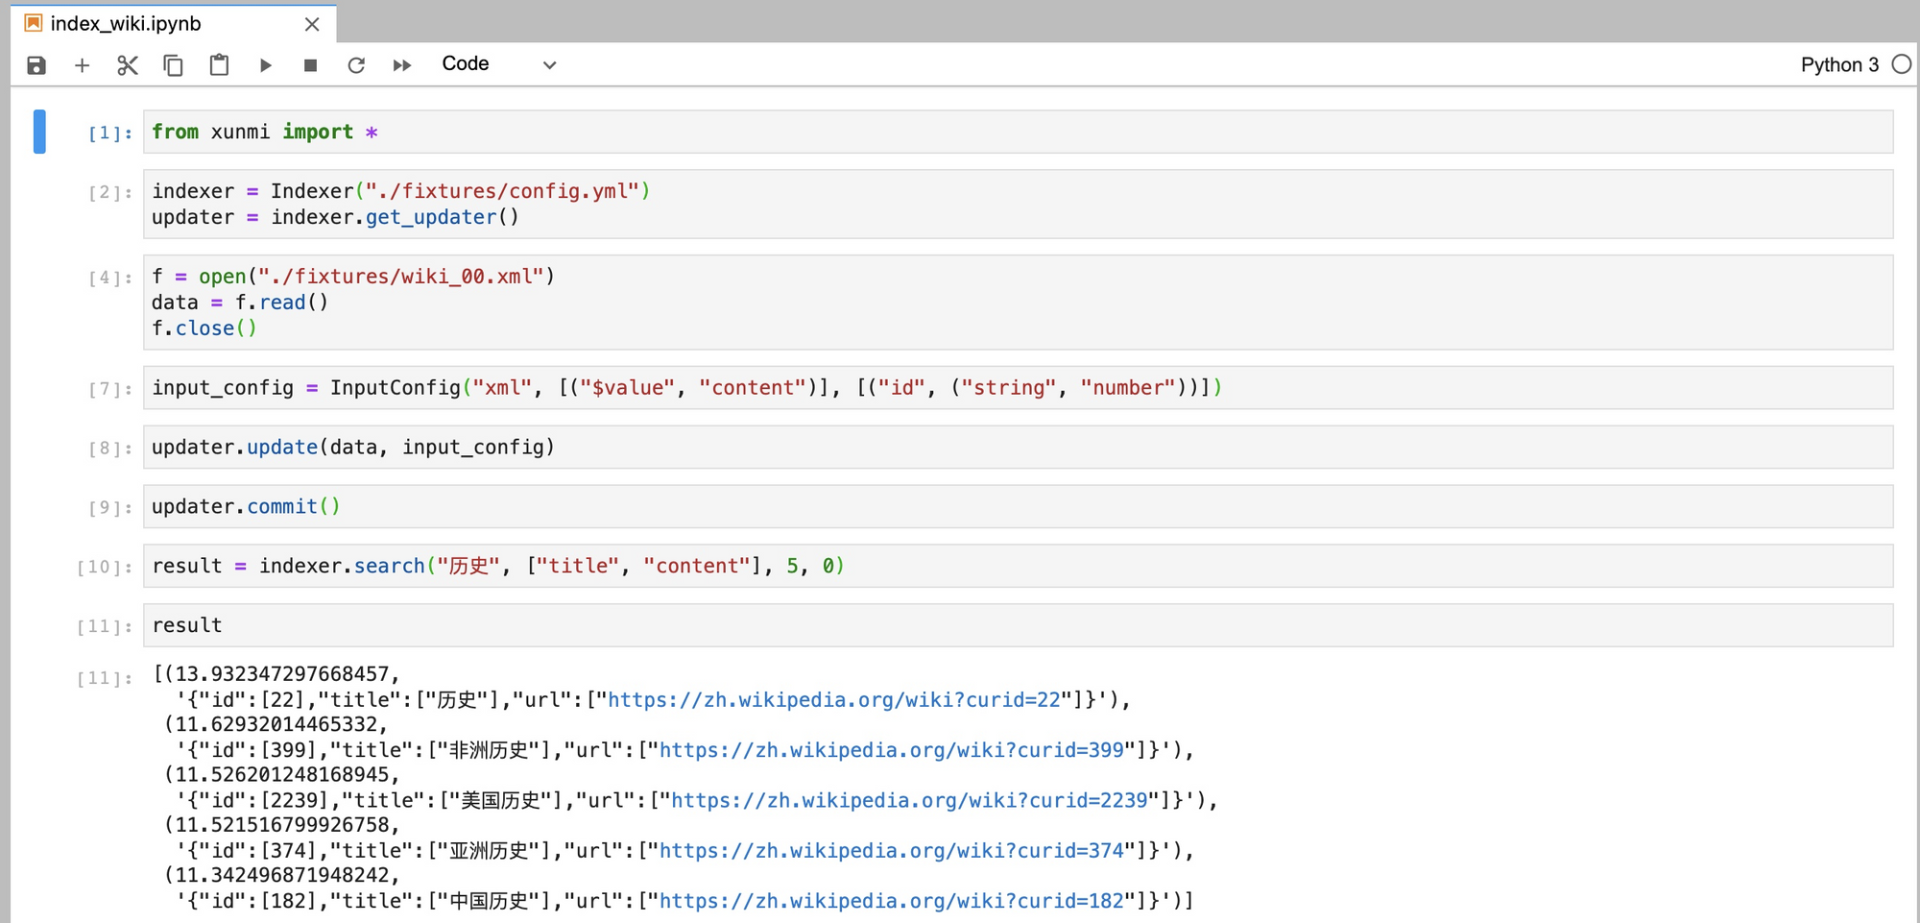
看上文使用截图中的一些代码(复制到这里了):
|
|
|
|
|
|
|
|
|
|
|
|
```python
|
|
|
|
|
|
from xunmi import *
|
|
|
|
|
|
|
|
|
|
|
|
indexer = Indexer("./fixtures/config.yml")
|
|
|
|
|
|
updater = indexer.get_updater()
|
|
|
|
|
|
f = open("./fixtures/wiki_00.xml")
|
|
|
|
|
|
data = f.read()
|
|
|
|
|
|
f.close()
|
|
|
|
|
|
input_config = InputConfig("xml", [("$value", "content")], [("id", ("string", "number"))])
|
|
|
|
|
|
updater.update(data, input_config)
|
|
|
|
|
|
updater.commit()
|
|
|
|
|
|
|
|
|
|
|
|
result = indexer.search("历史", ["title", "content"], 5, 0)
|
|
|
|
|
|
|
|
|
|
|
|
```
|
|
|
|
|
|
|
|
|
|
|
|
你会发现,**我们需要注册 Indexer、IndexUpdater 和 InputConfig 这三个类**,它们都有自己的成员函数,其中,Indexer 和 InputConfig 还要有类的构造函数。
|
|
|
|
|
|
|
|
|
|
|
|
但是因为 xunmi 是 xunmi-py 外部引入的一个 crate,我们无法直接动 xunmi 的数据结构,把这几个类注册进去。怎么办?我们需要封装一下:
|
|
|
|
|
|
|
|
|
|
|
|
```rust
|
|
|
|
|
|
use pyo3::{exceptions, prelude::*};
|
|
|
|
|
|
use xunmi::{self as x};
|
|
|
|
|
|
|
|
|
|
|
|
#[pyclass]
|
|
|
|
|
|
pub struct Indexer(x::Indexer);
|
|
|
|
|
|
|
|
|
|
|
|
#[pyclass]
|
|
|
|
|
|
pub struct InputConfig(x::InputConfig);
|
|
|
|
|
|
|
|
|
|
|
|
#[pyclass]
|
|
|
|
|
|
pub struct IndexUpdater(x::IndexUpdater);
|
|
|
|
|
|
|
|
|
|
|
|
```
|
|
|
|
|
|
|
|
|
|
|
|
这里有个小技巧,可以把 xunmi 的命名空间临时改成 x,这样,xunmi 自己的结构用 x:: 来引用,就不会有命名的冲突了。
|
|
|
|
|
|
|
|
|
|
|
|
有了这三个定义,我们就可以通过 `m.add_class` 把它们引入到模块中:
|
|
|
|
|
|
|
|
|
|
|
|
```rust
|
|
|
|
|
|
#[pymodule]
|
|
|
|
|
|
fn xunmi(_py: Python, m: &PyModule) -> PyResult<()> {
|
|
|
|
|
|
m.add_class::<Indexer>()?;
|
|
|
|
|
|
m.add_class::<InputConfig>()?;
|
|
|
|
|
|
m.add_class::<IndexUpdater>()?;
|
|
|
|
|
|
Ok(())
|
|
|
|
|
|
}
|
|
|
|
|
|
|
|
|
|
|
|
```
|
|
|
|
|
|
|
|
|
|
|
|
注意,**这里的函数名要和 crate lib name 一致**,如果你没有定义 lib name,默认会使用 crate name。我们为了区别,crate name 使用了 “xunmi-py”,所以前面在 Cargo.toml 里,会单独声明一下 lib name:
|
|
|
|
|
|
|
|
|
|
|
|
```bash
|
|
|
|
|
|
[lib]
|
|
|
|
|
|
name = "xunmi"
|
|
|
|
|
|
crate-type = ["cdylib"]
|
|
|
|
|
|
|
|
|
|
|
|
```
|
|
|
|
|
|
|
|
|
|
|
|
### 把 struct 的方法暴露成 class 的方法
|
|
|
|
|
|
|
|
|
|
|
|
注册好Python的类,继续写功能的实现,基本上是 shim 代码,也就是把 xunmi 里对应的数据结构的方法暴露给 Python。先看个简单的,IndexUpdater 的实现:
|
|
|
|
|
|
|
|
|
|
|
|
```rust
|
|
|
|
|
|
#[pymethods]
|
|
|
|
|
|
impl IndexUpdater {
|
|
|
|
|
|
pub fn add(&mut self, input: &str, config: &InputConfig) -> PyResult<()> {
|
|
|
|
|
|
Ok(self.0.add(input, &config.0).map_err(to_pyerr)?)
|
|
|
|
|
|
}
|
|
|
|
|
|
|
|
|
|
|
|
pub fn update(&mut self, input: &str, config: &InputConfig) -> PyResult<()> {
|
|
|
|
|
|
Ok(self.0.update(input, &config.0).map_err(to_pyerr)?)
|
|
|
|
|
|
}
|
|
|
|
|
|
|
|
|
|
|
|
pub fn commit(&mut self) -> PyResult<()> {
|
|
|
|
|
|
Ok(self.0.commit().map_err(to_pyerr)?)
|
|
|
|
|
|
}
|
|
|
|
|
|
|
|
|
|
|
|
pub fn clear(&self) -> PyResult<()> {
|
|
|
|
|
|
Ok(self.0.clear().map_err(to_pyerr)?)
|
|
|
|
|
|
}
|
|
|
|
|
|
}
|
|
|
|
|
|
|
|
|
|
|
|
```
|
|
|
|
|
|
|
|
|
|
|
|
首先,需要用 `#[pymethods]` 来包裹 `impl IndexUpdater {}`,这样,里面所有的 pub 方法都可以在 Python 侧使用。我们暴露了 add / update / commit / clear 这几个方法。方法的类型签名正常撰写即可,Rust 的基本类型都能通过 PyO3 对应到 Python,使用到的 InputConfig 之前也注册成 Python class 了。
|
|
|
|
|
|
|
|
|
|
|
|
所以,通过这些方法,一个 Python 用户就可以轻松地在 Python 侧生成字符串,生成 InputConfig 类,然后传给 update() 函数,交给 Rust 侧处理。比如这样:
|
|
|
|
|
|
|
|
|
|
|
|
```python
|
|
|
|
|
|
f = open("./fixtures/wiki_00.xml")
|
|
|
|
|
|
data = f.read()
|
|
|
|
|
|
f.close()
|
|
|
|
|
|
input_config = InputConfig("xml", [("$value", "content")], [("id", ("string", "number"))])
|
|
|
|
|
|
updater.update(data, input_config)
|
|
|
|
|
|
|
|
|
|
|
|
```
|
|
|
|
|
|
|
|
|
|
|
|
### 错误处理
|
|
|
|
|
|
|
|
|
|
|
|
还记得上一讲强调的三个要点吗,在写FFI的时候要注意Rust的错误处理。这里,所有函数如果要返回 Result<T, E>,需要使用 PyResult<T>。你原本的错误类型需要处理一下,变成 Python 错误。
|
|
|
|
|
|
|
|
|
|
|
|
我们可以用 map\_err 处理,其中 to\_pyerr 实现如下:
|
|
|
|
|
|
|
|
|
|
|
|
```rust
|
|
|
|
|
|
pub(crate) fn to_pyerr<E: ToString>(err: E) -> PyErr {
|
|
|
|
|
|
exceptions::PyValueError::new_err(err.to_string())
|
|
|
|
|
|
}
|
|
|
|
|
|
|
|
|
|
|
|
```
|
|
|
|
|
|
|
|
|
|
|
|
通过使用 PyO3 提供的 PyValueError,在 Rust 侧生成的 err,会被 PyO3 转化成 Python 侧的异常。比如我们在创建 indexer 时提供一个不存在的 config:
|
|
|
|
|
|
|
|
|
|
|
|
```python
|
|
|
|
|
|
In [3]: indexer = Indexer("./fixtures/config.ymla")
|
|
|
|
|
|
---------------------------------------------------------------------------
|
|
|
|
|
|
ValueError Traceback (most recent call last)
|
|
|
|
|
|
<ipython-input-3-bde6b0e501ea> in <module>
|
|
|
|
|
|
----> 1 indexer = Indexer("./fixtures/config.ymla")
|
|
|
|
|
|
|
|
|
|
|
|
ValueError: No such file or directory (os error 2)
|
|
|
|
|
|
|
|
|
|
|
|
```
|
|
|
|
|
|
|
|
|
|
|
|
即使你在 Rust 侧使用了 `panic!`,PyO3 也有很好的处理:
|
|
|
|
|
|
|
|
|
|
|
|
```python
|
|
|
|
|
|
In [3]: indexer = Indexer("./fixtures/config.ymla")
|
|
|
|
|
|
---------------------------------------------------------------------------
|
|
|
|
|
|
PanicException Traceback (most recent call last)
|
|
|
|
|
|
<ipython-input-11-082d933e67e2> in <module>
|
|
|
|
|
|
----> 1 indexer = Indexer("./fixtures/config.ymla")
|
|
|
|
|
|
2 updater = indexer.get_updater()
|
|
|
|
|
|
|
|
|
|
|
|
PanicException: called `Result::unwrap()` on an `Err` value: Os { code: 2, kind: NotFound, message: "No such file or directory" }
|
|
|
|
|
|
|
|
|
|
|
|
```
|
|
|
|
|
|
|
|
|
|
|
|
它也是在 Python 侧抛出一个异常。
|
|
|
|
|
|
|
|
|
|
|
|
### 构造函数
|
|
|
|
|
|
|
|
|
|
|
|
好,接着看 Indexer 怎么实现:
|
|
|
|
|
|
|
|
|
|
|
|
```rust
|
|
|
|
|
|
#[pymethods]
|
|
|
|
|
|
impl Indexer {
|
|
|
|
|
|
// 创建或载入 index
|
|
|
|
|
|
#[new]
|
|
|
|
|
|
pub fn open_or_create(filename: &str) -> PyResult<Indexer> {
|
|
|
|
|
|
let content = fs::read_to_string(filename).unwrap();
|
|
|
|
|
|
let config = x::IndexConfig::from_str(&content).map_err(to_pyerr)?;
|
|
|
|
|
|
let indexer = x::Indexer::open_or_create(config).map_err(to_pyerr)?;
|
|
|
|
|
|
Ok(Indexer(indexer))
|
|
|
|
|
|
}
|
|
|
|
|
|
|
|
|
|
|
|
// 获取 updater
|
|
|
|
|
|
pub fn get_updater(&self) -> IndexUpdater {
|
|
|
|
|
|
IndexUpdater(self.0.get_updater())
|
|
|
|
|
|
}
|
|
|
|
|
|
|
|
|
|
|
|
// 搜索
|
|
|
|
|
|
pub fn search(
|
|
|
|
|
|
&self,
|
|
|
|
|
|
query: String,
|
|
|
|
|
|
fields: Vec<String>,
|
|
|
|
|
|
limit: usize,
|
|
|
|
|
|
offset: Option<usize>,
|
|
|
|
|
|
) -> PyResult<Vec<(f32, String)>> {
|
|
|
|
|
|
let default_fields: Vec<_> = fields.iter().map(|s| s.as_str()).collect();
|
|
|
|
|
|
let data: Vec<_> = self
|
|
|
|
|
|
.0
|
|
|
|
|
|
.search(&query, &default_fields, limit, offset.unwrap_or(0))
|
|
|
|
|
|
.map_err(to_pyerr)?
|
|
|
|
|
|
.into_iter()
|
|
|
|
|
|
.map(|(score, doc)| (score, serde_json::to_string(&doc).unwrap()))
|
|
|
|
|
|
.collect();
|
|
|
|
|
|
|
|
|
|
|
|
Ok(data)
|
|
|
|
|
|
}
|
|
|
|
|
|
|
|
|
|
|
|
// 重新加载 index
|
|
|
|
|
|
pub fn reload(&self) -> PyResult<()> {
|
|
|
|
|
|
self.0.reload().map_err(to_pyerr)
|
|
|
|
|
|
}
|
|
|
|
|
|
}
|
|
|
|
|
|
|
|
|
|
|
|
```
|
|
|
|
|
|
|
|
|
|
|
|
你看,我们可以用 `#[new]` 来标记要成为构造函数的方法,所以,在 Python 侧,当你调用:
|
|
|
|
|
|
|
|
|
|
|
|
```python
|
|
|
|
|
|
indexer = Indexer("./fixtures/config.yml")
|
|
|
|
|
|
|
|
|
|
|
|
```
|
|
|
|
|
|
|
|
|
|
|
|
其实,它在 Rust 侧就调用了 `open_or_crate` 方法。把某个用来构建数据结构的方法,标记为一个构造函数,可以让 Python 用户感觉用起来更加自然。
|
|
|
|
|
|
|
|
|
|
|
|
### 缺省参数
|
|
|
|
|
|
|
|
|
|
|
|
好,最后来看看缺省参数的实现。Python 支持缺省参数,但 Rust 不支持缺省参数,怎么破?
|
|
|
|
|
|
|
|
|
|
|
|
别着急,PyO3 巧妙使用了 Option<T>,当 Python 侧使用缺省参数时,相当于传给 Rust 一个 None,Rust 侧就可以根据 None 来使用缺省值,比如下面 InputConfig 的实现:
|
|
|
|
|
|
|
|
|
|
|
|
```rust
|
|
|
|
|
|
#[pymethods]
|
|
|
|
|
|
impl InputConfig {
|
|
|
|
|
|
#[new]
|
|
|
|
|
|
fn new(
|
|
|
|
|
|
input_type: String,
|
|
|
|
|
|
mapping: Option<Vec<(String, String)>>,
|
|
|
|
|
|
conversion: Option<Vec<(String, (String, String))>>,
|
|
|
|
|
|
) -> PyResult<Self> {
|
|
|
|
|
|
let input_type = match input_type.as_ref() {
|
|
|
|
|
|
"yaml" | "yml" => x::InputType::Yaml,
|
|
|
|
|
|
"json" => x::InputType::Json,
|
|
|
|
|
|
"xml" => x::InputType::Xml,
|
|
|
|
|
|
_ => return Err(exceptions::PyValueError::new_err("Invalid input type")),
|
|
|
|
|
|
};
|
|
|
|
|
|
let conversion = conversion
|
|
|
|
|
|
.unwrap_or_default()
|
|
|
|
|
|
.into_iter()
|
|
|
|
|
|
.filter_map(|(k, (t1, t2))| {
|
|
|
|
|
|
let t = match (t1.as_ref(), t2.as_ref()) {
|
|
|
|
|
|
("string", "number") => (x::ValueType::String, x::ValueType::Number),
|
|
|
|
|
|
("number", "string") => (x::ValueType::Number, x::ValueType::String),
|
|
|
|
|
|
_ => return None,
|
|
|
|
|
|
};
|
|
|
|
|
|
Some((k, t))
|
|
|
|
|
|
})
|
|
|
|
|
|
.collect::<Vec<_>>();
|
|
|
|
|
|
|
|
|
|
|
|
Ok(Self(x::InputConfig::new(
|
|
|
|
|
|
input_type,
|
|
|
|
|
|
mapping.unwrap_or_default(),
|
|
|
|
|
|
conversion,
|
|
|
|
|
|
)))
|
|
|
|
|
|
}
|
|
|
|
|
|
}
|
|
|
|
|
|
|
|
|
|
|
|
```
|
|
|
|
|
|
|
|
|
|
|
|
这段代码是典型的 shim 代码,它就是把接口包装成更简单的形式提供给 Python,然后内部做转换适配原本的接口。
|
|
|
|
|
|
|
|
|
|
|
|
在 Python 侧,当 mapping 或 conversion 不需要时,可以不提供。这里我们使用 unwrap\_or\_default() 来得到缺省值(对 Vec<T> 来说就是 `vec![]`)。这样,在 Python 侧这么调用都是合法的:
|
|
|
|
|
|
|
|
|
|
|
|
```python
|
|
|
|
|
|
input_config = InputConfig("xml", [("$value", "content")], [("id", ("string", "number"))])
|
|
|
|
|
|
input_config = InputConfig("xml", [("$value", "content")])
|
|
|
|
|
|
input_config = InputConfig("xml")
|
|
|
|
|
|
|
|
|
|
|
|
```
|
|
|
|
|
|
|
|
|
|
|
|
### 完整代码
|
|
|
|
|
|
|
|
|
|
|
|
好了,到这里今天的主要目标就基本完成啦。 xunmi-py 里 src/lib.rs 的完整代码也展示一下供你对比参考:
|
|
|
|
|
|
|
|
|
|
|
|
```rust
|
|
|
|
|
|
use pyo3::{
|
|
|
|
|
|
exceptions,
|
|
|
|
|
|
prelude::*,
|
|
|
|
|
|
types::{PyDict, PyTuple},
|
|
|
|
|
|
};
|
|
|
|
|
|
use std::{fs, str::FromStr};
|
|
|
|
|
|
use xunmi::{self as x};
|
|
|
|
|
|
|
|
|
|
|
|
pub(crate) fn to_pyerr<E: ToString>(err: E) -> PyErr {
|
|
|
|
|
|
exceptions::PyValueError::new_err(err.to_string())
|
|
|
|
|
|
}
|
|
|
|
|
|
|
|
|
|
|
|
#[pyclass]
|
|
|
|
|
|
pub struct Indexer(x::Indexer);
|
|
|
|
|
|
|
|
|
|
|
|
#[pyclass]
|
|
|
|
|
|
pub struct InputConfig(x::InputConfig);
|
|
|
|
|
|
|
|
|
|
|
|
#[pyclass]
|
|
|
|
|
|
pub struct IndexUpdater(x::IndexUpdater);
|
|
|
|
|
|
|
|
|
|
|
|
#[pymethods]
|
|
|
|
|
|
impl Indexer {
|
|
|
|
|
|
#[new]
|
|
|
|
|
|
pub fn open_or_create(filename: &str) -> PyResult<Indexer> {
|
|
|
|
|
|
let content = fs::read_to_string(filename).map_err(to_pyerr)?;
|
|
|
|
|
|
let config = x::IndexConfig::from_str(&content).map_err(to_pyerr)?;
|
|
|
|
|
|
let indexer = x::Indexer::open_or_create(config).map_err(to_pyerr)?;
|
|
|
|
|
|
Ok(Indexer(indexer))
|
|
|
|
|
|
}
|
|
|
|
|
|
|
|
|
|
|
|
pub fn get_updater(&self) -> IndexUpdater {
|
|
|
|
|
|
IndexUpdater(self.0.get_updater())
|
|
|
|
|
|
}
|
|
|
|
|
|
|
|
|
|
|
|
pub fn search(
|
|
|
|
|
|
&self,
|
|
|
|
|
|
query: String,
|
|
|
|
|
|
fields: Vec<String>,
|
|
|
|
|
|
limit: usize,
|
|
|
|
|
|
offset: Option<usize>,
|
|
|
|
|
|
) -> PyResult<Vec<(f32, String)>> {
|
|
|
|
|
|
let default_fields: Vec<_> = fields.iter().map(|s| s.as_str()).collect();
|
|
|
|
|
|
let data: Vec<_> = self
|
|
|
|
|
|
.0
|
|
|
|
|
|
.search(&query, &default_fields, limit, offset.unwrap_or(0))
|
|
|
|
|
|
.map_err(to_pyerr)?
|
|
|
|
|
|
.into_iter()
|
|
|
|
|
|
.map(|(score, doc)| (score, serde_json::to_string(&doc).unwrap()))
|
|
|
|
|
|
.collect();
|
|
|
|
|
|
|
|
|
|
|
|
Ok(data)
|
|
|
|
|
|
}
|
|
|
|
|
|
|
|
|
|
|
|
pub fn reload(&self) -> PyResult<()> {
|
|
|
|
|
|
self.0.reload().map_err(to_pyerr)
|
|
|
|
|
|
}
|
|
|
|
|
|
}
|
|
|
|
|
|
|
|
|
|
|
|
#[pymethods]
|
|
|
|
|
|
impl IndexUpdater {
|
|
|
|
|
|
pub fn add(&mut self, input: &str, config: &InputConfig) -> PyResult<()> {
|
|
|
|
|
|
self.0.add(input, &config.0).map_err(to_pyerr)
|
|
|
|
|
|
}
|
|
|
|
|
|
|
|
|
|
|
|
pub fn update(&mut self, input: &str, config: &InputConfig) -> PyResult<()> {
|
|
|
|
|
|
self.0.update(input, &config.0).map_err(to_pyerr)
|
|
|
|
|
|
}
|
|
|
|
|
|
|
|
|
|
|
|
pub fn commit(&mut self) -> PyResult<()> {
|
|
|
|
|
|
self.0.commit().map_err(to_pyerr)
|
|
|
|
|
|
}
|
|
|
|
|
|
|
|
|
|
|
|
pub fn clear(&self) -> PyResult<()> {
|
|
|
|
|
|
self.0.clear().map_err(to_pyerr)
|
|
|
|
|
|
}
|
|
|
|
|
|
}
|
|
|
|
|
|
|
|
|
|
|
|
#[pymethods]
|
|
|
|
|
|
impl InputConfig {
|
|
|
|
|
|
#[new]
|
|
|
|
|
|
fn new(
|
|
|
|
|
|
input_type: String,
|
|
|
|
|
|
mapping: Option<Vec<(String, String)>>,
|
|
|
|
|
|
conversion: Option<Vec<(String, (String, String))>>,
|
|
|
|
|
|
) -> PyResult<Self> {
|
|
|
|
|
|
let input_type = match input_type.as_ref() {
|
|
|
|
|
|
"yaml" | "yml" => x::InputType::Yaml,
|
|
|
|
|
|
"json" => x::InputType::Json,
|
|
|
|
|
|
"xml" => x::InputType::Xml,
|
|
|
|
|
|
_ => return Err(exceptions::PyValueError::new_err("Invalid input type")),
|
|
|
|
|
|
};
|
|
|
|
|
|
let conversion = conversion
|
|
|
|
|
|
.unwrap_or_default()
|
|
|
|
|
|
.into_iter()
|
|
|
|
|
|
.filter_map(|(k, (t1, t2))| {
|
|
|
|
|
|
let t = match (t1.as_ref(), t2.as_ref()) {
|
|
|
|
|
|
("string", "number") => (x::ValueType::String, x::ValueType::Number),
|
|
|
|
|
|
("number", "string") => (x::ValueType::Number, x::ValueType::String),
|
|
|
|
|
|
_ => return None,
|
|
|
|
|
|
};
|
|
|
|
|
|
Some((k, t))
|
|
|
|
|
|
})
|
|
|
|
|
|
.collect::<Vec<_>>();
|
|
|
|
|
|
|
|
|
|
|
|
Ok(Self(x::InputConfig::new(
|
|
|
|
|
|
input_type,
|
|
|
|
|
|
mapping.unwrap_or_default(),
|
|
|
|
|
|
conversion,
|
|
|
|
|
|
)))
|
|
|
|
|
|
}
|
|
|
|
|
|
}
|
|
|
|
|
|
|
|
|
|
|
|
#[pymodule]
|
|
|
|
|
|
fn xunmi(_py: Python, m: &PyModule) -> PyResult<()> {
|
|
|
|
|
|
m.add_class::<Indexer>()?;
|
|
|
|
|
|
m.add_class::<InputConfig>()?;
|
|
|
|
|
|
m.add_class::<IndexUpdater>()?;
|
|
|
|
|
|
Ok(())
|
|
|
|
|
|
}
|
|
|
|
|
|
|
|
|
|
|
|
```
|
|
|
|
|
|
|
|
|
|
|
|
整体的代码除了使用了一些 PyO3 提供的宏,没有什么特别之处,就是把 xunmi crate 的接口包装了一下(Indexer / InputConfig / IndexUpdater),然后把它们呈现在 pymodule 中。
|
|
|
|
|
|
|
|
|
|
|
|
你可以去这门课的 [GitHub repo](https://github.com/tyrchen/geektime-rust) 里,下载可以用于测试的 fixtures,以及 Jupyter Notebook(index\_wiki.ipynb)。
|
|
|
|
|
|
|
|
|
|
|
|
如果要测试 Python 代码,请运行 `make`,这样会编译出一个 release 版本的 .so 放在 xunmi 目录下,之后你就可以在 ipython 或者 jupyter-lab 里 `from xunmi import *` 来使用了。当然,你也可以使用第 6 讲介绍的 [maturin](https://github.com/PyO3/maturin) 来测试和发布。
|
|
|
|
|
|
|
|
|
|
|
|
### One more thing
|
|
|
|
|
|
|
|
|
|
|
|
作为一个 Python 老手,你可能会问,如果在 Python 侧,我要传入 \*args(变长参数) 或者 \*\*kwargs(变长字典)怎么办?这可是 Python 的精髓啊!别担心,pyo3 提供了对应的 PyTuple / PyDict 类型,以及相应的宏。
|
|
|
|
|
|
|
|
|
|
|
|
我们可以这么写:
|
|
|
|
|
|
|
|
|
|
|
|
```rust
|
|
|
|
|
|
use pyo3::types::{PyDict, PyTuple};
|
|
|
|
|
|
|
|
|
|
|
|
#[pyclass]
|
|
|
|
|
|
struct MyClass {}
|
|
|
|
|
|
|
|
|
|
|
|
#[pymethods]
|
|
|
|
|
|
impl MyClass {
|
|
|
|
|
|
#[staticmethod]
|
|
|
|
|
|
#[args(kwargs = "**")]
|
|
|
|
|
|
fn test1(kwargs: Option<&PyDict>) -> PyResult<()> {
|
|
|
|
|
|
if let Some(kwargs) = kwargs {
|
|
|
|
|
|
for kwarg in kwargs {
|
|
|
|
|
|
println!("{:?}", kwarg);
|
|
|
|
|
|
}
|
|
|
|
|
|
} else {
|
|
|
|
|
|
println!("kwargs is none");
|
|
|
|
|
|
}
|
|
|
|
|
|
Ok(())
|
|
|
|
|
|
}
|
|
|
|
|
|
|
|
|
|
|
|
#[staticmethod]
|
|
|
|
|
|
#[args(args = "*")]
|
|
|
|
|
|
fn test2(args: &PyTuple) -> PyResult<()> {
|
|
|
|
|
|
for arg in args {
|
|
|
|
|
|
println!("{:?}", arg);
|
|
|
|
|
|
}
|
|
|
|
|
|
Ok(())
|
|
|
|
|
|
}
|
|
|
|
|
|
}
|
|
|
|
|
|
|
|
|
|
|
|
```
|
|
|
|
|
|
|
|
|
|
|
|
感兴趣的同学可以尝试一下(记得要 m.add\_class 注册一下)。下面是运行结果:
|
|
|
|
|
|
|
|
|
|
|
|
```python
|
|
|
|
|
|
In [6]: MyClass.test1()
|
|
|
|
|
|
kwargs is none
|
|
|
|
|
|
|
|
|
|
|
|
In [7]: MyClass.test1(a=1, b=2)
|
|
|
|
|
|
('a', 1)
|
|
|
|
|
|
('b', 2)
|
|
|
|
|
|
|
|
|
|
|
|
In [8]: MyClass.test2(1,2,3)
|
|
|
|
|
|
1
|
|
|
|
|
|
2
|
|
|
|
|
|
3
|
|
|
|
|
|
|
|
|
|
|
|
```
|
|
|
|
|
|
|
|
|
|
|
|
## 小结
|
|
|
|
|
|
|
|
|
|
|
|
PyO3 是一个非常成熟的让 Python 和 Rust 互操作的库。很多 Rust 的库都是通过 PyO3 被介绍到 Python 社区的。所以如果你是一名 Python 开发者,喜欢在 Jupyter Notebook 上开发,不妨把一些需要高性能的库用 Rust 实现。其实 tantivy 也有自己的 [tantivy-py](https://github.com/quickwit-inc/tantivy-py),你也可以看看它的实现源码。
|
|
|
|
|
|
|
|
|
|
|
|
当然啦,这一讲我们对 PyO3 的使用也仅仅是冰山一角。PyO3 还允许你在 Rust 下调用 Python 代码。
|
|
|
|
|
|
|
|
|
|
|
|
比如你可以提供一个库给 Python,让 Python 调用这个库的能力。在需要的时候,这个库还可以接受一个来自 Python 的闭包函数,让 Python 用户享受到 Rust 库的高性能之外,还可以拥有足够的灵活性。我们之前使用过的 [polars](https://github.com/pola-rs/polars) 就有不少这样 Rust 和 Python 的深度交互。感兴趣的同学可以看看它的代码。
|
|
|
|
|
|
|
|
|
|
|
|
### 思考题
|
|
|
|
|
|
|
|
|
|
|
|
今天我们实现了 xunmi-py,按照类似的思路,你可以试着边看 neon 的文档,边实现一个 xunmi-js,让它也可以被用在 Node.js 社区。
|
|
|
|
|
|
|
|
|
|
|
|
欢迎在留言区分享讨论。感谢你的收听,今天你完成了第32次Rust打卡啦,继续坚持。我们下节课见~
|
|
|
|
|
|
|