622 lines
23 KiB
Markdown
622 lines
23 KiB
Markdown
|
|
# 29|运行时:Vue在浏览器里是怎么跑起来的?
|
|||
|
|
|
|||
|
|
你好,我是大圣。
|
|||
|
|
|
|||
|
|
上一讲我们学习了Vue响应式的大致原理,响应式就是可以把普通的JavaScript对象包裹成响应式对象,这样,我们对对象做的修改,响应式都能够监听到,并且执行effect内部注册的函数来执行数据修改之后的效果。
|
|||
|
|
|
|||
|
|
那今天我就跟你聊一下Vue在浏览器里是如何运行的,照例我们还是对着Vue 3的源码来学习,不过源码复杂,为了帮助你理解主要逻辑,我会直接把源码简化再演示,当然怎么简化源码的一些小技巧也会顺便分享给你。
|
|||
|
|
|
|||
|
|
好了废话不多说,我们马上开始。前端框架需要处理的最核心的两个流程,就是首次渲染和数据更新后的渲染。先来看首次渲染的源码。演示代码会用Vue 3的实际代码,你也可以在 [weiyouyi](https://github.com/shengxinjing/weiyouyi/blob/main/src/runtime-core/apiCreateApp.js#L4) 项目中看到我们课程的mini版本代码。
|
|||
|
|
|
|||
|
|
## 首次渲染
|
|||
|
|
|
|||
|
|
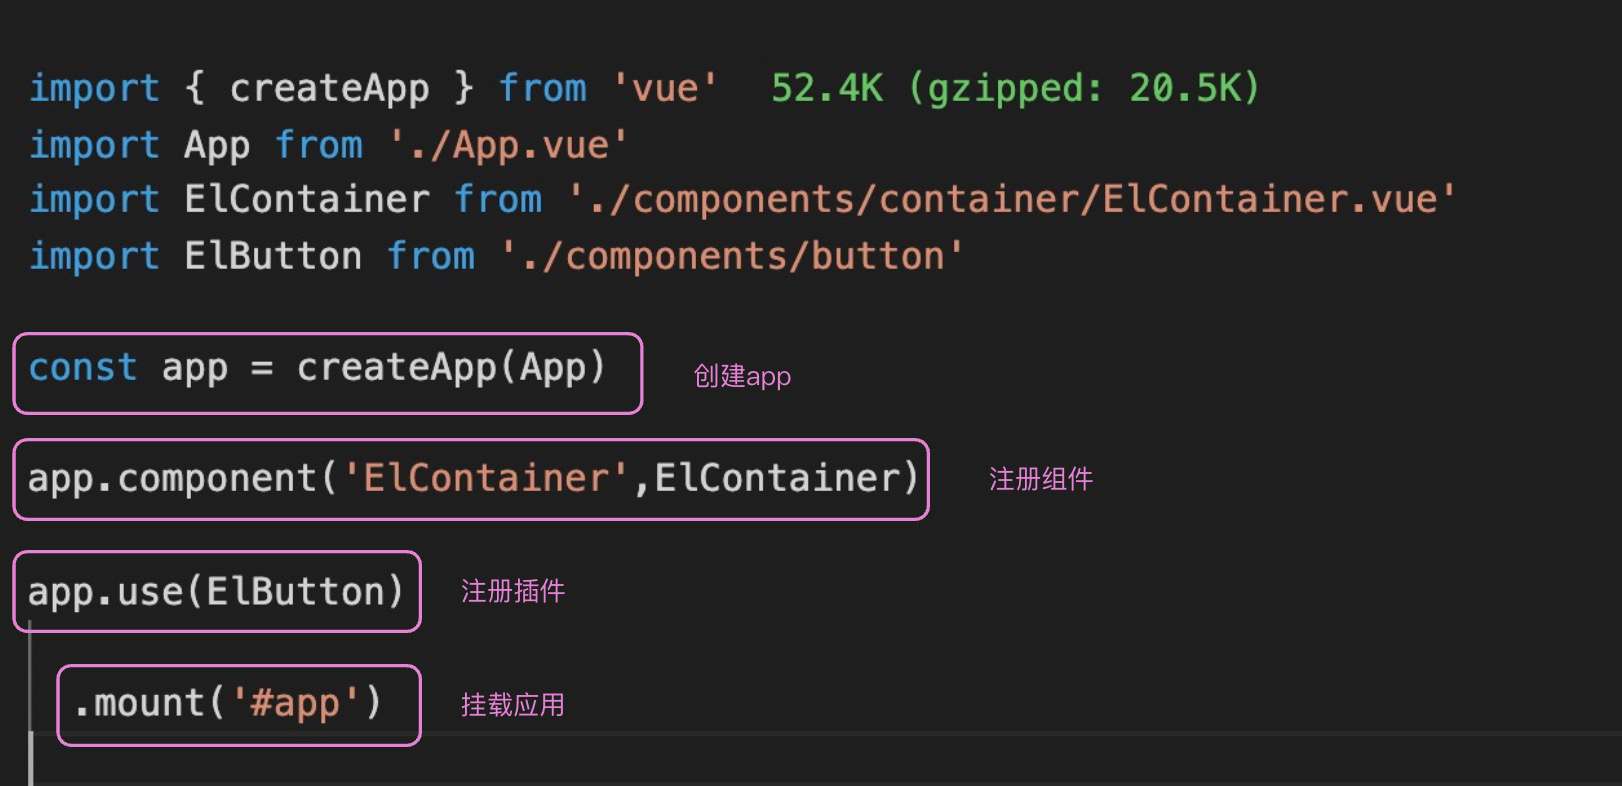
我们知道,想要启动一个Vue项目,只需要从Vue中引入createApp,传入App组件,并且调用createApp返回的App实例的mount方法,就实现了项目的启动。这个时候Vue也完成了首次渲染,代码逻辑如下:
|
|||
|
|
|
|||
|
|
|
|||
|
|
|
|||
|
|
所以createApp就是项目的初始化渲染入口。
|
|||
|
|
|
|||
|
|
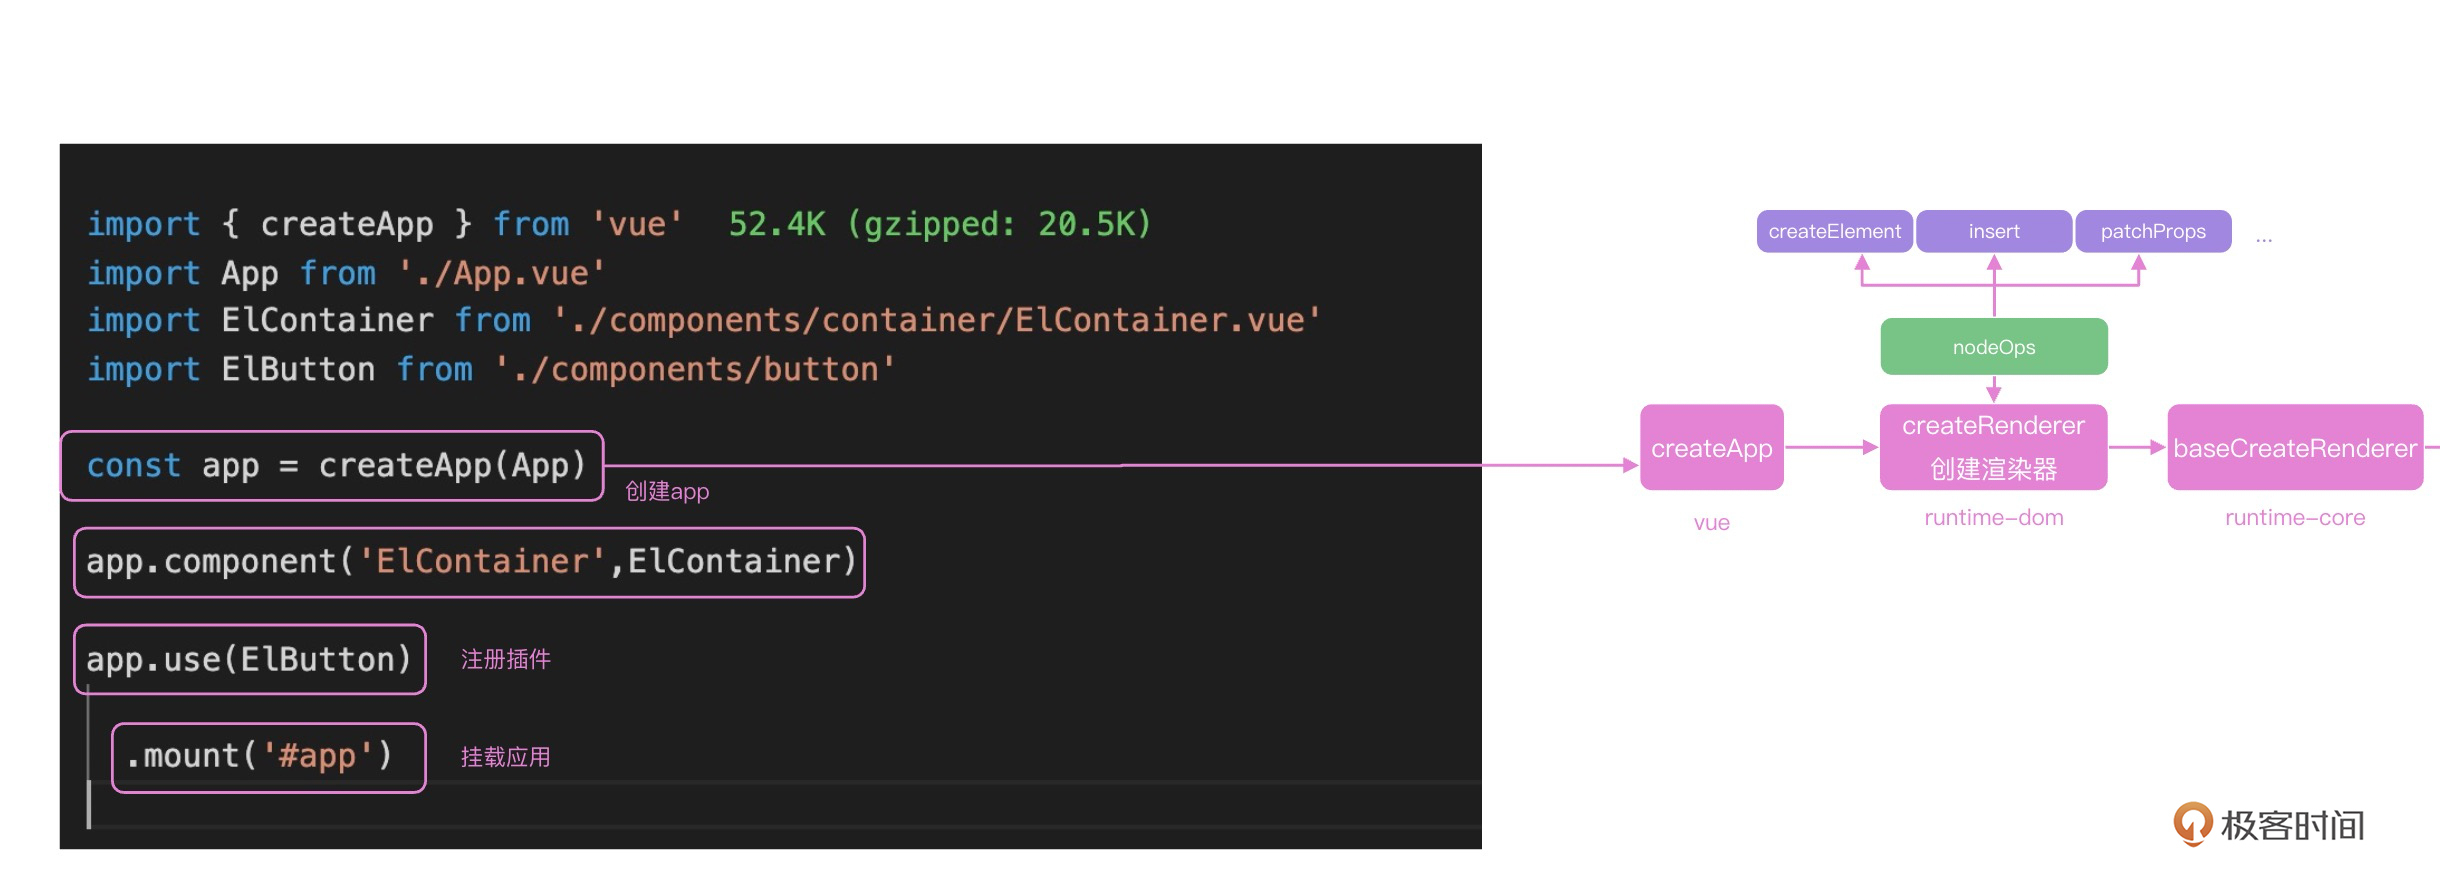
但是这段简单的代码是怎么完成初始化渲染的呢?我们可以在Vue中的runtime-dom中看到createApp的定义,你可以打开 [GitHub链接](https://github.com/vuejs/vue-next/blob/master/packages/runtime-dom/src/index.ts#L66)查看。
|
|||
|
|
|
|||
|
|
这里就有一个看代码的小技巧,分享给你,我们首次查看源码的时候,可以先把一些无用的信息删除,方便自己梳理主体的逻辑。看Vue代码,和今天主题无关的无用信息有哪些,\_\_COMPAT\_\_代码是用来兼容Vue 2的,\_\_DEV\_\_代码是用来调试的,我们可以把这些代码删除之后,得到下面的简化版createApp源码。
|
|||
|
|
|
|||
|
|
再看思路就比较清晰了。我们使用ensureRenderer返回的对象去创建app,并且重写了app.mount方法;在mount方法内部,我们查找mount传递的DOM元素,并且调用ensureRenderer返回的mount方法,进行初始化渲染。如下图所示:
|
|||
|
|
|
|||
|
|
|
|||
|
|
|
|||
|
|
之前我们讲过要会TypeScript,这时你就能感受到TypeScript的好处了,现在即使我们不知道app.mount是什么逻辑,也能知道这个函数的参数只能是Element、ShadowRoot或者string三者之一,也就很好理解内部的normalizeContainer就是把你传递的参数统一变为浏览器的DOM元素,Typescript类型带来的好处,我们在读源码的时候会一直感受得到。
|
|||
|
|
|
|||
|
|
```javascript
|
|||
|
|
export const createApp = ((...args) => {
|
|||
|
|
const app = ensureRenderer().createApp(...args)
|
|||
|
|
const { mount } = app
|
|||
|
|
// 重写mount
|
|||
|
|
app.mount = (containerOrSelector: Element | ShadowRoot | string): any => {
|
|||
|
|
const container = normalizeContainer(containerOrSelector)
|
|||
|
|
if (!container) return
|
|||
|
|
|
|||
|
|
const component = app._component
|
|||
|
|
if (!isFunction(component) && !component.render && !component.template) {
|
|||
|
|
component.template = container.innerHTML
|
|||
|
|
}
|
|||
|
|
container.innerHTML = ''
|
|||
|
|
const proxy = mount(container, false, container instanceof SVGElement)
|
|||
|
|
if (container instanceof Element) {
|
|||
|
|
container.removeAttribute('v-cloak')
|
|||
|
|
container.setAttribute('data-v-app', '')
|
|||
|
|
}
|
|||
|
|
return proxy
|
|||
|
|
}
|
|||
|
|
return app
|
|||
|
|
})
|
|||
|
|
function normalizeContainer(container){
|
|||
|
|
if (isString(container)) {
|
|||
|
|
const res = document.querySelector(container)
|
|||
|
|
}
|
|||
|
|
return container
|
|||
|
|
}
|
|||
|
|
|
|||
|
|
```
|
|||
|
|
|
|||
|
|
我们继续深入了解ensureRenderer方法,以及ensureRenderer方法返回的createApp方法。
|
|||
|
|
|
|||
|
|
**这里ensureRenderer函数,内部通过createRenderer函数,创建了一个浏览器的渲染器,并且缓存了渲染器renderer**,这种使用闭包做缓存的方式,你在日常开发中也可以借鉴这种思路。
|
|||
|
|
|
|||
|
|
createRenderer函数,我们在自定义渲染器那一讲里学到过,传递的rendererOptions就是浏览器里面标签的增删改查API:
|
|||
|
|
|
|||
|
|
```javascript
|
|||
|
|
// 浏览器dom操作
|
|||
|
|
import { nodeOps } from './nodeOps'
|
|||
|
|
// 浏览器dom属性更新
|
|||
|
|
import { patchProp } from './patchProp'
|
|||
|
|
import { createRenderer } from '@vue/runtime-core'
|
|||
|
|
const rendererOptions = extend({ patchProp }, nodeOps)
|
|||
|
|
|
|||
|
|
let renderer: Renderer<Element | ShadowRoot> | HydrationRenderer
|
|||
|
|
|
|||
|
|
function ensureRenderer() {
|
|||
|
|
return (
|
|||
|
|
renderer ||
|
|||
|
|
(renderer = createRenderer<Node, Element | ShadowRoot>(rendererOptions))
|
|||
|
|
)
|
|||
|
|
}
|
|||
|
|
|
|||
|
|
```
|
|||
|
|
|
|||
|
|
可以看到,createRenderer函数传递的参数是nodeOps和patchProp的合并对象。
|
|||
|
|
|
|||
|
|
我们继续进入nodeOps和pathProp也可以看到下面的代码,写了很多方法。通过ensureRenderer存储这些操作方法后,createApp内部就可以脱离具体的渲染平台了,这也是Vue 3实现跨端的核心逻辑:
|
|||
|
|
|
|||
|
|
```javascript
|
|||
|
|
export const nodeOps: Omit<RendererOptions<Node, Element>, 'patchProp'> = {
|
|||
|
|
insert: (child, parent, anchor) => {
|
|||
|
|
parent.insertBefore(child, anchor || null)
|
|||
|
|
},
|
|||
|
|
remove: child => {
|
|||
|
|
const parent = child.parentNode
|
|||
|
|
if (parent) {
|
|||
|
|
parent.removeChild(child)
|
|||
|
|
}
|
|||
|
|
},
|
|||
|
|
createElement: (tag, isSVG, is, props): Element => {
|
|||
|
|
const el = isSVG
|
|||
|
|
? doc.createElementNS(svgNS, tag)
|
|||
|
|
: doc.createElement(tag, is ? { is } : undefined)
|
|||
|
|
|
|||
|
|
if (tag === 'select' && props && props.multiple != null) {
|
|||
|
|
;(el as HTMLSelectElement).setAttribute('multiple', props.multiple)
|
|||
|
|
}
|
|||
|
|
return el
|
|||
|
|
},
|
|||
|
|
|
|||
|
|
createText: text => doc.createTextNode(text),
|
|||
|
|
|
|||
|
|
createComment: text => doc.createComment(text),
|
|||
|
|
|
|||
|
|
setText: (node, text) => {
|
|||
|
|
node.nodeValue = text
|
|||
|
|
},
|
|||
|
|
|
|||
|
|
setElementText: (el, text) => {
|
|||
|
|
el.textContent = text
|
|||
|
|
},
|
|||
|
|
parentNode: node => node.parentNode as Element | null,
|
|||
|
|
nextSibling: node => node.nextSibling,
|
|||
|
|
querySelector: selector => doc.querySelector(selector),
|
|||
|
|
...
|
|||
|
|
}
|
|||
|
|
|
|||
|
|
```
|
|||
|
|
|
|||
|
|
然后我们就需要进入到rumtime-core模块去看下createRenderer是如何工作的。你可以在这个[GitHub链接](https://github.com/vuejs/vue-next/blob/master/packages/runtime-core/src/renderer.ts#L290)内看到createRenderer的代码逻辑。当然源码比较复杂,我们照样需要简化一下。
|
|||
|
|
|
|||
|
|
createRenderer是调用baseCreateRenderer创建的,baseCreateRenderer函数内部有十几个函数,代码行数合计2000行左右,这也是我们学习Vue源码最复杂的一个函数了。按前面简化源码的思路,先把工具函数的实现折叠起来,精简之后代码主要逻辑其实很简单。
|
|||
|
|
|
|||
|
|
我们一起来看。
|
|||
|
|
|
|||
|
|
首先获取了平台上所有的insert、remove函数,这些函数都是nodeOps传递进来的,然后定义了一些列patch、mount、unmount函数,通过名字我们不难猜出,这就是Vue中更新、渲染组件的工具函数,比如mountElement就是渲染DOM元素、mountComponent就是渲染组件updateComponent就是更新组件。这部分的简化代码,你也可以在[weiyouyi](https://github.com/shengxinjing/weiyouyi/blob/main/src/runtime-core/renderer.js)项目中查看。
|
|||
|
|
|
|||
|
|
```javascript
|
|||
|
|
export function createRenderer<
|
|||
|
|
HostNode = RendererNode,
|
|||
|
|
HostElement = RendererElement
|
|||
|
|
>(options: RendererOptions<HostNode, HostElement>) {
|
|||
|
|
return baseCreateRenderer<HostNode, HostElement>(options)
|
|||
|
|
}
|
|||
|
|
|
|||
|
|
function baseCreateRenderer(){
|
|||
|
|
const {
|
|||
|
|
insert: hostInsert,
|
|||
|
|
remove: hostRemove,
|
|||
|
|
patchProp: hostPatchProp,
|
|||
|
|
createElement: hostCreateElement,
|
|||
|
|
createText: hostCreateText,
|
|||
|
|
createComment: hostCreateComment,
|
|||
|
|
setText: hostSetText,
|
|||
|
|
setElementText: hostSetElementText,
|
|||
|
|
parentNode: hostParentNode,
|
|||
|
|
nextSibling: hostNextSibling,
|
|||
|
|
setScopeId: hostSetScopeId = NOOP,
|
|||
|
|
cloneNode: hostCloneNode,
|
|||
|
|
insertStaticContent: hostInsertStaticContent
|
|||
|
|
} = options
|
|||
|
|
const patch = ()=>... //一个函数
|
|||
|
|
const processText = ()=>...
|
|||
|
|
const processCommentNode = ()=>...
|
|||
|
|
const processElement = ()=>...
|
|||
|
|
const mountElement = ()=>...
|
|||
|
|
const mountChildren = ()=>...
|
|||
|
|
const patchElement = ()=>...
|
|||
|
|
const patchBlockChildren = ()=>...
|
|||
|
|
const patchProps = ()=>...
|
|||
|
|
const processComponent = ()=>...
|
|||
|
|
const mountComponent = ()=>...
|
|||
|
|
const updateComponent = ()=>...
|
|||
|
|
const setupRenderEffect = ()=>...
|
|||
|
|
const patchChildren = ()=>...
|
|||
|
|
const patchKeyedChildren = ()=>...
|
|||
|
|
const unmount = ()=>...
|
|||
|
|
const unmountComponent = ()=>...
|
|||
|
|
const unmountComponent = ()=>...
|
|||
|
|
const unmountComponent = ()=>...
|
|||
|
|
const unmountComponent = ()=>...
|
|||
|
|
const render: RootRenderFunction = (vnode, container, isSVG) => {
|
|||
|
|
if (vnode == null) {
|
|||
|
|
if (container._vnode) {
|
|||
|
|
unmount(container._vnode, null, null, true)
|
|||
|
|
}
|
|||
|
|
} else {
|
|||
|
|
patch(container._vnode || null, vnode, container, null, null, null, isSVG)
|
|||
|
|
}
|
|||
|
|
flushPostFlushCbs()
|
|||
|
|
container._vnode = vnode
|
|||
|
|
}
|
|||
|
|
return {
|
|||
|
|
render,
|
|||
|
|
hydrate,
|
|||
|
|
createApp: createAppAPI(render, hydrate)
|
|||
|
|
}
|
|||
|
|
}
|
|||
|
|
|
|||
|
|
```
|
|||
|
|
|
|||
|
|
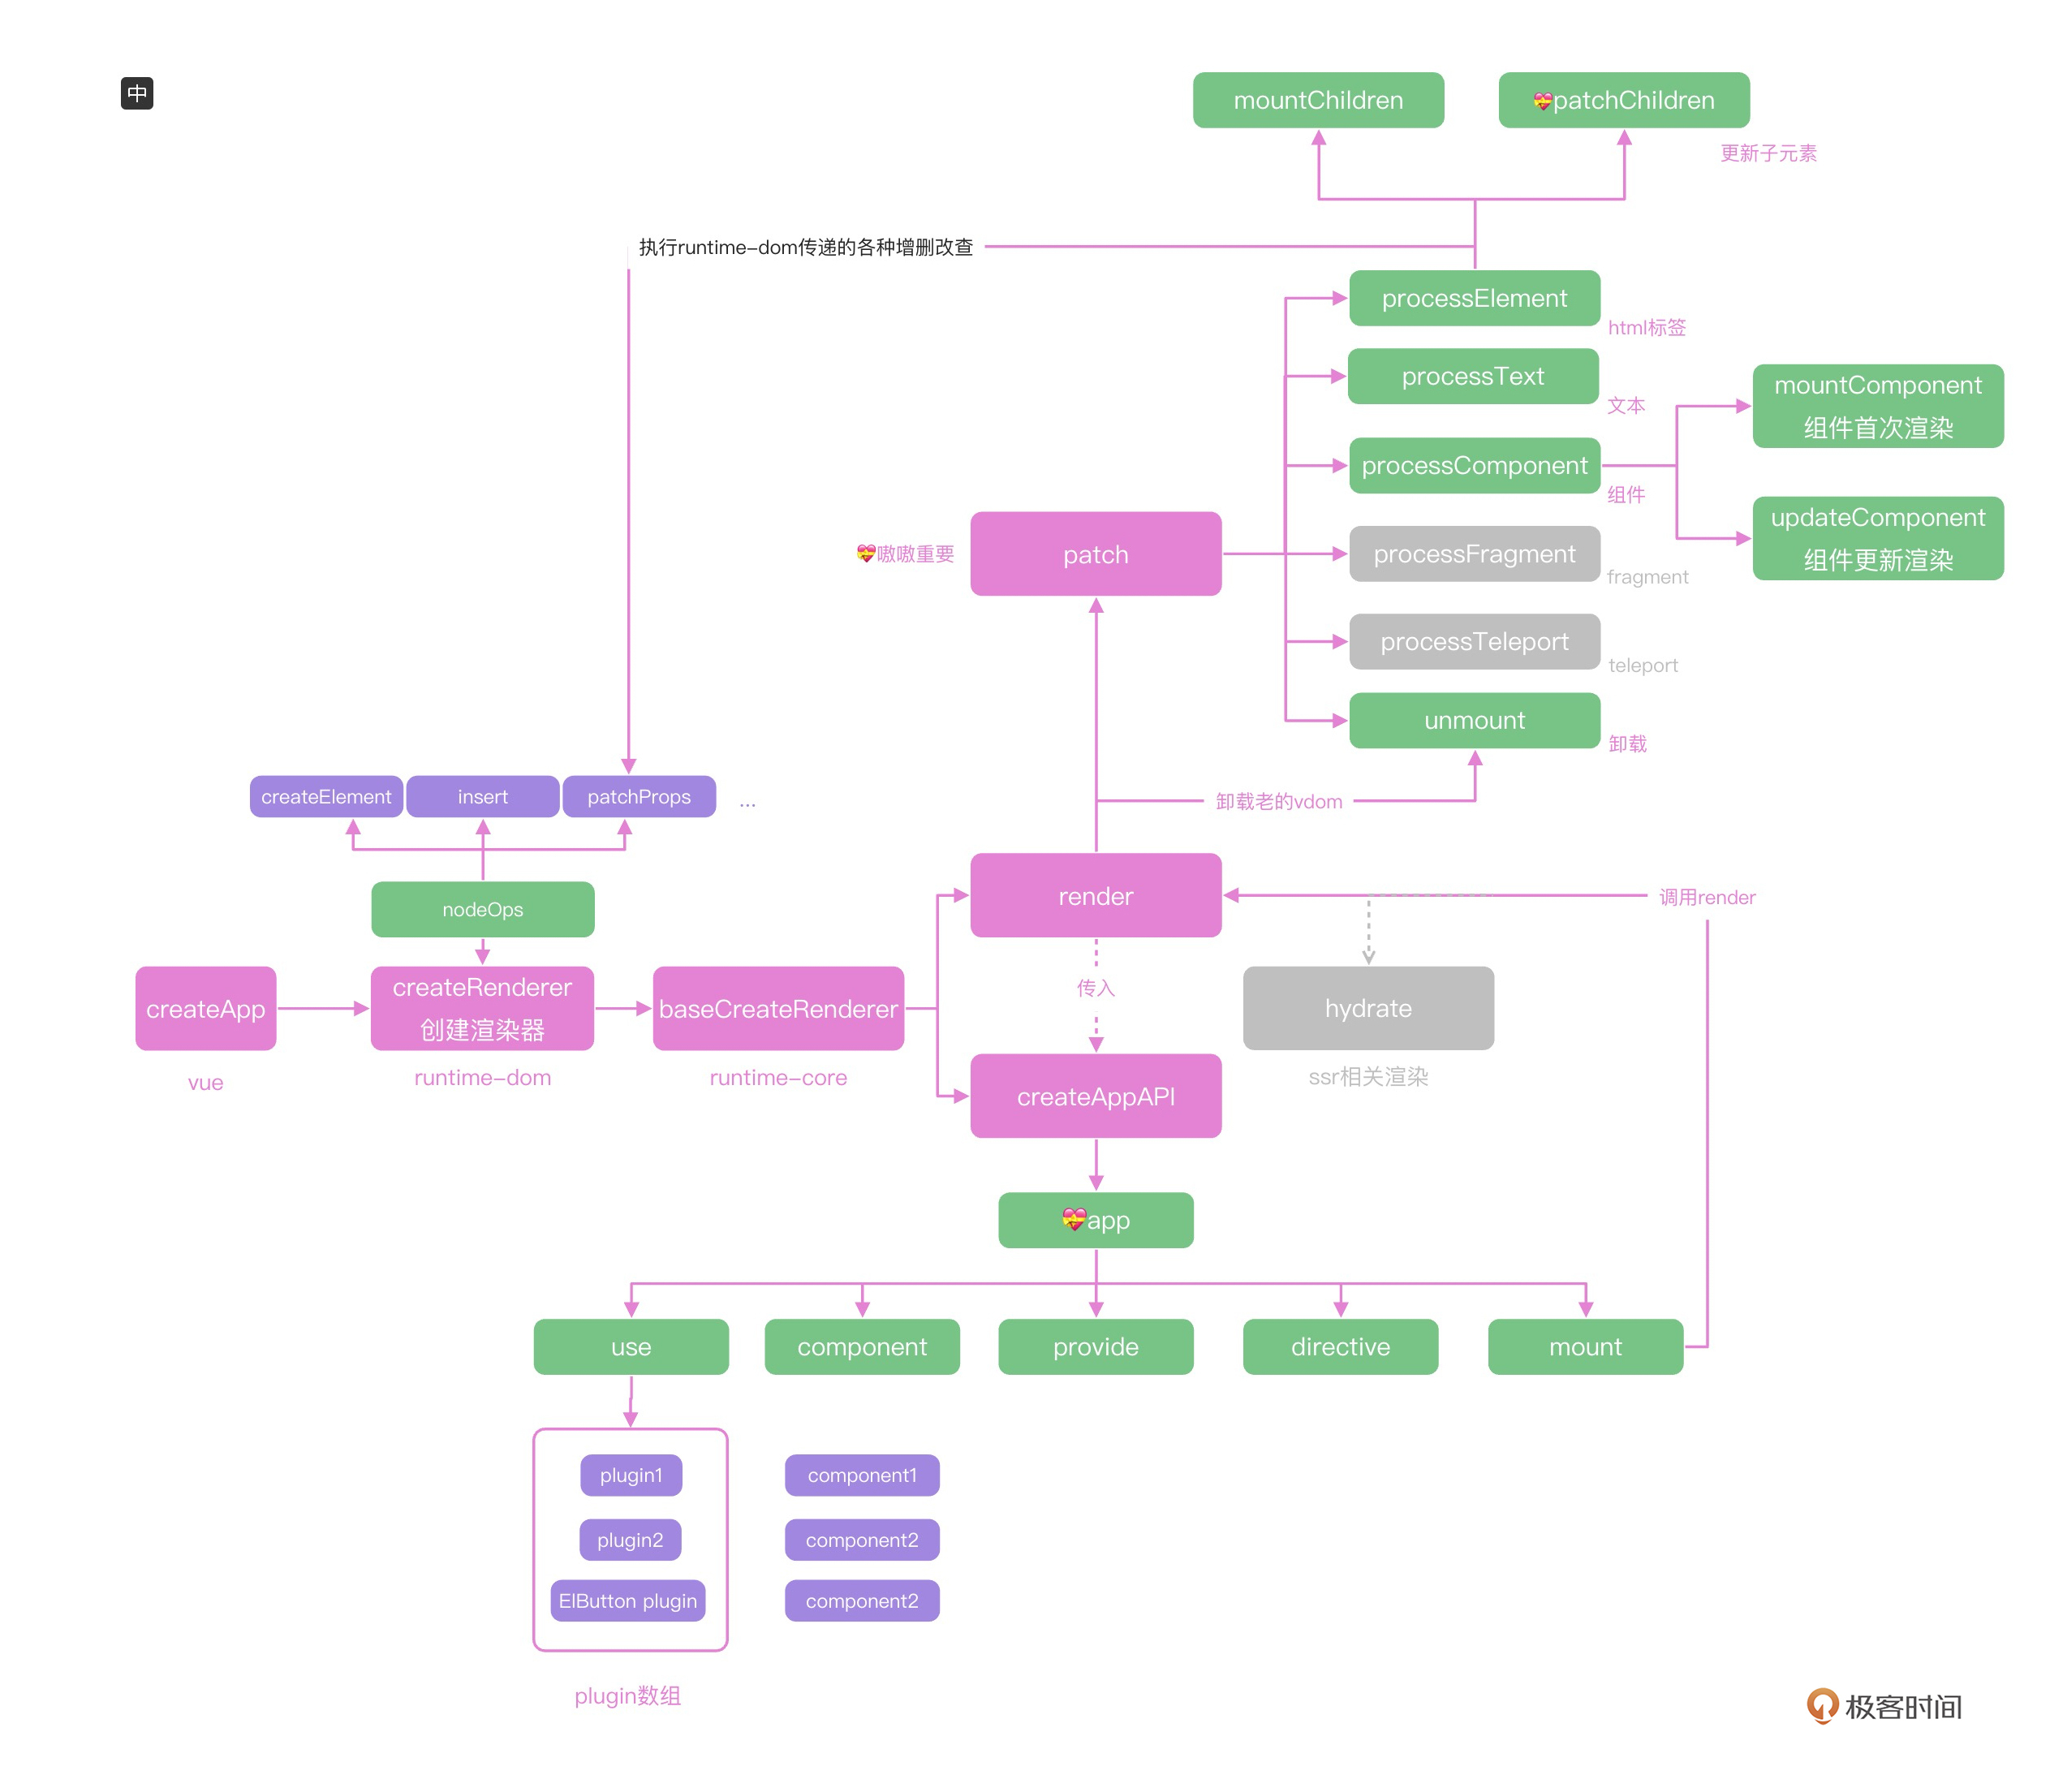
整个createApp函数的执行逻辑如下图所示:
|
|||
|
|
|
|||
|
|
|
|||
|
|
|
|||
|
|
最后返回的createApp方法,实际上是createAPI的返回值,并且给createAPI传递了render方法。render方法内部很简单,就是判断container容器上有没有\_vnode属性,如果有的话就执行unmout方法,没有的话就执行patch方法,最后把vnode信息存储在container.\_vnode上。
|
|||
|
|
|
|||
|
|
那createAppAPI又做了什么呢?我们继续进入createAppAPI源码,看下面的代码。内部创建了一个app对象,app上注册了我们熟悉的use、component和mount等方法:
|
|||
|
|
|
|||
|
|
```javascript
|
|||
|
|
export function createAppAPI<HostElement>(
|
|||
|
|
render: RootRenderFunction,
|
|||
|
|
hydrate?: RootHydrateFunction
|
|||
|
|
): CreateAppFunction<HostElement> {
|
|||
|
|
return function createApp(rootComponent, rootProps = null) {
|
|||
|
|
const context = createAppContext()
|
|||
|
|
let isMounted = false
|
|||
|
|
|
|||
|
|
const app: App = (context.app = {
|
|||
|
|
_context: context,
|
|||
|
|
_instance: null,
|
|||
|
|
use(plugin: Plugin, ...options: any[]) ,
|
|||
|
|
component(name: string, component?: Component): any {
|
|||
|
|
if (!component) {
|
|||
|
|
return context.components[name]
|
|||
|
|
}
|
|||
|
|
context.components[name] = component
|
|||
|
|
return app
|
|||
|
|
},
|
|||
|
|
directive(name: string, directive?: Directive)
|
|||
|
|
mount(
|
|||
|
|
rootContainer: HostElement,
|
|||
|
|
isHydrate?: boolean,
|
|||
|
|
isSVG?: boolean
|
|||
|
|
): any {
|
|||
|
|
if (!isMounted) {
|
|||
|
|
const vnode = createVNode(
|
|||
|
|
rootComponent as ConcreteComponent,
|
|||
|
|
rootProps
|
|||
|
|
)
|
|||
|
|
vnode.appContext = context
|
|||
|
|
// 核心的逻辑
|
|||
|
|
if (isHydrate && hydrate) {
|
|||
|
|
hydrate(vnode as VNode<Node, Element>, rootContainer as any)
|
|||
|
|
} else {
|
|||
|
|
render(vnode, rootContainer, isSVG)
|
|||
|
|
}
|
|||
|
|
return getExposeProxy(vnode.component!) || vnode.component!.proxy
|
|||
|
|
}
|
|||
|
|
},
|
|||
|
|
|
|||
|
|
provide(key, value) {
|
|||
|
|
context.provides[key as string] = value
|
|||
|
|
return app
|
|||
|
|
}
|
|||
|
|
})
|
|||
|
|
|
|||
|
|
return app
|
|||
|
|
}
|
|||
|
|
}
|
|||
|
|
|
|||
|
|
```
|
|||
|
|
|
|||
|
|
可以看到mount内部执行的是传递进来的render方法,也就是上面的render方法。container 就是我们app.mount中传递的DOM元素,对DOM元素进行处理之后,执行patch函数实现整个应用的加载。
|
|||
|
|
|
|||
|
|
所以我们的下一个任务就是需要搞清楚patch函数的执行逻辑。
|
|||
|
|
|
|||
|
|
### patch 函数
|
|||
|
|
|
|||
|
|
patch传递的是container.\_vnode,也就是上一次渲染缓存的vnode、本次渲染组件的vnode,以及容器container。
|
|||
|
|
|
|||
|
|
下面就是patch函数的代码,核心代码我添加了注释。其中n1是上次渲染的虚拟DOM,n2是下次要渲染的虚拟DOM。
|
|||
|
|
|
|||
|
|
首先可以把n1和n2做一次判断,如果虚拟DOM的节点类型不同,就直接unmount之前的节点。因为比如之前是Button组件,现在要渲染Container组件,就没有计算diff的必要,直接把Button组件销毁再渲染Container即可。
|
|||
|
|
|
|||
|
|
如果n1和n2类型相同,比如都是Button组件或者都是div标签,我们需要判断具体的类型再去执行不同的函数,比如processText、processFragment、processElement以及processComponent等函数。
|
|||
|
|
|
|||
|
|
看第55行,这里的ShapeFlags用到了位运算的知识,我们后面会通过刷算法题的方式介绍,暂时我们只需要知道,ShapeFlags可以帮助我们快速判断需要操作的类型就可以了。
|
|||
|
|
|
|||
|
|
```javascript
|
|||
|
|
const patch: PatchFn = (
|
|||
|
|
n1,
|
|||
|
|
n2,
|
|||
|
|
container,
|
|||
|
|
anchor = null,
|
|||
|
|
parentComponent = null,
|
|||
|
|
parentSuspense = null,
|
|||
|
|
isSVG = false,
|
|||
|
|
slotScopeIds = null,
|
|||
|
|
optimized = __DEV__ && isHmrUpdating ? false : !!n2.dynamicChildren
|
|||
|
|
) => {
|
|||
|
|
// 两次虚拟dom完全一样 啥也不用干
|
|||
|
|
if (n1 === n2) {
|
|||
|
|
return
|
|||
|
|
}
|
|||
|
|
// 虚拟dom节点类型不一样, unmount老的虚拟dom,并且n1赋值null
|
|||
|
|
if (n1 && !isSameVNodeType(n1, n2)) {
|
|||
|
|
anchor = getNextHostNode(n1)
|
|||
|
|
unmount(n1, parentComponent, parentSuspense, true)
|
|||
|
|
n1 = null
|
|||
|
|
}
|
|||
|
|
// n2是要渲染的虚拟dom,我们获取type,ref和shapeFlag
|
|||
|
|
const { type, ref, shapeFlag } = n2
|
|||
|
|
switch (type) {
|
|||
|
|
case Text:
|
|||
|
|
// 文本
|
|||
|
|
processText(n1, n2, container, anchor)
|
|||
|
|
break
|
|||
|
|
case Comment:
|
|||
|
|
// 注释
|
|||
|
|
processCommentNode(n1, n2, container, anchor)
|
|||
|
|
break
|
|||
|
|
case Static:
|
|||
|
|
// 静态节点
|
|||
|
|
if (n1 == null) {
|
|||
|
|
mountStaticNode(n2, container, anchor, isSVG)
|
|||
|
|
} else if (__DEV__) {
|
|||
|
|
patchStaticNode(n1, n2, container, isSVG)
|
|||
|
|
}
|
|||
|
|
break
|
|||
|
|
case Fragment:
|
|||
|
|
processFragment(
|
|||
|
|
n1,
|
|||
|
|
n2,
|
|||
|
|
container,
|
|||
|
|
anchor,
|
|||
|
|
parentComponent,
|
|||
|
|
parentSuspense,
|
|||
|
|
isSVG,
|
|||
|
|
slotScopeIds,
|
|||
|
|
optimized
|
|||
|
|
)
|
|||
|
|
break
|
|||
|
|
default:
|
|||
|
|
// 运运算判断操作类型
|
|||
|
|
if (shapeFlag & ShapeFlags.ELEMENT) {
|
|||
|
|
// html标签
|
|||
|
|
processElement(
|
|||
|
|
n1,
|
|||
|
|
n2,
|
|||
|
|
container,
|
|||
|
|
anchor,
|
|||
|
|
parentComponent,
|
|||
|
|
parentSuspense,
|
|||
|
|
isSVG,
|
|||
|
|
slotScopeIds,
|
|||
|
|
optimized
|
|||
|
|
)
|
|||
|
|
} else if (shapeFlag & ShapeFlags.COMPONENT) {
|
|||
|
|
// 组件
|
|||
|
|
processComponent(
|
|||
|
|
n1,
|
|||
|
|
n2,
|
|||
|
|
container,
|
|||
|
|
anchor,
|
|||
|
|
parentComponent,
|
|||
|
|
parentSuspense,
|
|||
|
|
isSVG,
|
|||
|
|
slotScopeIds,
|
|||
|
|
optimized
|
|||
|
|
)
|
|||
|
|
} else if (shapeFlag & ShapeFlags.TELEPORT) {
|
|||
|
|
;(type as typeof TeleportImpl).process(
|
|||
|
|
n1 as TeleportVNode,
|
|||
|
|
n2 as TeleportVNode,
|
|||
|
|
container,
|
|||
|
|
anchor,
|
|||
|
|
parentComponent,
|
|||
|
|
parentSuspense,
|
|||
|
|
isSVG,
|
|||
|
|
slotScopeIds,
|
|||
|
|
optimized,
|
|||
|
|
internals
|
|||
|
|
)
|
|||
|
|
} else if (__FEATURE_SUSPENSE__ && shapeFlag & ShapeFlags.SUSPENSE) {
|
|||
|
|
;(type as typeof SuspenseImpl).process(
|
|||
|
|
n1,
|
|||
|
|
n2,
|
|||
|
|
container,
|
|||
|
|
anchor,
|
|||
|
|
parentComponent,
|
|||
|
|
parentSuspense,
|
|||
|
|
isSVG,
|
|||
|
|
slotScopeIds,
|
|||
|
|
optimized,
|
|||
|
|
internals
|
|||
|
|
)
|
|||
|
|
} else if (__DEV__) {
|
|||
|
|
warn('Invalid VNode type:', type, `(${typeof type})`)
|
|||
|
|
}
|
|||
|
|
}
|
|||
|
|
|
|||
|
|
// set ref
|
|||
|
|
if (ref != null && parentComponent) {
|
|||
|
|
setRef(ref, n1 && n1.ref, parentSuspense, n2 || n1, !n2)
|
|||
|
|
}
|
|||
|
|
}
|
|||
|
|
|
|||
|
|
```
|
|||
|
|
|
|||
|
|
代码的整体执行逻辑如下图所示: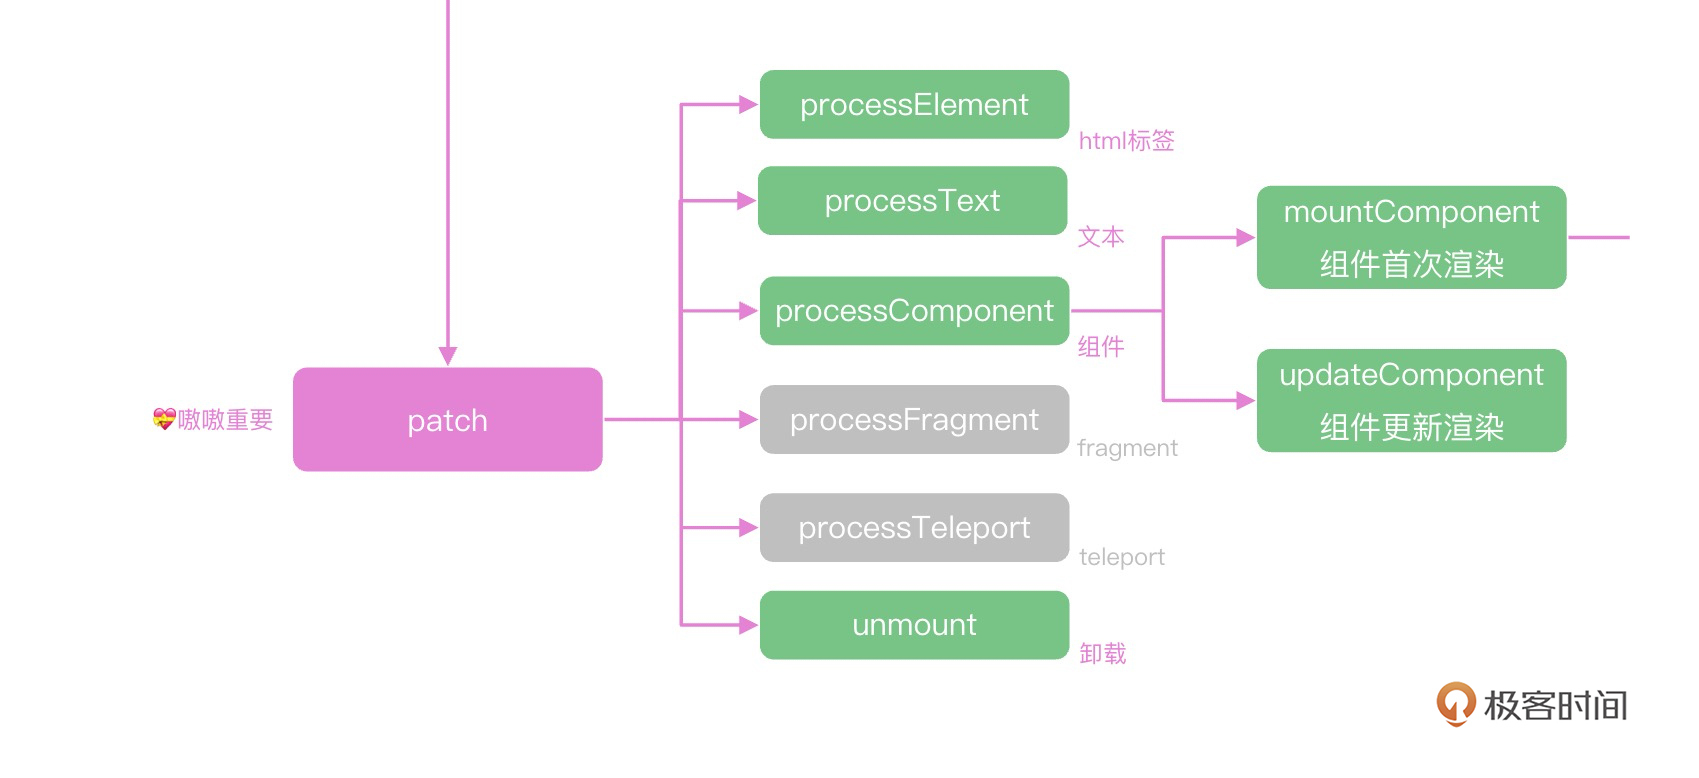
|
|||
|
|
|
|||
|
|
我们首次渲染的App是一个组件,所以要执行的就是processComponent方法。
|
|||
|
|
|
|||
|
|
### processComponent方法
|
|||
|
|
|
|||
|
|
那我们继续进入到processComponent代码内部,看下面的代码。首次渲染的时候,n1就是null,所以会执行mountComponent;如果是更新组件的时候,n1就是上次渲染的vdom,需要执行updateComponent。
|
|||
|
|
|
|||
|
|
```javascript
|
|||
|
|
const processComponent = (
|
|||
|
|
n1: VNode | null,
|
|||
|
|
n2: VNode,
|
|||
|
|
container: RendererElement,
|
|||
|
|
anchor: RendererNode | null,
|
|||
|
|
parentComponent: ComponentInternalInstance | null,
|
|||
|
|
parentSuspense: SuspenseBoundary | null,
|
|||
|
|
isSVG: boolean,
|
|||
|
|
slotScopeIds: string[] | null,
|
|||
|
|
optimized: boolean
|
|||
|
|
) => {
|
|||
|
|
n2.slotScopeIds = slotScopeIds
|
|||
|
|
if (n1 == null) {
|
|||
|
|
if (n2.shapeFlag & ShapeFlags.COMPONENT_KEPT_ALIVE) {
|
|||
|
|
;(parentComponent!.ctx as KeepAliveContext).activate(
|
|||
|
|
n2,
|
|||
|
|
container,
|
|||
|
|
anchor,
|
|||
|
|
isSVG,
|
|||
|
|
optimized
|
|||
|
|
)
|
|||
|
|
} else {
|
|||
|
|
mountComponent(
|
|||
|
|
n2,
|
|||
|
|
container,
|
|||
|
|
anchor,
|
|||
|
|
parentComponent,
|
|||
|
|
parentSuspense,
|
|||
|
|
isSVG,
|
|||
|
|
optimized
|
|||
|
|
)
|
|||
|
|
}
|
|||
|
|
} else {
|
|||
|
|
updateComponent(n1, n2, optimized)
|
|||
|
|
}
|
|||
|
|
}
|
|||
|
|
|
|||
|
|
```
|
|||
|
|
|
|||
|
|
updateComponent是虚拟DOM的逻辑,我们会在下一讲详细剖析,这一讲主要讲首次渲染的过程。
|
|||
|
|
|
|||
|
|
所以我们进入mountComponent函数中,可以看到mountComponent函数内部会对组件的类型进行一系列的判断,还有一些对Vue 2的兼容代码,核心的渲染逻辑就是setupComponent函数和setupRenderEffect函数。
|
|||
|
|
|
|||
|
|
```javascript
|
|||
|
|
import {setupComponent} from './component'
|
|||
|
|
const mountComponent: MountComponentFn = (
|
|||
|
|
) => {
|
|||
|
|
// 2.x compat may pre-creaate the component instance before actually
|
|||
|
|
// mounting
|
|||
|
|
const compatMountInstance =
|
|||
|
|
__COMPAT__ && initialVNode.isCompatRoot && initialVNode.component
|
|||
|
|
const instance: ComponentInternalInstance =
|
|||
|
|
compatMountInstance ||
|
|||
|
|
(initialVNode.component = createComponentInstance(
|
|||
|
|
initialVNode,
|
|||
|
|
parentComponent,
|
|||
|
|
parentSuspense
|
|||
|
|
))
|
|||
|
|
|
|||
|
|
// resolve props and slots for setup context
|
|||
|
|
if (!(__COMPAT__ && compatMountInstance)) {
|
|||
|
|
|
|||
|
|
setupComponent(instance)
|
|||
|
|
|
|||
|
|
}
|
|||
|
|
(
|
|||
|
|
instance,
|
|||
|
|
initialVNode,
|
|||
|
|
container,
|
|||
|
|
anchor,
|
|||
|
|
parentSuspense,
|
|||
|
|
isSVG,
|
|||
|
|
optimized
|
|||
|
|
)
|
|||
|
|
|
|||
|
|
if (__DEV__) {
|
|||
|
|
popWarningContext()
|
|||
|
|
endMeasure(instance, `mount`)
|
|||
|
|
}
|
|||
|
|
}
|
|||
|
|
|
|||
|
|
```
|
|||
|
|
|
|||
|
|
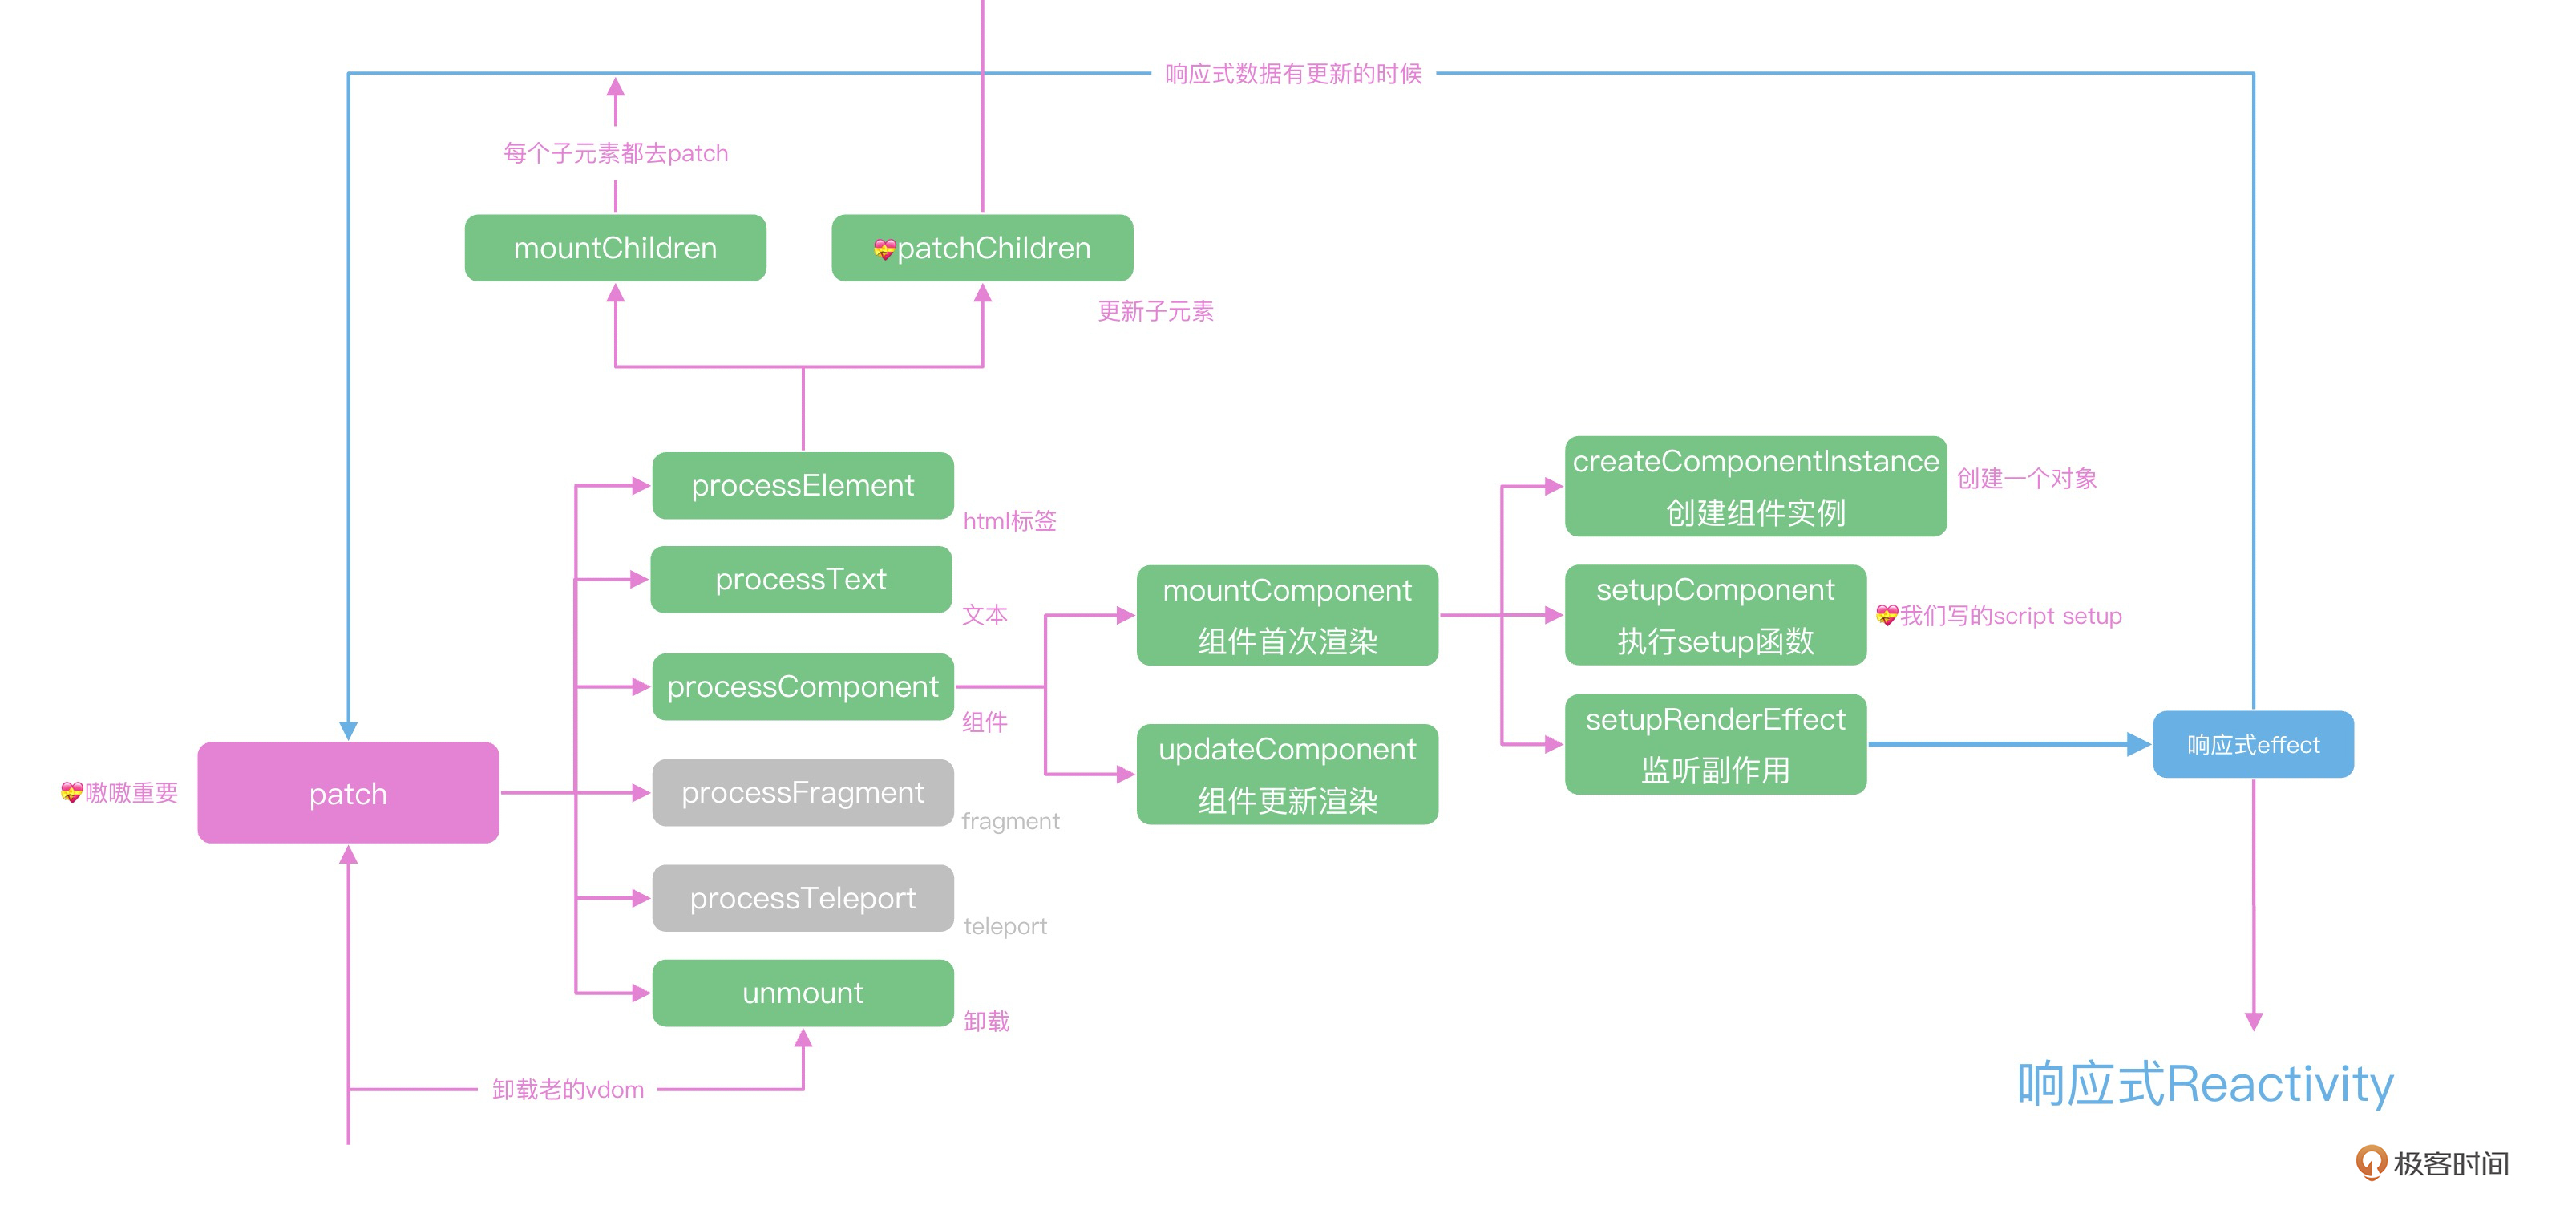
setupComponent和setupRenderEffect,它俩又做了点什么呢?可以参考下面的示意图这两个实现组件首次渲染的函数:
|
|||
|
|
|
|||
|
|
|
|||
|
|
### setupComponent
|
|||
|
|
|
|||
|
|
首先看setupComponent,要完成的就是执行我们写的setup函数。
|
|||
|
|
|
|||
|
|
可以看到,内部先初始化了props和slots,并且执行setupStatefulComponent创建组件,而这个函数内部从component中获取setup属性,也就是script setup内部实现的函数,就进入到我们组件内部的reactive、ref等函数实现的逻辑了。
|
|||
|
|
|
|||
|
|
```javascript
|
|||
|
|
export function setupComponent(
|
|||
|
|
instance: ComponentInternalInstance,
|
|||
|
|
isSSR = false
|
|||
|
|
) {
|
|||
|
|
isInSSRComponentSetup = isSSR
|
|||
|
|
|
|||
|
|
const { props, children } = instance.vnode
|
|||
|
|
const isStateful = isStatefulComponent(instance)
|
|||
|
|
initProps(instance, props, isStateful, isSSR)
|
|||
|
|
initSlots(instance, children)
|
|||
|
|
|
|||
|
|
const setupResult = isStateful
|
|||
|
|
? setupStatefulComponent(instance, isSSR)
|
|||
|
|
: undefined
|
|||
|
|
isInSSRComponentSetup = false
|
|||
|
|
return setupResult
|
|||
|
|
}
|
|||
|
|
|
|||
|
|
function setupStatefulComponent(
|
|||
|
|
instance: ComponentInternalInstance,
|
|||
|
|
isSSR: boolean
|
|||
|
|
) {
|
|||
|
|
const Component = instance.type as ComponentOptions
|
|||
|
|
// 执行setup
|
|||
|
|
const { setup } = Component
|
|||
|
|
if (setup) {
|
|||
|
|
const setupContext = (instance.setupContext =
|
|||
|
|
setup.length > 1 ? createSetupContext(instance) : null)
|
|||
|
|
|
|||
|
|
setCurrentInstance(instance)
|
|||
|
|
pauseTracking()
|
|||
|
|
const setupResult = callWithErrorHandling(
|
|||
|
|
setup,
|
|||
|
|
instance,
|
|||
|
|
ErrorCodes.SETUP_FUNCTION,
|
|||
|
|
[instance.props, setupContext]
|
|||
|
|
)
|
|||
|
|
if (isPromise(setupResult)) {
|
|||
|
|
setupResult.then(unsetCurrentInstance, unsetCurrentInstance)
|
|||
|
|
} else {
|
|||
|
|
handleSetupResult(instance, setupResult, isSSR)
|
|||
|
|
}
|
|||
|
|
} else {
|
|||
|
|
finishComponentSetup(instance, isSSR)
|
|||
|
|
}
|
|||
|
|
}
|
|||
|
|
|
|||
|
|
export function callWithErrorHandling(
|
|||
|
|
fn: Function,
|
|||
|
|
instance: ComponentInternalInstance | null,
|
|||
|
|
type: ErrorTypes,
|
|||
|
|
args?: unknown[]
|
|||
|
|
) {
|
|||
|
|
let res
|
|||
|
|
try {
|
|||
|
|
res = args ? fn(...args) : fn()
|
|||
|
|
} catch (err) {
|
|||
|
|
handleError(err, instance, type)
|
|||
|
|
}
|
|||
|
|
return res
|
|||
|
|
}
|
|||
|
|
|
|||
|
|
```
|
|||
|
|
|
|||
|
|
### setupRenderEffect
|
|||
|
|
|
|||
|
|
另一个setupRenderEffect函数,就是为了后续数据修改注册的函数,我们先梳理一下核心的实现逻辑。
|
|||
|
|
|
|||
|
|
组件首次加载会调用patch函数去初始化子组件,注意setupRenderEffect本身就是在patch函数内部执行的,所以这里就会递归整个虚拟DOM树,然后触发生命周期mounted,完成这个组件的初始化。
|
|||
|
|
|
|||
|
|
页面首次更新结束后,setupRenderEffect不仅实现了组件的递归渲染,还注册了组件的更新机制。
|
|||
|
|
|
|||
|
|
在下面的核心代码中,我们通过ReactiveEffect创建了effect函数,这个概念上一讲我们手写过,然后执行instance.update赋值为effect.run方法,这样结合setup内部的ref和reactive绑定的数据,数据修改之后,就会触发update方法的执行,内部就会componentUpdateFn,内部进行递归的patch调用执行每个组件内部的update方法实现组件的更新。
|
|||
|
|
|
|||
|
|
```javascript
|
|||
|
|
if (!instance.isMounted) {
|
|||
|
|
patch(
|
|||
|
|
null,
|
|||
|
|
subTree,
|
|||
|
|
container,
|
|||
|
|
anchor,
|
|||
|
|
instance,
|
|||
|
|
parentSuspense,
|
|||
|
|
isSVG
|
|||
|
|
)
|
|||
|
|
}else{
|
|||
|
|
// updateComponent
|
|||
|
|
}
|
|||
|
|
// create reactive effect for rendering
|
|||
|
|
const effect = new ReactiveEffect(
|
|||
|
|
componentUpdateFn,
|
|||
|
|
() => queueJob(instance.update),
|
|||
|
|
instance.scope // track it in component's effect scope
|
|||
|
|
)
|
|||
|
|
|
|||
|
|
const update = (instance.update = effect.run.bind(effect) as SchedulerJob)
|
|||
|
|
update.id = instance.uid
|
|||
|
|
|
|||
|
|
update()
|
|||
|
|
|
|||
|
|
```
|
|||
|
|
|
|||
|
|
这样我们就实现了整个Vue的渲染和更新流程。
|
|||
|
|
|
|||
|
|
## 总结
|
|||
|
|
|
|||
|
|
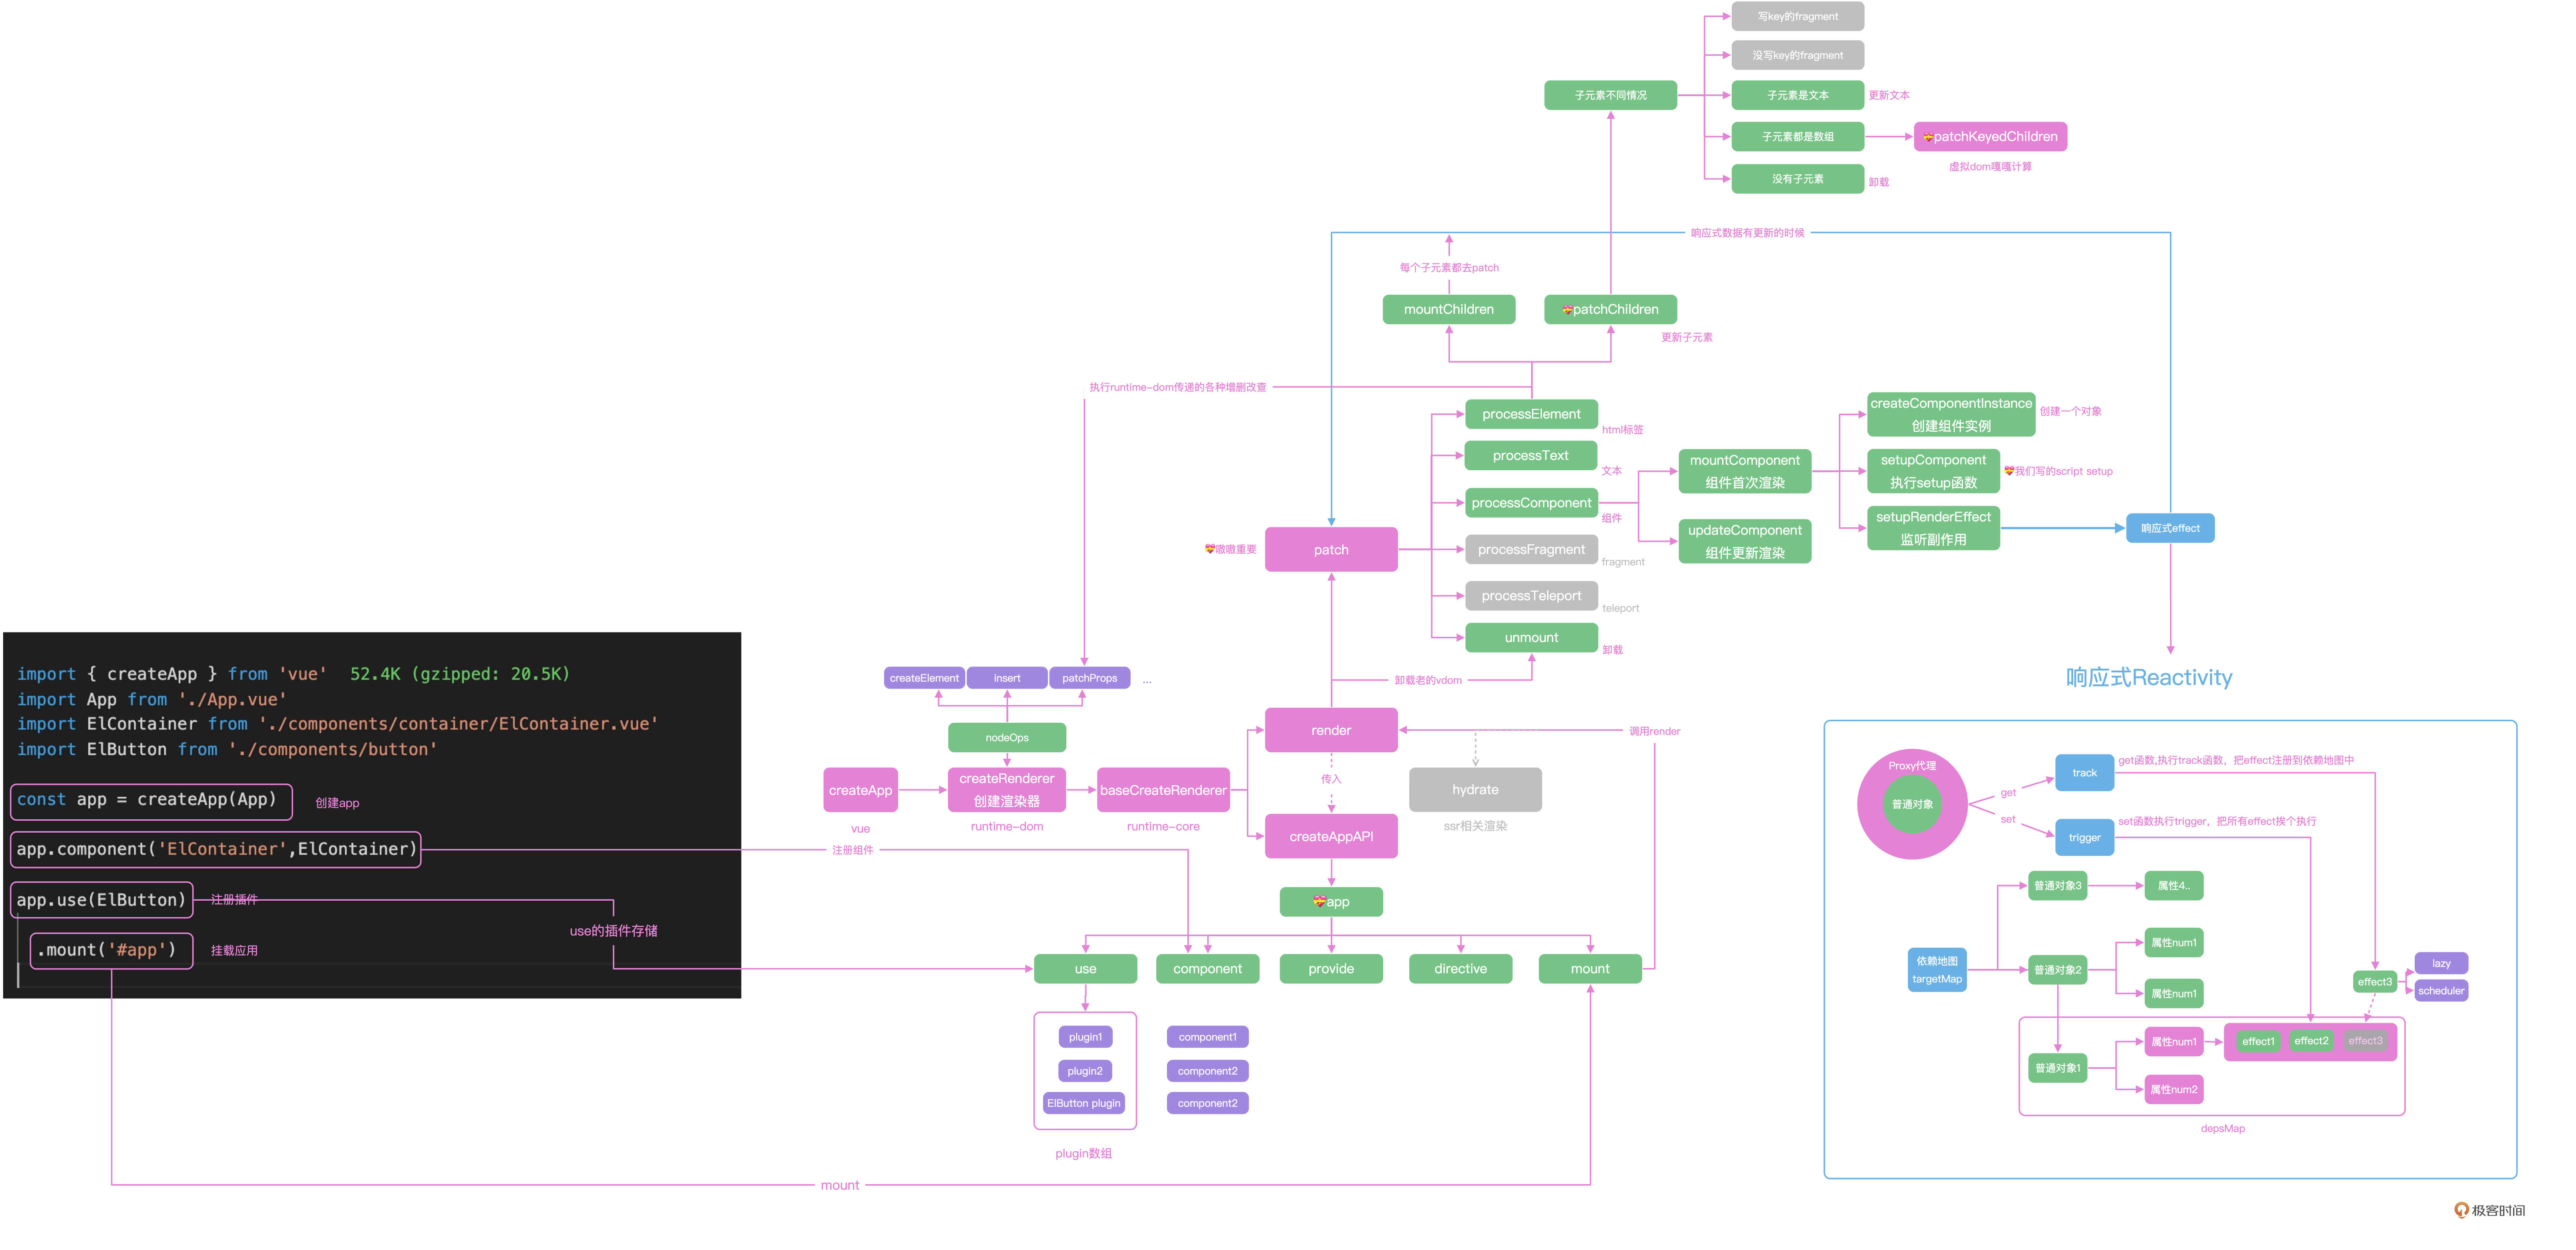
今天要学的内容就聊完了,我们来总结一下学到的内容吧,今天我们分析了Vue 3在浏览器中执行的全流程,你可以配合Vue在浏览器中执行的流程图来复习。
|
|||
|
|
|
|||
|
|
|
|||
|
|
Vue通过createApp创建应用,并且执行返回的mount方法实现在浏览器中的挂载,在createApp中,通过传递浏览器平台的操作方法nodeOps创建了浏览器的渲染器renderer。
|
|||
|
|
|
|||
|
|
首次执行Vue项目的时候,通过patch实现组件的渲染,patch函数内部根据节点的不同类型,去分别执行processElement、processComponent、processText等方法去递归处理不同类型的节点,最终通过setupComponent执行组件的setup函数,setupRenderEffect中使用响应式的effect函数监听数据的变化。
|
|||
|
|
|
|||
|
|
你可以先看我们实现的迷你版本项目weiyouyi,然后再去看Vue 3中实际的代码,可以学习代码中很多优秀的设计思路,比如createRenderer中使用闭包作为缓存、使用位运算来提高组件类型的判断效率等。学习优秀框架中的代码设计,这对我们日常开发项目的代码质量也有很好的提高作用。
|
|||
|
|
|
|||
|
|
## 思考题
|
|||
|
|
|
|||
|
|
最后留一个思考题,mount函数中除了render函数,还有一个hydrate的函数调用,这个函数式干什么用的呢?欢迎在评论区分享你的答案,我们下一讲再见。
|
|||
|
|
|