483 lines
20 KiB
Markdown
483 lines
20 KiB
Markdown
|
|
# 13 | API 风格(下):RPC API介绍
|
|||
|
|
|
|||
|
|
你好,我是孔令飞。这一讲,我们继续来看下如何设计应用的API风格。
|
|||
|
|
|
|||
|
|
上一讲,我介绍了REST API风格,这一讲我来介绍下另外一种常用的API风格,RPC。在Go项目开发中,如果业务对性能要求比较高,并且需要提供给多种编程语言调用,这时候就可以考虑使用RPC API接口。RPC在Go项目开发中用得也非常多,需要我们认真掌握。
|
|||
|
|
|
|||
|
|
## RPC介绍
|
|||
|
|
|
|||
|
|
根据维基百科的定义,RPC(Remote Procedure Call),即远程过程调用,是一个计算机通信协议。该协议允许运行于一台计算机的程序调用另一台计算机的子程序,而程序员不用额外地为这个交互作用编程。
|
|||
|
|
|
|||
|
|
通俗来讲,就是服务端实现了一个函数,客户端使用RPC框架提供的接口,像调用本地函数一样调用这个函数,并获取返回值。RPC屏蔽了底层的网络通信细节,使得开发人员无需关注网络编程的细节,可以将更多的时间和精力放在业务逻辑本身的实现上,从而提高开发效率。
|
|||
|
|
|
|||
|
|
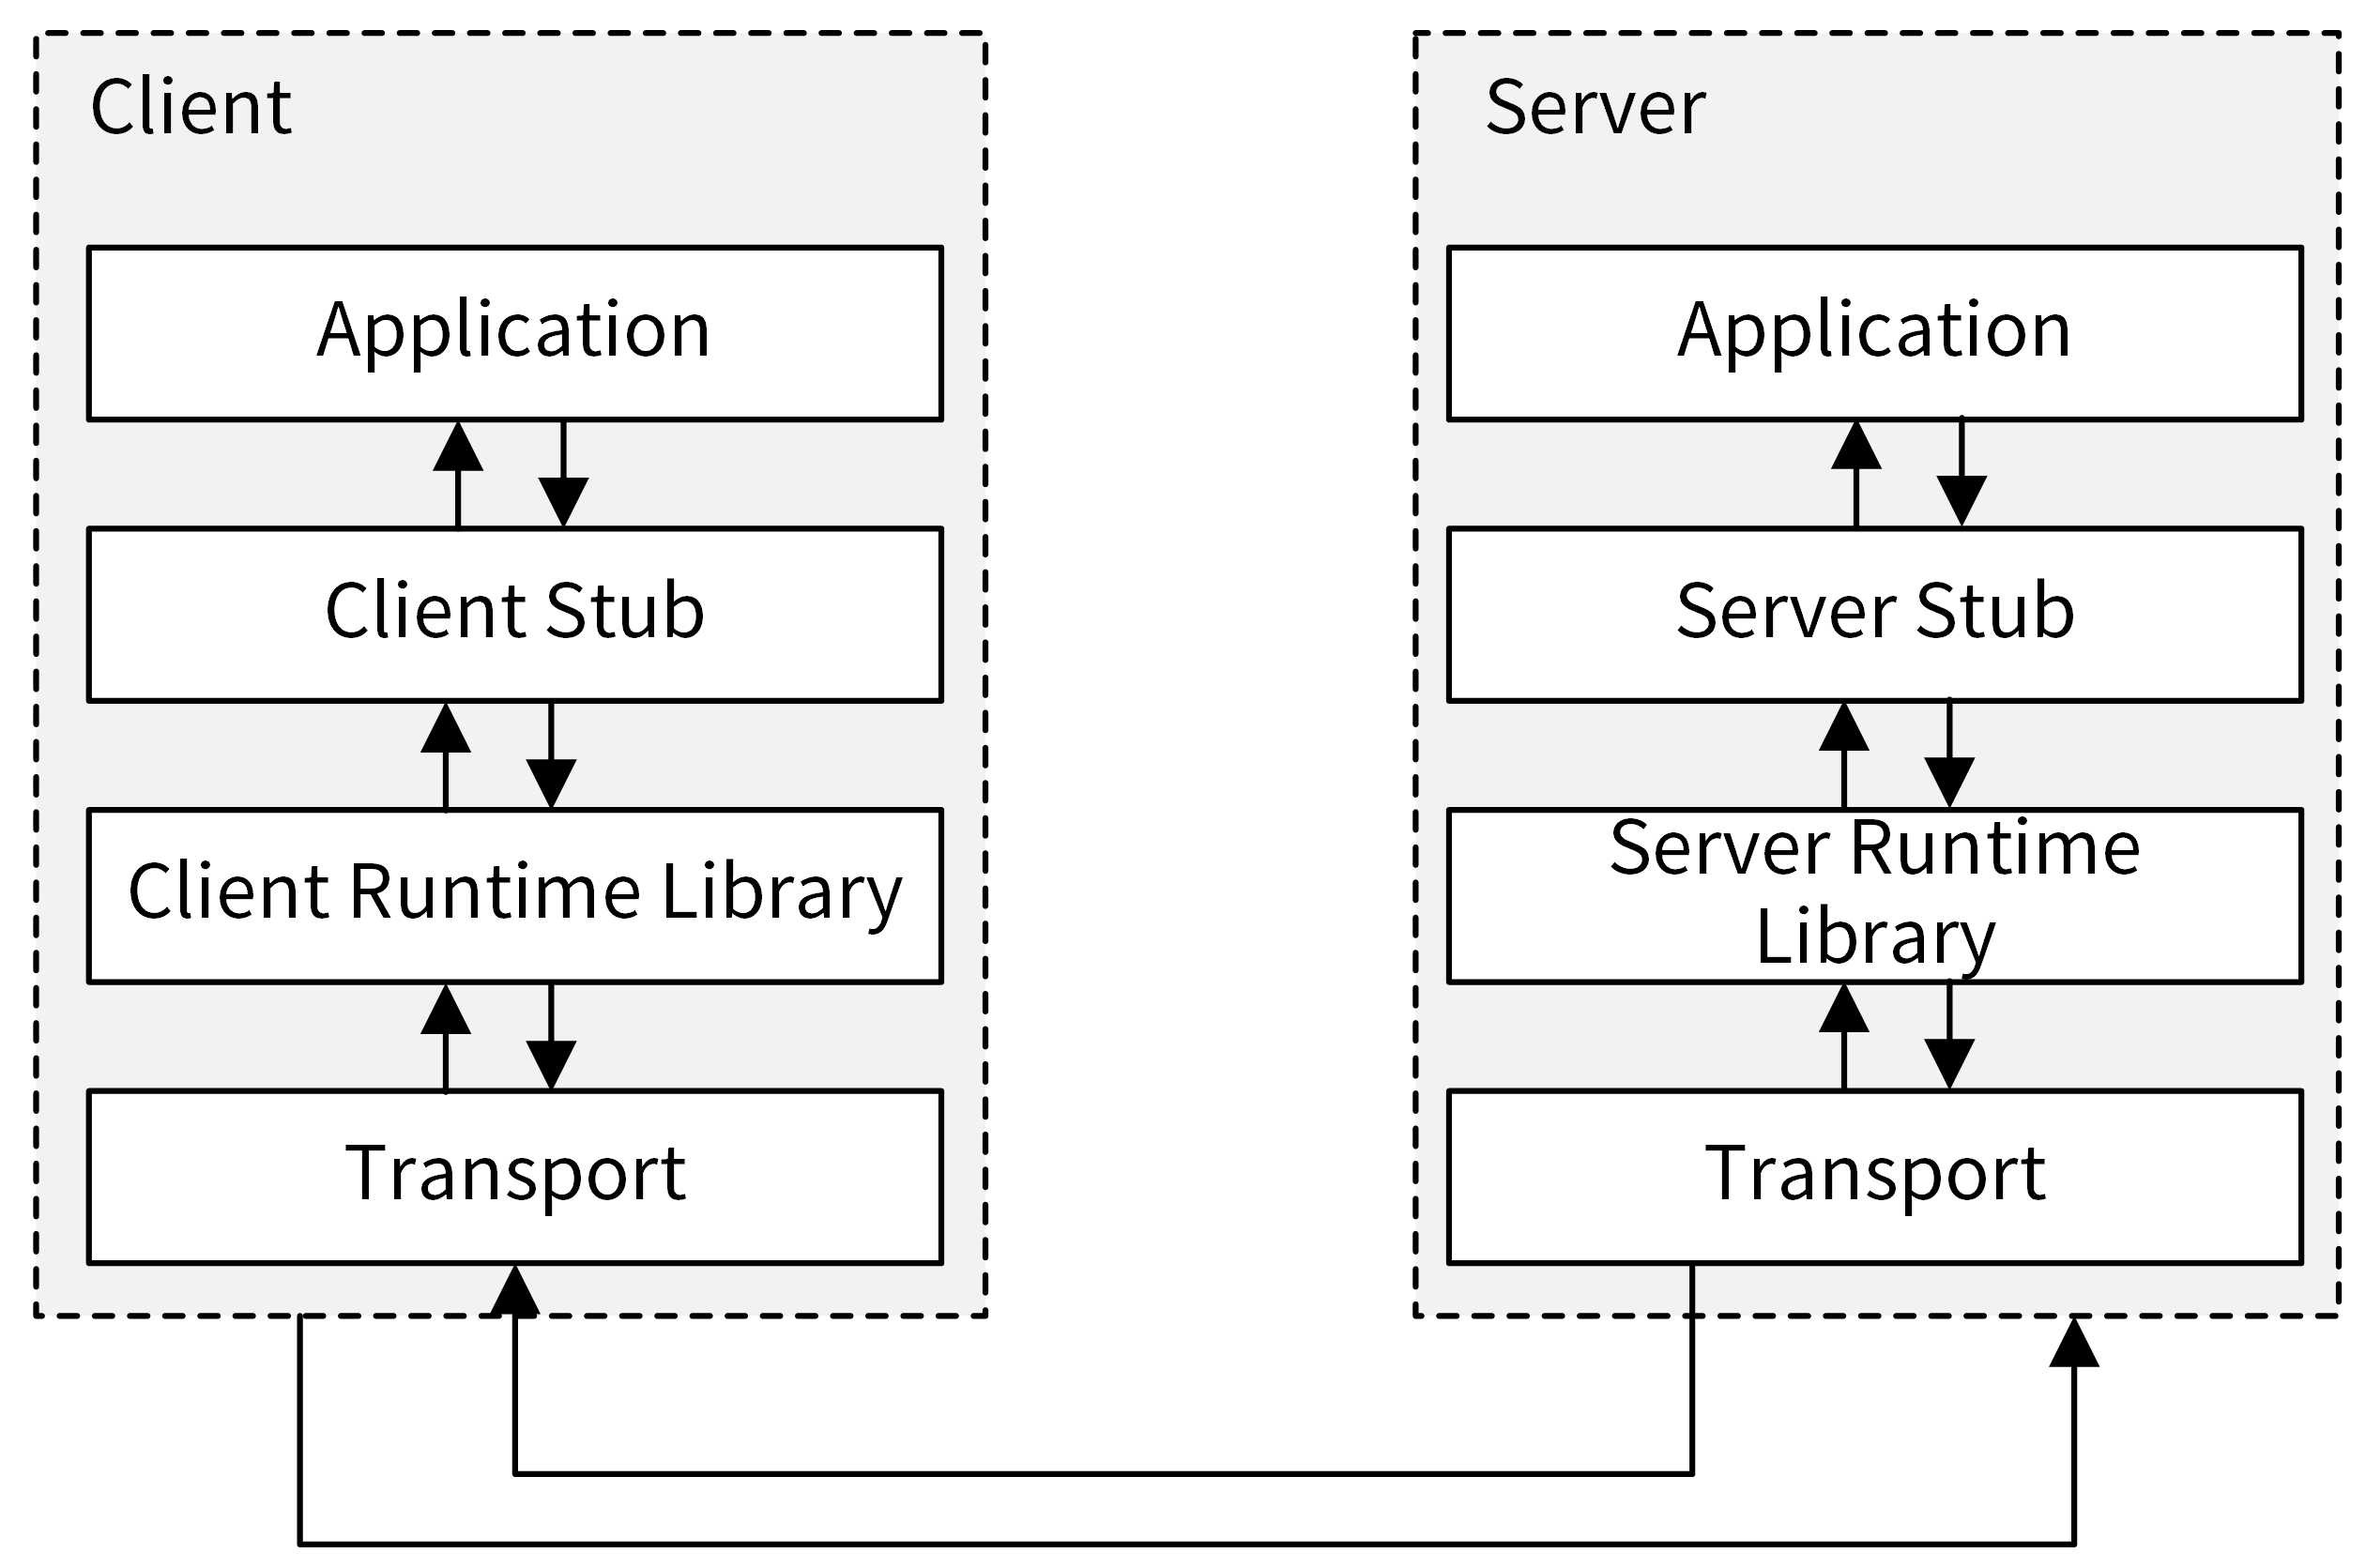
RPC的调用过程如下图所示:
|
|||
|
|
|
|||
|
|

|
|||
|
|
|
|||
|
|
RPC调用具体流程如下:
|
|||
|
|
|
|||
|
|
1. Client通过本地调用,调用Client Stub。
|
|||
|
|
2. Client Stub将参数打包(也叫Marshalling)成一个消息,然后发送这个消息。
|
|||
|
|
3. Client所在的OS将消息发送给Server。
|
|||
|
|
4. Server端接收到消息后,将消息传递给Server Stub。
|
|||
|
|
5. Server Stub将消息解包(也叫 Unmarshalling)得到参数。
|
|||
|
|
6. Server Stub调用服务端的子程序(函数),处理完后,将最终结果按照相反的步骤返回给 Client。
|
|||
|
|
|
|||
|
|
这里需要注意,Stub负责调用参数和返回值的流化(serialization)、参数的打包和解包,以及网络层的通信。Client端一般叫Stub,Server端一般叫Skeleton。
|
|||
|
|
|
|||
|
|
目前,业界有很多优秀的RPC协议,例如腾讯的Tars、阿里的Dubbo、微博的Motan、Facebook的Thrift、RPCX,等等。但使用最多的还是[gRPC](https://github.com/grpc/grpc-go),这也是本专栏所采用的RPC框架,所以接下来我会重点介绍gRPC框架。
|
|||
|
|
|
|||
|
|
## gRPC介绍
|
|||
|
|
|
|||
|
|
gRPC是由Google开发的高性能、开源、跨多种编程语言的通用RPC框架,基于HTTP 2.0协议开发,默认采用Protocol Buffers数据序列化协议。gRPC具有如下特性:
|
|||
|
|
|
|||
|
|
* 支持多种语言,例如 Go、Java、C、C++、C#、Node.js、PHP、Python、Ruby等。
|
|||
|
|
* 基于IDL(Interface Definition Language)文件定义服务,通过proto3工具生成指定语言的数据结构、服务端接口以及客户端Stub。通过这种方式,也可以将服务端和客户端解耦,使客户端和服务端可以并行开发。
|
|||
|
|
* 通信协议基于标准的HTTP/2设计,支持双向流、消息头压缩、单TCP的多路复用、服务端推送等特性。
|
|||
|
|
* 支持Protobuf和JSON序列化数据格式。Protobuf是一种语言无关的高性能序列化框架,可以减少网络传输流量,提高通信效率。
|
|||
|
|
|
|||
|
|
这里要注意的是,gRPC的全称不是golang Remote Procedure Call,而是google Remote Procedure Call。
|
|||
|
|
|
|||
|
|
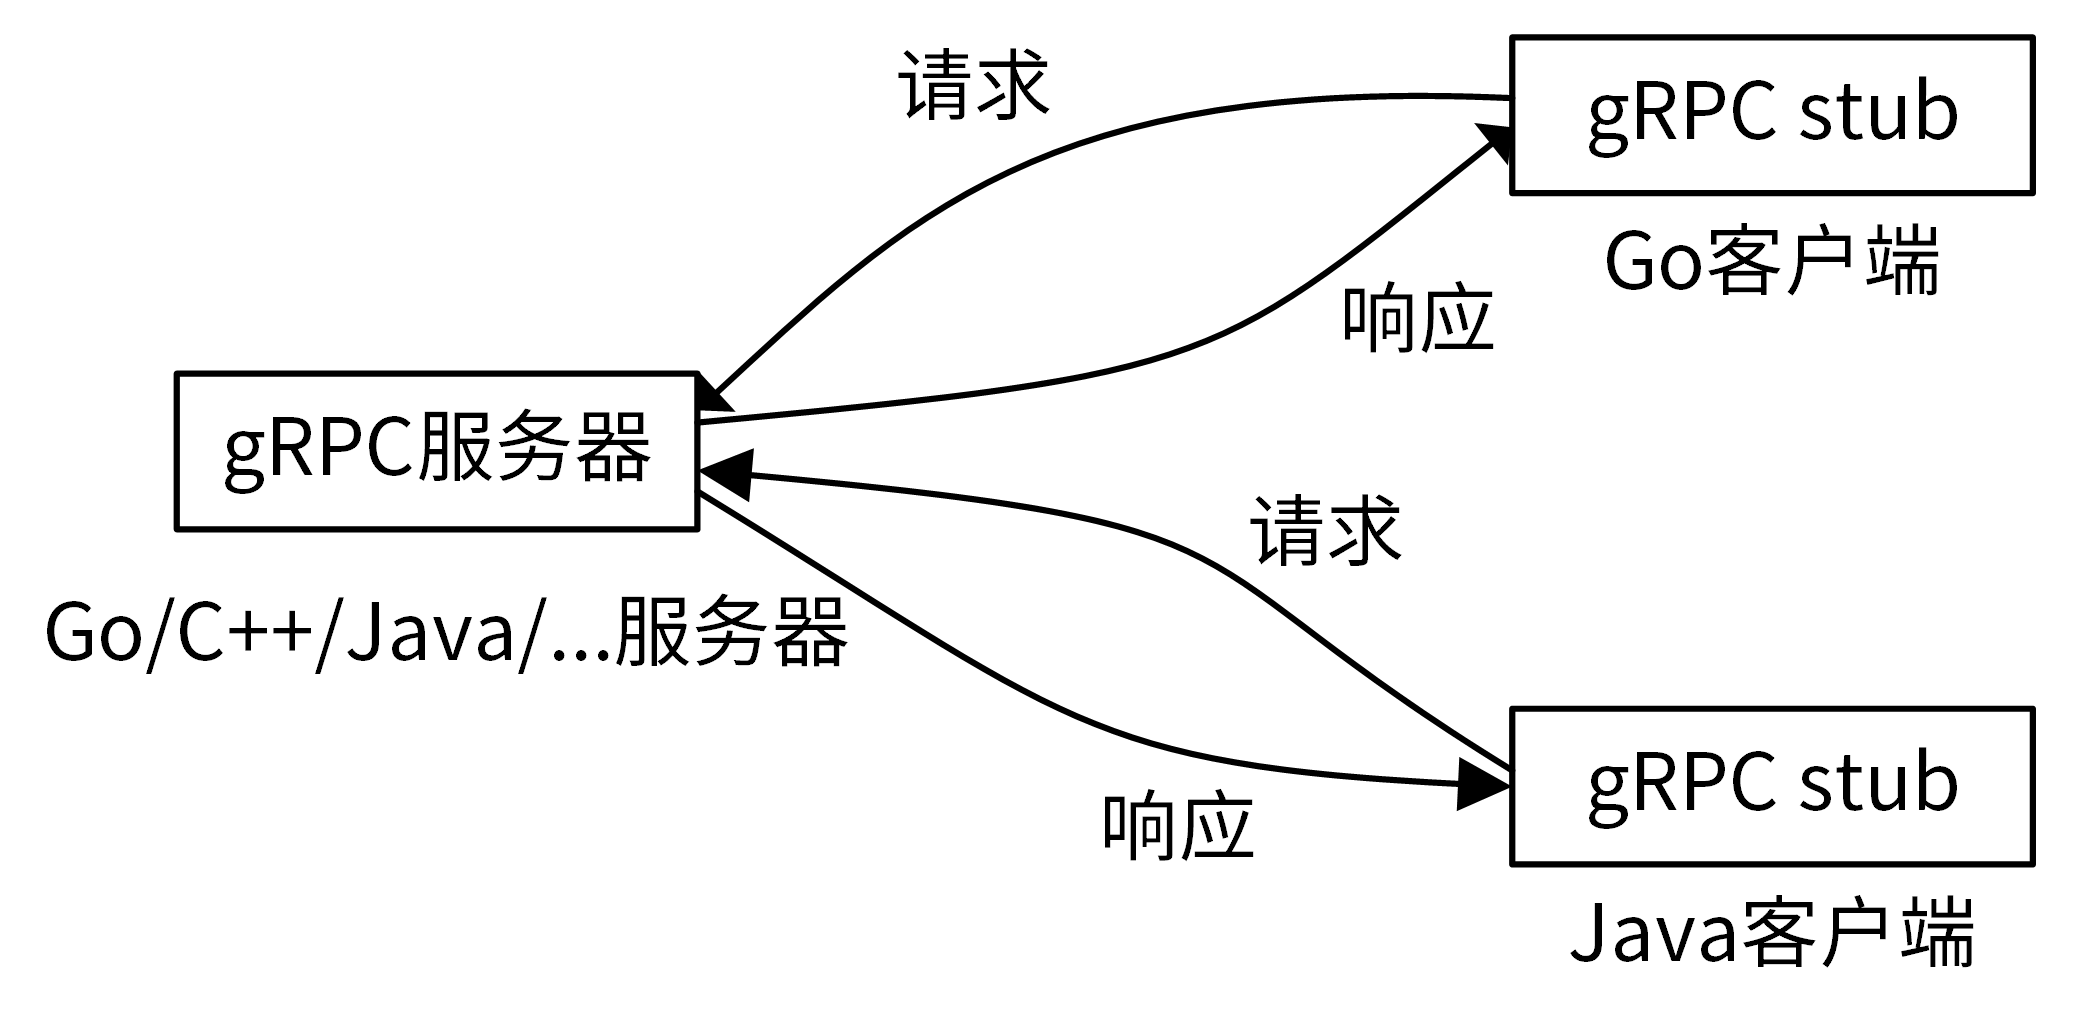
gRPC的调用如下图所示:
|
|||
|
|
|
|||
|
|

|
|||
|
|
|
|||
|
|
在gRPC中,客户端可以直接调用部署在不同机器上的gRPC服务所提供的方法,调用远端的gRPC方法就像调用本地的方法一样,非常简单方便,通过gRPC调用**,我们可以非常容易地构建出一个分布式应用。**
|
|||
|
|
|
|||
|
|
像很多其他的RPC服务一样,gRPC也是通过IDL语言,预先定义好接口(接口的名字、传入参数和返回参数等)。在服务端,gRPC服务实现我们所定义的接口。在客户端,gRPC存根提供了跟服务端相同的方法。
|
|||
|
|
|
|||
|
|
gRPC支持多种语言,比如我们可以用Go语言实现gRPC服务,并通过Java语言客户端调用gRPC服务所提供的方法。通过多语言支持,我们编写的gRPC服务能满足客户端多语言的需求。
|
|||
|
|
|
|||
|
|
gRPC API接口通常使用的数据传输格式是Protocol Buffers。接下来,我们就一起了解下Protocol Buffers。
|
|||
|
|
|
|||
|
|
## Protocol Buffers介绍
|
|||
|
|
|
|||
|
|
Protocol Buffers(ProtocolBuffer/ protobuf)是Google开发的一套对数据结构进行序列化的方法,可用作(数据)通信协议、数据存储格式等,也是一种更加灵活、高效的数据格式,与XML、JSON类似。它的传输性能非常好,所以常被用在一些对数据传输性能要求比较高的系统中,作为数据传输格式。Protocol Buffers的主要特性有下面这几个。
|
|||
|
|
|
|||
|
|
* 更快的数据传输速度:protobuf在传输时,会将数据序列化为二进制数据,和XML、JSON的文本传输格式相比,这可以节省大量的IO操作,从而提高数据传输速度。
|
|||
|
|
* 跨平台多语言:protobuf自带的编译工具 protoc 可以基于protobuf定义文件,编译出不同语言的客户端或者服务端,供程序直接调用,因此可以满足多语言需求的场景。
|
|||
|
|
* 具有非常好的扩展性和兼容性,可以更新已有的数据结构,而不破坏和影响原有的程序。
|
|||
|
|
* 基于IDL文件定义服务,通过proto3工具生成指定语言的数据结构、服务端和客户端接口。
|
|||
|
|
|
|||
|
|
在gRPC的框架中,Protocol Buffers主要有三个作用。
|
|||
|
|
|
|||
|
|
**第一,可以用来定义数据结构。**举个例子,下面的代码定义了一个SecretInfo数据结构:
|
|||
|
|
|
|||
|
|
```
|
|||
|
|
// SecretInfo contains secret details.
|
|||
|
|
message SecretInfo {
|
|||
|
|
string name = 1;
|
|||
|
|
string secret_id = 2;
|
|||
|
|
string username = 3;
|
|||
|
|
string secret_key = 4;
|
|||
|
|
int64 expires = 5;
|
|||
|
|
string description = 6;
|
|||
|
|
string created_at = 7;
|
|||
|
|
string updated_at = 8;
|
|||
|
|
}
|
|||
|
|
|
|||
|
|
```
|
|||
|
|
|
|||
|
|
**第二,可以用来定义服务接口。**下面的代码定义了一个Cache服务,服务包含了ListSecrets和ListPolicies 两个API接口。
|
|||
|
|
|
|||
|
|
```
|
|||
|
|
// Cache implements a cache rpc service.
|
|||
|
|
service Cache{
|
|||
|
|
rpc ListSecrets(ListSecretsRequest) returns (ListSecretsResponse) {}
|
|||
|
|
rpc ListPolicies(ListPoliciesRequest) returns (ListPoliciesResponse) {}
|
|||
|
|
}
|
|||
|
|
|
|||
|
|
```
|
|||
|
|
|
|||
|
|
**第三,可以通过protobuf序列化和反序列化,提升传输效率。**
|
|||
|
|
|
|||
|
|
## gRPC示例
|
|||
|
|
|
|||
|
|
我们已经对gRPC这一通用RPC框架有了一定的了解,但是你可能还不清楚怎么使用gRPC编写API接口。接下来,我就通过gRPC官方的一个示例来快速给大家展示下。运行本示例需要在Linux服务器上安装Go编译器、Protocol buffer编译器(protoc,v3)和 protoc 的Go语言插件,在 [**02讲**](https://time.geekbang.org/column/article/378076) 中我们已经安装过,这里不再讲具体的安装方法。
|
|||
|
|
|
|||
|
|
这个示例分为下面几个步骤:
|
|||
|
|
|
|||
|
|
1. 定义gRPC服务。
|
|||
|
|
2. 生成客户端和服务器代码。
|
|||
|
|
3. 实现gRPC服务。
|
|||
|
|
4. 实现gRPC客户端。
|
|||
|
|
|
|||
|
|
示例代码存放在[gopractise-demo/apistyle/greeter](https://github.com/marmotedu/gopractise-demo/tree/main/apistyle/greeter)目录下。代码结构如下:
|
|||
|
|
|
|||
|
|
```
|
|||
|
|
$ tree
|
|||
|
|
├── client
|
|||
|
|
│ └── main.go
|
|||
|
|
├── helloworld
|
|||
|
|
│ ├── helloworld.pb.go
|
|||
|
|
│ └── helloworld.proto
|
|||
|
|
└── server
|
|||
|
|
└── main.go
|
|||
|
|
|
|||
|
|
```
|
|||
|
|
|
|||
|
|
client目录存放Client端的代码,helloworld目录用来存放服务的IDL定义,server目录用来存放Server端的代码。
|
|||
|
|
|
|||
|
|
下面我具体介绍下这个示例的四个步骤。
|
|||
|
|
|
|||
|
|
1. 定义gRPC服务。
|
|||
|
|
|
|||
|
|
首先,需要定义我们的服务。进入helloworld目录,新建文件helloworld.proto:
|
|||
|
|
|
|||
|
|
```
|
|||
|
|
$ cd helloworld
|
|||
|
|
$ vi helloworld.proto
|
|||
|
|
|
|||
|
|
```
|
|||
|
|
|
|||
|
|
内容如下:
|
|||
|
|
|
|||
|
|
```
|
|||
|
|
syntax = "proto3";
|
|||
|
|
|
|||
|
|
option go_package = "github.com/marmotedu/gopractise-demo/apistyle/greeter/helloworld";
|
|||
|
|
|
|||
|
|
package helloworld;
|
|||
|
|
|
|||
|
|
// The greeting service definition.
|
|||
|
|
service Greeter {
|
|||
|
|
// Sends a greeting
|
|||
|
|
rpc SayHello (HelloRequest) returns (HelloReply) {}
|
|||
|
|
}
|
|||
|
|
|
|||
|
|
// The request message containing the user's name.
|
|||
|
|
message HelloRequest {
|
|||
|
|
string name = 1;
|
|||
|
|
}
|
|||
|
|
|
|||
|
|
// The response message containing the greetings
|
|||
|
|
message HelloReply {
|
|||
|
|
string message = 1;
|
|||
|
|
}
|
|||
|
|
|
|||
|
|
```
|
|||
|
|
|
|||
|
|
在helloworld.proto定义文件中,option关键字用来对.proto文件进行一些设置,其中go\_package是必需的设置,而且go\_package的值必须是包导入的路径。package关键字指定生成的.pb.go文件所在的包名。我们通过service关键字定义服务,然后再指定该服务拥有的RPC方法,并定义方法的请求和返回的结构体类型:
|
|||
|
|
|
|||
|
|
```
|
|||
|
|
service Greeter {
|
|||
|
|
// Sends a greeting
|
|||
|
|
rpc SayHello (HelloRequest) returns (HelloReply) {}
|
|||
|
|
}
|
|||
|
|
|
|||
|
|
```
|
|||
|
|
|
|||
|
|
gRPC支持定义4种类型的服务方法,分别是简单模式、服务端数据流模式、客户端数据流模式和双向数据流模式。
|
|||
|
|
|
|||
|
|
* 简单模式(Simple RPC):是最简单的gRPC模式。客户端发起一次请求,服务端响应一个数据。定义格式为rpc SayHello (HelloRequest) returns (HelloReply) {}。
|
|||
|
|
|
|||
|
|
* 服务端数据流模式(Server-side streaming RPC):客户端发送一个请求,服务器返回数据流响应,客户端从流中读取数据直到为空。定义格式为rpc SayHello (HelloRequest) returns (stream HelloReply) {}。
|
|||
|
|
|
|||
|
|
* 客户端数据流模式(Client-side streaming RPC):客户端将消息以流的方式发送给服务器,服务器全部处理完成之后返回一次响应。定义格式为rpc SayHello (stream HelloRequest) returns (HelloReply) {}。
|
|||
|
|
|
|||
|
|
* 双向数据流模式(Bidirectional streaming RPC):客户端和服务端都可以向对方发送数据流,这个时候双方的数据可以同时互相发送,也就是可以实现实时交互RPC框架原理。定义格式为rpc SayHello (stream HelloRequest) returns (stream HelloReply) {}。
|
|||
|
|
|
|||
|
|
|
|||
|
|
本示例使用了简单模式。.proto文件也包含了Protocol Buffers 消息的定义,包括请求消息和返回消息。例如请求消息:
|
|||
|
|
|
|||
|
|
```
|
|||
|
|
// The request message containing the user's name.
|
|||
|
|
message HelloRequest {
|
|||
|
|
string name = 1;
|
|||
|
|
}
|
|||
|
|
|
|||
|
|
```
|
|||
|
|
|
|||
|
|
2. 生成客户端和服务器代码。
|
|||
|
|
|
|||
|
|
接下来,我们需要根据.proto服务定义生成gRPC客户端和服务器接口。我们可以使用protoc编译工具,并指定使用其Go语言插件来生成:
|
|||
|
|
|
|||
|
|
```
|
|||
|
|
$ protoc -I. --go_out=plugins=grpc:$GOPATH/src helloworld.proto
|
|||
|
|
$ ls
|
|||
|
|
helloworld.pb.go helloworld.proto
|
|||
|
|
|
|||
|
|
```
|
|||
|
|
|
|||
|
|
你可以看到,新增了一个helloworld.pb.go文件。
|
|||
|
|
|
|||
|
|
3. 实现gRPC服务。
|
|||
|
|
|
|||
|
|
接着,我们就可以实现gRPC服务了。进入server目录,新建main.go文件:
|
|||
|
|
|
|||
|
|
```
|
|||
|
|
$ cd ../server
|
|||
|
|
$ vi main.go
|
|||
|
|
|
|||
|
|
```
|
|||
|
|
|
|||
|
|
main.go内容如下:
|
|||
|
|
|
|||
|
|
```
|
|||
|
|
// Package main implements a server for Greeter service.
|
|||
|
|
package main
|
|||
|
|
|
|||
|
|
import (
|
|||
|
|
"context"
|
|||
|
|
"log"
|
|||
|
|
"net"
|
|||
|
|
|
|||
|
|
pb "github.com/marmotedu/gopractise-demo/apistyle/greeter/helloworld"
|
|||
|
|
"google.golang.org/grpc"
|
|||
|
|
)
|
|||
|
|
|
|||
|
|
const (
|
|||
|
|
port = ":50051"
|
|||
|
|
)
|
|||
|
|
|
|||
|
|
// server is used to implement helloworld.GreeterServer.
|
|||
|
|
type server struct {
|
|||
|
|
pb.UnimplementedGreeterServer
|
|||
|
|
}
|
|||
|
|
|
|||
|
|
// SayHello implements helloworld.GreeterServer
|
|||
|
|
func (s *server) SayHello(ctx context.Context, in *pb.HelloRequest) (*pb.HelloReply, error) {
|
|||
|
|
log.Printf("Received: %v", in.GetName())
|
|||
|
|
return &pb.HelloReply{Message: "Hello " + in.GetName()}, nil
|
|||
|
|
}
|
|||
|
|
|
|||
|
|
func main() {
|
|||
|
|
lis, err := net.Listen("tcp", port)
|
|||
|
|
if err != nil {
|
|||
|
|
log.Fatalf("failed to listen: %v", err)
|
|||
|
|
}
|
|||
|
|
s := grpc.NewServer()
|
|||
|
|
pb.RegisterGreeterServer(s, &server{})
|
|||
|
|
if err := s.Serve(lis); err != nil {
|
|||
|
|
log.Fatalf("failed to serve: %v", err)
|
|||
|
|
}
|
|||
|
|
}
|
|||
|
|
|
|||
|
|
```
|
|||
|
|
|
|||
|
|
上面的代码实现了我们上一步根据服务定义生成的Go接口。
|
|||
|
|
|
|||
|
|
我们先定义了一个Go结构体server,并为server结构体添加`SayHello(context.Context, pb.HelloRequest) (pb.HelloReply, error)`方法,也就是说server是GreeterServer接口(位于helloworld.pb.go文件中)的一个实现。
|
|||
|
|
|
|||
|
|
在我们实现了gRPC服务所定义的方法之后,就可以通过 `net.Listen(...)` 指定监听客户端请求的端口;接着,通过 `grpc.NewServer()` 创建一个gRPC Server实例,并通过 `pb.RegisterGreeterServer(s, &server{})` 将该服务注册到gRPC框架中;最后,通过 `s.Serve(lis)` 启动gRPC服务。
|
|||
|
|
|
|||
|
|
创建完main.go文件后,在当前目录下执行 `go run main.go` ,启动gRPC服务。
|
|||
|
|
|
|||
|
|
4. 实现gRPC客户端。
|
|||
|
|
|
|||
|
|
打开一个新的Linux终端,进入client目录,新建main.go文件:
|
|||
|
|
|
|||
|
|
```
|
|||
|
|
$ cd ../client
|
|||
|
|
$ vi main.go
|
|||
|
|
|
|||
|
|
```
|
|||
|
|
|
|||
|
|
main.go内容如下:
|
|||
|
|
|
|||
|
|
```
|
|||
|
|
// Package main implements a client for Greeter service.
|
|||
|
|
package main
|
|||
|
|
|
|||
|
|
import (
|
|||
|
|
"context"
|
|||
|
|
"log"
|
|||
|
|
"os"
|
|||
|
|
"time"
|
|||
|
|
|
|||
|
|
pb "github.com/marmotedu/gopractise-demo/apistyle/greeter/helloworld"
|
|||
|
|
"google.golang.org/grpc"
|
|||
|
|
)
|
|||
|
|
|
|||
|
|
const (
|
|||
|
|
address = "localhost:50051"
|
|||
|
|
defaultName = "world"
|
|||
|
|
)
|
|||
|
|
|
|||
|
|
func main() {
|
|||
|
|
// Set up a connection to the server.
|
|||
|
|
conn, err := grpc.Dial(address, grpc.WithInsecure(), grpc.WithBlock())
|
|||
|
|
if err != nil {
|
|||
|
|
log.Fatalf("did not connect: %v", err)
|
|||
|
|
}
|
|||
|
|
defer conn.Close()
|
|||
|
|
c := pb.NewGreeterClient(conn)
|
|||
|
|
|
|||
|
|
// Contact the server and print out its response.
|
|||
|
|
name := defaultName
|
|||
|
|
if len(os.Args) > 1 {
|
|||
|
|
name = os.Args[1]
|
|||
|
|
}
|
|||
|
|
ctx, cancel := context.WithTimeout(context.Background(), time.Second)
|
|||
|
|
defer cancel()
|
|||
|
|
r, err := c.SayHello(ctx, &pb.HelloRequest{Name: name})
|
|||
|
|
if err != nil {
|
|||
|
|
log.Fatalf("could not greet: %v", err)
|
|||
|
|
}
|
|||
|
|
log.Printf("Greeting: %s", r.Message)
|
|||
|
|
}
|
|||
|
|
|
|||
|
|
```
|
|||
|
|
|
|||
|
|
在上面的代码中,我们通过如下代码创建了一个gRPC连接,用来跟服务端进行通信:
|
|||
|
|
|
|||
|
|
```
|
|||
|
|
// Set up a connection to the server.
|
|||
|
|
conn, err := grpc.Dial(address, grpc.WithInsecure(), grpc.WithBlock())
|
|||
|
|
if err != nil {
|
|||
|
|
log.Fatalf("did not connect: %v", err)
|
|||
|
|
}
|
|||
|
|
defer conn.Close()
|
|||
|
|
|
|||
|
|
```
|
|||
|
|
|
|||
|
|
在创建连接时,我们可以指定不同的选项,用来控制创建连接的方式,例如grpc.WithInsecure()、grpc.WithBlock()等。gRPC支持很多选项,更多的选项可以参考grpc仓库下[dialoptions.go](https://github.com/grpc/grpc-go/blob/v1.37.0/dialoptions.go)文件中以With开头的函数。
|
|||
|
|
|
|||
|
|
连接建立起来之后,我们需要创建一个客户端stub,用来执行RPC请求`c := pb.NewGreeterClient(conn)`。创建完成之后,我们就可以像调用本地函数一样,调用远程的方法了。例如,下面一段代码通过 `c.SayHello` 这种本地式调用方式调用了远端的SayHello接口:
|
|||
|
|
|
|||
|
|
```
|
|||
|
|
r, err := c.SayHello(ctx, &pb.HelloRequest{Name: name})
|
|||
|
|
if err != nil {
|
|||
|
|
log.Fatalf("could not greet: %v", err)
|
|||
|
|
}
|
|||
|
|
log.Printf("Greeting: %s", r.Message)
|
|||
|
|
|
|||
|
|
```
|
|||
|
|
|
|||
|
|
从上面的调用格式中,我们可以看到RPC调用具有下面两个特点。
|
|||
|
|
|
|||
|
|
* 调用方便:RPC屏蔽了底层的网络通信细节,使得调用RPC就像调用本地方法一样方便,调用方式跟大家所熟知的调用类的方法一致:`ClassName.ClassFuc(params)`。
|
|||
|
|
* 不需要打包和解包:RPC调用的入参和返回的结果都是Go的结构体,不需要对传入参数进行打包操作,也不需要对返回参数进行解包操作,简化了调用步骤。
|
|||
|
|
|
|||
|
|
最后,创建完main.go文件后,在当前目录下,执行go run main.go发起RPC调用:
|
|||
|
|
|
|||
|
|
```
|
|||
|
|
$ go run main.go
|
|||
|
|
2020/10/17 07:55:00 Greeting: Hello world
|
|||
|
|
|
|||
|
|
```
|
|||
|
|
|
|||
|
|
至此,我们用四个步骤,创建并调用了一个gRPC服务。接下来我再给大家讲解一个在具体场景中的注意事项。
|
|||
|
|
|
|||
|
|
在做服务开发时,我们经常会遇到一种场景:定义一个接口,接口会通过判断是否传入某个参数,决定接口行为。例如,我们想提供一个GetUser接口,期望GetUser接口在传入username参数时,根据username查询用户的信息,如果没有传入username,则默认根据userId查询用户信息。
|
|||
|
|
|
|||
|
|
这时候,我们需要判断客户端有没有传入username参数。我们不能根据username是否为空值来判断,因为我们不能区分客户端传的是空值,还是没有传username参数。这是由Go语言的语法特性决定的:如果客户端没有传入username参数,Go会默认赋值为所在类型的零值,而字符串类型的零值就是空字符串。
|
|||
|
|
|
|||
|
|
那我们怎么判断客户端有没有传入username参数呢?最好的方法是通过指针来判断,如果是nil指针就说明没有传入,非nil指针就说明传入,具体实现步骤如下:
|
|||
|
|
|
|||
|
|
1. 编写protobuf定义文件。
|
|||
|
|
|
|||
|
|
新建user.proto文件,内容如下:
|
|||
|
|
|
|||
|
|
```
|
|||
|
|
syntax = "proto3";
|
|||
|
|
|
|||
|
|
package proto;
|
|||
|
|
option go_package = "github.com/marmotedu/gopractise-demo/protobuf/user";
|
|||
|
|
|
|||
|
|
//go:generate protoc -I. --experimental_allow_proto3_optional --go_out=plugins=grpc:.
|
|||
|
|
|
|||
|
|
service User {
|
|||
|
|
rpc GetUser(GetUserRequest) returns (GetUserResponse) {}
|
|||
|
|
}
|
|||
|
|
|
|||
|
|
message GetUserRequest {
|
|||
|
|
string class = 1;
|
|||
|
|
optional string username = 2;
|
|||
|
|
optional string user_id = 3;
|
|||
|
|
}
|
|||
|
|
|
|||
|
|
message GetUserResponse {
|
|||
|
|
string class = 1;
|
|||
|
|
string user_id = 2;
|
|||
|
|
string username = 3;
|
|||
|
|
string address = 4;
|
|||
|
|
string sex = 5;
|
|||
|
|
string phone = 6;
|
|||
|
|
}
|
|||
|
|
|
|||
|
|
```
|
|||
|
|
|
|||
|
|
你需要注意,这里我们在需要设置为可选字段的前面添加了**optional**标识。
|
|||
|
|
|
|||
|
|
2. 使用protoc工具编译protobuf文件。
|
|||
|
|
|
|||
|
|
在执行protoc命令时,需要传入`--experimental_allow_proto3_optional`参数以打开**optional**选项,编译命令如下:
|
|||
|
|
|
|||
|
|
```
|
|||
|
|
$ protoc --experimental_allow_proto3_optional --go_out=plugins=grpc:. user.proto
|
|||
|
|
|
|||
|
|
```
|
|||
|
|
|
|||
|
|
上述编译命令会生成user.pb.go文件,其中的GetUserRequest结构体定义如下:
|
|||
|
|
|
|||
|
|
```
|
|||
|
|
type GetUserRequest struct {
|
|||
|
|
state protoimpl.MessageState
|
|||
|
|
sizeCache protoimpl.SizeCache
|
|||
|
|
unknownFields protoimpl.UnknownFields
|
|||
|
|
|
|||
|
|
Class string `protobuf:"bytes,1,opt,name=class,proto3" json:"class,omitempty"`
|
|||
|
|
Username *string `protobuf:"bytes,2,opt,name=username,proto3,oneof" json:"username,omitempty"`
|
|||
|
|
UserId *string `protobuf:"bytes,3,opt,name=user_id,json=userId,proto3,oneof" json:"user_id,omitempty"`
|
|||
|
|
}
|
|||
|
|
|
|||
|
|
```
|
|||
|
|
|
|||
|
|
通过 `optional` + `--experimental_allow_proto3_optional` 组合,我们可以将一个字段编译为指针类型。
|
|||
|
|
|
|||
|
|
3. 编写gRPC接口实现。
|
|||
|
|
|
|||
|
|
新建一个user.go文件,内容如下:
|
|||
|
|
|
|||
|
|
```
|
|||
|
|
package user
|
|||
|
|
|
|||
|
|
import (
|
|||
|
|
"context"
|
|||
|
|
|
|||
|
|
pb "github.com/marmotedu/api/proto/apiserver/v1"
|
|||
|
|
|
|||
|
|
"github.com/marmotedu/iam/internal/apiserver/store"
|
|||
|
|
)
|
|||
|
|
|
|||
|
|
type User struct {
|
|||
|
|
}
|
|||
|
|
|
|||
|
|
func (c *User) GetUser(ctx context.Context, r *pb.GetUserRequest) (*pb.GetUserResponse, error) {
|
|||
|
|
if r.Username != nil {
|
|||
|
|
return store.Client().Users().GetUserByName(r.Class, r.Username)
|
|||
|
|
}
|
|||
|
|
|
|||
|
|
return store.Client().Users().GetUserByID(r.Class, r.UserId)
|
|||
|
|
}
|
|||
|
|
|
|||
|
|
```
|
|||
|
|
|
|||
|
|
总之,在GetUser方法中,我们可以通过判断r.Username是否为nil,来判断客户端是否传入了Username参数。
|
|||
|
|
|
|||
|
|
## RESTful VS gRPC
|
|||
|
|
|
|||
|
|
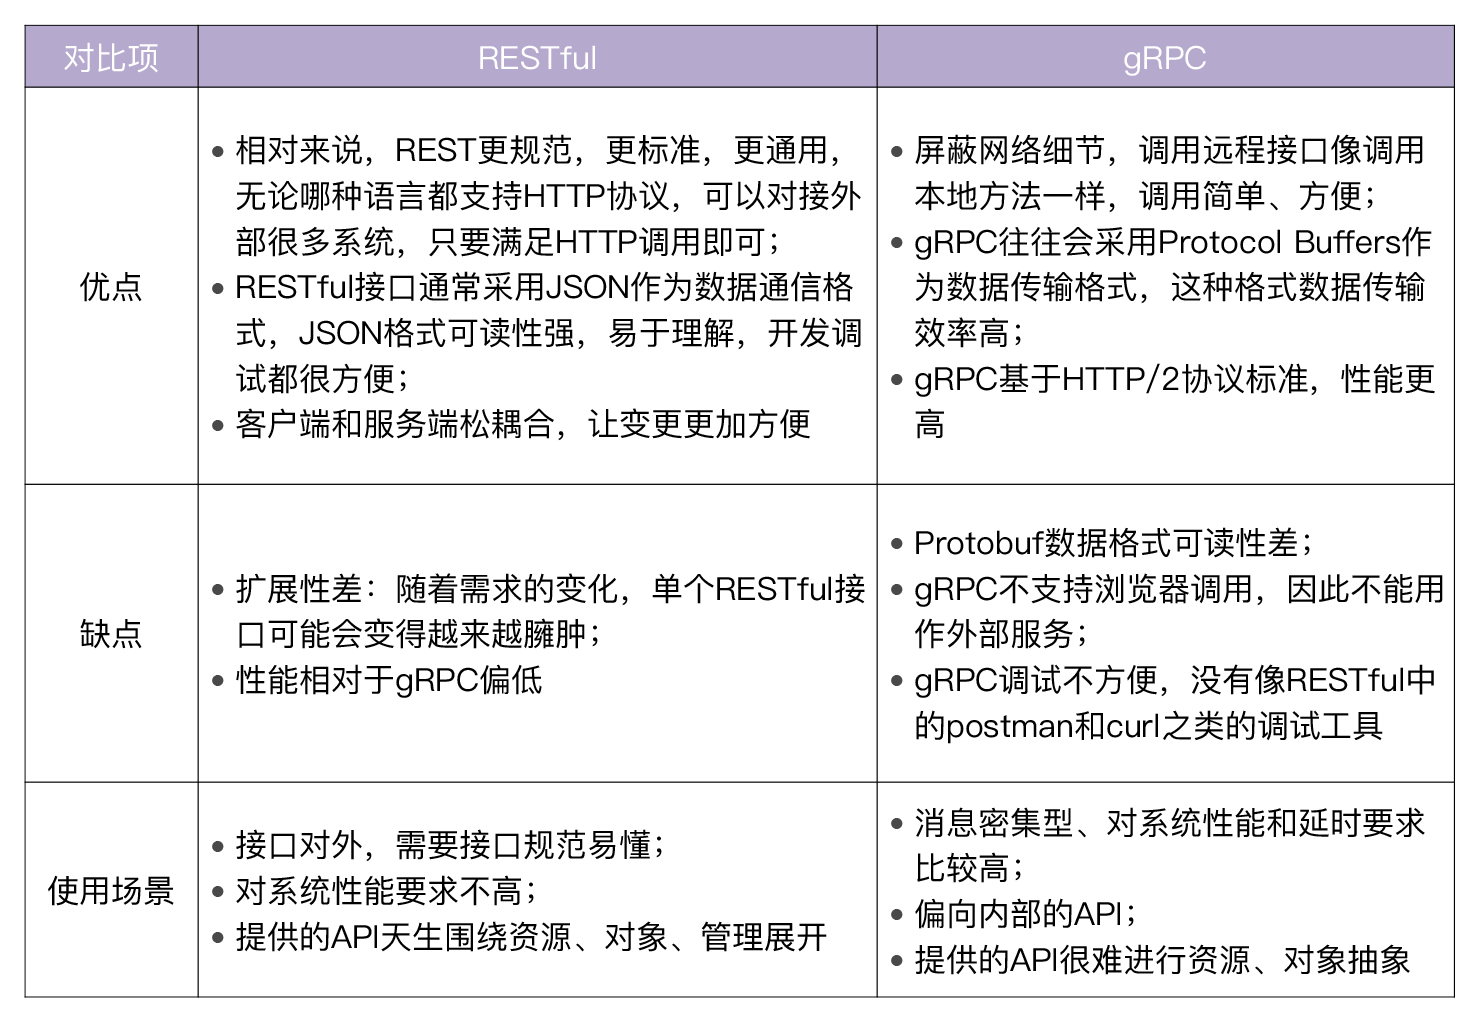
到这里,今天我们已经介绍完了gRPC API。回想一下我们昨天学习的RESTful API,你可能想问:这两种API风格分别有什么优缺点,适用于什么场景呢?我把这个问题的答案放在了下面这张表中,你可以对照着它,根据自己的需求在实际应用时进行选择。
|
|||
|
|
|
|||
|
|

|
|||
|
|
|
|||
|
|
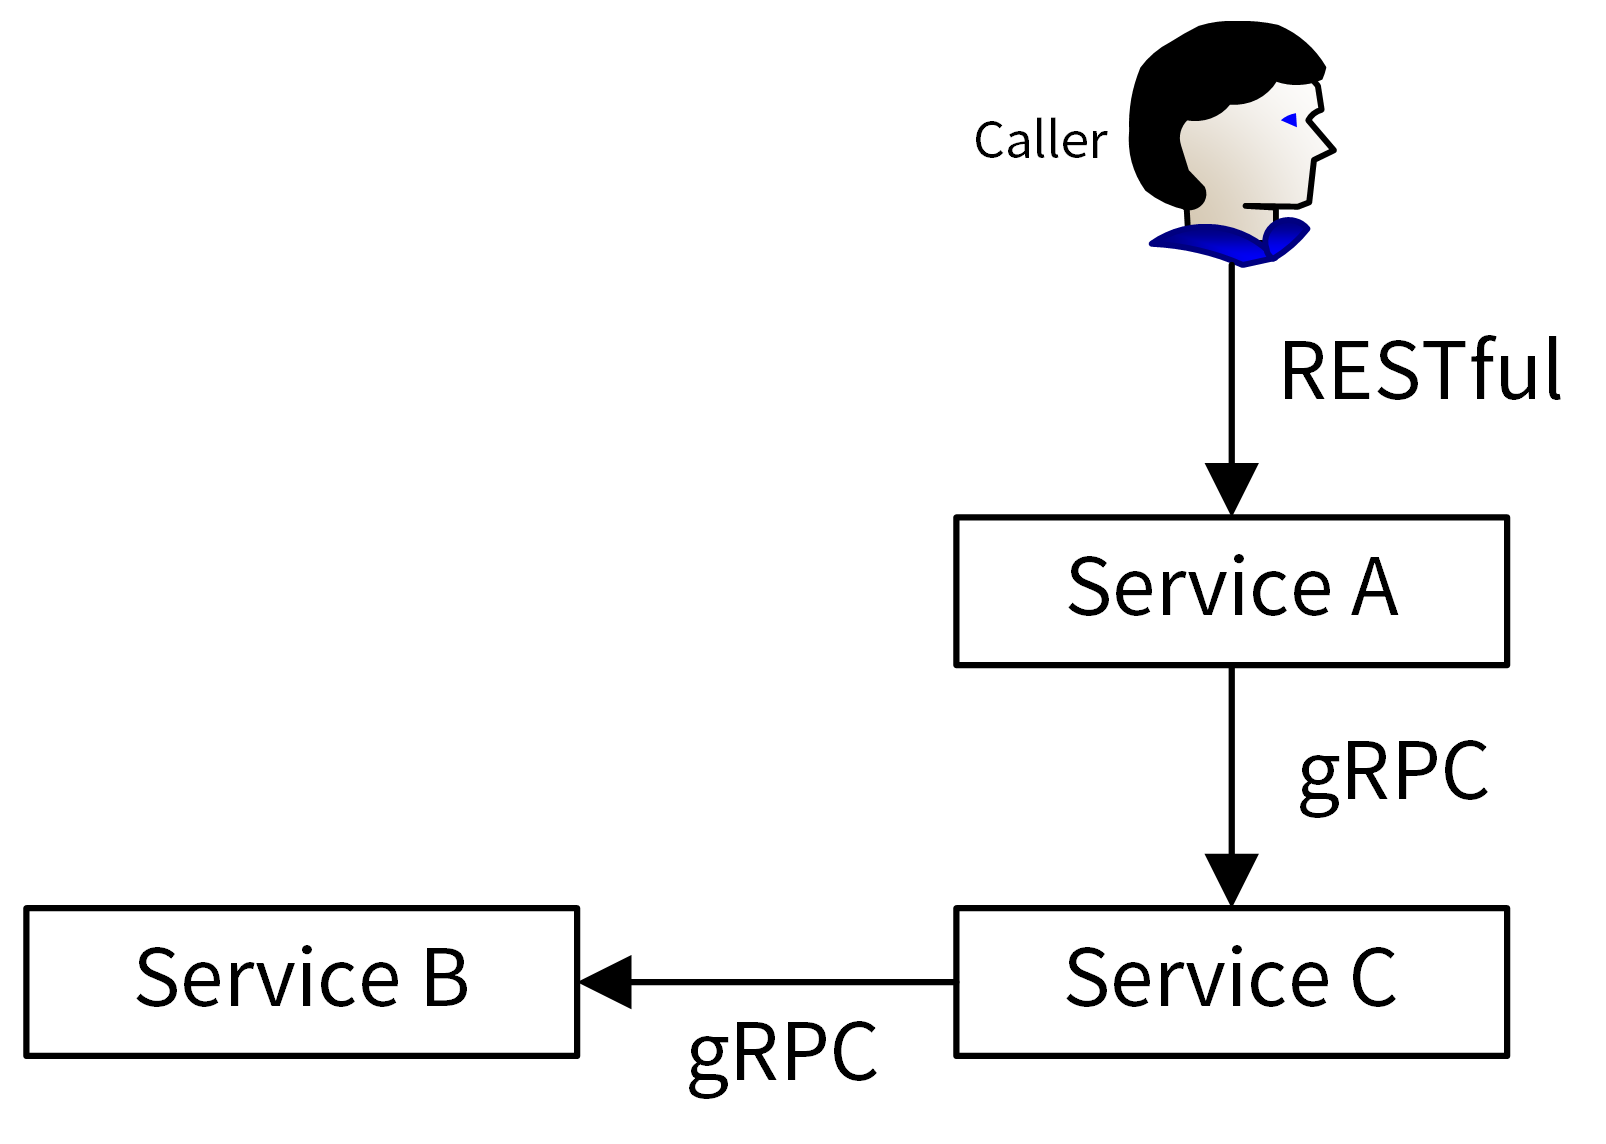
当然,更多的时候,RESTful API 和gRPC API是一种合作的关系,对内业务使用gRPC API,对外业务使用RESTful API,如下图所示:
|
|||
|
|
|
|||
|
|

|
|||
|
|
|
|||
|
|
## 总结
|
|||
|
|
|
|||
|
|
在Go项目开发中,我们可以选择使用 RESTful API 风格和 RPC API 风格,这两种服务都用得很多。其中,RESTful API风格因为规范、易理解、易用,所以**适合用在需要对外提供API接口的场景中**。而RPC API因为性能比较高、调用方便,**更适合用在内部业务中**。
|
|||
|
|
|
|||
|
|
RESTful API使用的是HTTP协议,而RPC API使用的是RPC协议。目前,有很多RPC协议可供你选择,而我推荐你使用gRPC,因为它很轻量,同时性能很高、很稳定,是一个优秀的RPC框架。所以目前业界用的最多的还是gRPC协议,腾讯、阿里等大厂内部很多核心的线上服务用的就是gRPC。
|
|||
|
|
|
|||
|
|
除了使用gRPC协议,在进行Go项目开发前,你也可以了解业界一些其他的优秀Go RPC框架,比如腾讯的tars-go、阿里的dubbo-go、Facebook的thrift、rpcx等,你可以在项目开发之前一并调研,根据实际情况进行选择。
|
|||
|
|
|
|||
|
|
## 课后练习
|
|||
|
|
|
|||
|
|
1. 使用gRPC包,快速实现一个RPC API服务,并实现PrintHello接口,该接口会返回“Hello World”字符串。
|
|||
|
|
2. 请你思考这个场景:你有一个gRPC服务,但是却希望该服务同时也能提供RESTful API接口,这该如何实现?
|
|||
|
|
|
|||
|
|
期待在留言区看到你的思考和答案,也欢迎和我一起探讨关于RPC API相关的问题,我们下一讲见!
|
|||
|
|
|