869 lines
29 KiB
Markdown
869 lines
29 KiB
Markdown
|
|
# 20 | Flow:为什么说Flow是“冷”的?
|
|||
|
|
|
|||
|
|
你好,我是朱涛。今天我们来学习Kotlin协程Flow的基础知识。
|
|||
|
|
|
|||
|
|
Flow,可以说是在Kotlin协程当中自成体系的知识点。**Flow极其强大、极其灵活**,在它出现之前,业界还有很多质疑Kotlin协程的声音,认为Kotlin的挂起函数、结构化并发,并不足以形成核心竞争力,在异步、并发任务的领域,RxJava可以做得更好。
|
|||
|
|
|
|||
|
|
但是,随着2019年Kotlin推出Flow以后,这样的质疑声就渐渐没有了。有了Flow以后,Kotlin的协程已经没有明显的短板了。简单的异步场景,我们可以直接使用挂起函数、launch、async;至于复杂的异步场景,我们就可以使用Flow。
|
|||
|
|
|
|||
|
|
实际上,在很多技术领域,Flow已经开始占领RxJava原本的领地,在Android领域,Flow甚至还要取代原本LiveData的地位。因为,Flow是真的香啊!
|
|||
|
|
|
|||
|
|
接下来,我们就一起来学习Flow。
|
|||
|
|
|
|||
|
|
## Flow就是“数据流”
|
|||
|
|
|
|||
|
|
Flow这个单词有“流”的意思,比如Cash Flow代表了“现金流”;Traffic Flow代表了“车流”;Flow在Kotlin协程当中,其实就是“数据流”的意思。因为Flow当中“流淌”的,都是数据。
|
|||
|
|
|
|||
|
|
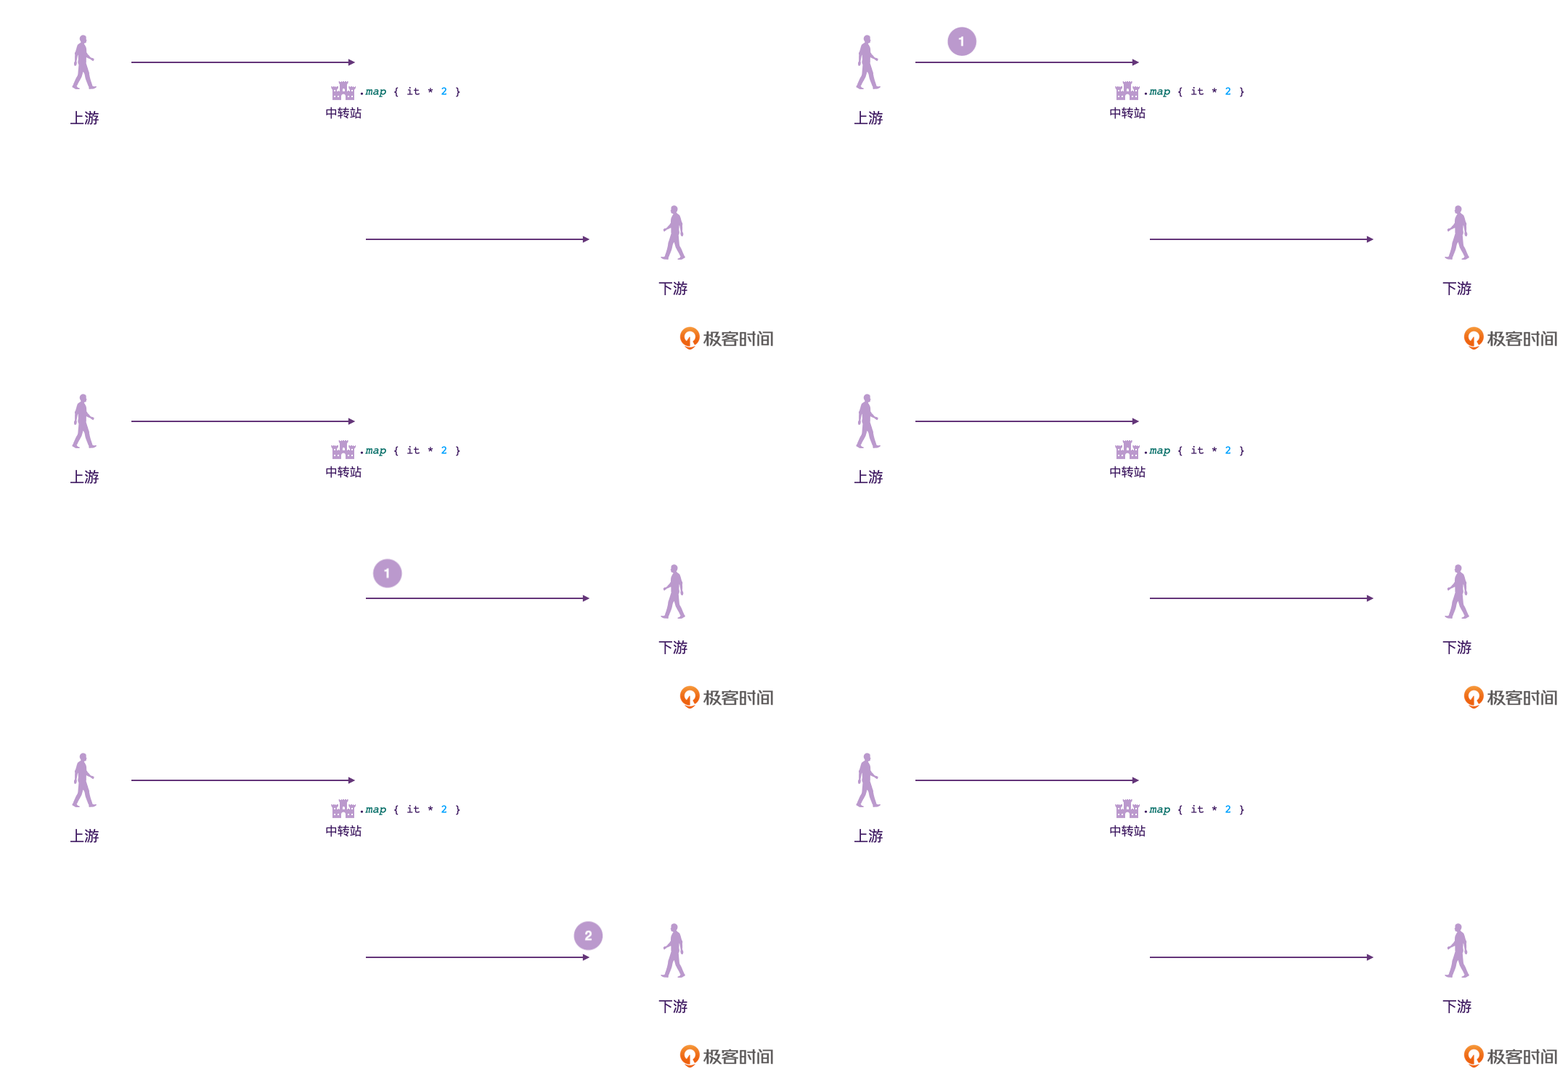
为了帮你建立思维模型,我做了一个动图,来描述Flow的行为模式。
|
|||
|
|
|
|||
|
|
|
|||
|
|
|
|||
|
|
可以看到,Flow和我们上节课学习的Channel不一样,Flow并不是只有“发送”“接收”两个行为,它当中流淌的数据是**可以在中途改变**的。
|
|||
|
|
|
|||
|
|
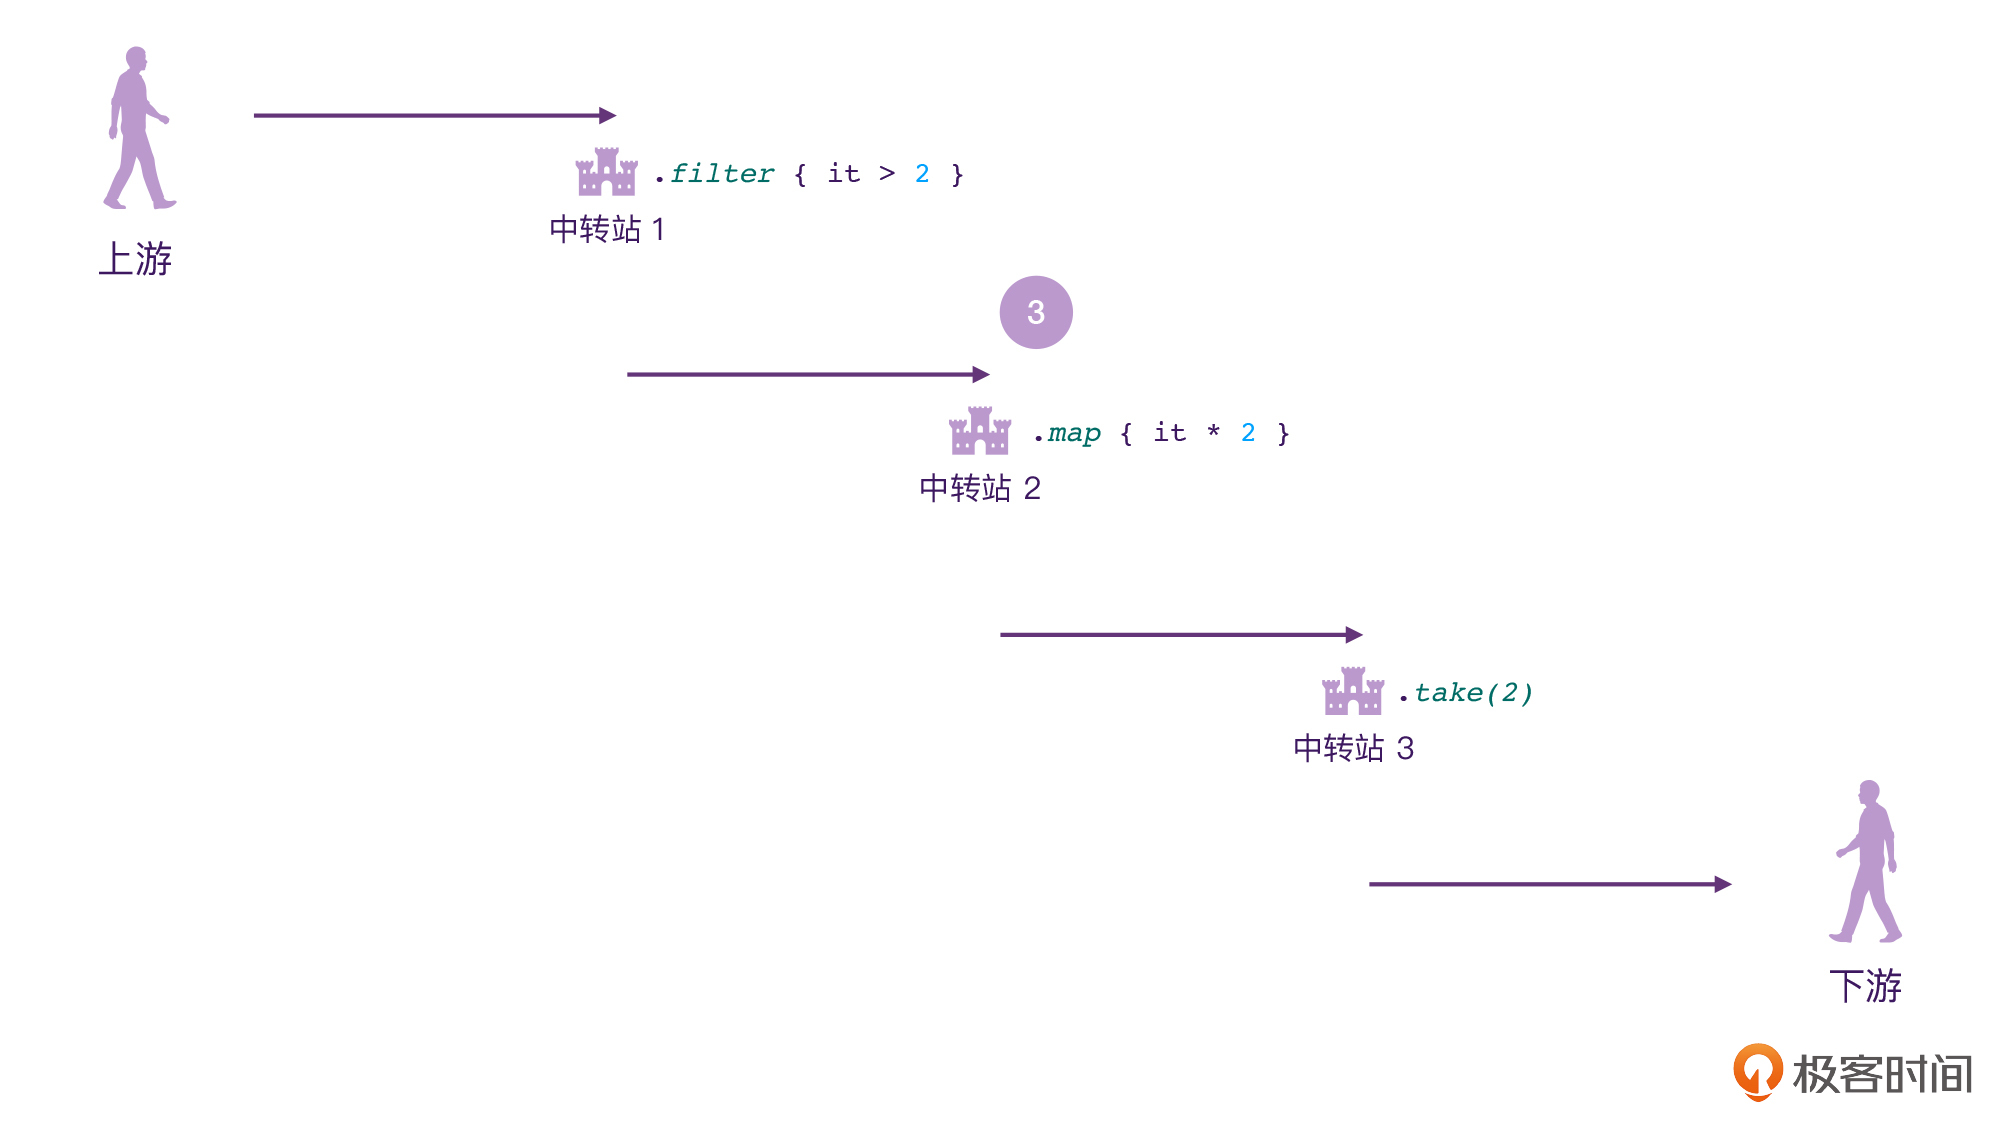
Flow的数据发送方,我们称之为“上游”;数据接收方称之为“下游”。跟现实生活中一样,上下游其实也是相对的概念。比如我们可以看到下面的图,对于中转站2来说,中转站1就相当于它的上游。
|
|||
|
|
|
|||
|
|
|
|||
|
|
|
|||
|
|
另外我们也可以看到,在发送方、接收方的中间,是可以有多个“中转站”的。在这些中转站里,我们就可以对数据进行一些处理了。
|
|||
|
|
|
|||
|
|
其实,Flow这样的数据模型,在现实生活中也存在,比如说长江,它有发源地和下游,中间还有很多大坝、水电站,甚至还有一些污水净化厂。
|
|||
|
|
|
|||
|
|
好,相信你现在对Flow已经有比较清晰的概念了。下面我们来看一段代码:
|
|||
|
|
|
|||
|
|
```plain
|
|||
|
|
// 代码段1
|
|||
|
|
|
|||
|
|
fun main() = runBlocking {
|
|||
|
|
flow { // 上游,发源地
|
|||
|
|
emit(1) // 挂起函数
|
|||
|
|
emit(2)
|
|||
|
|
emit(3)
|
|||
|
|
emit(4)
|
|||
|
|
emit(5)
|
|||
|
|
}.filter { it > 2 } // 中转站1
|
|||
|
|
.map { it * 2 } // 中转站2
|
|||
|
|
.take(2) // 中转站3
|
|||
|
|
.collect{ // 下游
|
|||
|
|
println(it)
|
|||
|
|
}
|
|||
|
|
}
|
|||
|
|
|
|||
|
|
/*
|
|||
|
|
输出结果:
|
|||
|
|
6
|
|||
|
|
8
|
|||
|
|
*/
|
|||
|
|
|
|||
|
|
```
|
|||
|
|
|
|||
|
|
如果你结合着之前的图片来分析这段代码的话,相信马上就能分析出它的执行结果。因为Flow的这种**链式调用**的API,本身就非常符合人的阅读习惯。
|
|||
|
|
|
|||
|
|
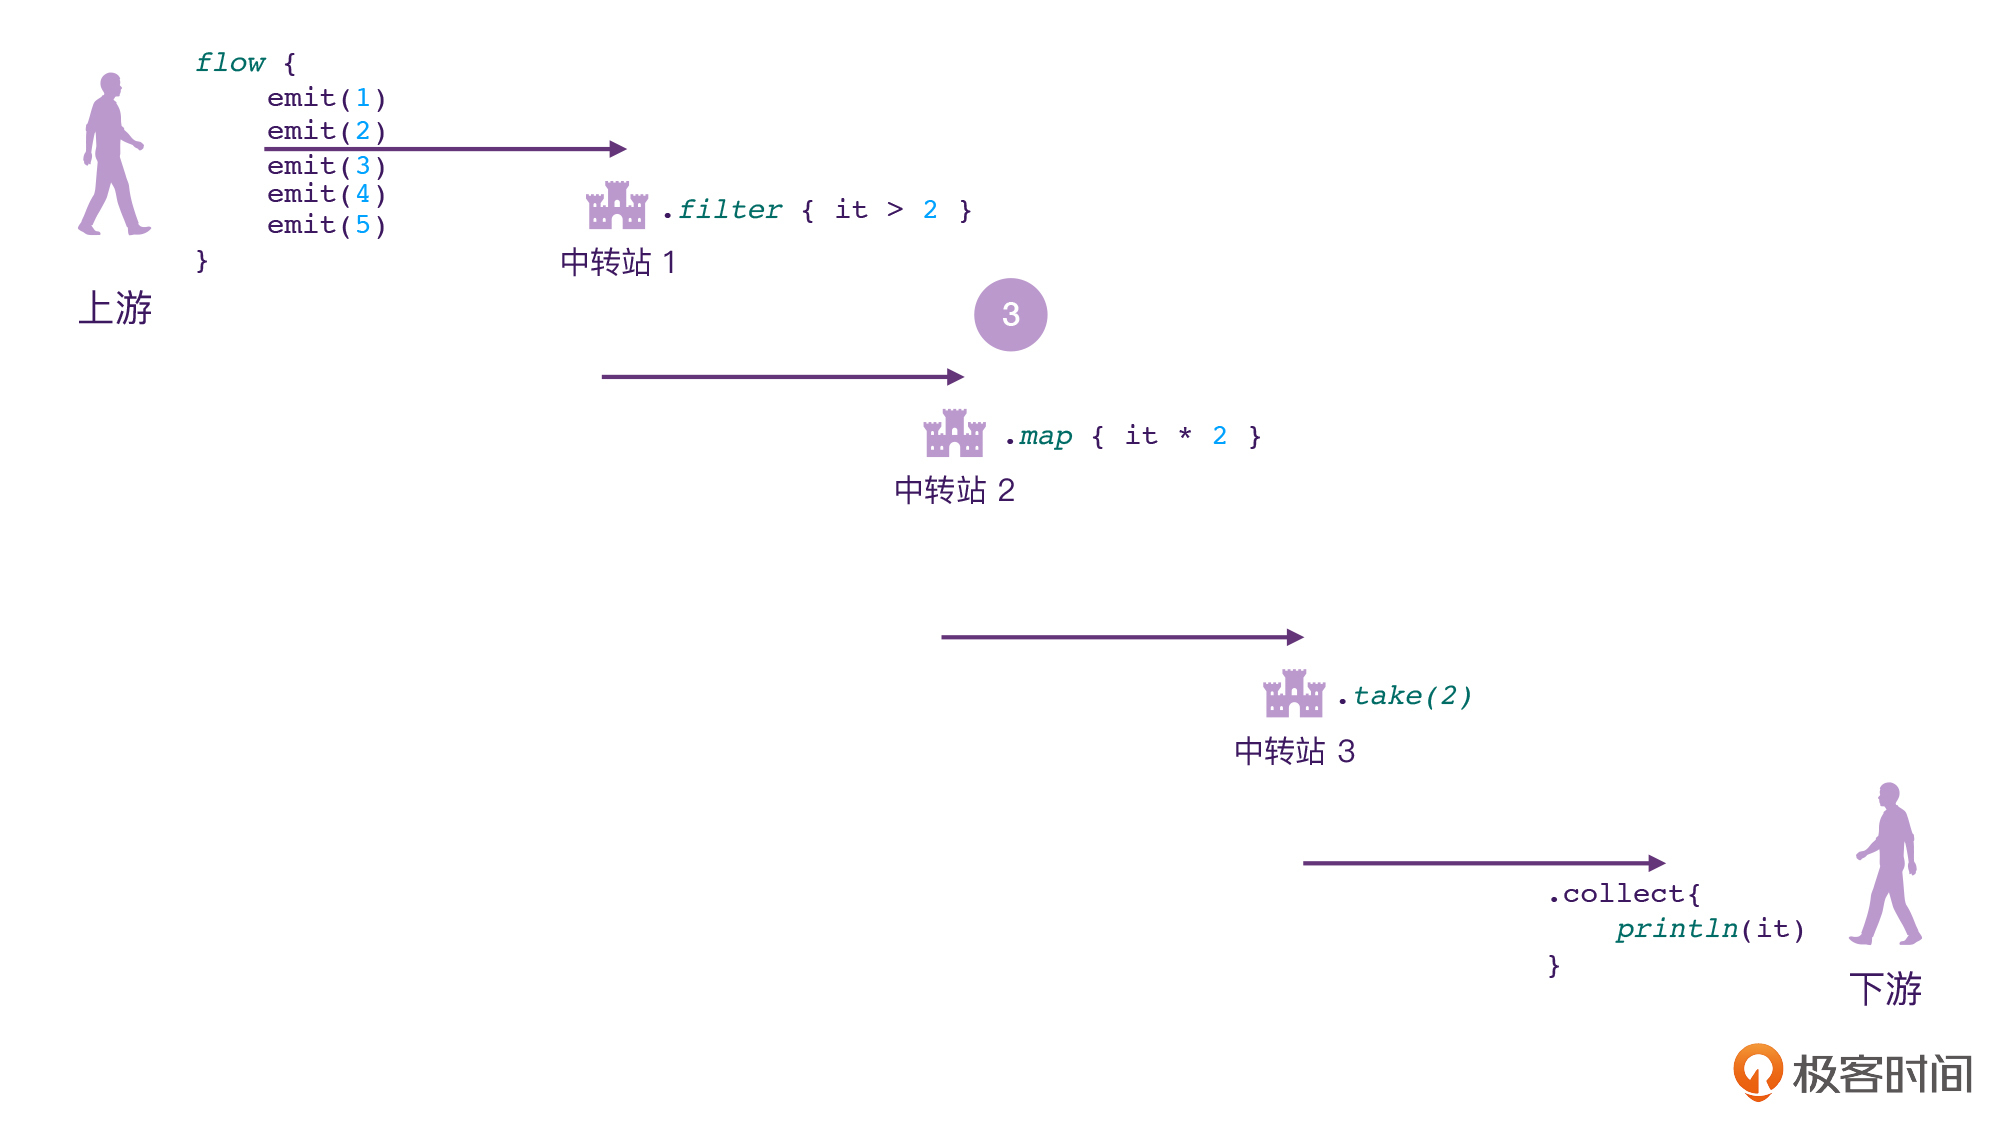
而且,Flow写出来的代码非常清晰易懂,我们可以对照前面的示意图来看一下:
|
|||
|
|
|
|||
|
|
|
|||
|
|
|
|||
|
|
说实话,Flow这样代码模式,谁不爱呢?我们可以来简单分析一下:
|
|||
|
|
|
|||
|
|
* **flow{}**,是一个高阶函数,它的作用就是创建一个新的Flow。在它的Lambda当中,我们可以使用 **emit()** 这个挂起函数往下游发送数据,这里的emit其实就是“发射”“发送”的意思。上游创建了一个“数据流”,同时也要负责发送数据。这跟现实生活也是一样的:长江里的水从上游产生,这是天经地义的。所以,对于上游而言,只需要创建Flow,然后发送数据即可,其他的都交给中转站和下游。
|
|||
|
|
* **filter{}、map{}、take(2)**,它们是**中间操作符**,就像中转站一样,它们的作用就是对数据进行处理,这很好理解。Flow最大的优势,就是它的操作符跟集合操作符高度一致。只要你会用List、Sequence,那你就可以快速上手Flow的操作符,这中间几乎没有额外的学习成本。
|
|||
|
|
* **collect{}**,也被称为**终止操作符**或者**末端操作符**,它的作用其实只有一个:终止Flow数据流,并且接收这些数据。
|
|||
|
|
|
|||
|
|
除了使用flow{} 创建Flow以外,我们还可以使用 **flowOf()** 这个函数。所以,从某种程度上讲,Flow跟Kotlin的集合其实也是有一些相似之处的。
|
|||
|
|
|
|||
|
|
```plain
|
|||
|
|
// 代码段2
|
|||
|
|
|
|||
|
|
fun main() = runBlocking {
|
|||
|
|
flowOf(1, 2, 3, 4, 5).filter { it > 2 }
|
|||
|
|
.map { it * 2 }
|
|||
|
|
.take(2)
|
|||
|
|
.collect {
|
|||
|
|
println(it)
|
|||
|
|
}
|
|||
|
|
|
|||
|
|
listOf(1, 2, 3, 4, 5).filter { it > 2 }
|
|||
|
|
.map { it * 2 }
|
|||
|
|
.take(2)
|
|||
|
|
.forEach {
|
|||
|
|
println(it)
|
|||
|
|
}
|
|||
|
|
}
|
|||
|
|
|
|||
|
|
/*
|
|||
|
|
输出结果
|
|||
|
|
6
|
|||
|
|
8
|
|||
|
|
6
|
|||
|
|
8
|
|||
|
|
*/
|
|||
|
|
|
|||
|
|
```
|
|||
|
|
|
|||
|
|
从上面的代码中,我们可以看到Flow API与集合API之间的共性。listOf创建List,flowOf创建Flow。遍历List,我们使用forEach{};遍历Flow,我们使用collect{}。
|
|||
|
|
|
|||
|
|
在某些场景下,我们甚至可以把Flow当做集合来使用,或者反过来,把集合当做Flow来用。
|
|||
|
|
|
|||
|
|
```plain
|
|||
|
|
// 代码段3
|
|||
|
|
|
|||
|
|
fun main() = runBlocking {
|
|||
|
|
// Flow转List
|
|||
|
|
flowOf(1, 2, 3, 4, 5)
|
|||
|
|
.toList()
|
|||
|
|
.filter { it > 2 }
|
|||
|
|
.map { it * 2 }
|
|||
|
|
.take(2)
|
|||
|
|
.forEach {
|
|||
|
|
println(it)
|
|||
|
|
}
|
|||
|
|
|
|||
|
|
// List转Flow
|
|||
|
|
listOf(1, 2, 3, 4, 5)
|
|||
|
|
.asFlow()
|
|||
|
|
.filter { it > 2 }
|
|||
|
|
.map { it * 2 }
|
|||
|
|
.take(2)
|
|||
|
|
.collect {
|
|||
|
|
println(it)
|
|||
|
|
}
|
|||
|
|
}
|
|||
|
|
|
|||
|
|
/*
|
|||
|
|
输出结果
|
|||
|
|
6
|
|||
|
|
8
|
|||
|
|
6
|
|||
|
|
8
|
|||
|
|
*/
|
|||
|
|
|
|||
|
|
```
|
|||
|
|
|
|||
|
|
在这段代码中,我们使用了Flow.toList()、List.asFlow()这两个扩展函数,让数据在List、Flow之间来回转换,而其中的代码甚至不需要做多少改变。
|
|||
|
|
|
|||
|
|
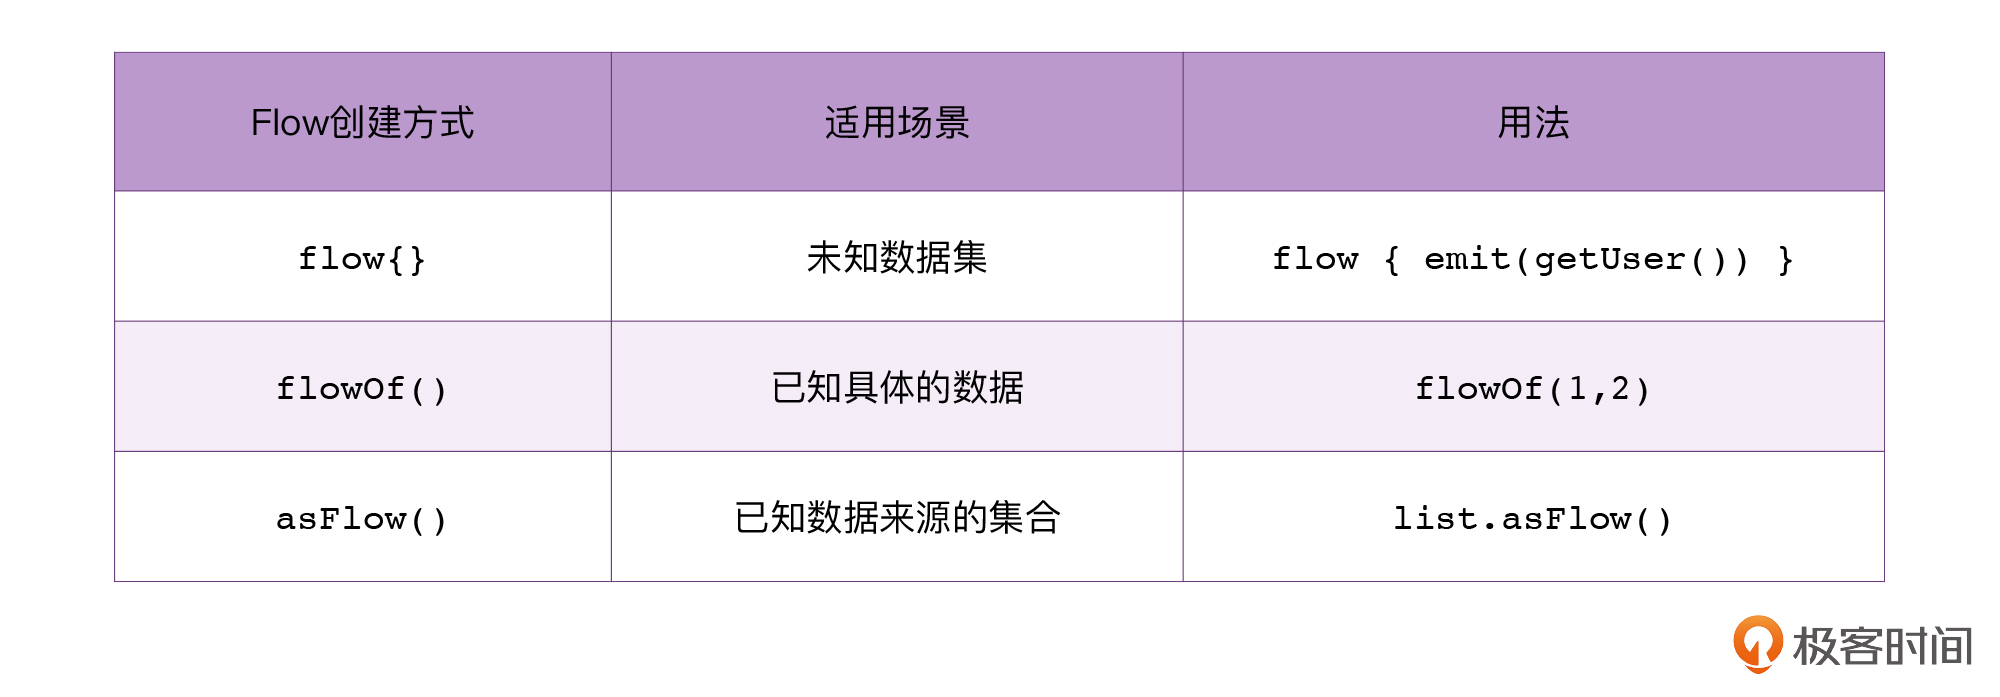
到这里,我其实已经给你介绍了三种创建Flow的方式,我来帮你总结一下。
|
|||
|
|
|
|||
|
|
|
|||
|
|
|
|||
|
|
好,现在我们就对Flow有一个整体的认识了,我们知道它的API总体分为三个部分:上游、中间操作、下游。其中对于上游来说,一般有三种创建方式,这些我们也都需要好好掌握。
|
|||
|
|
|
|||
|
|
那么接下来,我们重点看看中间操作符。
|
|||
|
|
|
|||
|
|
## 中间操作符
|
|||
|
|
|
|||
|
|
中间操作符(Intermediate Operators),除了之前提到的map、filter、take这种从集合那边“抄”来的操作符之外,还有一些特殊的操作符需要我们特别注意。这些操作符跟Kotlin集合API是没关系的,**它们是专门为Flow设计的**。我们一个个来看。
|
|||
|
|
|
|||
|
|
### Flow生命周期
|
|||
|
|
|
|||
|
|
在Flow的中间操作符当中,**onStart、onCompletion**这两个是比较特殊的。它们是以操作符的形式存在,但实际上的作用,是监听生命周期回调。
|
|||
|
|
|
|||
|
|
onStart,它的作用是注册一个监听事件:当flow启动以后,它就会被回调。具体我们可以看下面这个例子:
|
|||
|
|
|
|||
|
|
```plain
|
|||
|
|
// 代码段4
|
|||
|
|
fun main() = runBlocking {
|
|||
|
|
flowOf(1, 2, 3, 4, 5)
|
|||
|
|
.filter {
|
|||
|
|
println("filter: $it")
|
|||
|
|
it > 2
|
|||
|
|
}
|
|||
|
|
.map {
|
|||
|
|
println("map: $it")
|
|||
|
|
it * 2
|
|||
|
|
}
|
|||
|
|
.take(2)
|
|||
|
|
.onStart { println("onStart") } // 注意这里
|
|||
|
|
.collect {
|
|||
|
|
println("collect: $it")
|
|||
|
|
}
|
|||
|
|
}
|
|||
|
|
|
|||
|
|
/*
|
|||
|
|
输出结果
|
|||
|
|
onStart
|
|||
|
|
filter: 1
|
|||
|
|
filter: 2
|
|||
|
|
filter: 3
|
|||
|
|
map: 3
|
|||
|
|
collect: 6
|
|||
|
|
filter: 4
|
|||
|
|
map: 4
|
|||
|
|
collect: 8
|
|||
|
|
*/
|
|||
|
|
|
|||
|
|
```
|
|||
|
|
|
|||
|
|
可以看到,onStart的执行顺序,并不是严格按照上下游来执行的。虽然onStart的位置是处于下游,而filter、map、take是上游,但onStart是最先执行的。因为它本质上是一个回调,不是一个数据处理的中间站。
|
|||
|
|
|
|||
|
|
相应的,filter、map、take这类操作符,它们的执行顺序是跟它们的位置相关的。最终的执行结果,也会受到位置变化的影响。
|
|||
|
|
|
|||
|
|
```plain
|
|||
|
|
// 代码段5
|
|||
|
|
fun main() = runBlocking {
|
|||
|
|
flowOf(1, 2, 3, 4, 5)
|
|||
|
|
.take(2) // 注意这里
|
|||
|
|
.filter {
|
|||
|
|
println("filter: $it")
|
|||
|
|
it > 2
|
|||
|
|
}
|
|||
|
|
.map {
|
|||
|
|
println("map: $it")
|
|||
|
|
it * 2
|
|||
|
|
}
|
|||
|
|
.onStart { println("onStart") }
|
|||
|
|
.collect {
|
|||
|
|
println("collect: $it")
|
|||
|
|
}
|
|||
|
|
}
|
|||
|
|
/*
|
|||
|
|
输出结果
|
|||
|
|
onStart
|
|||
|
|
filter: 1
|
|||
|
|
filter: 2
|
|||
|
|
*/
|
|||
|
|
|
|||
|
|
```
|
|||
|
|
|
|||
|
|
可见,在以上代码中,我们将take(2)的位置挪到了上游的起始位置,这时候程序的执行结果就完全变了。
|
|||
|
|
|
|||
|
|
OK,理解了onStart以后,onCompletion也就很好理解了。
|
|||
|
|
|
|||
|
|
```plain
|
|||
|
|
// 代码段6
|
|||
|
|
fun main() = runBlocking {
|
|||
|
|
flowOf(1, 2, 3, 4, 5)
|
|||
|
|
.onCompletion { println("onCompletion") } // 注意这里
|
|||
|
|
.filter {
|
|||
|
|
println("filter: $it")
|
|||
|
|
it > 2
|
|||
|
|
}
|
|||
|
|
.take(2)
|
|||
|
|
.collect {
|
|||
|
|
println("collect: $it")
|
|||
|
|
}
|
|||
|
|
}
|
|||
|
|
|
|||
|
|
/*
|
|||
|
|
输出结果
|
|||
|
|
filter: 1
|
|||
|
|
filter: 2
|
|||
|
|
filter: 3
|
|||
|
|
collect: 3
|
|||
|
|
filter: 4
|
|||
|
|
collect: 4
|
|||
|
|
onCompletion
|
|||
|
|
*/
|
|||
|
|
|
|||
|
|
```
|
|||
|
|
|
|||
|
|
和onStart类似,onCompletion的执行顺序,跟它在Flow当中的位置无关。onCompletion只会在Flow数据流执行完毕以后,才会回调。
|
|||
|
|
|
|||
|
|
还记得在[第16讲](https://time.geekbang.org/column/article/487930)里,我们提到的Job.invokeOnCompletion{} 这个生命周期回调吗?在这里,Flow.onCompletion{} 也是类似的,onCompletion{} 在面对以下三种情况时都会进行回调:
|
|||
|
|
|
|||
|
|
* 情况1,Flow正常执行完毕;
|
|||
|
|
* 情况2,Flow当中出现异常;
|
|||
|
|
* 情况3,Flow被取消。
|
|||
|
|
|
|||
|
|
对于情况1,我们已经在上面的代码中验证过了。接下来,我们看看后面两种情况:
|
|||
|
|
|
|||
|
|
```plain
|
|||
|
|
// 代码段7
|
|||
|
|
fun main() = runBlocking {
|
|||
|
|
launch {
|
|||
|
|
flow {
|
|||
|
|
emit(1)
|
|||
|
|
emit(2)
|
|||
|
|
emit(3)
|
|||
|
|
}.onCompletion { println("onCompletion first: $it") }
|
|||
|
|
.collect {
|
|||
|
|
println("collect: $it")
|
|||
|
|
if (it == 2) {
|
|||
|
|
cancel() // 1
|
|||
|
|
println("cancel")
|
|||
|
|
}
|
|||
|
|
}
|
|||
|
|
}
|
|||
|
|
|
|||
|
|
delay(100L)
|
|||
|
|
|
|||
|
|
flowOf(4, 5, 6)
|
|||
|
|
.onCompletion { println("onCompletion second: $it") }
|
|||
|
|
.collect {
|
|||
|
|
println("collect: $it")
|
|||
|
|
// 仅用于测试,生产环境不应该这么创建异常
|
|||
|
|
throw IllegalStateException() // 2
|
|||
|
|
}
|
|||
|
|
}
|
|||
|
|
|
|||
|
|
/*
|
|||
|
|
collect: 1
|
|||
|
|
collect: 2
|
|||
|
|
cancel
|
|||
|
|
onCompletion first: JobCancellationException: // 3
|
|||
|
|
collect: 4
|
|||
|
|
onCompletion second: IllegalStateException // 4
|
|||
|
|
*/
|
|||
|
|
|
|||
|
|
```
|
|||
|
|
|
|||
|
|
在上面的注释1当中,我们在collect{} 里调用了cancel方法,这会取消掉整个Flow,这时候,flow{} 当中剩下的代码将不会再被执行。最后,onCompletion也会被调用,同时,请你留意注释3,这里还会带上对应的异常信息JobCancellationException。
|
|||
|
|
|
|||
|
|
同样的,根据注释2、4,我们也能分析出一样的结果。
|
|||
|
|
|
|||
|
|
而且从上面的代码里,我们也可以看到,当Flow当中发生异常以后,Flow就会终止。那么对于这样的问题,我们该如何处理呢?
|
|||
|
|
|
|||
|
|
下面我就带你来看看,Flow当中如何处理异常。
|
|||
|
|
|
|||
|
|
### catch异常处理
|
|||
|
|
|
|||
|
|
前面我已经介绍过,Flow主要有三个部分:上游、中间操作、下游。那么,Flow当中的异常,也可以根据这个标准来进行分类,也就是异常发生的位置。
|
|||
|
|
|
|||
|
|
对于发生在上游、中间操作这两个阶段的异常,我们可以直接使用 **catch** 这个操作符来进行捕获和进一步处理。如下所示:
|
|||
|
|
|
|||
|
|
```plain
|
|||
|
|
// 代码段8
|
|||
|
|
fun main() = runBlocking {
|
|||
|
|
val flow = flow {
|
|||
|
|
emit(1)
|
|||
|
|
emit(2)
|
|||
|
|
throw IllegalStateException()
|
|||
|
|
emit(3)
|
|||
|
|
}
|
|||
|
|
|
|||
|
|
flow.map { it * 2 }
|
|||
|
|
.catch { println("catch: $it") } // 注意这里
|
|||
|
|
.collect {
|
|||
|
|
println(it)
|
|||
|
|
}
|
|||
|
|
}
|
|||
|
|
/*
|
|||
|
|
输出结果:
|
|||
|
|
2
|
|||
|
|
4
|
|||
|
|
catch: java.lang.IllegalStateException
|
|||
|
|
*/
|
|||
|
|
|
|||
|
|
```
|
|||
|
|
|
|||
|
|
所以,catch这个操作符,其实就相当于我们平时使用的try-catch的意思。只是说,后者是用于普通的代码,而前者是用于Flow数据流的,两者的核心理念是一样的。不过,考虑到Flow具有上下游的特性,catch这个操作符的作用是**和它的位置强相关**的。
|
|||
|
|
|
|||
|
|
**catch的作用域,仅限于catch的上游。**换句话说,发生在catch上游的异常,才会被捕获,发生在catch下游的异常,则不会被捕获。为此,我们可以换一个写法:
|
|||
|
|
|
|||
|
|
```plain
|
|||
|
|
// 代码段9
|
|||
|
|
fun main() = runBlocking {
|
|||
|
|
val flow = flow {
|
|||
|
|
emit(1)
|
|||
|
|
emit(2)
|
|||
|
|
emit(3)
|
|||
|
|
}
|
|||
|
|
|
|||
|
|
flow.map { it * 2 }
|
|||
|
|
.catch { println("catch: $it") }
|
|||
|
|
.filter { it / 0 > 1} // 故意制造异常
|
|||
|
|
.collect {
|
|||
|
|
println(it)
|
|||
|
|
}
|
|||
|
|
}
|
|||
|
|
|
|||
|
|
/*
|
|||
|
|
输出结果
|
|||
|
|
Exception in thread "main" ArithmeticException: / by zero
|
|||
|
|
*/
|
|||
|
|
|
|||
|
|
```
|
|||
|
|
|
|||
|
|
从上面代码的执行结果里,我们可以看到,catch对于发生在它下游的异常是无能为力的。这一点,借助我们之前的思维模型来思考,也是非常符合直觉的。比如说,长江上面的污水处理厂,当然只能处理它上游的水,而对于发生在下游的污染,是无能为力的。
|
|||
|
|
|
|||
|
|
那么,发生在上游源头,还有发生在中间操作的异常,处理起来其实很容易,我们只需要留意catch的作用域即可。最后就是发生在下游末尾处的异常了。
|
|||
|
|
|
|||
|
|
如果你回过头去看代码段7当中的异常,会发现它也是一个典型的“发生在下游的异常”,所以对于这种情况,我们就不能用catch操作符了。那么最简单的办法,其实是使用 **try-catch**,把collect{} 当中可能出现问题的代码包裹起来。比如像下面这样:
|
|||
|
|
|
|||
|
|
```plain
|
|||
|
|
// 代码段10
|
|||
|
|
|
|||
|
|
fun main() = runBlocking {
|
|||
|
|
flowOf(4, 5, 6)
|
|||
|
|
.onCompletion { println("onCompletion second: $it") }
|
|||
|
|
.collect {
|
|||
|
|
try {
|
|||
|
|
println("collect: $it")
|
|||
|
|
throw IllegalStateException()
|
|||
|
|
} catch (e: Exception) {
|
|||
|
|
println("Catch $e")
|
|||
|
|
}
|
|||
|
|
}
|
|||
|
|
}
|
|||
|
|
|
|||
|
|
```
|
|||
|
|
|
|||
|
|
所以,针对Flow当中的异常处理,我们主要有两种手段:一个是catch操作符,它主要用于上游异常的捕获;而try-catch这种传统的方式,更多的是应用于下游异常的捕获。
|
|||
|
|
|
|||
|
|
> 提示:关于更多协程异常处理的话题,我们会在第23讲深入介绍。
|
|||
|
|
|
|||
|
|
### 切换Context:flowOn、launchIn
|
|||
|
|
|
|||
|
|
前面我们介绍过,Flow非常适合复杂的异步任务。在大部分的异步任务当中,我们都需要频繁切换工作的线程。对于耗时任务,我们需要线程池当中执行,对于UI任务,我们需要在主线程执行。
|
|||
|
|
|
|||
|
|
而在Flow当中,我们借助 **flowOn** 这一个操作符,就可以灵活实现以上的需求。
|
|||
|
|
|
|||
|
|
```plain
|
|||
|
|
// 代码段11
|
|||
|
|
fun main() = runBlocking {
|
|||
|
|
val flow = flow {
|
|||
|
|
logX("Start")
|
|||
|
|
emit(1)
|
|||
|
|
logX("Emit: 1")
|
|||
|
|
emit(2)
|
|||
|
|
logX("Emit: 2")
|
|||
|
|
emit(3)
|
|||
|
|
logX("Emit: 3")
|
|||
|
|
}
|
|||
|
|
|
|||
|
|
flow.filter {
|
|||
|
|
logX("Filter: $it")
|
|||
|
|
it > 2
|
|||
|
|
}
|
|||
|
|
.flowOn(Dispatchers.IO) // 注意这里
|
|||
|
|
.collect {
|
|||
|
|
logX("Collect $it")
|
|||
|
|
}
|
|||
|
|
}
|
|||
|
|
|
|||
|
|
/*
|
|||
|
|
输出结果
|
|||
|
|
================================
|
|||
|
|
Start
|
|||
|
|
Thread:DefaultDispatcher-worker-1 @coroutine#2
|
|||
|
|
================================
|
|||
|
|
================================
|
|||
|
|
Filter: 1
|
|||
|
|
Thread:DefaultDispatcher-worker-1 @coroutine#2
|
|||
|
|
================================
|
|||
|
|
================================
|
|||
|
|
Emit: 1
|
|||
|
|
Thread:DefaultDispatcher-worker-1 @coroutine#2
|
|||
|
|
================================
|
|||
|
|
================================
|
|||
|
|
Filter: 2
|
|||
|
|
Thread:DefaultDispatcher-worker-1 @coroutine#2
|
|||
|
|
================================
|
|||
|
|
================================
|
|||
|
|
Emit: 2
|
|||
|
|
Thread:DefaultDispatcher-worker-1 @coroutine#2
|
|||
|
|
================================
|
|||
|
|
================================
|
|||
|
|
Filter: 3
|
|||
|
|
Thread:DefaultDispatcher-worker-1 @coroutine#2
|
|||
|
|
================================
|
|||
|
|
================================
|
|||
|
|
Emit: 3
|
|||
|
|
Thread:DefaultDispatcher-worker-1 @coroutine#2
|
|||
|
|
================================
|
|||
|
|
================================
|
|||
|
|
Collect 3
|
|||
|
|
Thread:main @coroutine#1
|
|||
|
|
================================
|
|||
|
|
|
|||
|
|
```
|
|||
|
|
|
|||
|
|
flowOn操作符也是和它的位置强相关的。它的作用域跟前面的catch类似:**flowOn仅限于它的上游。**
|
|||
|
|
|
|||
|
|
在上面的代码中,flowOn的上游,就是flow{}、filter{} 当中的代码,所以,它们的代码全都运行在DefaultDispatcher这个线程池当中。只有collect{} 当中的代码是运行在main线程当中的。
|
|||
|
|
|
|||
|
|
对应的,如果你挪动一下上面代码中flowOn的位置,会发现执行结果就会不一样,比如这样:
|
|||
|
|
|
|||
|
|
```plain
|
|||
|
|
// 代码段12
|
|||
|
|
flow.flowOn(Dispatchers.IO) // 注意这里
|
|||
|
|
.filter {
|
|||
|
|
logX("Filter: $it")
|
|||
|
|
it > 2
|
|||
|
|
}
|
|||
|
|
.collect {
|
|||
|
|
logX("Collect $it")
|
|||
|
|
}
|
|||
|
|
/*
|
|||
|
|
输出结果:
|
|||
|
|
filter当中的代码会执行在main线程
|
|||
|
|
*/
|
|||
|
|
|
|||
|
|
```
|
|||
|
|
|
|||
|
|
这里的代码执行结果,我们很容易就能推测出来,因为flowOn的作用域仅限于上游,所以它只会让flow{} 当中的代码运行在DefaultDispatcher当中,剩下的代码则执行在main线程。
|
|||
|
|
|
|||
|
|
但是到这里,我们就会遇到一个类似catch的困境:如果想要指定collect当中的Context,该怎么办呢?
|
|||
|
|
|
|||
|
|
我们能想到的最简单的办法,就是用前面学过的:**withContext{}**。
|
|||
|
|
|
|||
|
|
```plain
|
|||
|
|
// 代码段13
|
|||
|
|
|
|||
|
|
// 不推荐
|
|||
|
|
flow.flowOn(Dispatchers.IO)
|
|||
|
|
.filter {
|
|||
|
|
logX("Filter: $it")
|
|||
|
|
it > 2
|
|||
|
|
}
|
|||
|
|
.collect {
|
|||
|
|
withContext(mySingleDispatcher) {
|
|||
|
|
logX("Collect $it")
|
|||
|
|
}
|
|||
|
|
}
|
|||
|
|
/*
|
|||
|
|
输出结果:
|
|||
|
|
collect{}将运行在MySingleThread
|
|||
|
|
filter{}运行在main
|
|||
|
|
flow{}运行在DefaultDispatcher
|
|||
|
|
*/
|
|||
|
|
|
|||
|
|
```
|
|||
|
|
|
|||
|
|
在上面的代码中,我们直接在collect{} 里使用了withContext{},所以它的执行就交给了MySingleThread。不过,有的时候,我们想要改变除了flowOn以外所有代码的Context。比如,我们希望collect{}、filter{} 都运行在MySingleThread。
|
|||
|
|
|
|||
|
|
那么这时候,我们可以考虑使用withContext{} **进一步扩大包裹的范围**,就像下面这样:
|
|||
|
|
|
|||
|
|
```plain
|
|||
|
|
// 代码段14
|
|||
|
|
|
|||
|
|
// 不推荐
|
|||
|
|
withContext(mySingleDispatcher) {
|
|||
|
|
flow.flowOn(Dispatchers.IO)
|
|||
|
|
.filter {
|
|||
|
|
logX("Filter: $it")
|
|||
|
|
it > 2
|
|||
|
|
}
|
|||
|
|
.collect{
|
|||
|
|
logX("Collect $it")
|
|||
|
|
}
|
|||
|
|
}
|
|||
|
|
|
|||
|
|
/*
|
|||
|
|
输出结果:
|
|||
|
|
collect{}将运行在MySingleThread
|
|||
|
|
filter{}运行在MySingleThread
|
|||
|
|
flow{}运行在DefaultDispatcher
|
|||
|
|
*/
|
|||
|
|
|
|||
|
|
```
|
|||
|
|
|
|||
|
|
不过,这种写法终归是有些丑陋,因此,Kotlin官方还为我们提供了另一个操作符,**launchIn**。
|
|||
|
|
|
|||
|
|
我们来看看这个操作符是怎么用的:
|
|||
|
|
|
|||
|
|
```plain
|
|||
|
|
// 代码段15
|
|||
|
|
val scope = CoroutineScope(mySingleDispatcher)
|
|||
|
|
flow.flowOn(Dispatchers.IO)
|
|||
|
|
.filter {
|
|||
|
|
logX("Filter: $it")
|
|||
|
|
it > 2
|
|||
|
|
}
|
|||
|
|
.onEach {
|
|||
|
|
logX("onEach $it")
|
|||
|
|
}
|
|||
|
|
.launchIn(scope)
|
|||
|
|
|
|||
|
|
/*
|
|||
|
|
输出结果:
|
|||
|
|
onEach{}将运行在MySingleThread
|
|||
|
|
filter{}运行在MySingleThread
|
|||
|
|
flow{}运行在DefaultDispatcher
|
|||
|
|
*/
|
|||
|
|
|
|||
|
|
```
|
|||
|
|
|
|||
|
|
可以看到,在这段代码中,我们不再直接使用collect{},而是借助了onEach{} 来实现类似collect{} 的功能。同时我们在最后使用了launchIn(scope),把它上游的代码都分发到指定的线程当中。
|
|||
|
|
|
|||
|
|
如果你去看launchIn的源代码的话,你会发现它的定义极其简单:
|
|||
|
|
|
|||
|
|
```plain
|
|||
|
|
// 代码段16
|
|||
|
|
public fun <T> Flow<T>.launchIn(scope: CoroutineScope): Job = scope.launch {
|
|||
|
|
collect() // tail-call
|
|||
|
|
}
|
|||
|
|
|
|||
|
|
```
|
|||
|
|
|
|||
|
|
由此可见,launchIn从严格意义来讲,应该算是一个下游的终止操作符,因为它本质上是调用了collect()。
|
|||
|
|
|
|||
|
|
因此,上面的代码段16,也会等价于下面的写法:
|
|||
|
|
|
|||
|
|
```plain
|
|||
|
|
// 代码段17
|
|||
|
|
fun main() = runBlocking {
|
|||
|
|
val scope = CoroutineScope(mySingleDispatcher)
|
|||
|
|
val flow = flow {
|
|||
|
|
logX("Start")
|
|||
|
|
emit(1)
|
|||
|
|
logX("Emit: 1")
|
|||
|
|
emit(2)
|
|||
|
|
logX("Emit: 2")
|
|||
|
|
emit(3)
|
|||
|
|
logX("Emit: 3")
|
|||
|
|
}
|
|||
|
|
.flowOn(Dispatchers.IO)
|
|||
|
|
.filter {
|
|||
|
|
logX("Filter: $it")
|
|||
|
|
it > 2
|
|||
|
|
}
|
|||
|
|
.onEach {
|
|||
|
|
logX("onEach $it")
|
|||
|
|
}
|
|||
|
|
|
|||
|
|
scope.launch { // 注意这里
|
|||
|
|
flow.collect()
|
|||
|
|
}
|
|||
|
|
|
|||
|
|
delay(100L)
|
|||
|
|
}
|
|||
|
|
|
|||
|
|
```
|
|||
|
|
|
|||
|
|
所以,总的来说,对于Flow当中的线程切换,我们可以使用flowOn、launchIn、withContext,但其实,flowOn、launchIn就已经可以满足需求了。
|
|||
|
|
|
|||
|
|
另外,由于Flow当中直接使用withContext是很容易引发其他问题的,因此,**withContext在Flow当中是不被推荐的,即使要用,也应该谨慎再谨慎**。
|
|||
|
|
|
|||
|
|
> 提示:针对Flow当中withContext引发的问题,我会在这节课的思考题里给出具体案例。
|
|||
|
|
|
|||
|
|
## 下游:终止操作符
|
|||
|
|
|
|||
|
|
最后,我们就到了下游阶段,我们来看看终止操作符(Terminal Operators)的含义和使用。
|
|||
|
|
|
|||
|
|
> 这里的Terminal,其实有终止、末尾、终点的意思。
|
|||
|
|
|
|||
|
|
在Flow当中,终止操作符的意思就是终止整个Flow流程的操作符。这里的“终止”,其实是跟前面的“中间”操作符对应的。
|
|||
|
|
|
|||
|
|
具体来说,就是在filter操作符的后面,还可以继续添加其他的操作符,比如说map,因为filter本身就是一个“中间”操作符。但是,collect操作符之后,我们无法继续使用map之类的操作,因为collect是一个“终止”操作符,代表Flow数据流的终止。
|
|||
|
|
|
|||
|
|
Flow里面,最常见的终止操作符就是collect。除此之外,还有一些从集合当中“抄”过来的操作符,也是Flow的终止操作符。比如first()、single()、fold{}、reduce{}。
|
|||
|
|
|
|||
|
|
另外,当我们尝试将Flow转换成集合的时候,它本身也就意味着Flow数据流的终止。比如说,我们前面用过的toList:
|
|||
|
|
|
|||
|
|
```plain
|
|||
|
|
// 代码段18
|
|||
|
|
fun main() = runBlocking {
|
|||
|
|
// Flow转List
|
|||
|
|
flowOf(1, 2, 3, 4, 5)
|
|||
|
|
.toList() // 注意这里
|
|||
|
|
.filter { it > 2 }
|
|||
|
|
.map { it * 2 }
|
|||
|
|
.take(2)
|
|||
|
|
.forEach {
|
|||
|
|
println(it)
|
|||
|
|
}
|
|||
|
|
}
|
|||
|
|
|
|||
|
|
```
|
|||
|
|
|
|||
|
|
在上面的代码中,当我们调用了toList()以后,往后所有的操作符,都不再是Flow的API调用了,虽然它们的名字没有变,filter、map,这些都只是集合的API。所以,严格意义上讲,toList也算是一个终止操作符。
|
|||
|
|
|
|||
|
|
## 为什么说Flow是“冷”的?
|
|||
|
|
|
|||
|
|
现在我们就算是把Flow这个API给搞清楚了,但还有一个疑问我们没解决,就是这节课的标题:为什么说Flow是“冷”的?
|
|||
|
|
|
|||
|
|
实际上,如果你理解了上节课Channel为什么是“热”的,那你就一定可以理解Flow为什么是“冷”的。我们可以模仿上节课的Channel代码,写一段Flow的代码,两相对比之下其实马上就能发现它们之间的差异了。
|
|||
|
|
|
|||
|
|
```plain
|
|||
|
|
// 代码段19
|
|||
|
|
|
|||
|
|
fun main() = runBlocking {
|
|||
|
|
// 冷数据流
|
|||
|
|
val flow = flow {
|
|||
|
|
(1..3).forEach {
|
|||
|
|
println("Before send $it")
|
|||
|
|
emit(it)
|
|||
|
|
println("Send $it")
|
|||
|
|
}
|
|||
|
|
}
|
|||
|
|
|
|||
|
|
// 热数据流
|
|||
|
|
val channel = produce<Int>(capacity = 0) {
|
|||
|
|
(1..3).forEach {
|
|||
|
|
println("Before send $it")
|
|||
|
|
send(it)
|
|||
|
|
println("Send $it")
|
|||
|
|
}
|
|||
|
|
}
|
|||
|
|
|
|||
|
|
println("end")
|
|||
|
|
}
|
|||
|
|
|
|||
|
|
/*
|
|||
|
|
输出结果:
|
|||
|
|
end
|
|||
|
|
Before send 1
|
|||
|
|
// Flow 当中的代码并未执行
|
|||
|
|
*/
|
|||
|
|
|
|||
|
|
```
|
|||
|
|
|
|||
|
|
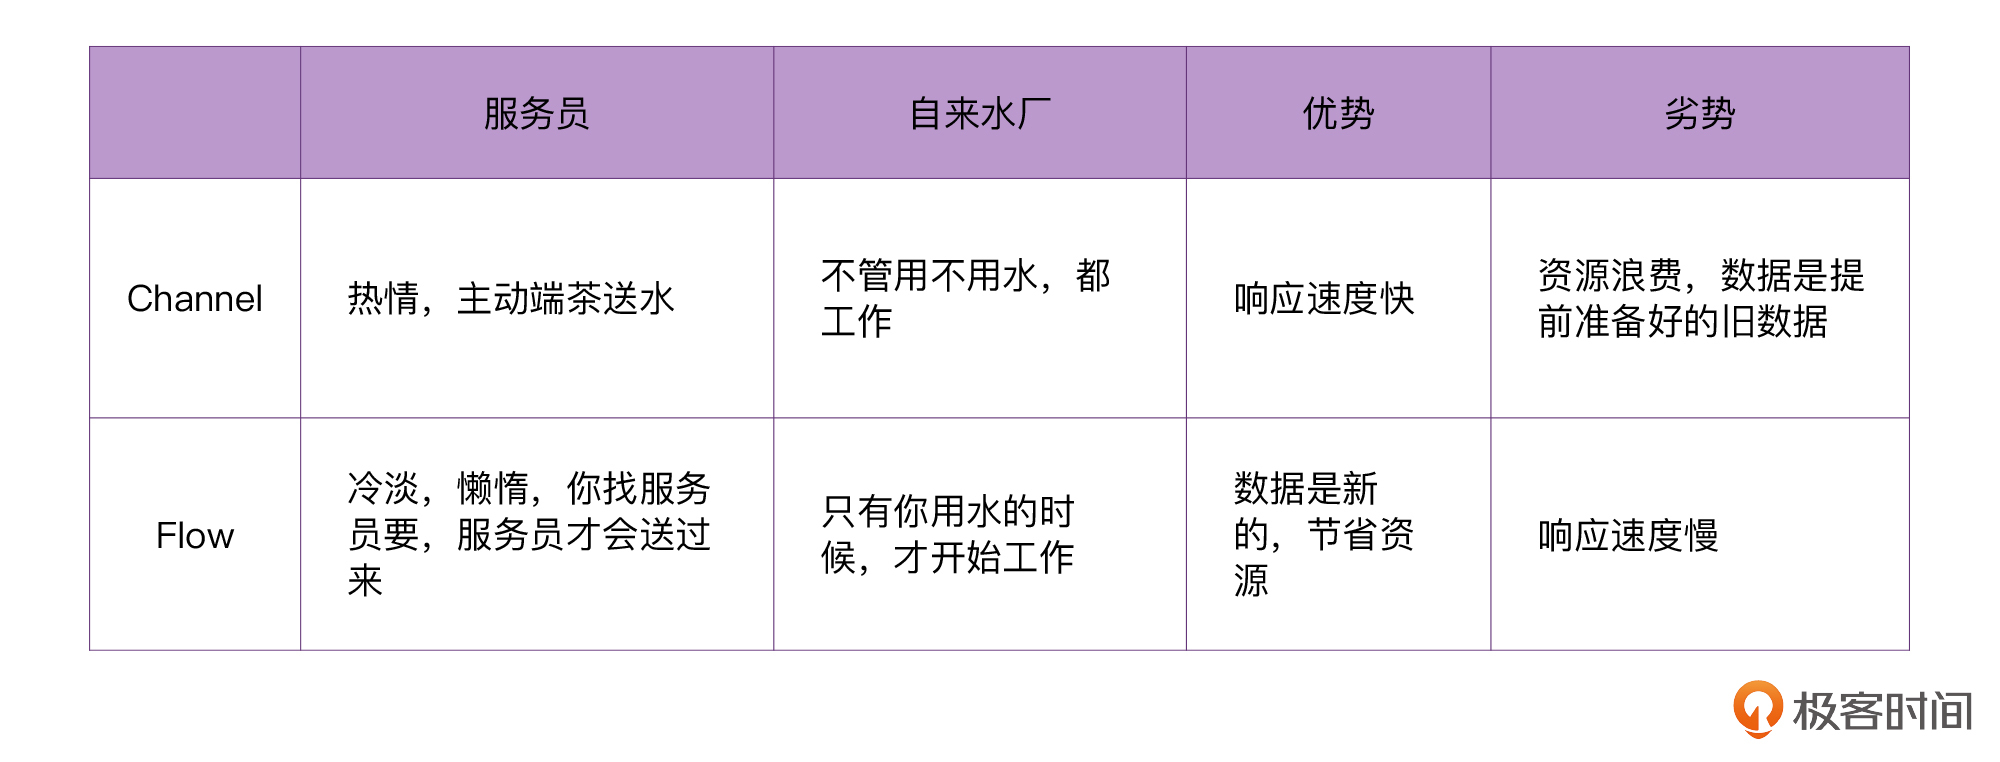
我们知道,Channel之所以被认为是“热”的原因,是因为**不管有没有接收方,发送方都会工作**。那么对应的,Flow被认为是“冷”的原因,就是因为**只有调用终止操作符之后,Flow才会开始工作。**
|
|||
|
|
|
|||
|
|
### Flow 还是“懒”的
|
|||
|
|
|
|||
|
|
其实,如果你去仔细调试过代码段1的话,应该就已经发现了,Flow不仅是“冷”的,它还是“懒”的。为了暴露出它的这个特点,我们稍微改造一下代码段1,然后加一些日志进来。
|
|||
|
|
|
|||
|
|
```plain
|
|||
|
|
// 代码段20
|
|||
|
|
|
|||
|
|
fun main() = runBlocking {
|
|||
|
|
flow {
|
|||
|
|
println("emit: 3")
|
|||
|
|
emit(3)
|
|||
|
|
println("emit: 4")
|
|||
|
|
emit(4)
|
|||
|
|
println("emit: 5")
|
|||
|
|
emit(5)
|
|||
|
|
}.filter {
|
|||
|
|
println("filter: $it")
|
|||
|
|
it > 2
|
|||
|
|
}.map {
|
|||
|
|
println("map: $it")
|
|||
|
|
it * 2
|
|||
|
|
}.collect {
|
|||
|
|
println("collect: $it")
|
|||
|
|
}
|
|||
|
|
}
|
|||
|
|
/*
|
|||
|
|
输出结果:
|
|||
|
|
emit: 3
|
|||
|
|
filter: 3
|
|||
|
|
map: 3
|
|||
|
|
collect: 6
|
|||
|
|
emit: 4
|
|||
|
|
filter: 4
|
|||
|
|
map: 4
|
|||
|
|
collect: 8
|
|||
|
|
emit: 5
|
|||
|
|
filter: 5
|
|||
|
|
map: 5
|
|||
|
|
collect: 10
|
|||
|
|
*/
|
|||
|
|
|
|||
|
|
```
|
|||
|
|
|
|||
|
|
通过上面的运行结果,我们可以发现,Flow一次只会处理一条数据。虽然它也是Flow“冷”的一种表现,但这个特性准确来说是“懒”。
|
|||
|
|
|
|||
|
|
如果你结合上节课“服务员端茶送水”的场景来思考的话,Flow不仅是一个“冷淡”的服务员,还是一个“懒惰”的服务员:明明饭桌上有3个人需要喝水,但服务员偏偏不一次性上3杯水,而是要这3个人,每个人都叫服务员一次,服务员才会一杯一杯地送3杯水过来。
|
|||
|
|
|
|||
|
|
对比Channel的思维模型来看的话:
|
|||
|
|
|
|||
|
|
|
|||
|
|
|
|||
|
|
> 提示:Flow默认情况下是“懒惰”的,但也可以通过配置让它“勤快”起来。
|
|||
|
|
|
|||
|
|
## 思考与实战
|
|||
|
|
|
|||
|
|
我们都知道,Flow非常适合复杂的异步任务场景。借助它的flowOn、launchIn,我们可以写出非常灵活的代码。比如说,在Android、Swing之类的UI平台之上,我们可以这样写:
|
|||
|
|
|
|||
|
|
```plain
|
|||
|
|
// 代码段21
|
|||
|
|
|
|||
|
|
fun main() = runBlocking {
|
|||
|
|
fun loadData() = flow {
|
|||
|
|
repeat(3){
|
|||
|
|
delay(100L)
|
|||
|
|
emit(it)
|
|||
|
|
logX("emit $it")
|
|||
|
|
}
|
|||
|
|
}
|
|||
|
|
|
|||
|
|
// 模拟Android、Swing的UI
|
|||
|
|
val uiScope = CoroutineScope(mySingleDispatcher)
|
|||
|
|
|
|||
|
|
loadData()
|
|||
|
|
.map { it * 2 }
|
|||
|
|
.flowOn(Dispatchers.IO) // 1,耗时任务
|
|||
|
|
.onEach {
|
|||
|
|
logX("onEach $it")
|
|||
|
|
}
|
|||
|
|
.launchIn(uiScope) // 2,UI任务
|
|||
|
|
|
|||
|
|
delay(1000L)
|
|||
|
|
}
|
|||
|
|
|
|||
|
|
```
|
|||
|
|
|
|||
|
|
这段代码很容易理解,我们让耗时任务在IO线程池执行,更新UI则在UI线程。
|
|||
|
|
|
|||
|
|
如果结合我们前面学过的Flow操作符,我们还可以设计出更加有意思的代码:
|
|||
|
|
|
|||
|
|
```plain
|
|||
|
|
// 代码段22
|
|||
|
|
|
|||
|
|
fun main() = runBlocking {
|
|||
|
|
fun loadData() = flow {
|
|||
|
|
repeat(3) {
|
|||
|
|
delay(100L)
|
|||
|
|
emit(it)
|
|||
|
|
logX("emit $it")
|
|||
|
|
}
|
|||
|
|
}
|
|||
|
|
fun updateUI(it: Int) {}
|
|||
|
|
fun showLoading() { println("Show loading") }
|
|||
|
|
fun hideLoading() { println("Hide loading") }
|
|||
|
|
|
|||
|
|
val uiScope = CoroutineScope(mySingleDispatcher)
|
|||
|
|
|
|||
|
|
loadData()
|
|||
|
|
.onStart { showLoading() } // 显示加载弹窗
|
|||
|
|
.map { it * 2 }
|
|||
|
|
.flowOn(Dispatchers.IO)
|
|||
|
|
.catch { throwable ->
|
|||
|
|
println(throwable)
|
|||
|
|
hideLoading() // 隐藏加载弹窗
|
|||
|
|
emit(-1) // 发生异常以后,指定默认值
|
|||
|
|
}
|
|||
|
|
.onEach { updateUI(it) } // 更新UI界面
|
|||
|
|
.onCompletion { hideLoading() } // 隐藏加载弹窗
|
|||
|
|
.launchIn(uiScope)
|
|||
|
|
|
|||
|
|
delay(10000L)
|
|||
|
|
}
|
|||
|
|
|
|||
|
|
```
|
|||
|
|
|
|||
|
|
在以上代码中,我们通过监听onStart、onCompletion的回调事件,就可以实现Loading弹窗的显示和隐藏。而对于出现异常的情况,我们也可以在catch{} 当中调用emit(),给出一个默认值,这样就可以有效防止UI界面出现空白。
|
|||
|
|
|
|||
|
|
不得不说,以上代码的可读性是非常好的。
|
|||
|
|
|
|||
|
|
## 小结
|
|||
|
|
|
|||
|
|
这节课的内容到这里就差不多结束了,我们来做一个简单的总结。
|
|||
|
|
|
|||
|
|
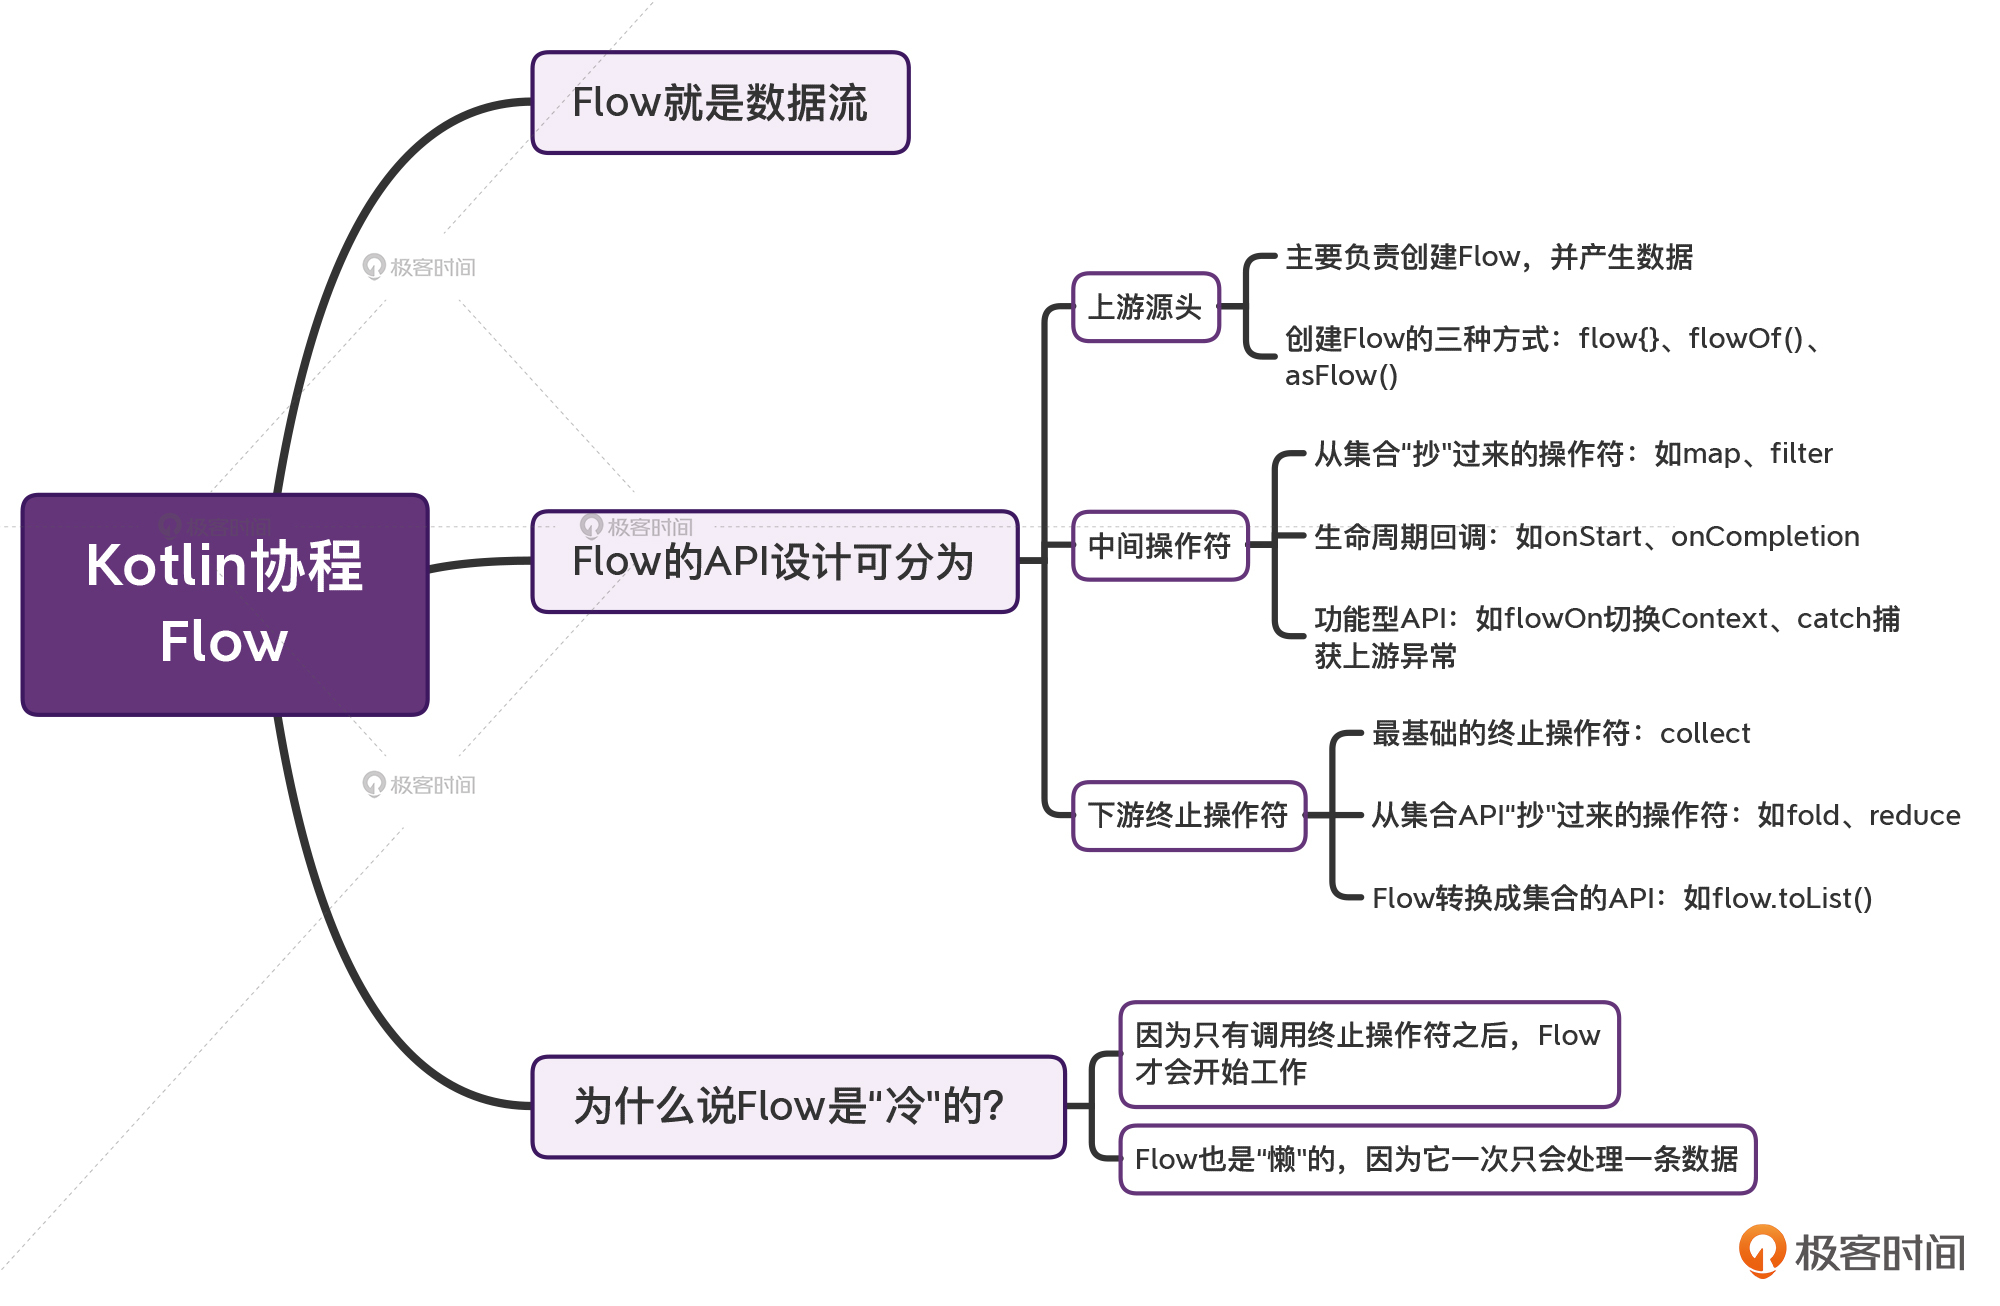
* Flow,就是**数据流**。整个Flow的API设计,可以大致分为三个部分,上游的源头、中间操作符、下游终止操作符。
|
|||
|
|
* 对于**上游源头**来说,它主要负责:创建Flow,并且产生数据。而创建Flow,主要有三种方式:flow{}、flowOf()、asFlow()。
|
|||
|
|
* 对于**中间操作符**来说,它也分为几大类。第一类是从集合“抄”过来的操作符,比如map、filter;第二类是生命周期回调,比如onStart、onCompletion;第三类是功能型API,比如说flowOn切换Context、catch捕获上游的异常。
|
|||
|
|
* 对于**下游的终止操作符**,也是分为三大类。首先,就是collect这个最基础的终止操作符;其次,就是从集合API“抄”过来的操作符,比如fold、reduce;最后,就是Flow转换成集合的API,比如说flow.toList()。
|
|||
|
|
|
|||
|
|
你也要清楚为什么我们说“Flow是冷的”的原因,以及它对比Channel的优势和劣势。另外在课程里,我们还探索了Flow在Android里的实际应用场景,当我们将Flow与它的操作符灵活组合到一起的时候,就可以设计出可读性非常好的代码。
|
|||
|
|
|
|||
|
|
|
|||
|
|
|
|||
|
|
其实,Flow本身就是一个非常大的话题,能讲的知识点实在太多了。但考虑到咱们课程学习需要循序渐进,现阶段我只是从中挑选一些最重要、最关键的知识点来讲。更多Flow的高阶用法,等我们学完协程篇、源码篇之后,我会再考虑增加一些更高阶的内容进来。
|
|||
|
|
|
|||
|
|
## 思考题
|
|||
|
|
|
|||
|
|
前面我曾提到过,Flow当中直接使用withContext{},是很容易出现问题的,下面代码是其中的一种。请问你能解释其中的缘由吗?Kotlin官方为什么要这么设计?
|
|||
|
|
|
|||
|
|
```plain
|
|||
|
|
// 代码段23
|
|||
|
|
|
|||
|
|
fun main() = runBlocking {
|
|||
|
|
flow {
|
|||
|
|
withContext(Dispatchers.IO) {
|
|||
|
|
emit(1)
|
|||
|
|
}
|
|||
|
|
}.map { it * 2 }
|
|||
|
|
.collect()
|
|||
|
|
}
|
|||
|
|
|
|||
|
|
/*
|
|||
|
|
输出结果
|
|||
|
|
IllegalStateException: Flow invariant is violated
|
|||
|
|
*/
|
|||
|
|
|
|||
|
|
```
|
|||
|
|
|
|||
|
|
这个问题的答案,我会在第32讲介绍Flow源码的时候给出详细的解释。
|
|||
|
|
|