494 lines
22 KiB
Markdown
494 lines
22 KiB
Markdown
|
|
# 14 | 如何启动协程?
|
|||
|
|
|
|||
|
|
你好,我是朱涛。
|
|||
|
|
|
|||
|
|
从今天开始,咱们正式进入协程API的学习,一起来攻克Kotlin当中最关键的部分。这节课呢,我会给你介绍下如何启动协程,主要包括协程的调试技巧、启动协程的三种方式。这些都是学习协程最基本的概念,也是后续学习更多高阶概念的基础。
|
|||
|
|
|
|||
|
|
注意,在这节课当中,我会使用协程API编写大量的案例。我也希望你能够打开IDE,跟着我一起来运行对应的代码。通过这样的方式,你一定会有更多的收获。
|
|||
|
|
|
|||
|
|
好,接下来,让我们直接开始学习吧!
|
|||
|
|
|
|||
|
|
## 协程调试
|
|||
|
|
|
|||
|
|
想要学好Kotlin协程,掌握它的调试技巧很重要。一般来说,我们可以通过两种手段来进行调试:设置VM参数、断点调试。
|
|||
|
|
|
|||
|
|
### 协程VM参数
|
|||
|
|
|
|||
|
|
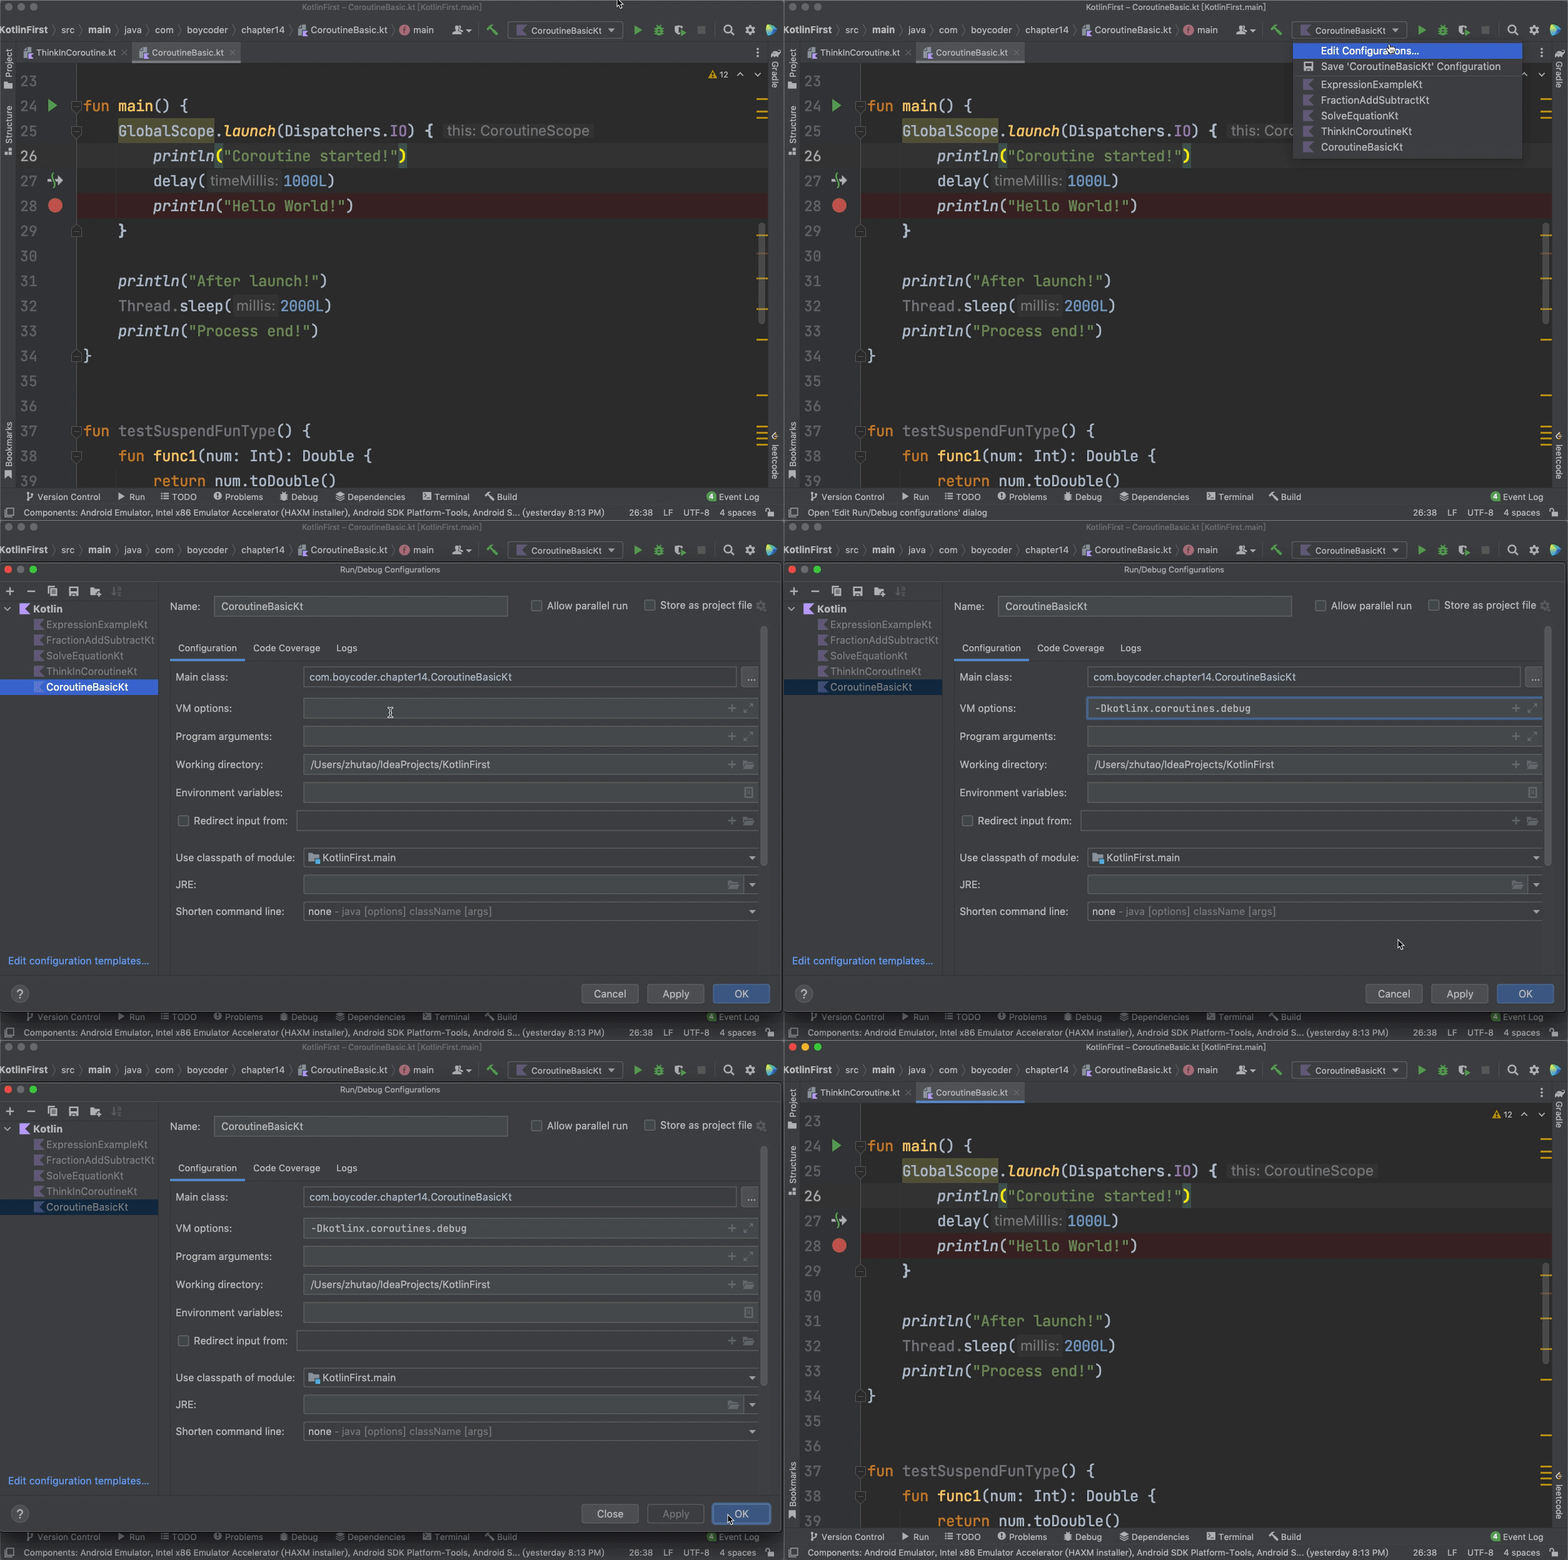
我们先来看第一种。具体的做法呢,其实很简单,我们只需要将VM参数设置成“-Dkotlinx.coroutines.debug”。
|
|||
|
|
|
|||
|
|
|
|||
|
|
|
|||
|
|
完成这个设置后,当我们在log当中打印“Thread.currentThread().name”的时候,如果当前代码是运行在协程当中的,那么它就会带上协程的相关信息。具体我们可以看个代码的例子:
|
|||
|
|
|
|||
|
|
```plain
|
|||
|
|
// 不必关心代码逻辑,关心输出结果即可
|
|||
|
|
fun main() {
|
|||
|
|
GlobalScope.launch(Dispatchers.IO) {
|
|||
|
|
println("Coroutine started:${Thread.currentThread().name}")
|
|||
|
|
delay(1000L)
|
|||
|
|
println("Hello World!")
|
|||
|
|
}
|
|||
|
|
|
|||
|
|
println("After launch:${Thread.currentThread().name}")
|
|||
|
|
Thread.sleep(2000L)
|
|||
|
|
}
|
|||
|
|
|
|||
|
|
/*
|
|||
|
|
输出结果:
|
|||
|
|
After launch:main
|
|||
|
|
Coroutine started:DefaultDispatcher-worker-1 @coroutine#1
|
|||
|
|
*/
|
|||
|
|
|
|||
|
|
```
|
|||
|
|
|
|||
|
|
可以看到,当代码处于协程当中的时候,“Thread.currentThread().name”是会带上协程相关的信息的,这里的“@coroutine#1”就代表了launch创建的协程。
|
|||
|
|
|
|||
|
|
### 断点调试协程
|
|||
|
|
|
|||
|
|
除了设置VM参数之外,我们还可以直接使用IDE的调试功能,直接以**打断点**的形式来调试协程。具体来说,主要有这样几个注意事项。
|
|||
|
|
|
|||
|
|
第一步,将IntelliJ升级到最新版本,目前我使用的版本是2021.3.2版本。
|
|||
|
|
|
|||
|
|
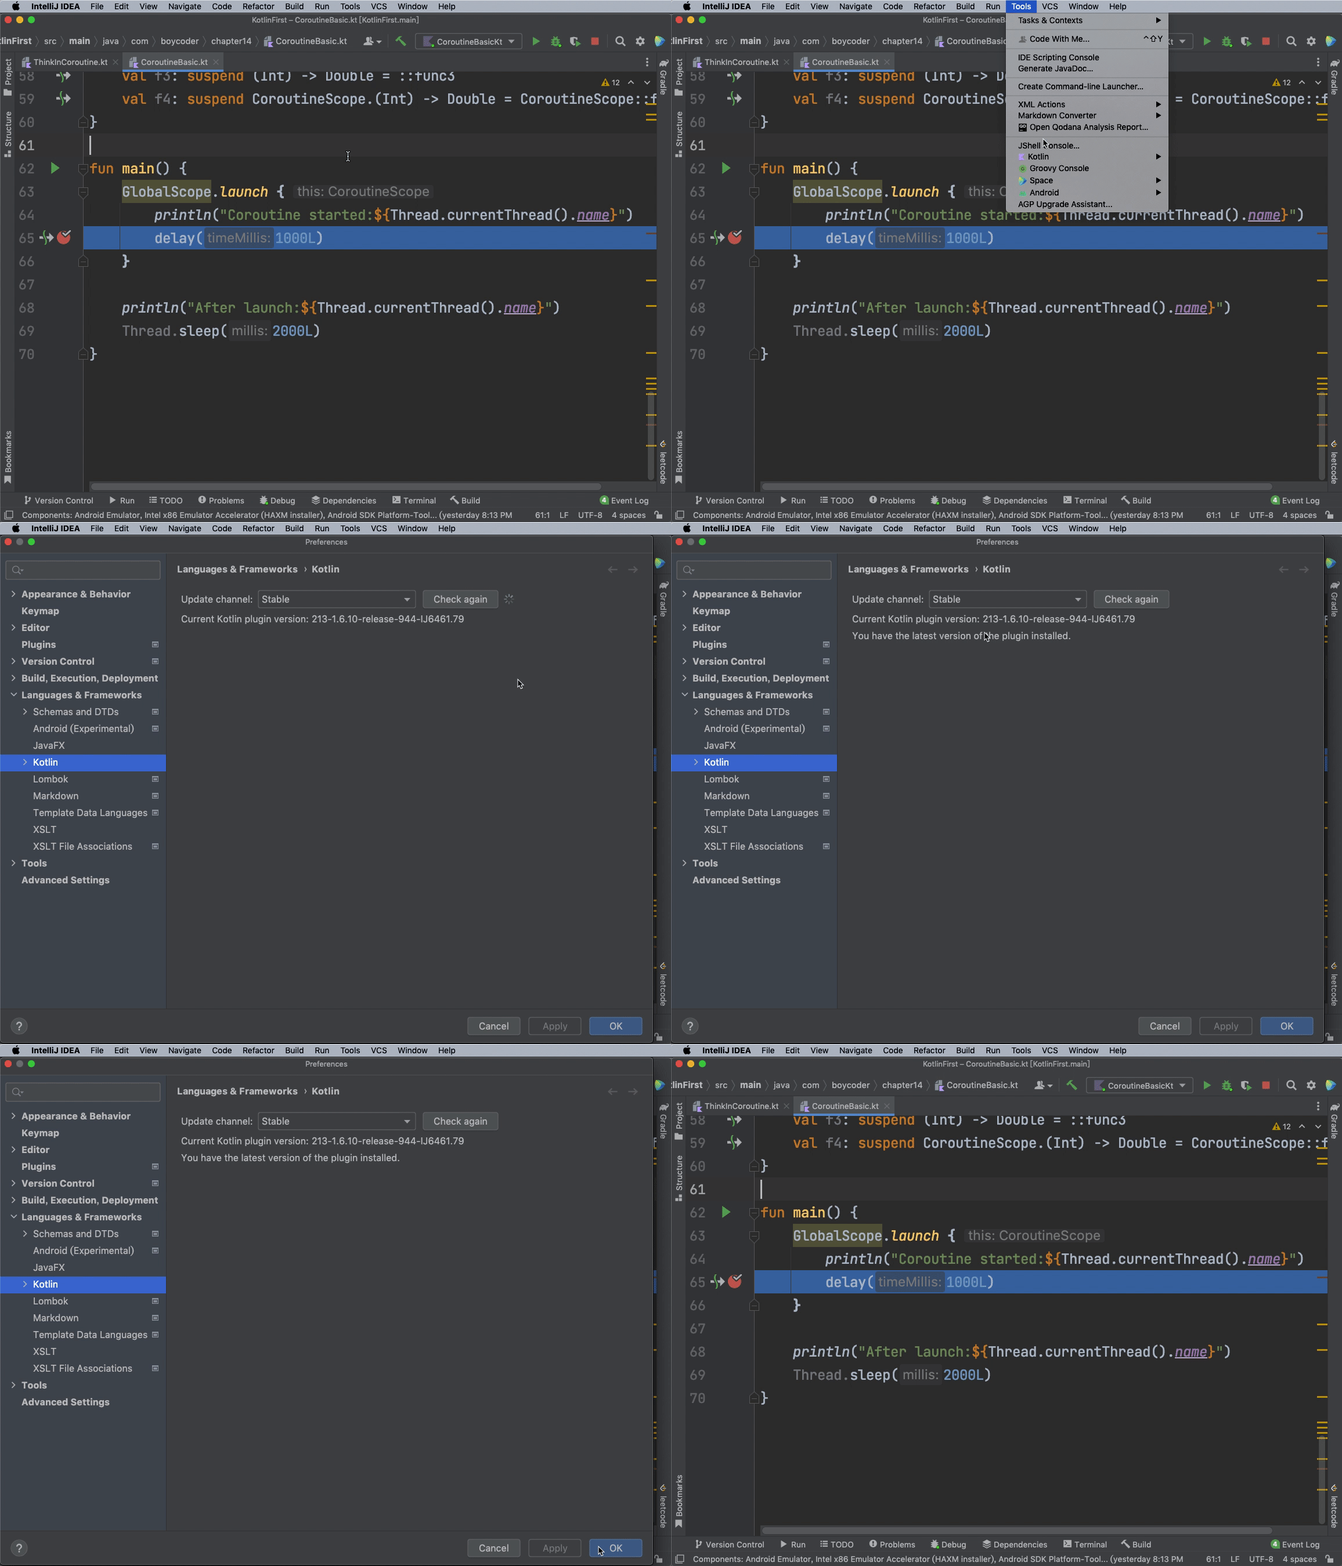
第二步,确保IDE自带的Kotlin编译器插件版本号大于1.4,目前我使用的是1.6.10。具体做法你可以参考下面的动图:
|
|||
|
|
|
|||
|
|
|
|||
|
|
|
|||
|
|
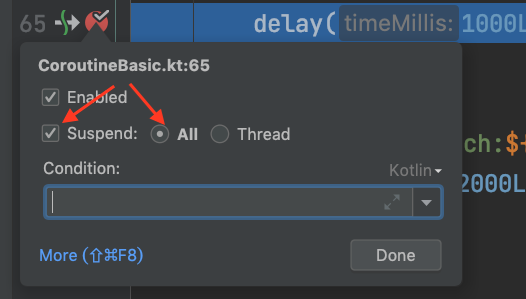
第三步,为协程代码打断点,并且右击断点处,勾选suspend、All,这代表了我们的断点将会对协程生效。具体可以参考我下面的截图:
|
|||
|
|
|
|||
|
|
|
|||
|
|
|
|||
|
|
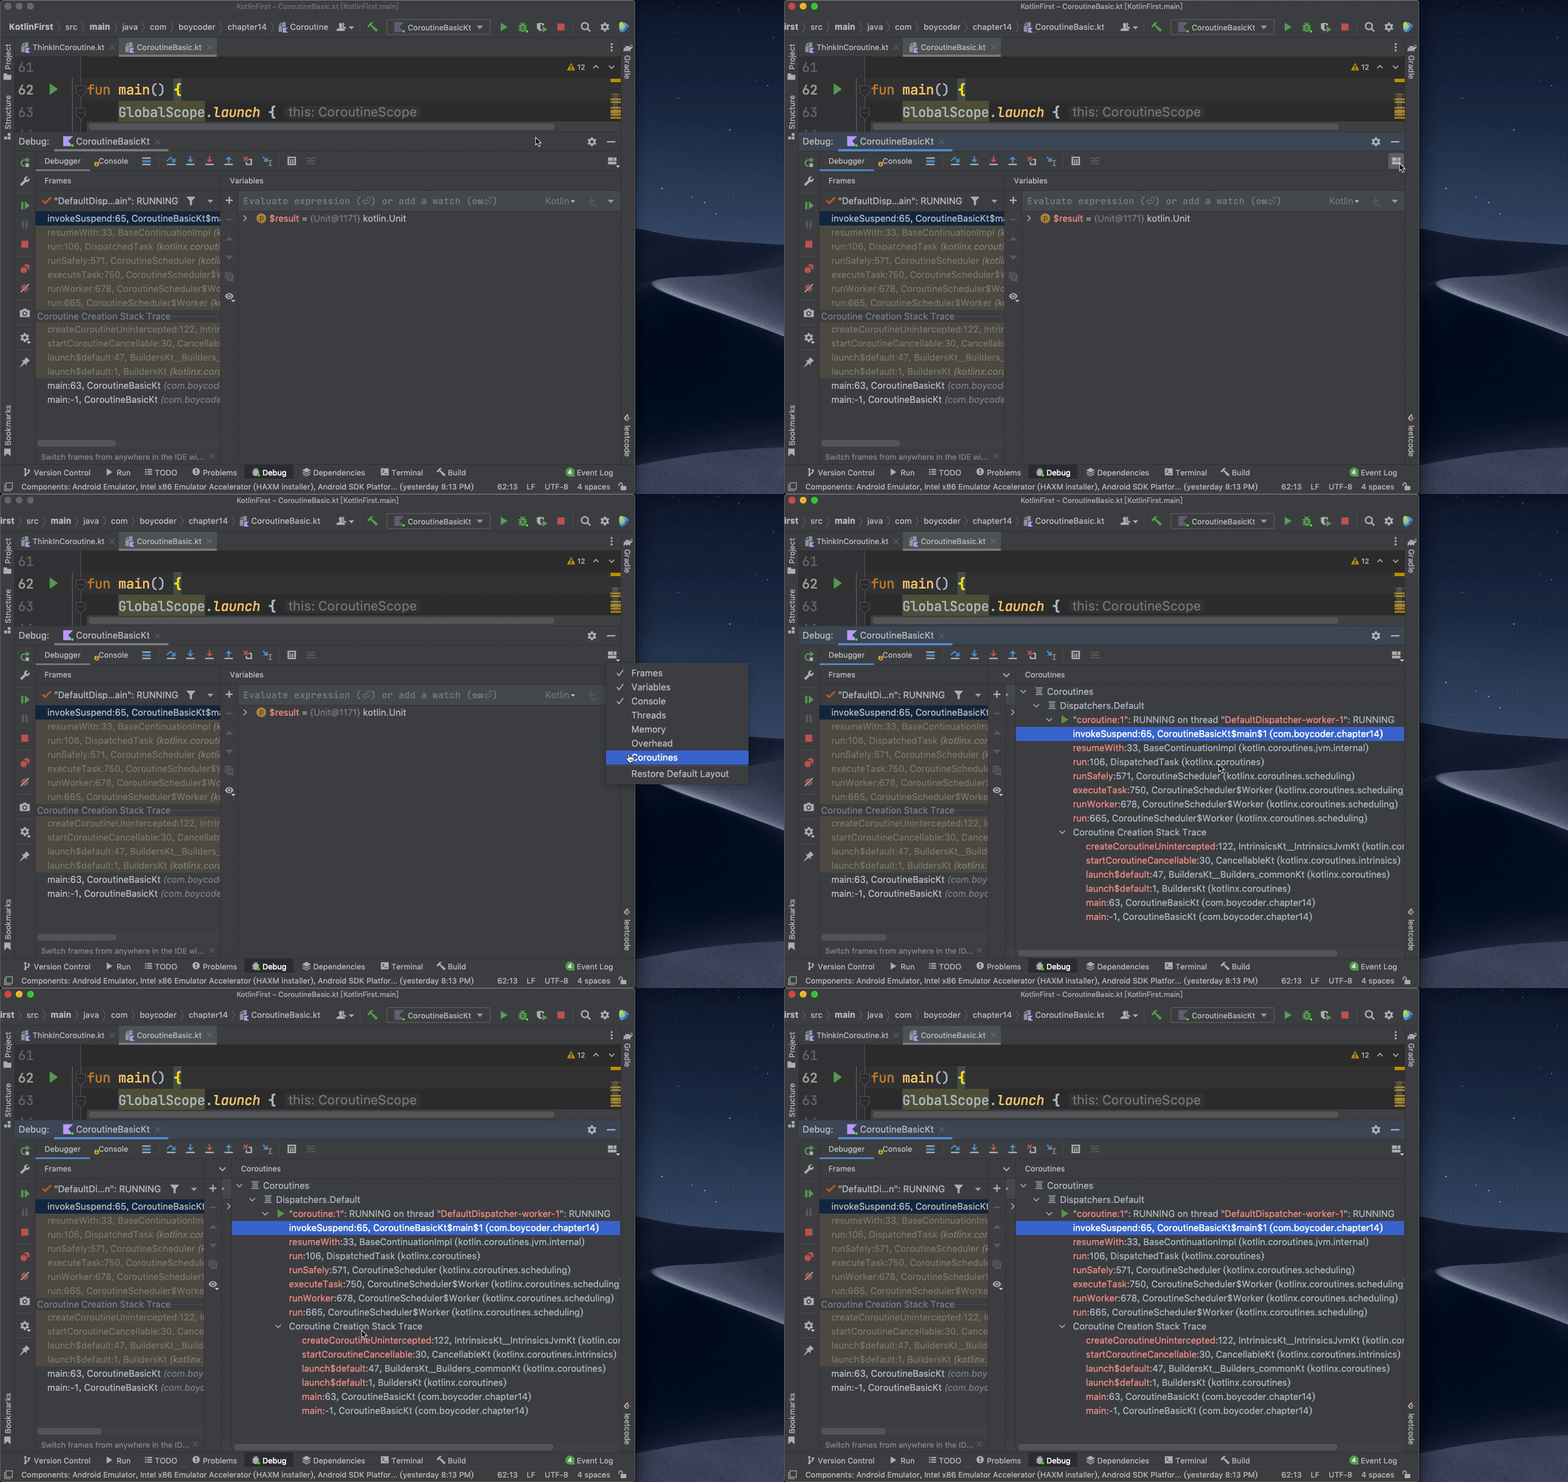
第四步,直接进行调试,当程序停留到断点处以后,我们就需要确保协程调试窗口已经被开启了。具体可以参考这个动图:
|
|||
|
|
|
|||
|
|
|
|||
|
|
|
|||
|
|
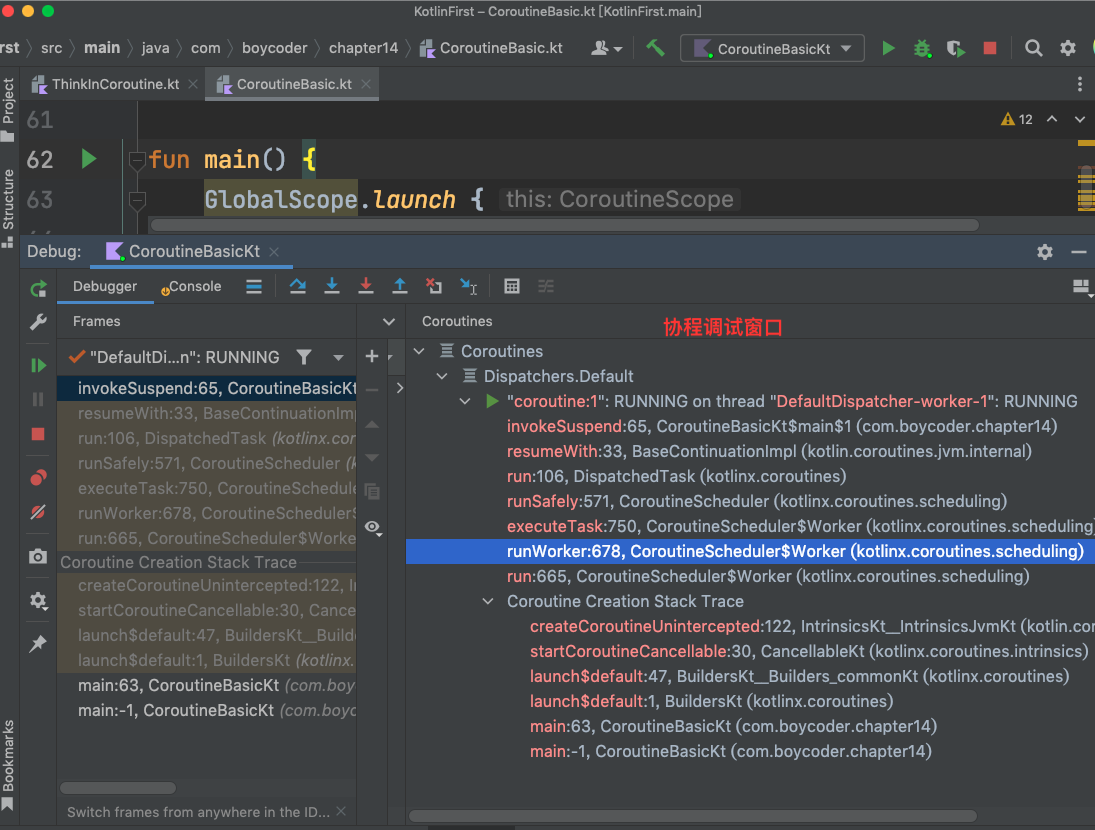
让我们来单独看看最后出现的那个协程调试窗口:
|
|||
|
|
|
|||
|
|
|
|||
|
|
|
|||
|
|
在这个专属的协程调试窗口当中,我们可以看到很多有用的协程信息,包括:
|
|||
|
|
|
|||
|
|
* 当前协程的名字,这里是“coroutine#1”;
|
|||
|
|
* 当前协程运行在哪个线程之上,这里是“DefaultDispatcher-worker-1”;
|
|||
|
|
* 当前协程的运行状态,这里是“RUNNING”;
|
|||
|
|
* 当前协程的“创建调用栈”。
|
|||
|
|
|
|||
|
|
通过调试,我们可以真真切切地看到,我们用launch创建了一个协程,“coroutine#1”,这个协程是运行在“DefaultDispatcher-worker-1”这个线程之上的。而通过这样调试的手段,我们也进一步验证了上节课提到的协程思维模型。
|
|||
|
|
|
|||
|
|
接下来,我们就一起来学习启动协程的三种方式。
|
|||
|
|
|
|||
|
|
## launch启动协程
|
|||
|
|
|
|||
|
|
上节课我们讲到协程思维模型的时候,其实是把协程想象成了**更加轻量的线程**。线程的启动方式我们都知道,也就是new Thread()、或者是thread{}。那么,如何才能启动一个真正的协程呢?如果你之前看过一些协程的教程,一定见过类似这样的代码:
|
|||
|
|
|
|||
|
|
```plain
|
|||
|
|
/* delay 函数的定义
|
|||
|
|
注意这个关键字
|
|||
|
|
↓ */
|
|||
|
|
public suspend fun delay(timeMillis: Long) { ... }
|
|||
|
|
|
|||
|
|
// 仅用于研究,生产环境不建议使用GlobalScope
|
|||
|
|
fun main() {
|
|||
|
|
// ①
|
|||
|
|
GlobalScope.launch {
|
|||
|
|
// ②
|
|||
|
|
delay(1000L)
|
|||
|
|
println("Hello World!")
|
|||
|
|
}
|
|||
|
|
|
|||
|
|
// ③
|
|||
|
|
Thread.sleep(2000L)
|
|||
|
|
}
|
|||
|
|
|
|||
|
|
/*
|
|||
|
|
输出结果;
|
|||
|
|
Hello World!
|
|||
|
|
*/
|
|||
|
|
|
|||
|
|
```
|
|||
|
|
|
|||
|
|
这段代码的逻辑很简单,核心代码只有三行,我已经用注释标记了,我们一个个看。
|
|||
|
|
|
|||
|
|
注释①,GlobalScope.launch{},它是一个高阶函数,它的作用就是启动一个协程。GlobalScope是Kotlin官方为我们提供的“协程作用域”,这涉及到协程的“结构化并发”理念,我们会在后面的第16、17讲里解释。
|
|||
|
|
|
|||
|
|
注释②,delay(),它的作用就是字面上的意思,“延迟”。以上代码中,我们是延迟了1秒。从delay()的函数签名这里可以发现,它的定义跟普通的函数不太一样,它多了一个“suspend”关键字,这代表了它是一个**挂起函数**。而这也就意味着,delay将会拥有“**挂起和恢复**”的能力。
|
|||
|
|
|
|||
|
|
在上节课我们提到过,delay()是**非阻塞**,那现在我们应该就终于明白了,既然它拥有“挂起和恢复”的能力,那么它肯定能实现非阻塞(如果你无法理解这句话,一定要回过头去看上节课的思维模型)。关于挂起函数的更多知识点,我们会在下节课介绍。
|
|||
|
|
|
|||
|
|
注释③,它的作用是让当前线程休眠2秒钟。
|
|||
|
|
|
|||
|
|
我们暂时先将注意力放在注释③这行代码上,很多协程的初学者都会很好奇,为什么上面的代码当中需要一个Thread.sleep(2000L)呢?它的作用是什么?
|
|||
|
|
|
|||
|
|
现在我们把它删掉,看看到底会发生什么。
|
|||
|
|
|
|||
|
|
```plain
|
|||
|
|
fun main() {
|
|||
|
|
GlobalScope.launch {
|
|||
|
|
delay(1000L)
|
|||
|
|
println("Hello World!")
|
|||
|
|
}
|
|||
|
|
}
|
|||
|
|
|
|||
|
|
/*
|
|||
|
|
输出结果;
|
|||
|
|
无
|
|||
|
|
*/
|
|||
|
|
|
|||
|
|
```
|
|||
|
|
|
|||
|
|
很奇怪,当我们删掉线程休眠的代码以后,协程代码就无法正常工作了。这是为什么?为了弄清楚这个问题,其实,我们可以做一个类比,暂时先将协程代码改成线程代码。
|
|||
|
|
|
|||
|
|
```plain
|
|||
|
|
fun main() {
|
|||
|
|
// 守护线程
|
|||
|
|
// ↓
|
|||
|
|
thread(isDaemon = true) {
|
|||
|
|
Thread.sleep(1000L)
|
|||
|
|
println("Hello World!")
|
|||
|
|
}
|
|||
|
|
}
|
|||
|
|
|
|||
|
|
/*
|
|||
|
|
输出结果;
|
|||
|
|
无
|
|||
|
|
*/
|
|||
|
|
|
|||
|
|
```
|
|||
|
|
|
|||
|
|
可以看到,当我们将代码改为线程以后,程序仍然没有输出任何结果。而这里,我们创建的Thread其实是一个“守护线程”。守护线程,就意味着当主线程结束的时候,它也会跟着被销毁。所以这样,相信你应该就能明白了,我们前面用GlobalScope创建的协程之所以不会正常运行,也是因为类似的原因。
|
|||
|
|
|
|||
|
|
那么,为了让问题能够更明确地暴露出来,我们可以为之前的代码增加一些日志。
|
|||
|
|
|
|||
|
|
```plain
|
|||
|
|
fun main() {
|
|||
|
|
GlobalScope.launch {
|
|||
|
|
println("Coroutine started!")
|
|||
|
|
|
|||
|
|
delay(1000L)
|
|||
|
|
println("Hello World!")
|
|||
|
|
}
|
|||
|
|
|
|||
|
|
println("Process end!")
|
|||
|
|
}
|
|||
|
|
/*
|
|||
|
|
输出结果;
|
|||
|
|
Process end!
|
|||
|
|
*/
|
|||
|
|
|
|||
|
|
```
|
|||
|
|
|
|||
|
|
根据输出结果,我们可以推测出:**通过launch创建的协程还没来得及开始执行,整个程序就已经结束了**。相应的,我们也就能推测出,之前案例中Thread.sleep(2000)的作用了,其实,它就是为了不让我们的主线程退出。
|
|||
|
|
|
|||
|
|
这里,你还会发现一个协程代码特殊的行为模式,那就是:**它的代码不是按照顺序执行的**。为了让这一点更加明显,我们再增加一些日志:
|
|||
|
|
|
|||
|
|
```plain
|
|||
|
|
fun main() {
|
|||
|
|
GlobalScope.launch { // 1
|
|||
|
|
println("Coroutine started!") // 2
|
|||
|
|
delay(1000L) // 3
|
|||
|
|
println("Hello World!") // 4
|
|||
|
|
}
|
|||
|
|
|
|||
|
|
println("After launch!") // 5
|
|||
|
|
Thread.sleep(2000L) // 6
|
|||
|
|
println("Process end!") // 7
|
|||
|
|
}
|
|||
|
|
|
|||
|
|
/*
|
|||
|
|
输出结果:
|
|||
|
|
After launch!
|
|||
|
|
Coroutine started!
|
|||
|
|
Hello World!
|
|||
|
|
Process end!
|
|||
|
|
*/
|
|||
|
|
|
|||
|
|
```
|
|||
|
|
|
|||
|
|
根据这个程序运行结果,我们发现,以上的协程代码运行顺序是1、5、6、2、3、4、7。也就是说,launch并不会阻塞线程的执行,甚至,我们可以认为launch()当中Lambda一定就是在函数调用之后才执行的。当然,在特殊情况下,这种行为模式也是可以打破的,这一点我们会在第17讲中详细探讨。
|
|||
|
|
|
|||
|
|
那么,如果你足够细心,你会发现,我们通过launch启动一个协程以后,并没有让协程为我们返回一个执行结果,这其实就是典型的 [Fire-and-forget](https://en.wikipedia.org/wiki/Fire-and-forget) 的应用场景。打个比方,launch一个协程任务,就像猎人射箭一样。
|
|||
|
|
|
|||
|
|

|
|||
|
|
|
|||
|
|
launch和射箭,有几个共同点:
|
|||
|
|
|
|||
|
|
* 箭一旦射出去了,目标就无法再被改变;协程一旦被launch,那么它当中执行的任务也不会被中途改变。
|
|||
|
|
* 箭如果命中了猎物,猎物也不会自动送到我们手上来;launch的协程任务一旦完成了,即使有了结果,也没办法直接返回给调用方。
|
|||
|
|
|
|||
|
|
那么,**launch为什么无法将结果返回给调用方呢?**如果你去看launch函数的源代码,你就会发现,这个函数的返回值是一个Job,它其实代表的是协程的[句柄](https://en.wikipedia.org/wiki/Handle_(computing))(Handle),它并不能为我们返回协程的执行结果。
|
|||
|
|
|
|||
|
|
```plain
|
|||
|
|
public fun CoroutineScope.launch(
|
|||
|
|
context: CoroutineContext = EmptyCoroutineContext,
|
|||
|
|
start: CoroutineStart = CoroutineStart.DEFAULT,
|
|||
|
|
block: suspend CoroutineScope.() -> Unit
|
|||
|
|
): Job { ... }
|
|||
|
|
|
|||
|
|
```
|
|||
|
|
|
|||
|
|
不过,从launch的函数签名这里,我们还是可以得到很多有用的信息的,我们一个个看。
|
|||
|
|
|
|||
|
|
首先是 **CoroutineScope.launch()**,代表了launch其实是一个扩展函数,而它的“扩展接收者类型”是CoroutineScope。这就意味着,我们的launch()会等价于CoroutineScope的成员方法。而如果我们要调用launch()来启动协程,就必须要先拿到CoroutineScope的对象。前面的案例,我们使用的GlobalScope,其实就是Kotlin官方为我们提供的一个CoroutineScope对象,方便我们开发者直接启动协程。
|
|||
|
|
|
|||
|
|
接着是第一个参数:**CoroutineContext**,它代表了我们协程的上下文,它的默认值是EmptyCoroutineContext,如果我们不传这个参数,默认就会使用EmptyCoroutineContext。一般来说,我们也可以传入Kotlin官方为我们提供的Dispatchers,来指定协程运行的线程池。协程上下文,是协程当中非常关键的元素,具体细节我会在17节课的时候再探讨。
|
|||
|
|
|
|||
|
|
然后是第二个参数:**CoroutineStart**,它代表了协程的启动模式。如果我们不传这个参数,它会默认使用CoroutineStart.DEFAULT。CoroutineStart其实是一个枚举类,一共有:DEFAULT、LAZY、ATOMIC、UNDISPATCHED。我们最常使用的就是DEFAULT、LAZY,它们分别代表:立即执行、懒加载执行。
|
|||
|
|
|
|||
|
|
最后一个参数,是一个函数类型的block,它的类型是“**suspend CoroutineScope.() -> Unit**”。这个类型看起来有点复杂,不过不要担心,我们可以一步步来推理,让我们先以“(Int) -> Double”这个函数类型开始:
|
|||
|
|
|
|||
|
|
```plain
|
|||
|
|
fun func1(num: Int): Double {
|
|||
|
|
return num.toDouble()
|
|||
|
|
}
|
|||
|
|
|
|||
|
|
val f1: (Int) -> Double = ::func1
|
|||
|
|
|
|||
|
|
```
|
|||
|
|
|
|||
|
|
上面的代码很好理解,“(Int) -> Double”代表了参数类型是Int,返回值类型是Double的函数,::func1这里,我们使用了**函数引用**的语法。接下来,我们再来看看“CoroutineScope.(Int) -> Double”意味着什么:
|
|||
|
|
|
|||
|
|
```plain
|
|||
|
|
fun CoroutineScope.func2(num: Int): Double {
|
|||
|
|
return num.toDouble()
|
|||
|
|
}
|
|||
|
|
|
|||
|
|
val f2: CoroutineScope.(Int) -> Double = CoroutineScope::func2
|
|||
|
|
|
|||
|
|
```
|
|||
|
|
|
|||
|
|
很明显,当我们在函数类型前面增加了一个接收者类型后,它的含义就变成了:这个函数应该是CoroutineScope类的**成员方法**或是**扩展方法**,并且,它的参数类型必须是Int,返回值类型必须是Double。
|
|||
|
|
|
|||
|
|
那么,“suspend (Int) -> Double”这个类型代表了什么呢?我们来看个例子:
|
|||
|
|
|
|||
|
|
```plain
|
|||
|
|
suspend fun func3(num: Int): Double {
|
|||
|
|
delay(100L)
|
|||
|
|
return num.toDouble()
|
|||
|
|
}
|
|||
|
|
|
|||
|
|
val f3: suspend (Int) -> Double = ::func3
|
|||
|
|
|
|||
|
|
```
|
|||
|
|
|
|||
|
|
有了前面的基础,相信你很容易就能理解了,“suspend (Int) -> Double”,其实就代表了一个“挂起函数”,同时它的参数类型是Int,返回值类型是Double。
|
|||
|
|
|
|||
|
|
到这里,我们还可以再做一次推理,请看下面的代码:
|
|||
|
|
|
|||
|
|
```plain
|
|||
|
|
suspend fun CoroutineScope.func4(num: Int): Double {
|
|||
|
|
delay(100L)
|
|||
|
|
return num.toDouble()
|
|||
|
|
}
|
|||
|
|
|
|||
|
|
val f4: suspend CoroutineScope.(Int) -> Double = CoroutineScope::func4
|
|||
|
|
|
|||
|
|
```
|
|||
|
|
|
|||
|
|
这时候,对于“suspend CoroutineScope.(Int) -> Double”这个函数类型,你应该也能轻松解释了。首先,它应该是一个“挂起函数”,同时,它还应该是CoroutineScope类的成员方法或是扩展方法,并且,它的参数类型必须是Int,返回值类型必须是Double。
|
|||
|
|
|
|||
|
|
那么现在,我们回过头再来看看launch()函数的第三个参数“suspend CoroutineScope.() -> Unit”,其实就能轻松分析出它的类型了。所以,当我们遇到复杂的函数类型的时候,一定不能害怕,只要我们一步步来拆解、推理,就一定能分析清楚了。
|
|||
|
|
|
|||
|
|
到这里,我们就弄清楚launch的作用了。我们通过调用launch()可以创建一个新的协程。那么,除了launch以外,还有其他办法启动协程吗?有的,那就是runBlocking。
|
|||
|
|
|
|||
|
|
## runBlocking启动协程
|
|||
|
|
|
|||
|
|
runBlocking跟我们前面学的launch的行为模式不太一样,通过它的名字,我们就可以看出来,它是存在某种阻塞行为的。让我们将前面launch的代码直接改为runBlocking,看看运行结果是否有差异。
|
|||
|
|
|
|||
|
|
```plain
|
|||
|
|
fun main() {
|
|||
|
|
runBlocking { // 1
|
|||
|
|
println("Coroutine started!") // 2
|
|||
|
|
delay(1000L) // 3
|
|||
|
|
println("Hello World!") // 4
|
|||
|
|
}
|
|||
|
|
|
|||
|
|
println("After launch!") // 5
|
|||
|
|
Thread.sleep(2000L) // 6
|
|||
|
|
println("Process end!") // 7
|
|||
|
|
}
|
|||
|
|
|
|||
|
|
/*
|
|||
|
|
输出结果:
|
|||
|
|
Coroutine started!
|
|||
|
|
Hello World!
|
|||
|
|
After launch!
|
|||
|
|
Process end!
|
|||
|
|
*/
|
|||
|
|
|
|||
|
|
```
|
|||
|
|
|
|||
|
|
通过分析上面的运行结果,我们可以发现,使用runBlocking启动的协程会阻塞当前线程的执行,这样一来,所有的代码就**变成了顺序执行**:1、2、3、4、5、6、7。这其实就是runBlocking与launch的最大差异。
|
|||
|
|
|
|||
|
|
为了验证这一点,我们可以将上面的例子再改造一下:
|
|||
|
|
|
|||
|
|
```plain
|
|||
|
|
fun main() {
|
|||
|
|
runBlocking {
|
|||
|
|
println("First:${Thread.currentThread().name}")
|
|||
|
|
delay(1000L)
|
|||
|
|
println("Hello First!")
|
|||
|
|
}
|
|||
|
|
|
|||
|
|
runBlocking {
|
|||
|
|
println("Second:${Thread.currentThread().name}")
|
|||
|
|
delay(1000L)
|
|||
|
|
println("Hello Second!")
|
|||
|
|
}
|
|||
|
|
|
|||
|
|
runBlocking {
|
|||
|
|
println("Third:${Thread.currentThread().name}")
|
|||
|
|
delay(1000L)
|
|||
|
|
println("Hello Third!")
|
|||
|
|
}
|
|||
|
|
|
|||
|
|
// 删掉了 Thread.sleep
|
|||
|
|
println("Process end!")
|
|||
|
|
}
|
|||
|
|
|
|||
|
|
/*
|
|||
|
|
输出结果:
|
|||
|
|
First:main @coroutine#1
|
|||
|
|
Hello First!
|
|||
|
|
Second:main @coroutine#2
|
|||
|
|
Hello Second!
|
|||
|
|
Third:main @coroutine#3
|
|||
|
|
Hello Third!
|
|||
|
|
Process end!
|
|||
|
|
*/
|
|||
|
|
|
|||
|
|
```
|
|||
|
|
|
|||
|
|
请注意这里的输出结果,我们调用三次runBlocking,对应地,程序就启动了三个协程。另外还有一点:以上代码中,我们删掉了末尾的“Thread.sleep(2000L)”,而程序仍然按照顺序执行了。这就进一步说明,runBlocking确实会阻塞当前线程的执行。对于这一点,Kotlin官方也强调了:runBlocking只推荐用于**连接线程与协程**,并且,大部分情况下,都只应该用于编写Demo或是测试代码。
|
|||
|
|
|
|||
|
|
所以,**请不要在生产环境当中使用runBlocking**。
|
|||
|
|
|
|||
|
|
另外,相信你也注意到了,当我们调用runBlocking的时候,并不需要GlobalScope,这也是它跟launch之间的一大差异,具体,让我们来看看runBlocking的函数签名:
|
|||
|
|
|
|||
|
|
```plain
|
|||
|
|
public actual fun <T> runBlocking(
|
|||
|
|
context: CoroutineContext,
|
|||
|
|
block: suspend CoroutineScope.() -> T): T {
|
|||
|
|
...
|
|||
|
|
}
|
|||
|
|
|
|||
|
|
```
|
|||
|
|
|
|||
|
|
可以看到,runBlocking就是一个普通的**顶层函数**,它并不是CoroutineScope的扩展函数,因此,我们调用它的时候,不需要CoroutineScope的对象。前面我们提到过,GlobalScope是不建议使用的,因此,**后面的案例我们将不再使用GlobalScope**。
|
|||
|
|
|
|||
|
|
另外,你可以注意到它的第二个参数“suspend CoroutineScope.() -> T”,这个函数类型是有返回值类型T的,而它刚好跟runBlocking的返回值类型是一样的。因此,我们可以推测,runBlocking其实是可以从协程当中返回执行结果的。让我们来试试:
|
|||
|
|
|
|||
|
|
```plain
|
|||
|
|
fun main() {
|
|||
|
|
val result = runBlocking {
|
|||
|
|
delay(1000L)
|
|||
|
|
// return@runBlocking 可写可不写
|
|||
|
|
return@runBlocking "Coroutine done!"
|
|||
|
|
}
|
|||
|
|
|
|||
|
|
println("Result is: $result")
|
|||
|
|
}
|
|||
|
|
/*
|
|||
|
|
输出结果:
|
|||
|
|
Result is: Coroutine done!
|
|||
|
|
*/
|
|||
|
|
|
|||
|
|
```
|
|||
|
|
|
|||
|
|
所以,从表面上看,runBlocking是对launch的一种补充,但由于它是阻塞式的,因此,runBlocking并不适用于实际的工作当中。那么,还有什么办法可以让我们拿到协程当中的执行结果吗?
|
|||
|
|
|
|||
|
|
答案就是:async。
|
|||
|
|
|
|||
|
|
## async启动协程
|
|||
|
|
|
|||
|
|
async,是在很多其他编程语言都存在的一种协程模式,比如C#。在Kotlin当中,我们可以使用async{} 创建协程,并且还能通过它返回的**句柄**拿到协程的执行结果。让我们看个简单的例子:
|
|||
|
|
|
|||
|
|
```plain
|
|||
|
|
fun main() = runBlocking {
|
|||
|
|
println("In runBlocking:${Thread.currentThread().name}")
|
|||
|
|
|
|||
|
|
val deferred: Deferred<String> = async {
|
|||
|
|
println("In async:${Thread.currentThread().name}")
|
|||
|
|
delay(1000L) // 模拟耗时操作
|
|||
|
|
return@async "Task completed!"
|
|||
|
|
}
|
|||
|
|
|
|||
|
|
println("After async:${Thread.currentThread().name}")
|
|||
|
|
|
|||
|
|
val result = deferred.await()
|
|||
|
|
println("Result is: $result")
|
|||
|
|
}
|
|||
|
|
/*
|
|||
|
|
输出结果:
|
|||
|
|
In runBlocking:main @coroutine#1
|
|||
|
|
After async:main @coroutine#1 // 注意,它比“In async”先输出
|
|||
|
|
In async:main @coroutine#2
|
|||
|
|
Result is: Task completed!
|
|||
|
|
*/
|
|||
|
|
|
|||
|
|
```
|
|||
|
|
|
|||
|
|
上面的代码中,我们直接使用runBlocking来实现了main函数。注意,由于runBlocking的最后一个参数的类型是“suspend CoroutineScope.() -> T”,因此在Lambda当中已经有了CoroutineScope,所以我们可以直接在runBlocking当中,用async启动一个协程。从程序的输出结果,我们也可以看到,确实存在两个协程,runBlocking启动的叫做“coroutine#1”;async启动的叫做“coroutine#2”。
|
|||
|
|
|
|||
|
|
另外,你应该还注意到了一个细节,那就是async启动协程以后,它也不会阻塞当前程序的执行流程,因为:“After async”在“In async”的前面就已经输出了。
|
|||
|
|
|
|||
|
|
> 这种行为模式在特殊情况下也是可以打破的,我们在第17讲的时候会介绍。
|
|||
|
|
|
|||
|
|
还有,请注意async{}的返回值,它是一个Deferred对象,我们通过调用它的await()方法,就可以拿到协程的执行结果。对比前面launch我们举的“射箭”的例子,这里的async,就更加像是“钓鱼”:
|
|||
|
|
|
|||
|
|

|
|||
|
|
|
|||
|
|
在我们钓鱼的时候,我们手里的鱼竿,就有点像是async当中的 **Deferred对象**。只要我们手里有这根鱼竿,**一旦有鱼儿上钩了,我们就可以直接拿到结果**。
|
|||
|
|
|
|||
|
|
这里,我们再来看看async的函数签名,顺便对比一下它跟launch之间的差异:
|
|||
|
|
|
|||
|
|
```plain
|
|||
|
|
public fun CoroutineScope.launch(
|
|||
|
|
context: CoroutineContext = EmptyCoroutineContext,
|
|||
|
|
start: CoroutineStart = CoroutineStart.DEFAULT,
|
|||
|
|
block: suspend CoroutineScope.() -> Unit // 不同点1
|
|||
|
|
): Job {} // 不同点2
|
|||
|
|
|
|||
|
|
public fun <T> CoroutineScope.async(
|
|||
|
|
context: CoroutineContext = EmptyCoroutineContext,
|
|||
|
|
start: CoroutineStart = CoroutineStart.DEFAULT,
|
|||
|
|
block: suspend CoroutineScope.() -> T // 不同点1
|
|||
|
|
): Deferred<T> {} // 不同点2
|
|||
|
|
|
|||
|
|
```
|
|||
|
|
|
|||
|
|
从上面的代码中,我们可以发现launch和async的两个不同点,一个是 **block的函数类型**,前者的返回值类型是Unit,后者则是泛型T;另外一个不同点在**返回值**上,前者返回值类型是Job,后者返回值类型是Deferred。而async可以返回协程执行结果的原因也在于此。关于Job与Deferred的更多细节,我们会在第16讲讨论。
|
|||
|
|
|
|||
|
|
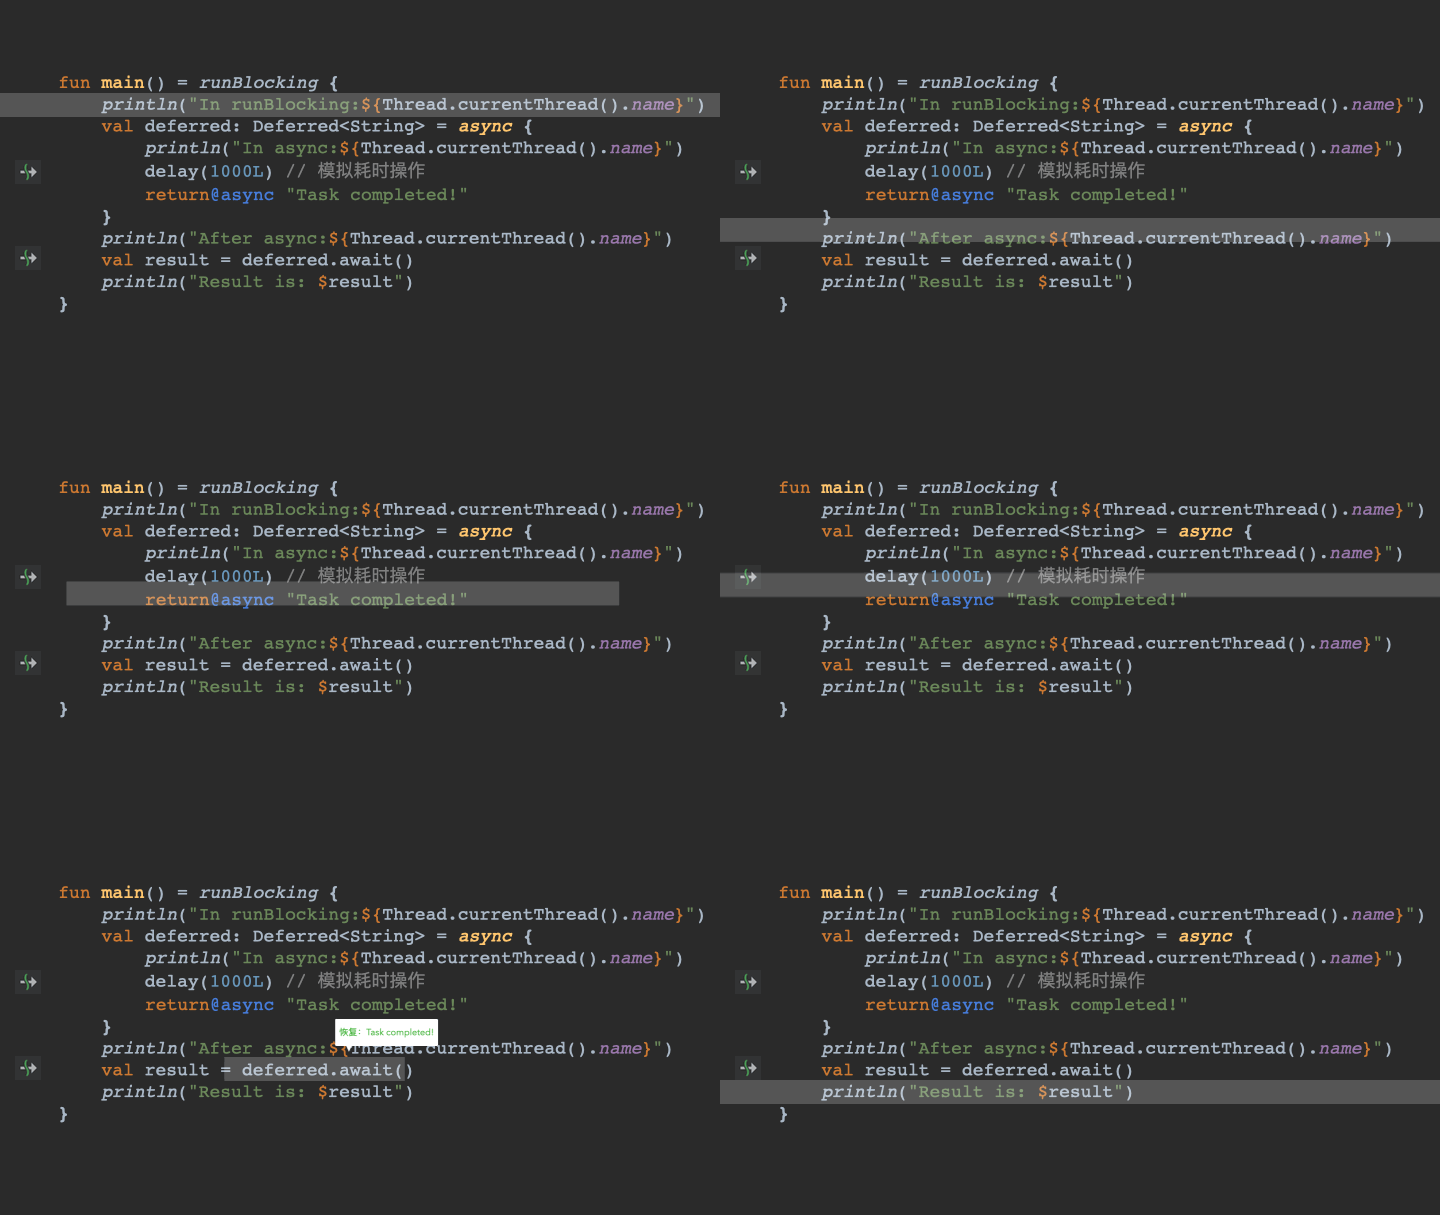
这里,我制作了一张动图,来演示程序整体的执行流程:
|
|||
|
|
|
|||
|
|
|
|||
|
|
|
|||
|
|
## 小结
|
|||
|
|
|
|||
|
|
由于协程是一个非常抽象的概念,因此,它的**调试手段就显得尤为重要**,我们研究协程的时候,通常有两种手段,一种是设置VM参数:-Dkotlinx.coroutines.debug。另一种是直接在IDE当中打断点,不过协程调试是在Kotlin 1.4之后才支持的新特性,因此我们要确保IDE和Kotlin的版本都更新到最新。
|
|||
|
|
|
|||
|
|
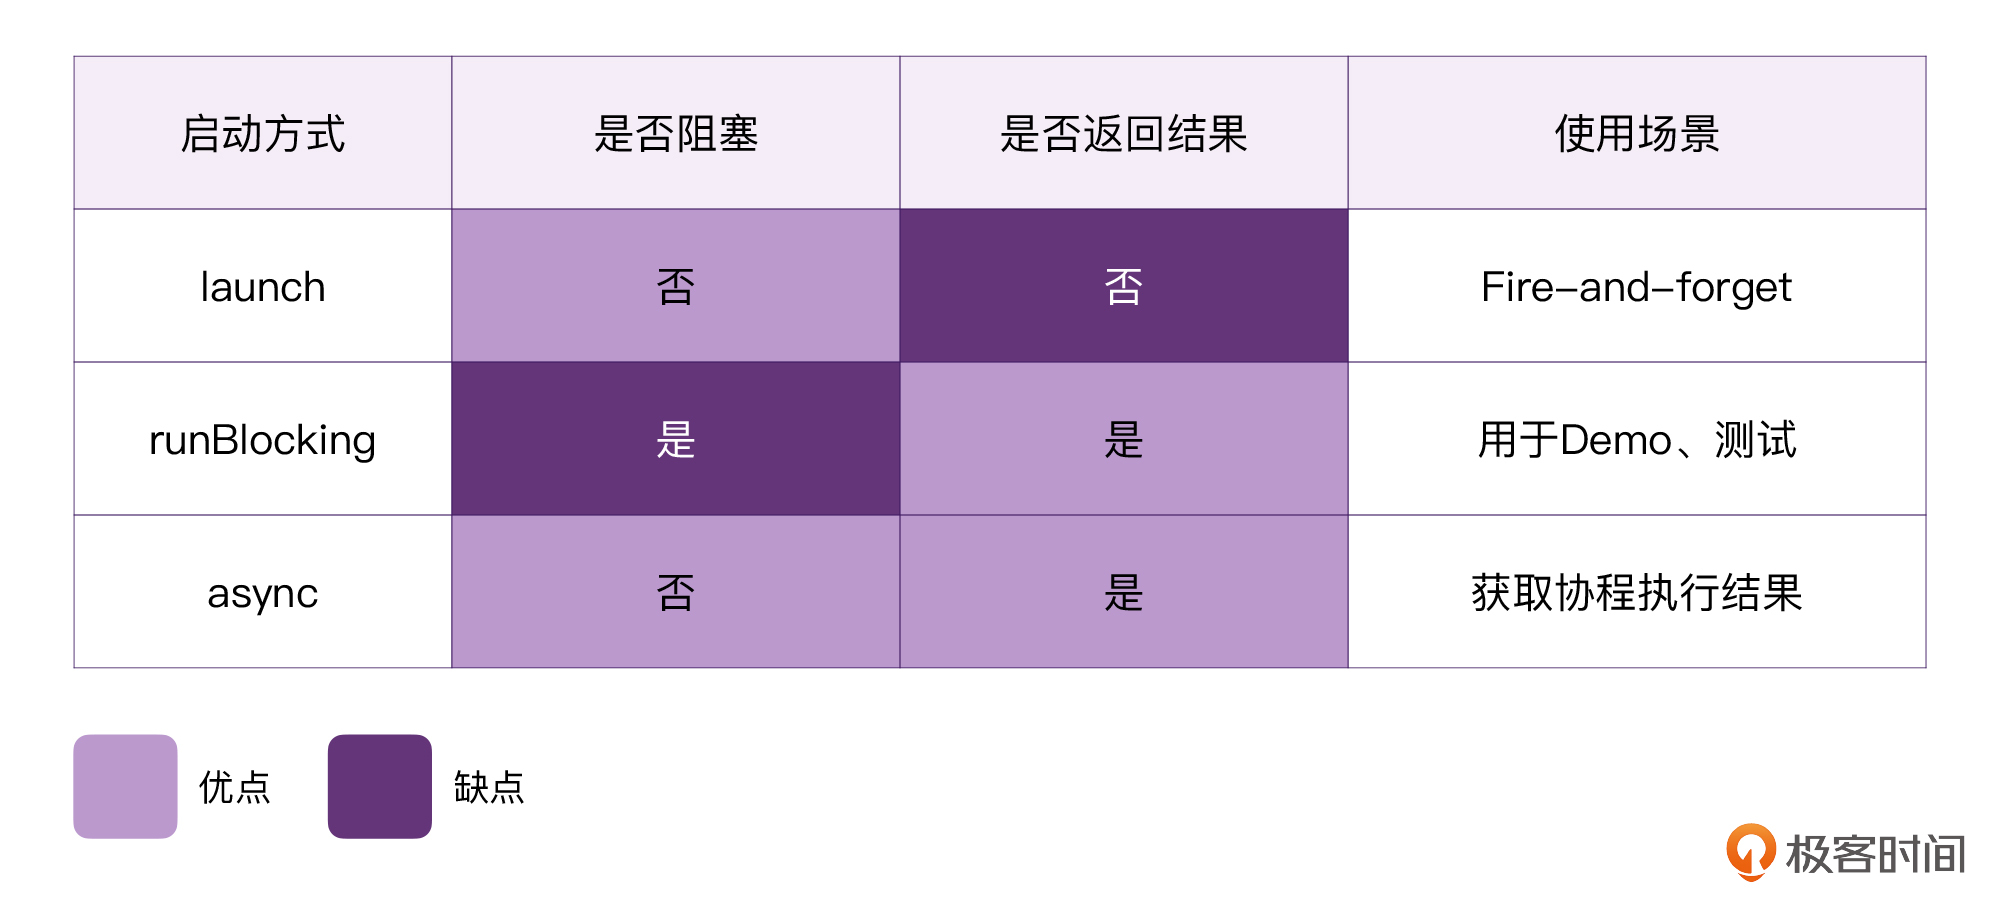
另外,我们还学到了三种启动协程的方式,分别是launch、runBlocking、async。
|
|||
|
|
|
|||
|
|
* **launch**,是典型的“Fire-and-forget”场景,它不会阻塞当前程序的执行流程,使用这种方式的时候,我们无法直接获取协程的执行结果。它有点像是生活中的**射箭**。
|
|||
|
|
* **runBlocking**,我们可以获取协程的执行结果,但这种方式会阻塞代码的执行流程,因为它一般用于测试用途,生产环境当中是不推荐使用的。
|
|||
|
|
* **async**,则是很多编程语言当中普遍存在的协程模式。它像是结合了launch和runBlocking两者的优点。它既不会阻塞当前的执行流程,还可以直接获取协程的执行结果。它有点像是生活中的**钓鱼**。
|
|||
|
|
|
|||
|
|
|
|||
|
|
|
|||
|
|
## 思考题
|
|||
|
|
|
|||
|
|
下面这段代码是我在当面试官时,问过其他候选人的,你能推测出这段代码的执行结果吗?
|
|||
|
|
|
|||
|
|
```plain
|
|||
|
|
fun main() = runBlocking {
|
|||
|
|
val deferred: Deferred<String> = async {
|
|||
|
|
println("In async:${Thread.currentThread().name}")
|
|||
|
|
delay(1000L) // 模拟耗时操作
|
|||
|
|
println("In async after delay!")
|
|||
|
|
return@async "Task completed!"
|
|||
|
|
}
|
|||
|
|
|
|||
|
|
// 不再调用 deferred.await()
|
|||
|
|
delay(2000L)
|
|||
|
|
}
|
|||
|
|
|
|||
|
|
```
|
|||
|
|
|