624 lines
26 KiB
Markdown
624 lines
26 KiB
Markdown
|
|
# 23 | 压测平台:如何改造对象存储和性能监控?
|
|||
|
|
|
|||
|
|
你好,我是高楼。
|
|||
|
|
|
|||
|
|
这节课我们来聊聊如何改造分布式压测平台。
|
|||
|
|
|
|||
|
|
在第 6 讲,我们已经详细了解了流量工具的选型,我们一起来回顾下全链路流量平台必须具备的能力:
|
|||
|
|
|
|||
|
|
1. 能录制线上真实流量;
|
|||
|
|
2. 能实现海量数据的并发请求,并覆盖地域性的 CDN 边缘节点;
|
|||
|
|
3. 能支持常见协议的请求;
|
|||
|
|
4. 对线上尽量应用透明,也就是说无侵入性;
|
|||
|
|
5. 避免写请求的脏数据,压测流量能够被识别,方便压测后清理;
|
|||
|
|
6. 工具使用简单,能够满足压测实时监控,服务安全保护(过载熔断)。
|
|||
|
|
|
|||
|
|
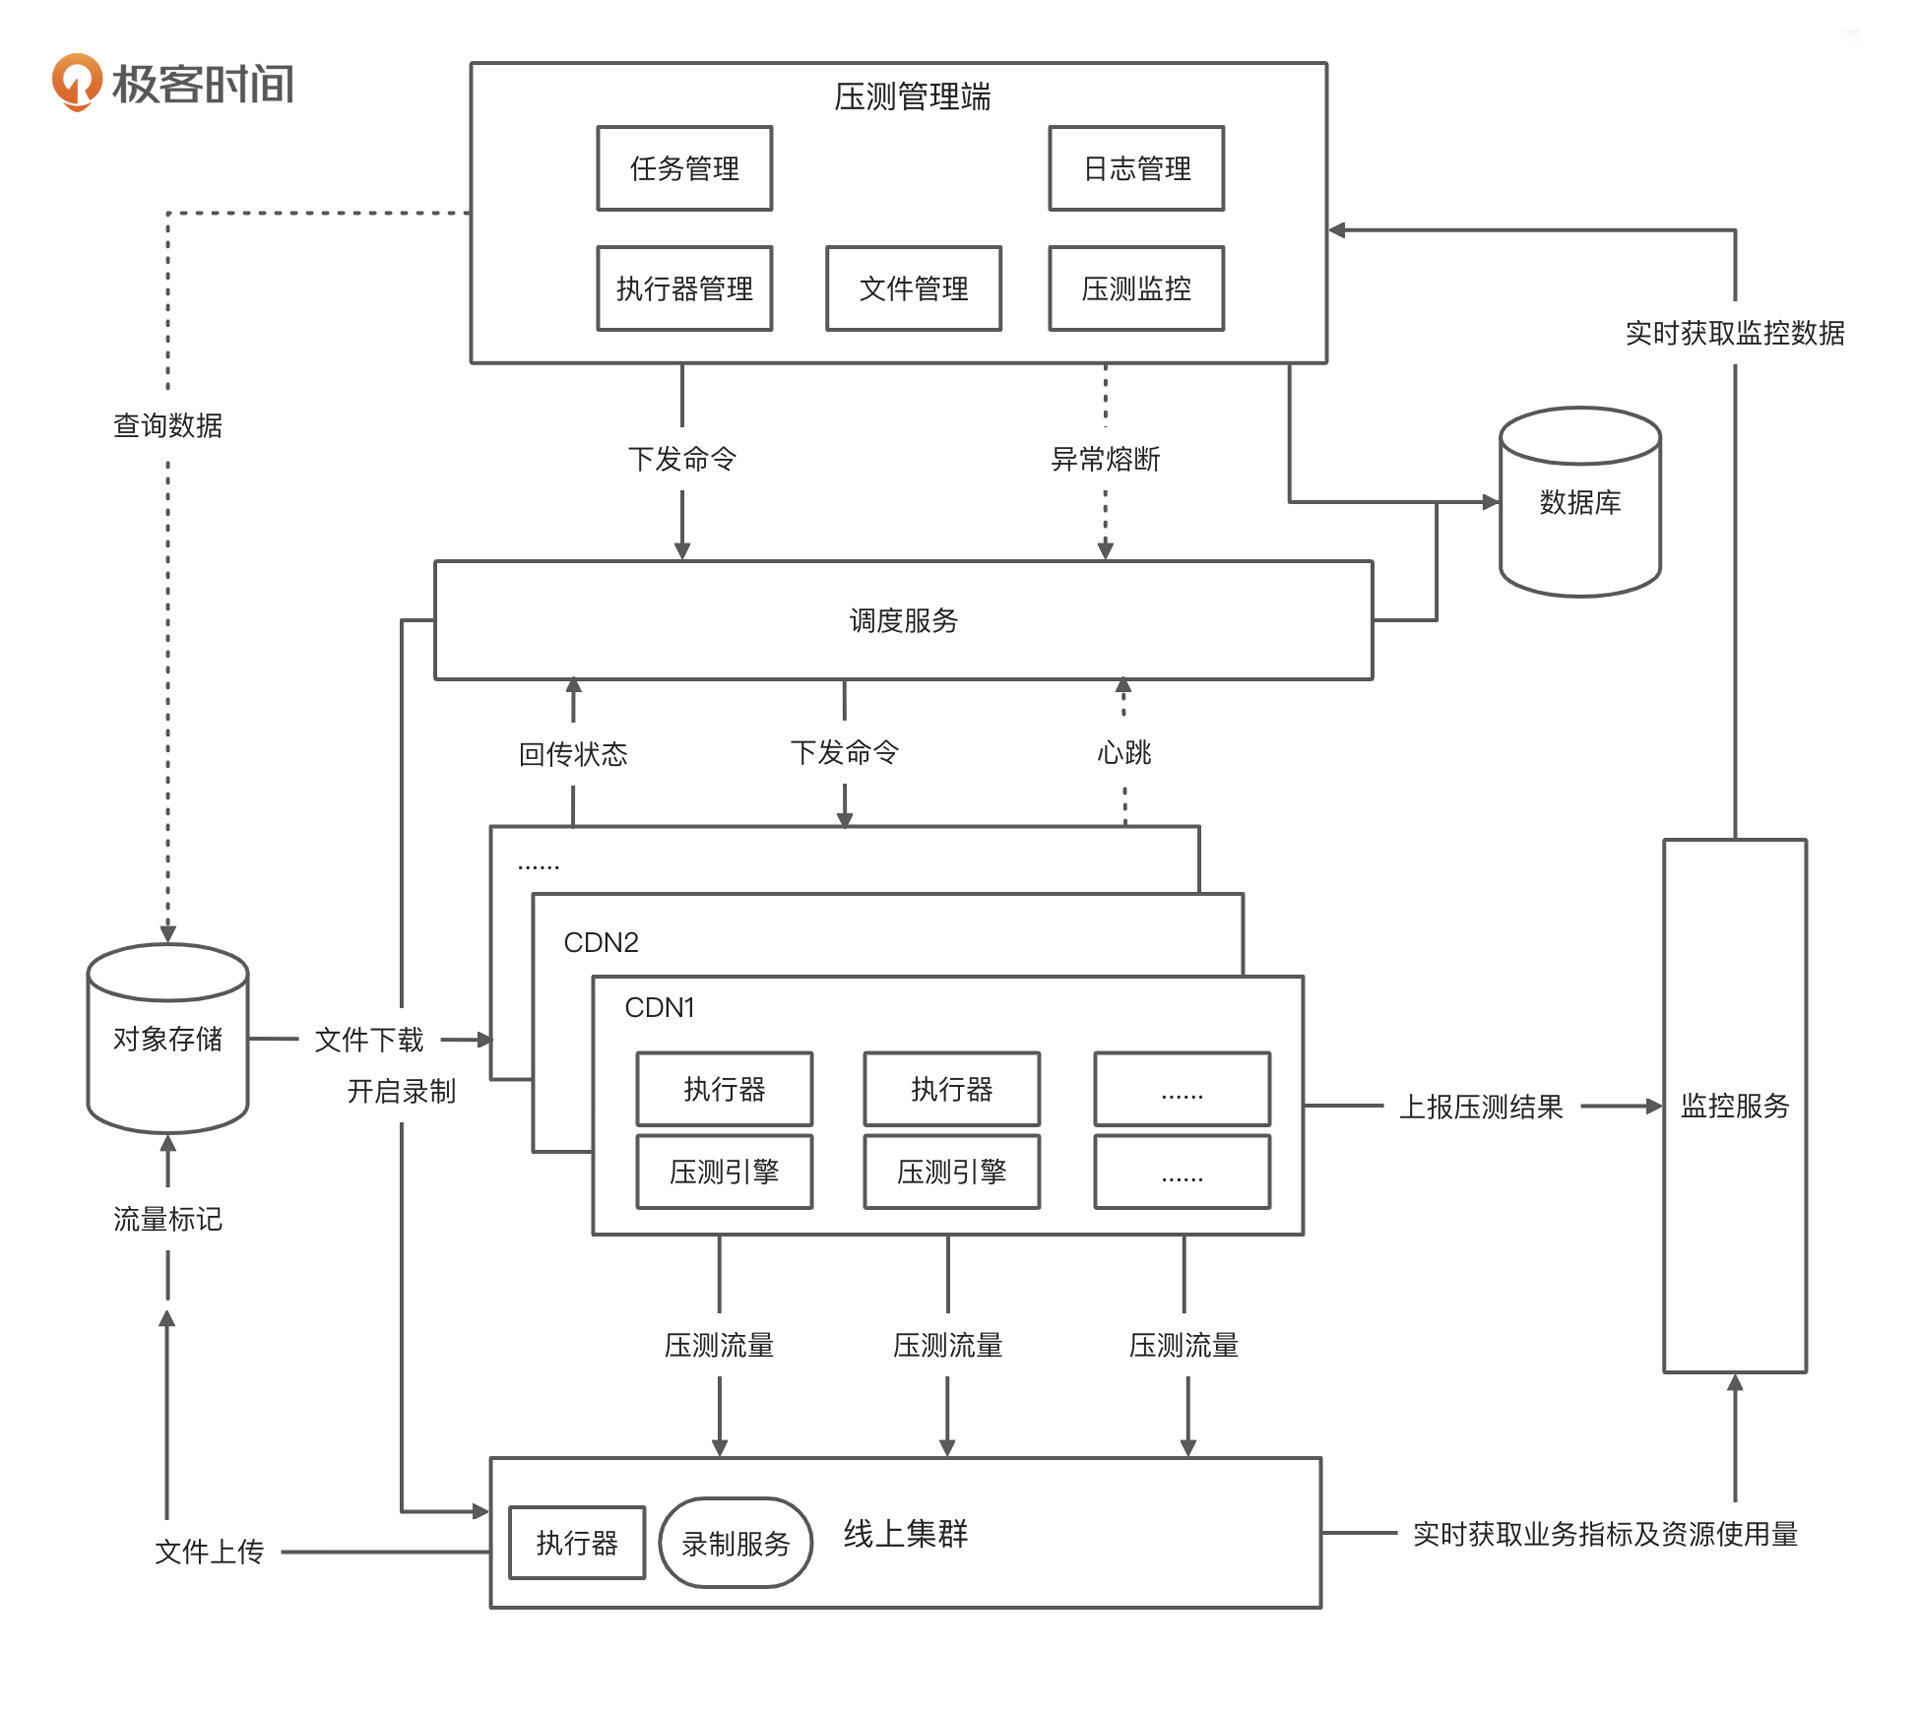
按照上面这几条能力需求,我还画了一个比较典型的全链路流量平台架构设计图。
|
|||
|
|
|
|||
|
|
|
|||
|
|
|
|||
|
|
在这张架构图中,我把压测平台分为压测 web 管理端、调度服务、压测引擎、监控服务、对象存储、录制服务六大模块。这样的一个全链路流量平台基本上就可以覆盖大部分企业的需求了。
|
|||
|
|
|
|||
|
|
接下来,我会就这里面部分的技术细节进行拆解。因为内容比较多,我会分成两节课讲解。这节课,我们主要看一下对象存储和性能监控模块如何落地。
|
|||
|
|
|
|||
|
|
## 对象存储
|
|||
|
|
|
|||
|
|
对象存储简单来说就是一种海量、安全、低成本、高可靠的云存储服务,适合存放任意类型的文件。它还支持快速查询、上传下载等功能。通俗来说就是一个文件仓库。
|
|||
|
|
|
|||
|
|
现在大部分的公有云厂商,都提供了自己的对象存储服务,比如阿里云的OSS、华为云的OBS,腾讯云的COS等,我们只需集成云厂商提供的SDK即可访问。而开源产品方面,比较常见的有 Ceph 和 [MinIO](http://www.minio.org.cn/overview.shtml#)。
|
|||
|
|
|
|||
|
|
其中,Ceph是一个比较强大的分布式存储系统,但是它整个系统非常复杂,比较重量级,需要花费大力气去维护,很显然与我们的目标不是很符合,所以暂时不考虑。
|
|||
|
|
|
|||
|
|
而MinIO是一个基于Apache License V2.0开源协议的高性能、分布式的对象存储系统,而且兼容亚马逊S3云存储服务,非常适合存储大容量非结构化的数据,比如图片、视频、日志文件等。而且MinIO系统较为轻量级,可以很简单地和其它的应用结合,很显然,气质和我们的流量平台比较符合。
|
|||
|
|
|
|||
|
|
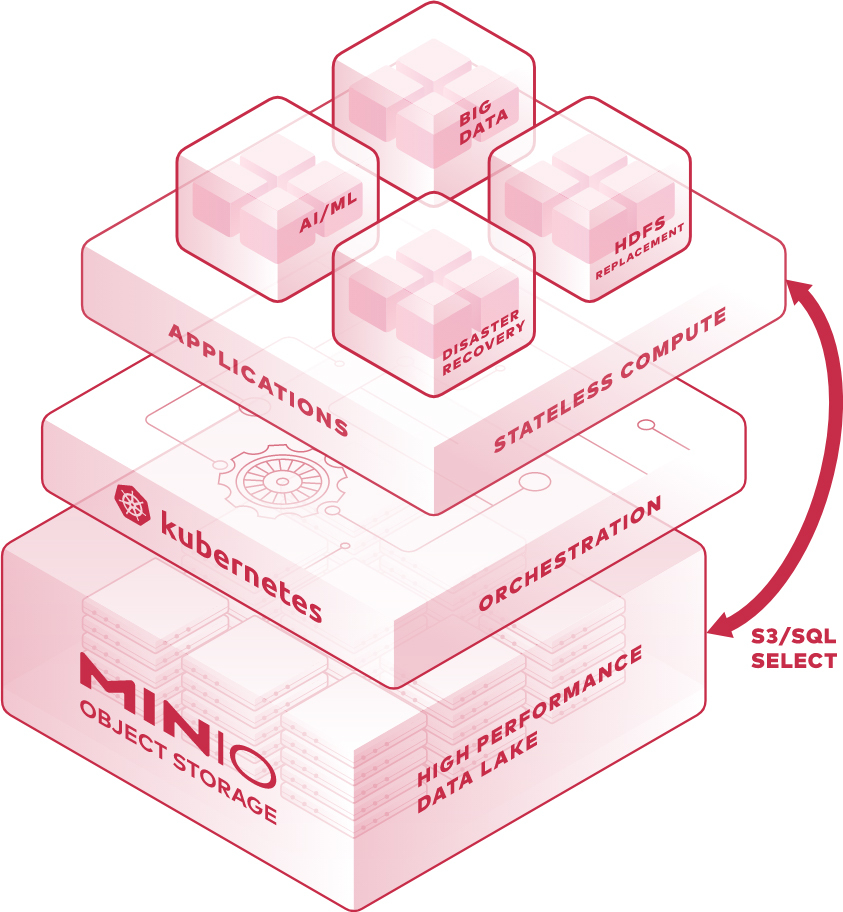
总而言之,如果想自建对象存储服务,而且有能力、规模又比较大的话,采用 Ceph 更好一点。但是我们只是想要一个对象存储,要求没有那么多,所以我们才选择了 MinIO。它的整体结构图如下:
|
|||
|
|
|
|||
|
|
|
|||
|
|
|
|||
|
|
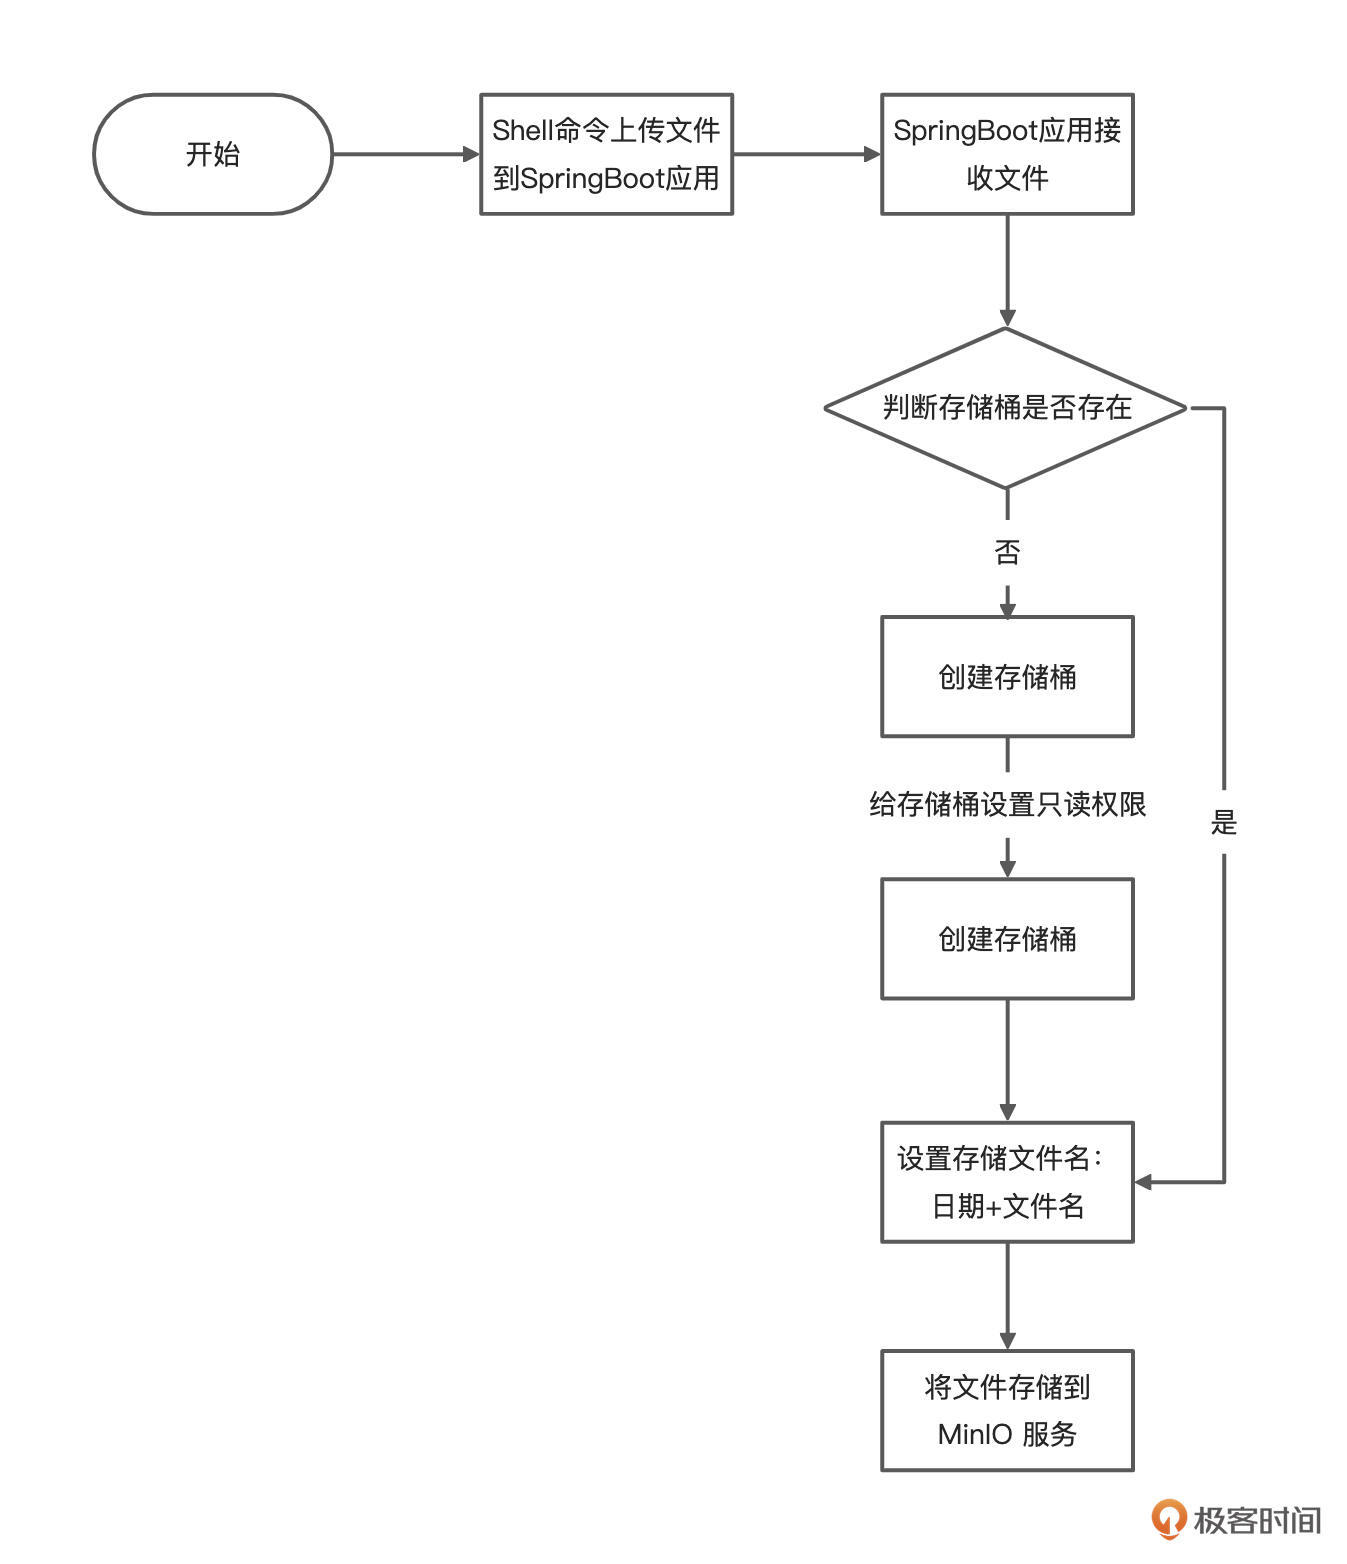
我们设计的上传文件的大致流程你可以看看下面这张图:
|
|||
|
|
|
|||
|
|
|
|||
|
|
|
|||
|
|
知道了大致的流程,接下来看看我们如何落地。
|
|||
|
|
|
|||
|
|
* 搭建 MinIO Server
|
|||
|
|
|
|||
|
|
这里,为了方便调试,我们使用Docker快速搭建 MinIO Server,并设置端口号、容器名。
|
|||
|
|
|
|||
|
|
```bash
|
|||
|
|
docker run -d --name minio-server \
|
|||
|
|
-p 9000:9000 \
|
|||
|
|
-p 9001:9001 \
|
|||
|
|
minio/minio server /data \
|
|||
|
|
--console-address ":9001"
|
|||
|
|
|
|||
|
|
```
|
|||
|
|
|
|||
|
|
如果你希望集成到k8s,还可以使用Operator方式搭建MinIO Server,具体方法可以参考[官网文档](http://docs.minio.org.cn/minio/k8s/deployment/deploy-minio-operator.html)。
|
|||
|
|
|
|||
|
|
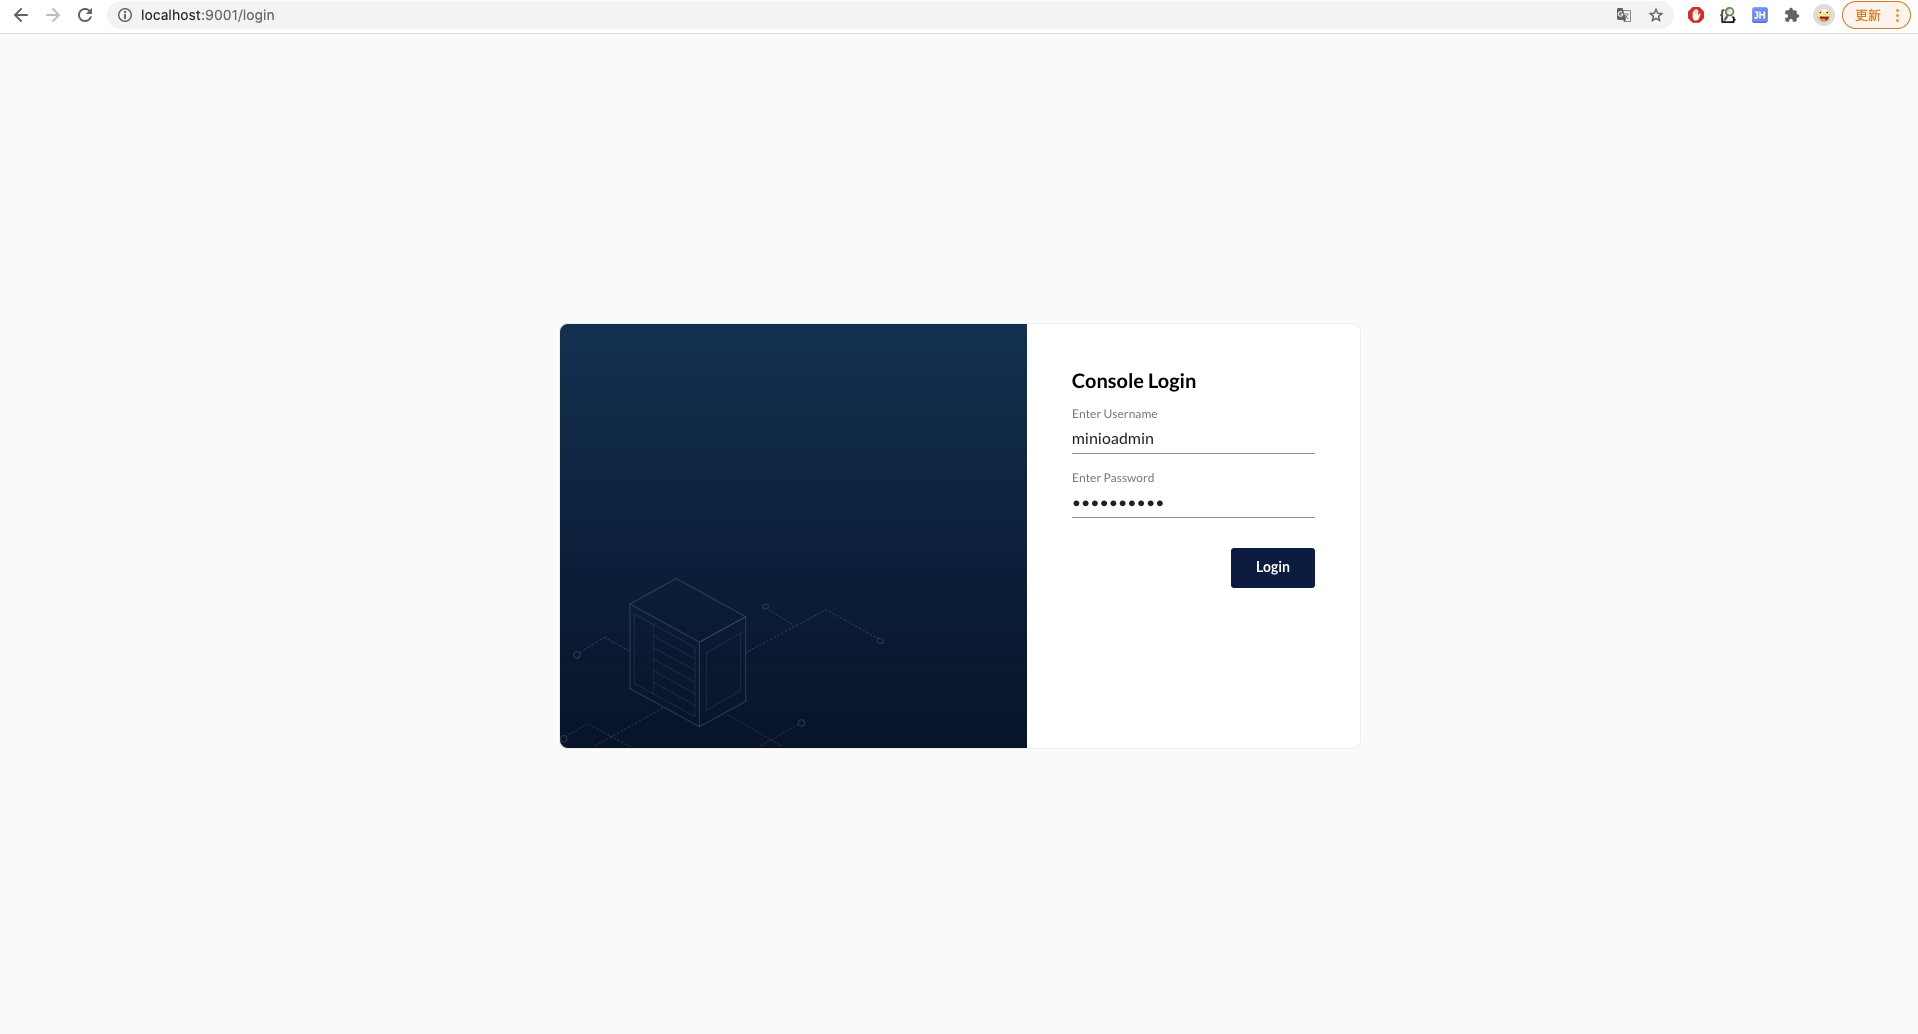
启动成功后,访问MinIO的IP地址,因为我的 MinIO Server 安装在本机,所以是 [http://localhost:9001](http://localhost:9001),输入默认的账号密码是 minioadmin/minioadmin。
|
|||
|
|
|
|||
|
|
|
|||
|
|
|
|||
|
|
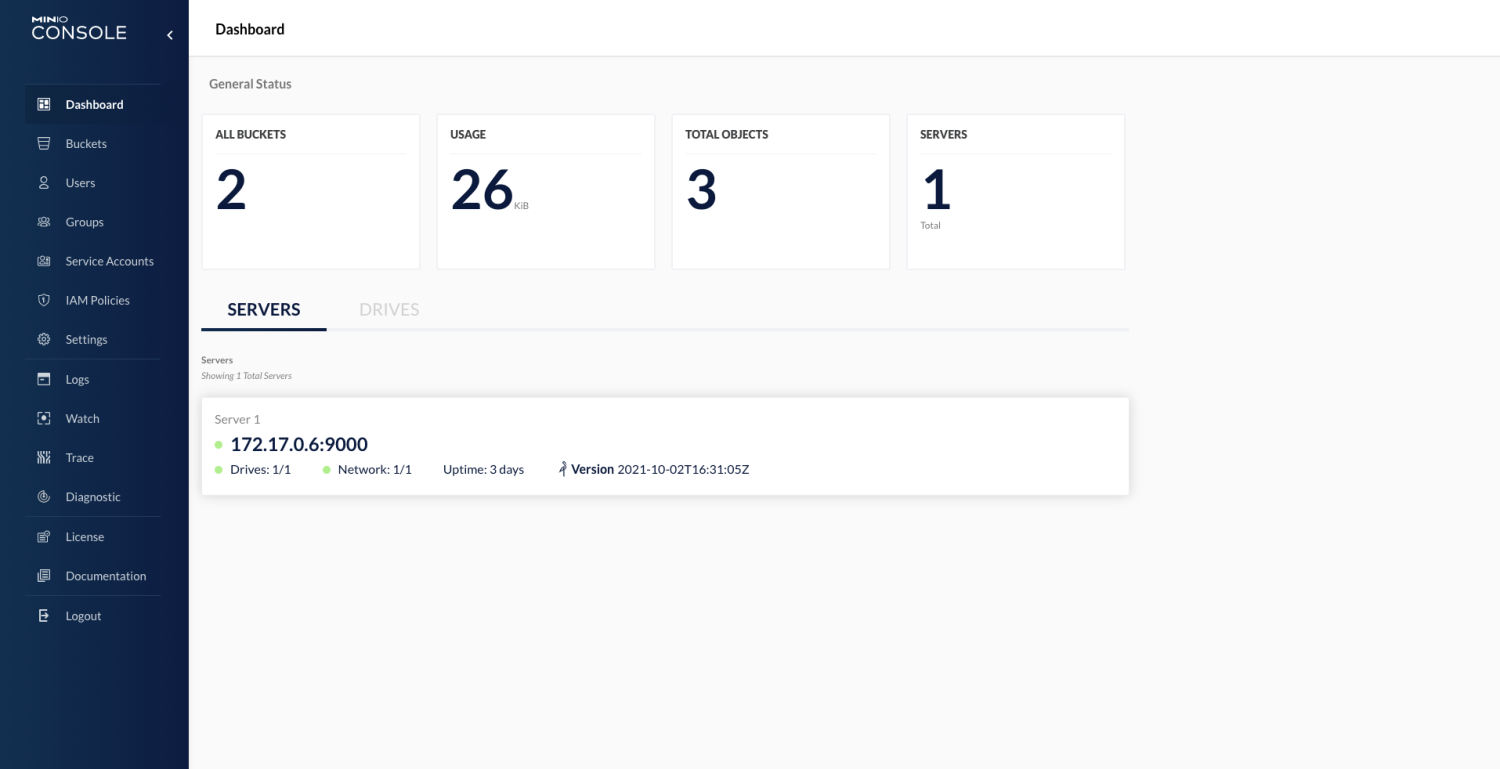
登录后,进入控制台看板页。
|
|||
|
|
|
|||
|
|
|
|||
|
|
|
|||
|
|
好了,搭建完 MinIO Server 之后,我们就需要实现自己的对象存储 HTTP服务了。
|
|||
|
|
|
|||
|
|
* 通过 SpringBoot 实现 HTTP 服务
|
|||
|
|
|
|||
|
|
因为项目使用的是 SpringBoot 应用,所以这里主要演示通过 SpringBoot 实现的 HTTP 服务。
|
|||
|
|
|
|||
|
|
首先, 在 pom.xml中 添加 MinIO 的相关依赖:
|
|||
|
|
|
|||
|
|
```xml
|
|||
|
|
<!--MinIO JAVA SDK-->
|
|||
|
|
<dependency>
|
|||
|
|
<groupId>io.minio</groupId>
|
|||
|
|
<artifactId>minio</artifactId>
|
|||
|
|
<version>3.0.10</version>
|
|||
|
|
</dependency>
|
|||
|
|
|
|||
|
|
```
|
|||
|
|
|
|||
|
|
第二步,在 SpringBoot 中开启文件上传功能,在 application.yml 中添加如下配置:
|
|||
|
|
|
|||
|
|
```yaml
|
|||
|
|
spring:
|
|||
|
|
servlet:
|
|||
|
|
multipart:
|
|||
|
|
enabled: true #开启文件上传
|
|||
|
|
max-file-size: 10MB #限制文件上传大小为10M
|
|||
|
|
|
|||
|
|
```
|
|||
|
|
|
|||
|
|
然后,添加一个 MinioController 控制器用于实现文件的上传、下载、删除操作:
|
|||
|
|
|
|||
|
|
```java
|
|||
|
|
package com.dunshan.controller;
|
|||
|
|
|
|||
|
|
import com.google.api.client.util.IOUtils;
|
|||
|
|
import com.dunshan.common.api.CommonResult;
|
|||
|
|
import com.dunshan.dto.MinioUploadDto;
|
|||
|
|
import io.minio.MinioClient;
|
|||
|
|
import io.minio.policy.PolicyType;
|
|||
|
|
import io.swagger.annotations.Api;
|
|||
|
|
import io.swagger.annotations.ApiOperation;
|
|||
|
|
import org.slf4j.Logger;
|
|||
|
|
import org.slf4j.LoggerFactory;
|
|||
|
|
import org.springframework.beans.factory.annotation.Value;
|
|||
|
|
import org.springframework.stereotype.Controller;
|
|||
|
|
import org.springframework.web.bind.annotation.RequestMapping;
|
|||
|
|
import org.springframework.web.bind.annotation.RequestMethod;
|
|||
|
|
import org.springframework.web.bind.annotation.RequestParam;
|
|||
|
|
import org.springframework.web.bind.annotation.ResponseBody;
|
|||
|
|
import org.springframework.web.multipart.MultipartFile;
|
|||
|
|
|
|||
|
|
import javax.servlet.http.HttpServletResponse;
|
|||
|
|
import java.io.InputStream;
|
|||
|
|
import java.io.OutputStream;
|
|||
|
|
import java.net.URLEncoder;
|
|||
|
|
import java.text.SimpleDateFormat;
|
|||
|
|
import java.util.Date;
|
|||
|
|
|
|||
|
|
/**
|
|||
|
|
* Created by dunshan on 2019/12/25.
|
|||
|
|
*/
|
|||
|
|
|
|||
|
|
@Api(tags = "MinioController", description = "MinIO对象存储管理")
|
|||
|
|
@Controller
|
|||
|
|
@RequestMapping("/minio")
|
|||
|
|
public class MinioController {
|
|||
|
|
|
|||
|
|
private static final Logger LOGGER = LoggerFactory.getLogger(MinioController.class);
|
|||
|
|
@Value("${minio.endpoint}")
|
|||
|
|
private String ENDPOINT;
|
|||
|
|
@Value("${minio.bucketName}")
|
|||
|
|
private String BUCKET_NAME;
|
|||
|
|
@Value("${minio.accessKey}")
|
|||
|
|
private String ACCESS_KEY;
|
|||
|
|
@Value("${minio.secretKey}")
|
|||
|
|
private String SECRET_KEY;
|
|||
|
|
|
|||
|
|
@ApiOperation("文件上传")
|
|||
|
|
@RequestMapping(value = "/upload", method = RequestMethod.POST)
|
|||
|
|
@ResponseBody
|
|||
|
|
public CommonResult upload(@RequestParam("file") MultipartFile file) {
|
|||
|
|
try {
|
|||
|
|
//创建一个MinIO的Java客户端
|
|||
|
|
MinioClient minioClient = new MinioClient(ENDPOINT, ACCESS_KEY, SECRET_KEY);
|
|||
|
|
boolean isExist = minioClient.bucketExists(BUCKET_NAME);
|
|||
|
|
if (isExist) {
|
|||
|
|
LOGGER.info("存储桶已经存在!");
|
|||
|
|
} else {
|
|||
|
|
//创建存储桶并设置只读权限
|
|||
|
|
minioClient.makeBucket(BUCKET_NAME);
|
|||
|
|
minioClient.setBucketPolicy(BUCKET_NAME, "*.*", PolicyType.READ_ONLY);
|
|||
|
|
}
|
|||
|
|
String filename = file.getOriginalFilename();
|
|||
|
|
SimpleDateFormat sdf = new SimpleDateFormat("yyyyMMdd");
|
|||
|
|
// 设置存储对象名称
|
|||
|
|
String objectName = sdf.format(new Date()) + "/" + filename;
|
|||
|
|
// 使用putObject上传一个文件到存储桶中
|
|||
|
|
minioClient.putObject(BUCKET_NAME, objectName, file.getInputStream(), file.getContentType());
|
|||
|
|
LOGGER.info("文件上传成功!");
|
|||
|
|
MinioUploadDto minioUploadDto = new MinioUploadDto();
|
|||
|
|
minioUploadDto.setName(filename);
|
|||
|
|
minioUploadDto.setUrl(ENDPOINT + "/" + BUCKET_NAME + "/" + objectName);
|
|||
|
|
return CommonResult.success(minioUploadDto);
|
|||
|
|
} catch (Exception e) {
|
|||
|
|
LOGGER.info("上传发生错误: {}!", e.getMessage());
|
|||
|
|
}
|
|||
|
|
return CommonResult.failed();
|
|||
|
|
}
|
|||
|
|
|
|||
|
|
@ApiOperation("文件删除")
|
|||
|
|
@RequestMapping(value = "/delete", method = RequestMethod.POST)
|
|||
|
|
@ResponseBody
|
|||
|
|
public CommonResult delete(@RequestParam("objectName") String objectName) {
|
|||
|
|
try {
|
|||
|
|
MinioClient minioClient = new MinioClient(ENDPOINT, ACCESS_KEY, SECRET_KEY);
|
|||
|
|
minioClient.removeObject(BUCKET_NAME, objectName);
|
|||
|
|
return CommonResult.success(null);
|
|||
|
|
} catch (Exception e) {
|
|||
|
|
e.printStackTrace();
|
|||
|
|
}
|
|||
|
|
return CommonResult.failed();
|
|||
|
|
}
|
|||
|
|
|
|||
|
|
@ApiOperation("文件下载")
|
|||
|
|
@RequestMapping(value = "/download", method = RequestMethod.GET)
|
|||
|
|
@ResponseBody
|
|||
|
|
public CommonResult download(@RequestParam("filename") String filename, HttpServletResponse httpResponse) {
|
|||
|
|
try {
|
|||
|
|
MinioClient minioClient = new MinioClient(ENDPOINT, ACCESS_KEY, SECRET_KEY);
|
|||
|
|
InputStream inputStream= minioClient.getObject(BUCKET_NAME, filename);
|
|||
|
|
httpResponse.reset();
|
|||
|
|
httpResponse.setHeader("Content-Disposition", "attachment;filename=" + URLEncoder.encode(filename, "UTF-8"));
|
|||
|
|
httpResponse.setContentType("application/octet-stream");
|
|||
|
|
httpResponse.setCharacterEncoding("utf-8");
|
|||
|
|
OutputStream outputStream = httpResponse.getOutputStream();
|
|||
|
|
IOUtils.copy(inputStream, outputStream);
|
|||
|
|
outputStream.close();
|
|||
|
|
|
|||
|
|
} catch (Exception e) {
|
|||
|
|
LOGGER.info("导出失败:", e.getMessage());
|
|||
|
|
e.printStackTrace();
|
|||
|
|
}
|
|||
|
|
return null;
|
|||
|
|
}
|
|||
|
|
}
|
|||
|
|
|
|||
|
|
```
|
|||
|
|
|
|||
|
|
最后,在 application.yml 中对 MinIO 客户端进行配置:
|
|||
|
|
|
|||
|
|
```yaml
|
|||
|
|
# MinIO对象存储相关配置
|
|||
|
|
minio:
|
|||
|
|
endpoint: http://127.0.0.1:9000 #MinIO服务所在地址
|
|||
|
|
bucketName: goreplay #存储桶名称
|
|||
|
|
accessKey: minioadmin #访问的key
|
|||
|
|
secretKey: minioadmin #访问的秘钥
|
|||
|
|
|
|||
|
|
```
|
|||
|
|
|
|||
|
|
* 接口测试
|
|||
|
|
|
|||
|
|
接下来我们启动 SpringBoot 应用,使用 Postman 来测试验证一下功能。
|
|||
|
|
|
|||
|
|
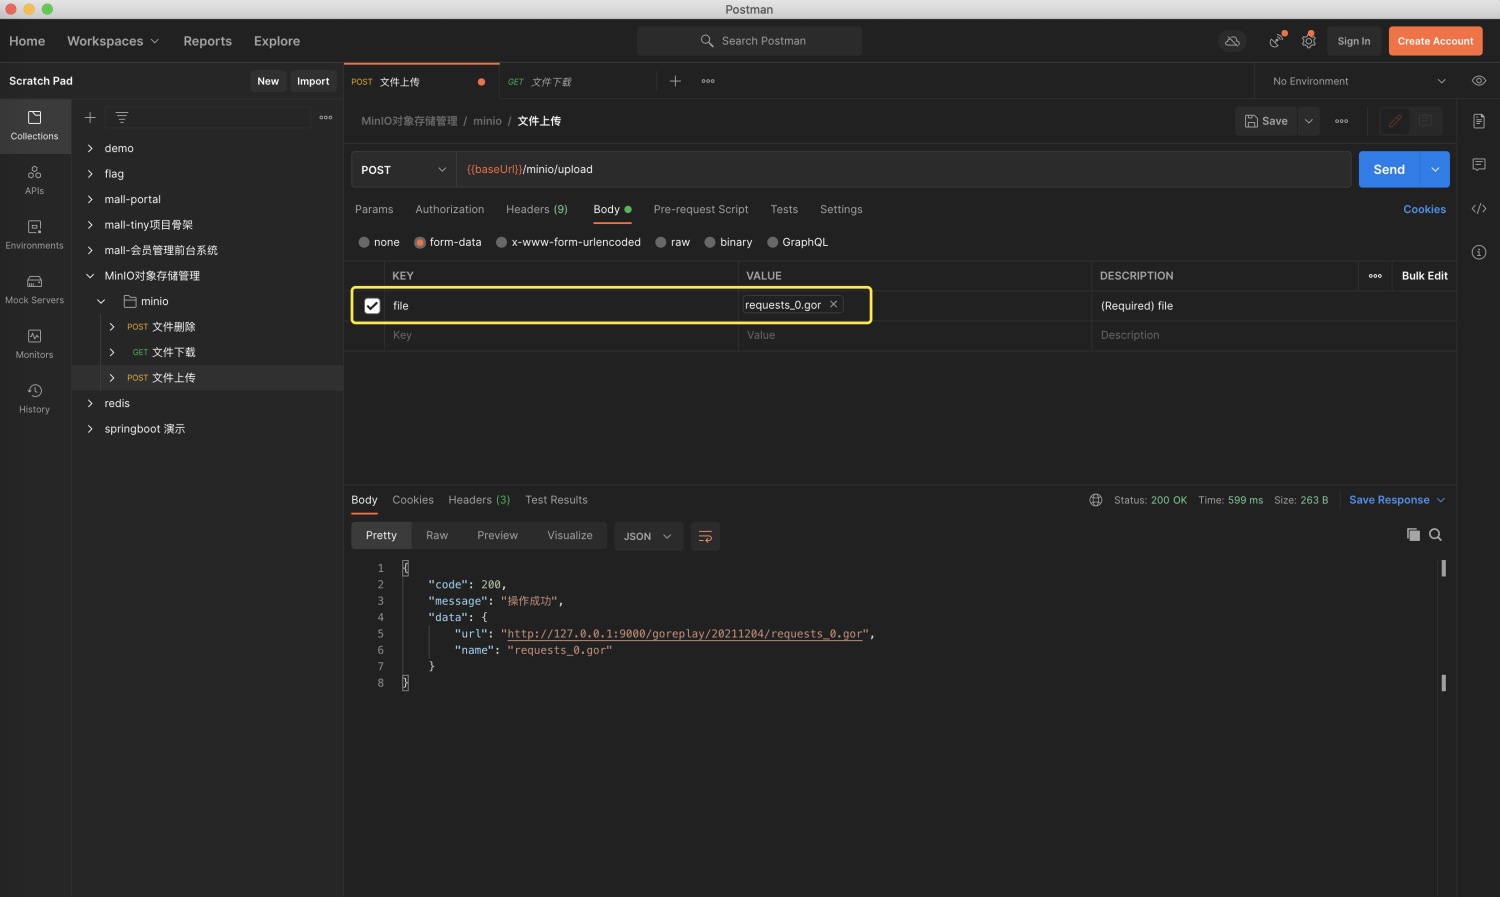
首先,访问上传接口,进行文件上传。上传接口的地址是:[http://localhost:8080/minio/upload](http://localhost:8080/minio/upload)。
|
|||
|
|
|
|||
|
|
|
|||
|
|
|
|||
|
|
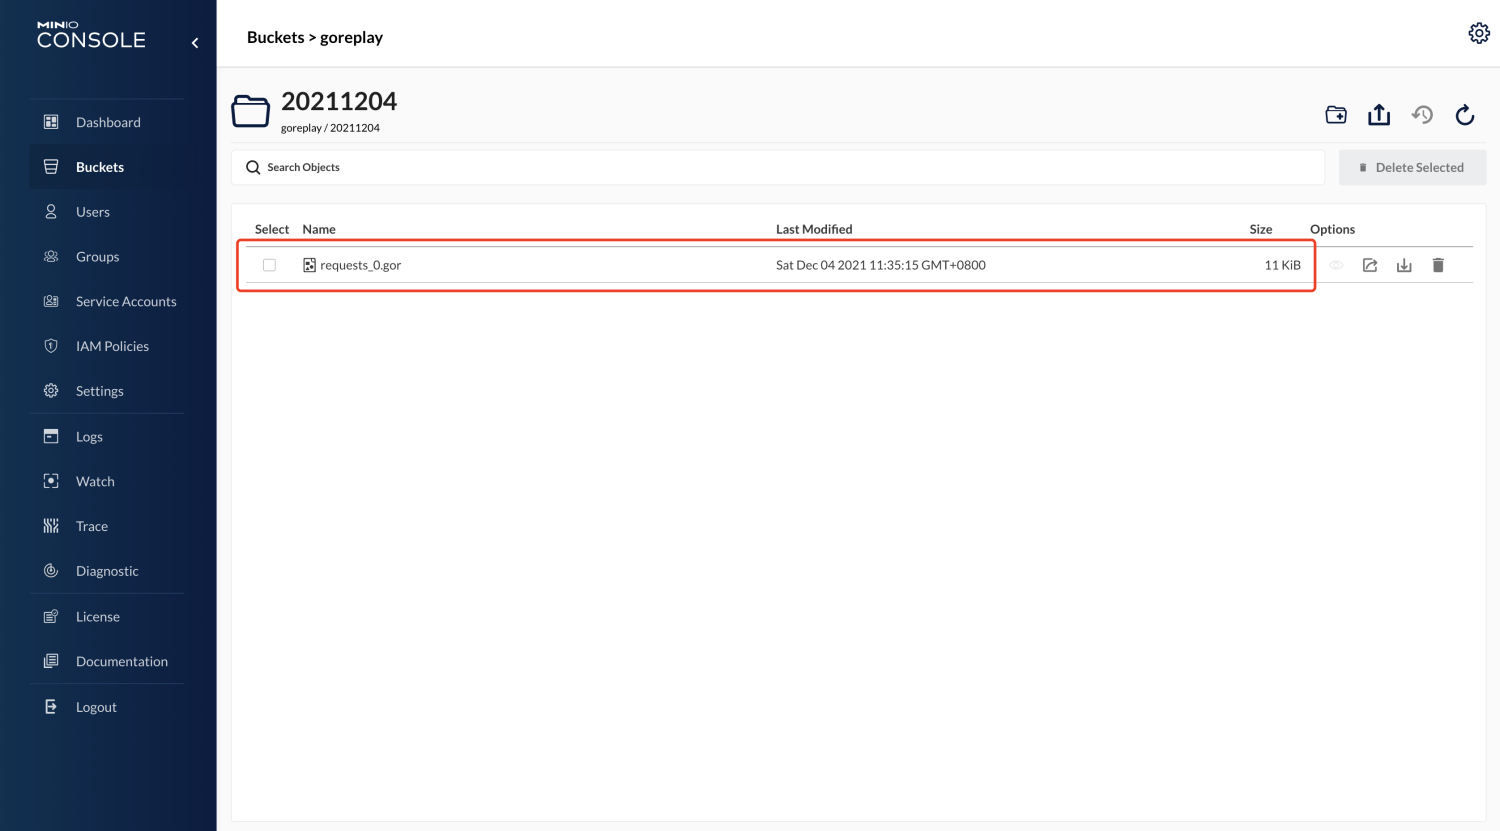
上传完成后,我们打开 MinIO 的管理界面,可以看到上传后的文件。
|
|||
|
|
|
|||
|
|
|
|||
|
|
|
|||
|
|
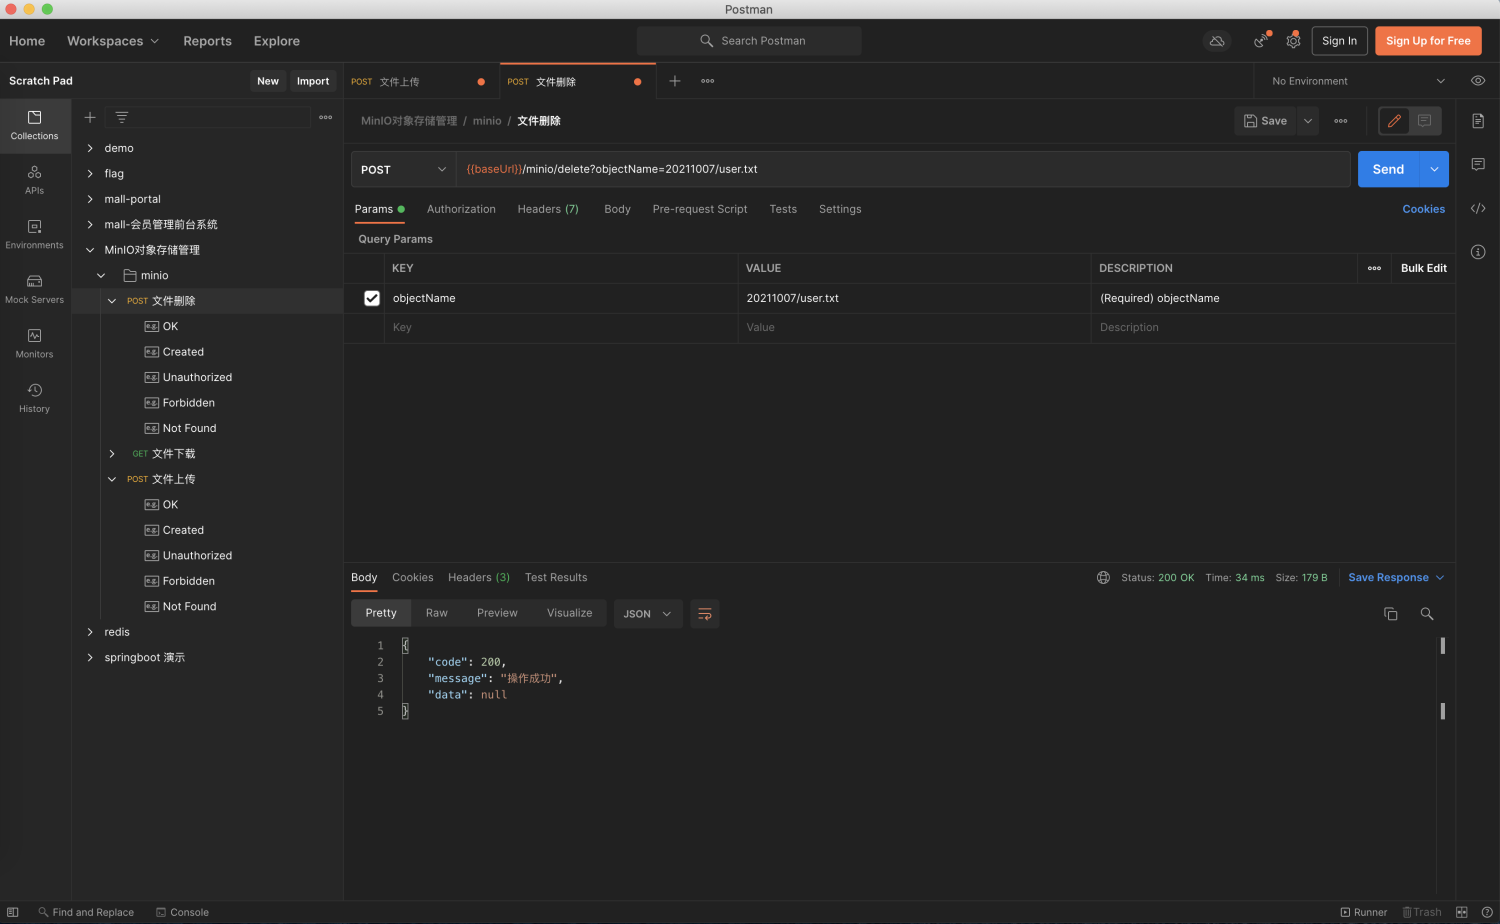
我们还可以调用删除接口来删除其中某文件,需要注意的是,objectName 参数值是存储桶(Buckets)中的文件相对路径,删除文件接口地址:[http://localhost:8080/minio/delete](http://localhost:8080/minio/delete)。
|
|||
|
|
|
|||
|
|
|
|||
|
|
|
|||
|
|
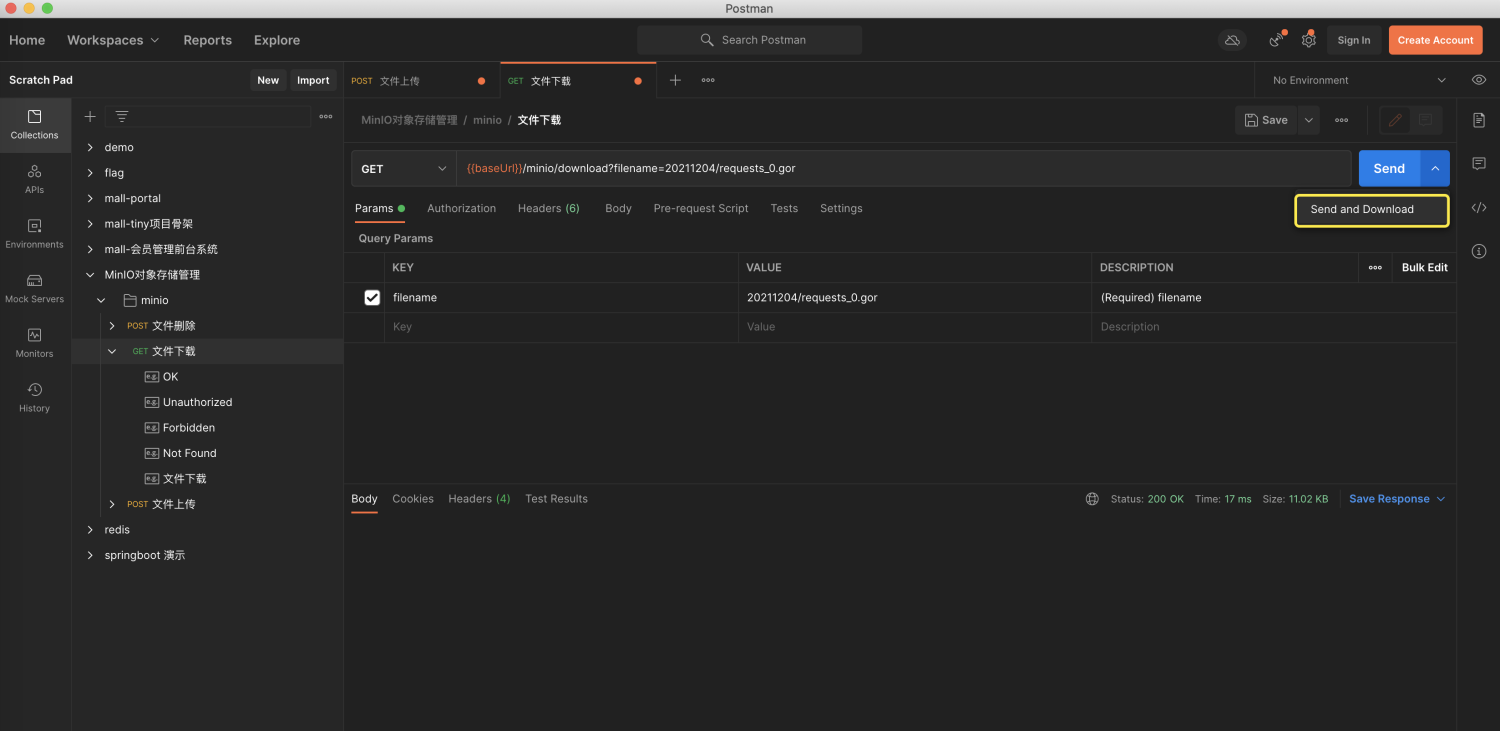
最后,我们还可以调用下载接口来下载文件,下载文件接口地址:[http://localhost:8080/minio/download](http://localhost:8080/minio/download)。
|
|||
|
|
|
|||
|
|
|
|||
|
|
|
|||
|
|
导出文件时填好文件名称,选择 **send and download**按钮就可以在 Postman 中下载文件了。
|
|||
|
|
|
|||
|
|
好了,到这里,我们的对象存储服务就改造完成了,这样,我们流量仓库的功能也就差不多实现了。
|
|||
|
|
|
|||
|
|
## 性能监控
|
|||
|
|
|
|||
|
|
接下来,我们要对 GoReplay 性能监控进行改造。
|
|||
|
|
|
|||
|
|
* GoReplay 统计请求队列信息
|
|||
|
|
|
|||
|
|
前面我们讲过, GoReplay 通过参数:-stats --out-http-stats 在控制台将统计的发送请求队列信息默认每 5 秒输出到控制台。
|
|||
|
|
|
|||
|
|
下面是参数 --stats --output-http-stats 的说明:
|
|||
|
|
|
|||
|
|
```bash
|
|||
|
|
--stats //打开输出队列的状态
|
|||
|
|
Turn on queue stats output
|
|||
|
|
-output-http-stats //每5秒钟输出一次输出队列的状态
|
|||
|
|
Report http output queue stats to console every N milliseconds. See output-http-stats-ms
|
|||
|
|
-output-http-stats-ms int
|
|||
|
|
Report http output queue stats to console every N milliseconds. default: 5000 (default 5000)
|
|||
|
|
|
|||
|
|
```
|
|||
|
|
|
|||
|
|
统计并发送请求队列信息的核心代码主要会用到下面两个函数。
|
|||
|
|
|
|||
|
|
我们用 [output\_http.go](https://github.com/buger/goreplay/blob/master/output_http.go) 实现统计信息收集:
|
|||
|
|
|
|||
|
|
```go
|
|||
|
|
// PluginWrite writes message to this plugin
|
|||
|
|
// 统计信息收集
|
|||
|
|
func (o *HTTPOutput) PluginWrite(msg *Message) (n int, err error) {
|
|||
|
|
if !isRequestPayload(msg.Meta) {
|
|||
|
|
return len(msg.Data), nil
|
|||
|
|
}
|
|||
|
|
|
|||
|
|
select {
|
|||
|
|
case <-o.stop:
|
|||
|
|
return 0, ErrorStopped
|
|||
|
|
case o.queue <- msg:
|
|||
|
|
}
|
|||
|
|
|
|||
|
|
if o.config.Stats {
|
|||
|
|
o.queueStats.Write(len(o.queue))
|
|||
|
|
}
|
|||
|
|
if len(o.queue) > 0 {
|
|||
|
|
// try to start a new worker to serve
|
|||
|
|
if atomic.LoadInt32(&o.activeWorkers) < int32(o.config.WorkersMax) {
|
|||
|
|
go o.startWorker()
|
|||
|
|
atomic.AddInt32(&o.activeWorkers, 1)
|
|||
|
|
}
|
|||
|
|
}
|
|||
|
|
return len(msg.Data) + len(msg.Meta), nil
|
|||
|
|
}
|
|||
|
|
|
|||
|
|
```
|
|||
|
|
|
|||
|
|
[gor\_stat.go](https://github.com/buger/goreplay/blob/master/gor_stat.go) 类中用 NewGorStat 函数构造统计:
|
|||
|
|
|
|||
|
|
```go
|
|||
|
|
// NewGorStat统计函数
|
|||
|
|
func NewGorStat(statName string, rateMs int) (s *GorStat) {
|
|||
|
|
s = new(GorStat)
|
|||
|
|
s.statName = statName
|
|||
|
|
s.rateMs = rateMs
|
|||
|
|
s.latest = 0
|
|||
|
|
s.mean = 0
|
|||
|
|
s.max = 0
|
|||
|
|
s.count = 0
|
|||
|
|
|
|||
|
|
if Settings.Stats {
|
|||
|
|
go s.reportStats()
|
|||
|
|
}
|
|||
|
|
return
|
|||
|
|
}
|
|||
|
|
|
|||
|
|
```
|
|||
|
|
|
|||
|
|
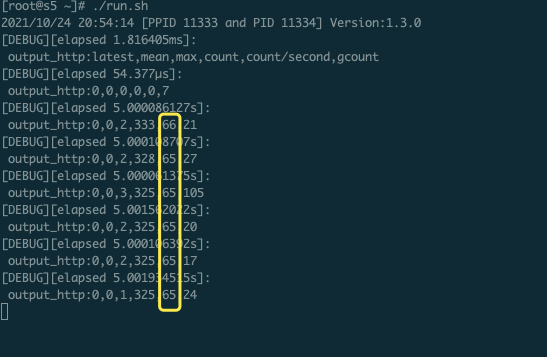
控制台输出的发送请求队列信息是这样的:
|
|||
|
|
|
|||
|
|
|
|||
|
|
|
|||
|
|
其中,倒数第二列等同于当前的TPS,但是这就是仅有的统计项了。如果想要更复杂的测试统计结果,就需要我们自己去埋点丰富监控指标了。
|
|||
|
|
|
|||
|
|
* GoReplay 埋点思路
|
|||
|
|
|
|||
|
|
在前面的课程中,我们已经选用了Exporter+Prometheus+Grafana作为我们全局的监控解决方案了,这里我们能不能把 GoReplay 的 Metrics 实时接入进来呢?
|
|||
|
|
|
|||
|
|
事实上是可以做到的。
|
|||
|
|
|
|||
|
|
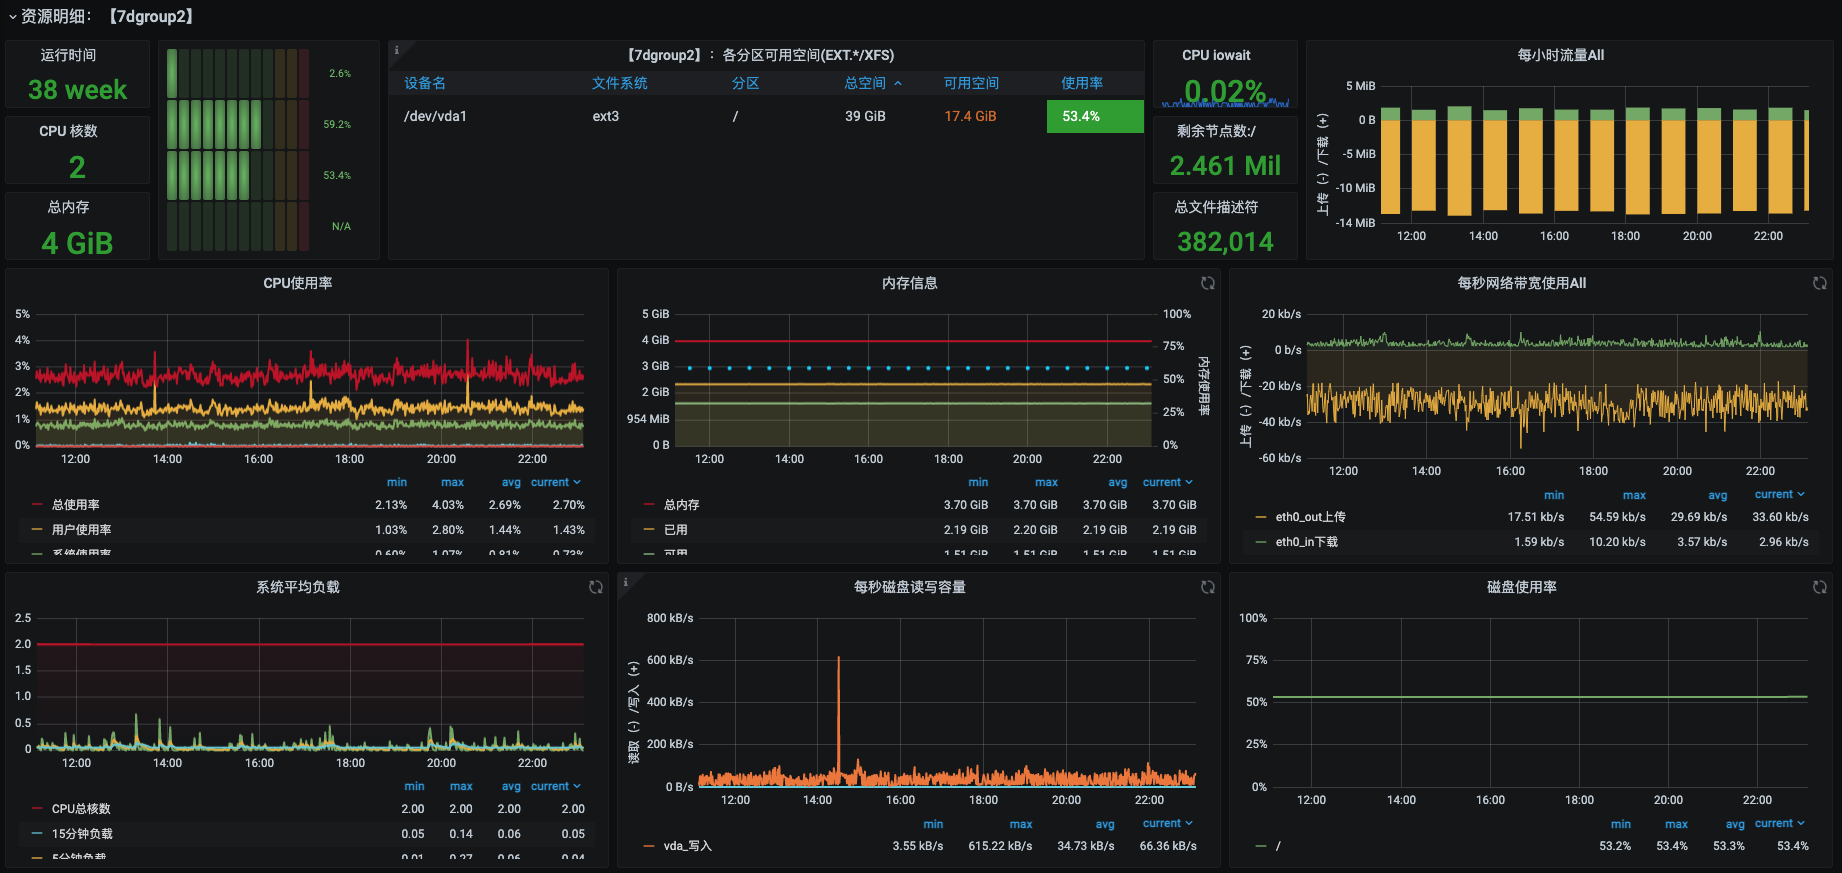
我们先来看看 node\_exporter+Prometheus+Grafana套件的运行效果:
|
|||
|
|
|
|||
|
|
|
|||
|
|
|
|||
|
|
Prometheus 提供了 [官方版 Golang 库](https://github.com/prometheus/client_golang) ,用于采集并暴露监控数据。我们只需要埋点,让 GoReplay 支持实时 Metrics 统计就可以了。这样,在 GoReplay 执行流量回放时,我们就可以实时采集TPS和响应时间等各项压测指标了,另外,结合 Grafana 看板还可以做到图形可视化展示。
|
|||
|
|
|
|||
|
|
既然我们要去 GoReplay 埋点,那么就得知道去哪里埋,对吧?所以我们得先分析源码,找出 GoReplay 发出请求的代码,理清 GoReplay 埋点的思路。
|
|||
|
|
|
|||
|
|
在用 GoReplay 进行流量回放时,我们主要使用的是HTTP输出的插件[output\_http.go](https://github.com/buger/goreplay/blob/master/output_http.go) 。它通过实现 HTTP 协议, 进而实现 io.Writer 接口,最后根据配置注册到 Plugin.outputs 队列里。
|
|||
|
|
|
|||
|
|
在[output\_http.go](https://github.com/buger/goreplay/blob/master/output_http.go) 中, NewHTTPOutput 是默认初始化函数:
|
|||
|
|
|
|||
|
|
```go
|
|||
|
|
// NewHTTPOutput constructor for HTTPOutput
|
|||
|
|
// Initialize workers
|
|||
|
|
func NewHTTPOutput(address string, config *HTTPOutputConfig) PluginReadWriter {
|
|||
|
|
o := new(HTTPOutput)
|
|||
|
|
var err error
|
|||
|
|
config.url, err = url.Parse(address)
|
|||
|
|
if err != nil {
|
|||
|
|
log.Fatal(fmt.Sprintf("[OUTPUT-HTTP] parse HTTP output URL error[%q]", err))
|
|||
|
|
}
|
|||
|
|
if config.url.Scheme == "" {
|
|||
|
|
config.url.Scheme = "http"
|
|||
|
|
}
|
|||
|
|
config.rawURL = config.url.String()
|
|||
|
|
if config.Timeout < time.Millisecond*100 {
|
|||
|
|
config.Timeout = time.Second
|
|||
|
|
}
|
|||
|
|
if config.BufferSize <= 0 {
|
|||
|
|
config.BufferSize = 100 * 1024 // 100kb
|
|||
|
|
}
|
|||
|
|
if config.WorkersMin <= 0 {
|
|||
|
|
config.WorkersMin = 1
|
|||
|
|
}
|
|||
|
|
if config.WorkersMin > 1000 {
|
|||
|
|
config.WorkersMin = 1000
|
|||
|
|
}
|
|||
|
|
if config.WorkersMax <= 0 {
|
|||
|
|
config.WorkersMax = math.MaxInt32 // idealy so large
|
|||
|
|
}
|
|||
|
|
if config.WorkersMax < config.WorkersMin {
|
|||
|
|
config.WorkersMax = config.WorkersMin
|
|||
|
|
}
|
|||
|
|
if config.QueueLen <= 0 {
|
|||
|
|
config.QueueLen = 1000
|
|||
|
|
}
|
|||
|
|
if config.RedirectLimit < 0 {
|
|||
|
|
config.RedirectLimit = 0
|
|||
|
|
}
|
|||
|
|
if config.WorkerTimeout <= 0 {
|
|||
|
|
config.WorkerTimeout = time.Second * 2
|
|||
|
|
}
|
|||
|
|
o.config = config
|
|||
|
|
o.stop = make(chan bool)
|
|||
|
|
//是否收集统计信息,统计输出间隔是多少
|
|||
|
|
if o.config.Stats {
|
|||
|
|
o.queueStats = NewGorStat("output_http", o.config.StatsMs)
|
|||
|
|
}
|
|||
|
|
|
|||
|
|
o.queue = make(chan *Message, o.config.QueueLen)
|
|||
|
|
if o.config.TrackResponses {
|
|||
|
|
o.responses = make(chan *response, o.config.QueueLen)
|
|||
|
|
}
|
|||
|
|
// it should not be buffered to avoid races
|
|||
|
|
o.stopWorker = make(chan struct{})
|
|||
|
|
|
|||
|
|
if o.config.ElasticSearch != "" {
|
|||
|
|
o.elasticSearch = new(ESPlugin)
|
|||
|
|
o.elasticSearch.Init(o.config.ElasticSearch)
|
|||
|
|
}
|
|||
|
|
o.client = NewHTTPClient(o.config)
|
|||
|
|
o.activeWorkers += int32(o.config.WorkersMin)
|
|||
|
|
for i := 0; i < o.config.WorkersMin; i++ {
|
|||
|
|
go o.startWorker()
|
|||
|
|
}
|
|||
|
|
go o.workerMaster()
|
|||
|
|
return o
|
|||
|
|
}
|
|||
|
|
|
|||
|
|
```
|
|||
|
|
|
|||
|
|
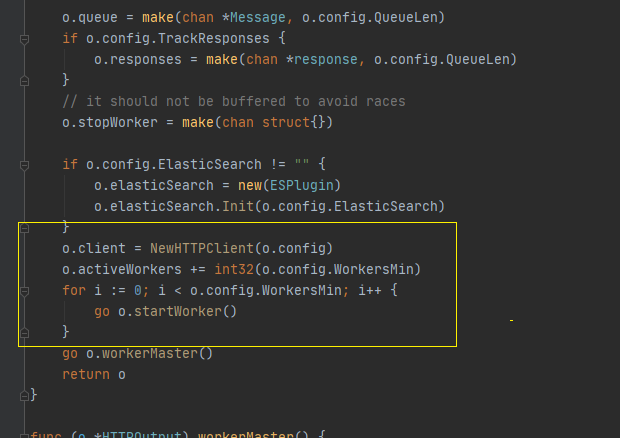
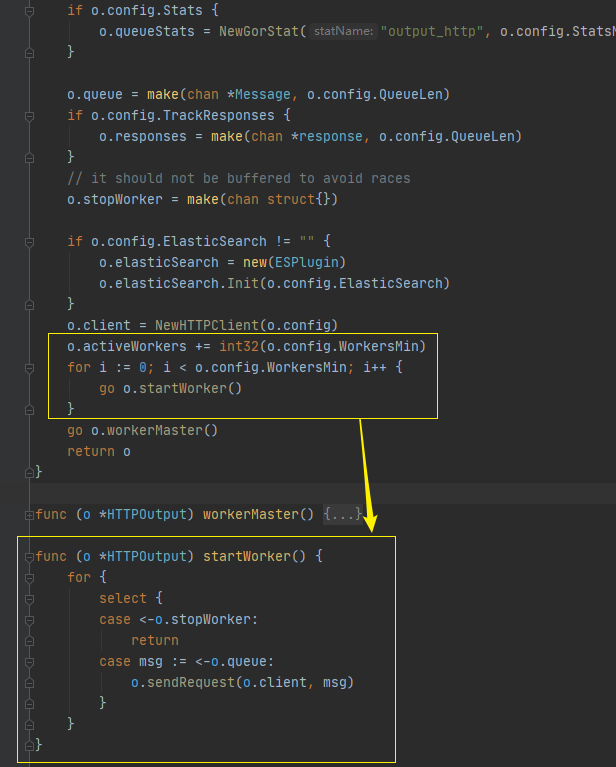
初始化配置后,启动 HttpClient 网络库:
|
|||
|
|
|
|||
|
|
|
|||
|
|
|
|||
|
|
紧接着,HttpClient 会启动多个发送请求协程:
|
|||
|
|
|
|||
|
|
|
|||
|
|
|
|||
|
|
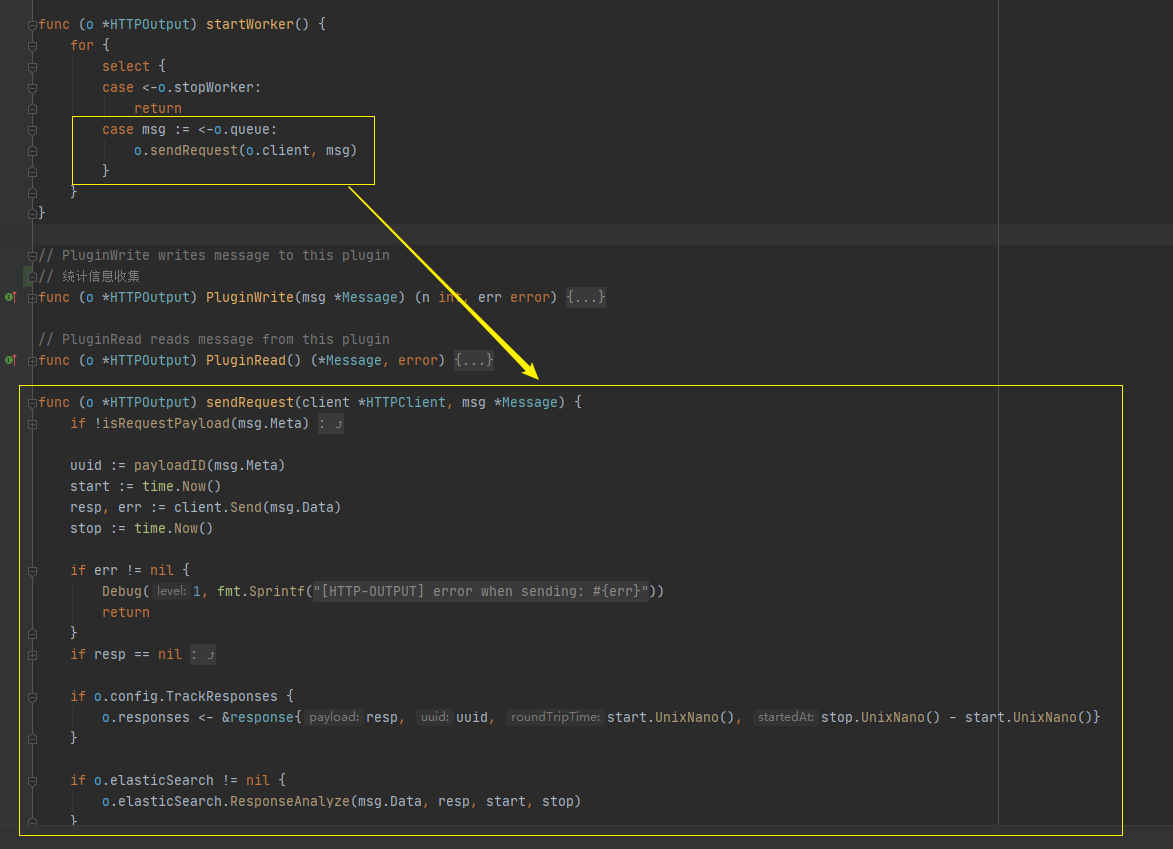
HttpClient 执行请求发送:
|
|||
|
|
|
|||
|
|
|
|||
|
|
|
|||
|
|
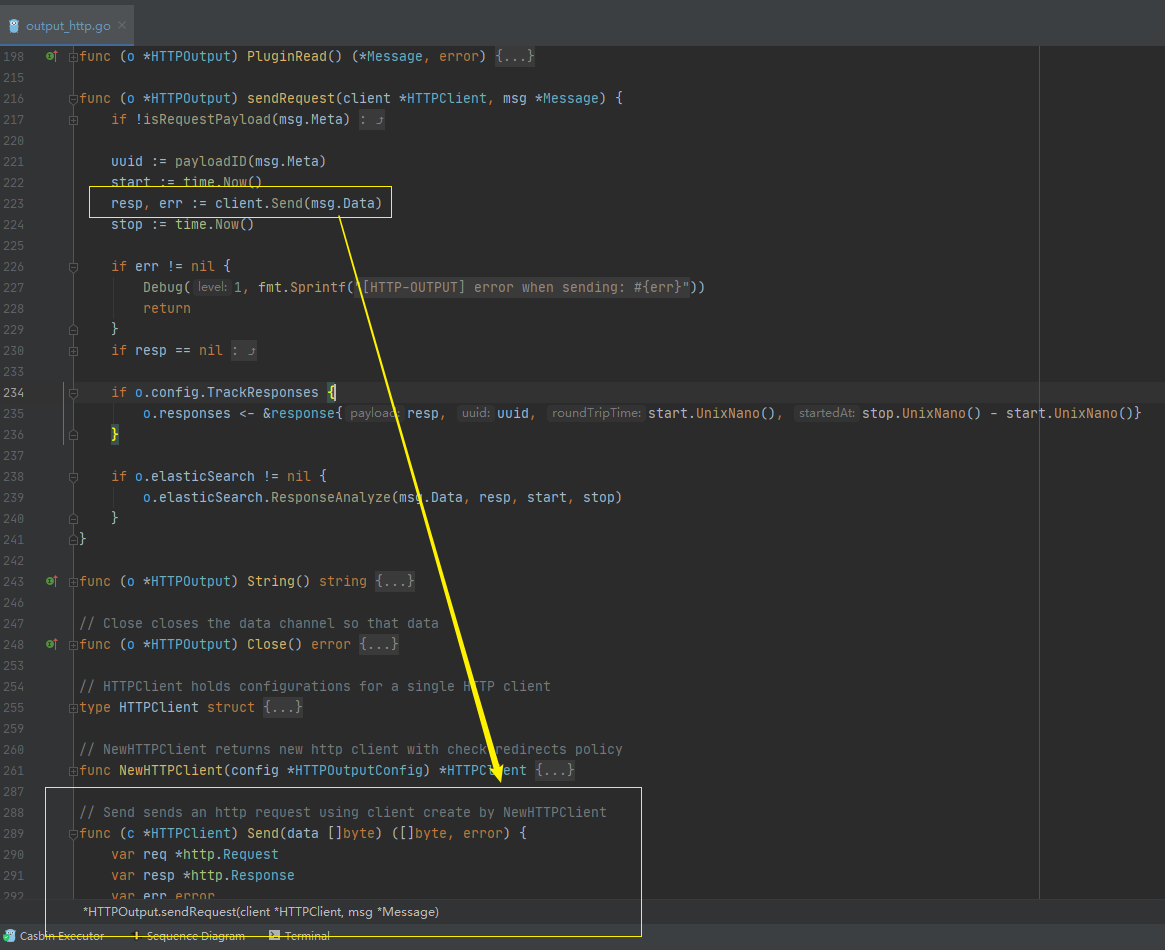
我们可以看看HttpClient 发送请求的细节,下面这张图中,我圈出的内容是各种配置的生效点:
|
|||
|
|
|
|||
|
|
|
|||
|
|
|
|||
|
|
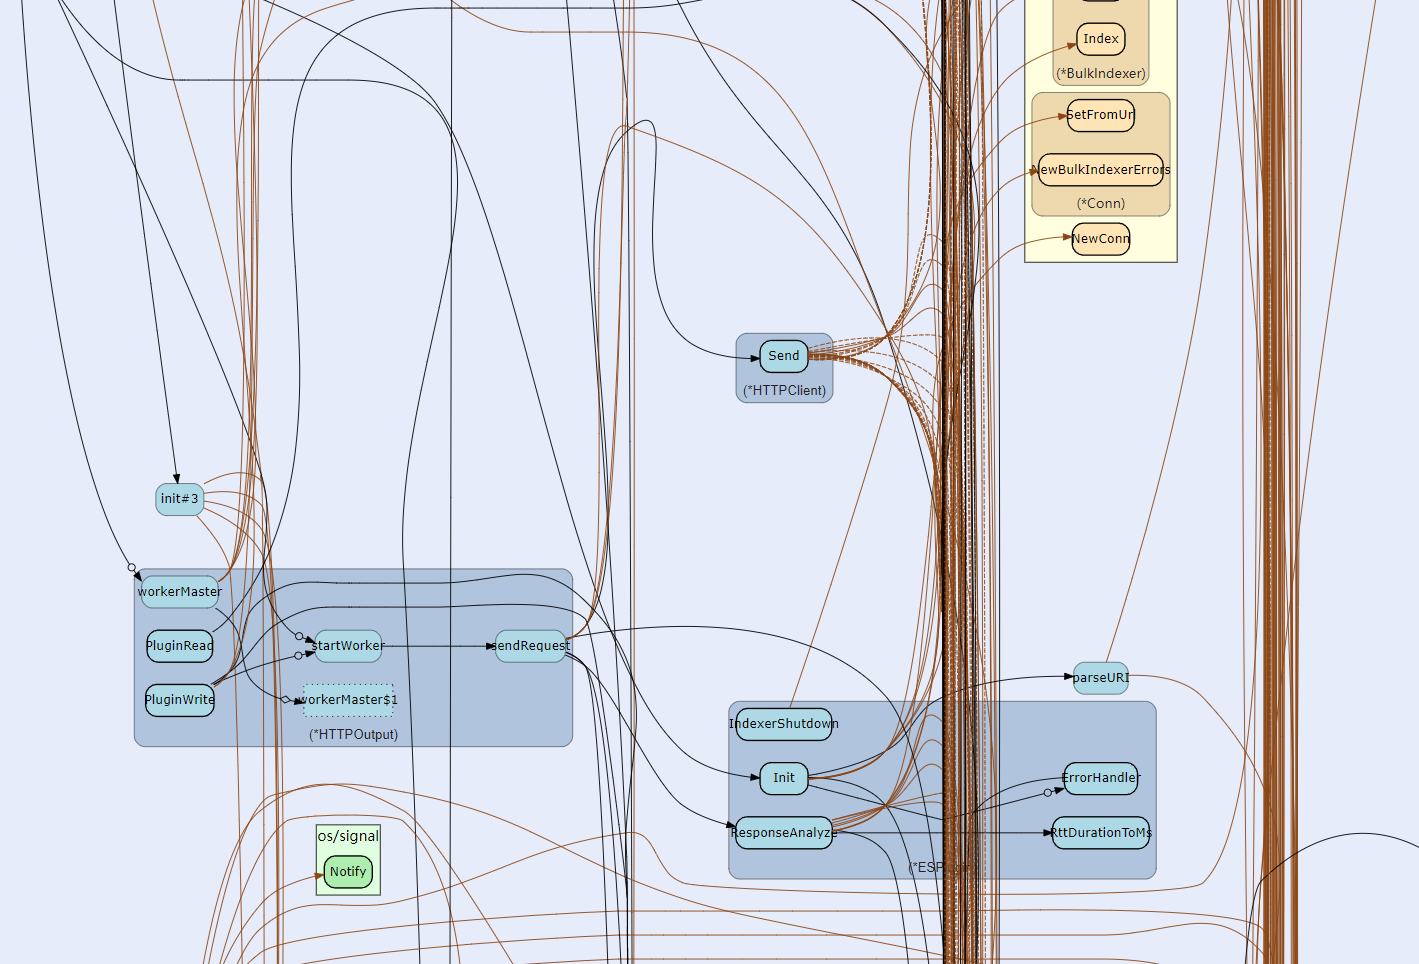
为了对[output\_http.go](https://github.com/buger/goreplay/blob/master/output_http.go) 有一个更清晰的理解,你可以看看下面这张核心代码逻辑调用图:
|
|||
|
|
|
|||
|
|
|
|||
|
|
|
|||
|
|
好了,搞懂了 GoReplay 发出请求的逻辑,接下来,我们就需要具体埋点了。
|
|||
|
|
|
|||
|
|
* GoReplay 实现埋点
|
|||
|
|
|
|||
|
|
我们之所以要埋点,主要是为了实现获取请求的状态码以及对应的 TPS,然后在获取请求返回值的位置插入对应的 Metric。
|
|||
|
|
|
|||
|
|
在此之前,我们先要了解 Prometheus 中常见的四大指标类型:
|
|||
|
|
|
|||
|
|
* Counter(计数器):一个递增的计数器,只增不减,但是它可以被重置为0(例如重启服务)。常用于需要记录请求次数、错误数量的场景;
|
|||
|
|
* Gauge(仪表盘):可以用它来表示一个可以任意变化的浮动值,可增可减。常用于反馈当前情况的场景;
|
|||
|
|
* Histogram(累积直方图):多用于需要统计一些数据分布的情况。它可以计算在一定范围内的分布情况,同时还提供了度量指标值的总和。常用于记录请求延迟、响应大小等统计场景;
|
|||
|
|
* Summary(摘要):在一段时间范围内对数据进行采样,和 Histogram 累积直方图比较类似,主要用于计算在一定时间窗口范围内,度量指标对象的总数以及所有度量指标值的总和。
|
|||
|
|
|
|||
|
|
更多内容你可以参考 [Prometheus官网](https://prometheus.io/docs/instrumenting/writing_clientlibs/#counter)。
|
|||
|
|
|
|||
|
|
了解了基础概念,我们就来看看要怎么在 GoReplay 中进行改造。
|
|||
|
|
|
|||
|
|
第一步,通过 go get 命令来安装相关依赖库,示例如下:
|
|||
|
|
|
|||
|
|
```bash
|
|||
|
|
go get github.com/prometheus/client_golang/prometheus/promhttp
|
|||
|
|
|
|||
|
|
```
|
|||
|
|
|
|||
|
|
有关全面的 API 文档,你可以参考 Prometheus 的各种 Go 库的 [GoDoc](https://godoc.org/github.com/prometheus/client_golang) 文档。
|
|||
|
|
|
|||
|
|
第二步,创建 prometheus\_family.go 类,初始化监控 Metric。
|
|||
|
|
|
|||
|
|
```go
|
|||
|
|
package metrics
|
|||
|
|
|
|||
|
|
import "github.com/prometheus/client_golang/prometheus"
|
|||
|
|
|
|||
|
|
// 创建 Prometheus 数据Metric, 就相当于SQL 数据库 声明table
|
|||
|
|
var (
|
|||
|
|
//Counter(计数器)
|
|||
|
|
totalRequestsCounter = prometheus.NewCounterVec(
|
|||
|
|
prometheus.CounterOpts{
|
|||
|
|
Name: "goreplay_total_requests",
|
|||
|
|
Help: "total income requests",
|
|||
|
|
},
|
|||
|
|
[]string{"location", "code"},
|
|||
|
|
)
|
|||
|
|
//Counter (计数器)
|
|||
|
|
subRequestsCounter = prometheus.NewCounterVec(
|
|||
|
|
prometheus.CounterOpts{
|
|||
|
|
Name: "test_sub_requests",
|
|||
|
|
Help: "sub requests",
|
|||
|
|
},
|
|||
|
|
[]string{"test"},
|
|||
|
|
)
|
|||
|
|
//Gauge(仪表盘)
|
|||
|
|
circuitBreakerRateGauge = prometheus.NewGaugeVec(
|
|||
|
|
prometheus.GaugeOpts{
|
|||
|
|
Name: "goreplay_circuit_breaker_rate",
|
|||
|
|
Help: "rate of circuit breaker",
|
|||
|
|
},
|
|||
|
|
[]string{"location", "code"},
|
|||
|
|
)
|
|||
|
|
|
|||
|
|
buckets = []float64{0, 100, 200}
|
|||
|
|
// Histogram(累积直方图)
|
|||
|
|
totalRequestsTimeHistogram = prometheus.NewHistogramVec(
|
|||
|
|
prometheus.HistogramOpts{
|
|||
|
|
Name: "goreplay_total_requests_time",
|
|||
|
|
Help: "income requests time",
|
|||
|
|
Buckets: buckets,
|
|||
|
|
},
|
|||
|
|
[]string{"location"},
|
|||
|
|
)
|
|||
|
|
|
|||
|
|
)
|
|||
|
|
|
|||
|
|
// 注册定义好的Metric 相当于执行SQL create table 语句
|
|||
|
|
func init() {
|
|||
|
|
prometheus.MustRegister(totalRequestsCounter)
|
|||
|
|
prometheus.MustRegister(subRequestsCounter)
|
|||
|
|
prometheus.MustRegister(circuitBreakerRateGauge)
|
|||
|
|
prometheus.MustRegister(totalRequestsTimeHistogram)
|
|||
|
|
}
|
|||
|
|
|
|||
|
|
func IncreaseTotalRequests(location,code string) {
|
|||
|
|
totalRequestsCounter.With(prometheus.Labels{"location": location, "code": code}).Add(1)
|
|||
|
|
}
|
|||
|
|
|
|||
|
|
func IncreaseSubRequests() {
|
|||
|
|
subRequestsCounter.With(prometheus.Labels{}).Add(1)
|
|||
|
|
}
|
|||
|
|
|
|||
|
|
|
|||
|
|
|
|||
|
|
func ObserveTotalRequestsTimeHistogram(location string, d float64) {
|
|||
|
|
totalRequestsTimeHistogram.With(prometheus.Labels{"location": location}).Observe(d)
|
|||
|
|
}
|
|||
|
|
|
|||
|
|
```
|
|||
|
|
|
|||
|
|
这里,我在项目中创建了 package metrics,初始化了 API 请求相关的 Metric,并且注册到了github.com/prometheus/client\_golang/prometheus 。
|
|||
|
|
|
|||
|
|
第三步,改造 output\_http.go 类,在业务代码中采集数据。
|
|||
|
|
|
|||
|
|
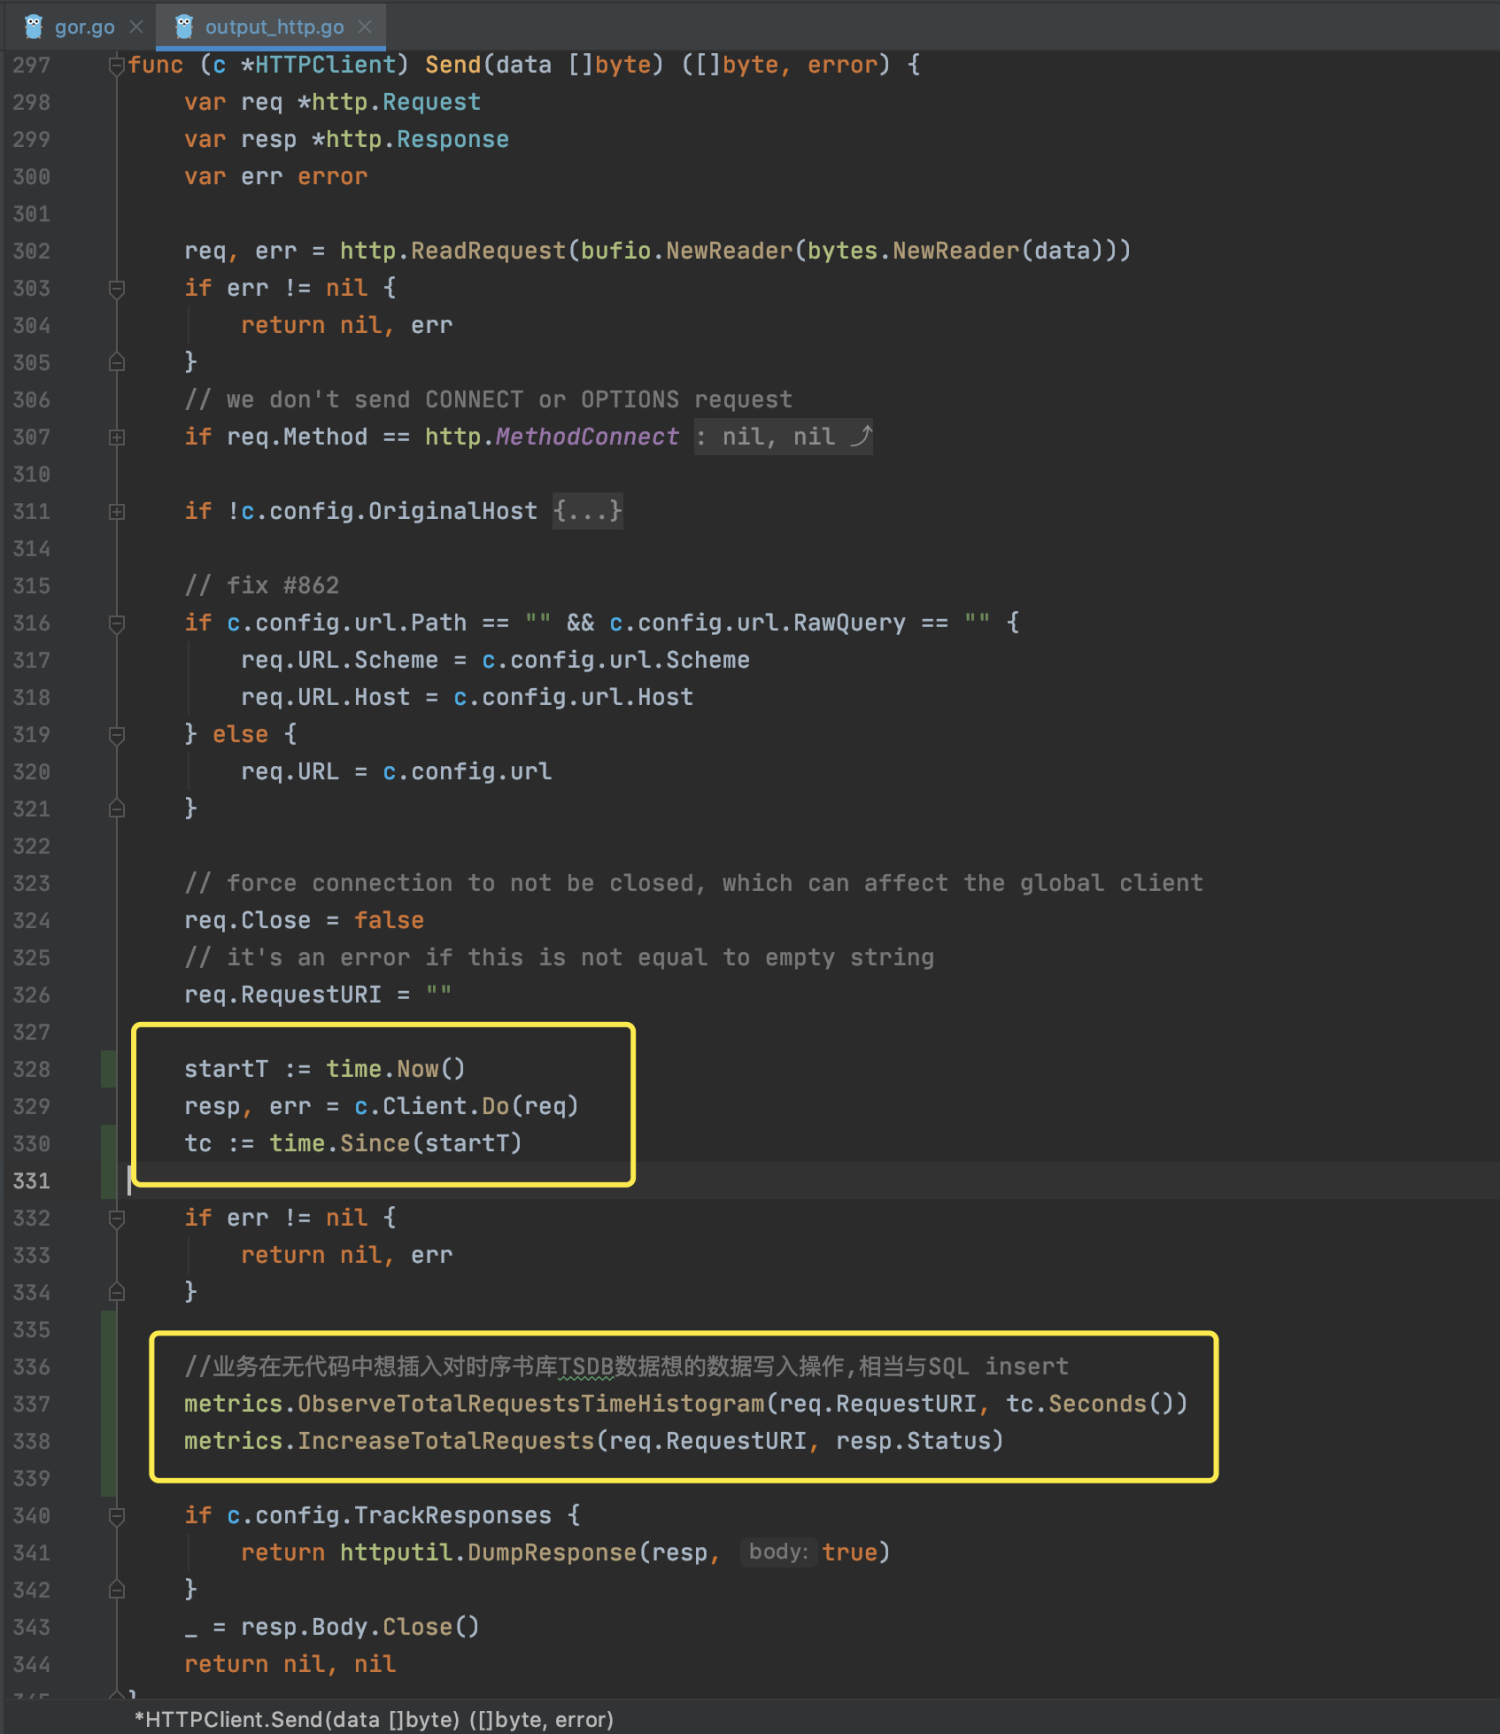
|
|||
|
|
|
|||
|
|
从这张截图可以看到,我们为了获取请求状态码以及对应的TPS,在获取请求返回值的位置插入了counter metric;为了获取不同请求的响应时间等指标,我们还需要在发出请求前记录开始时间,待请求返回后记录结束时间,同时还要记录时间消耗的 Histogram Metric。
|
|||
|
|
|
|||
|
|
这里大家可以举一反三,扩展其它的 Metric。
|
|||
|
|
|
|||
|
|
第四步,改造 main.go ,进行 Metric 注册,提供/metric 接口给 Prometheus TSDB 时序数据库收集数据。
|
|||
|
|
|
|||
|
|
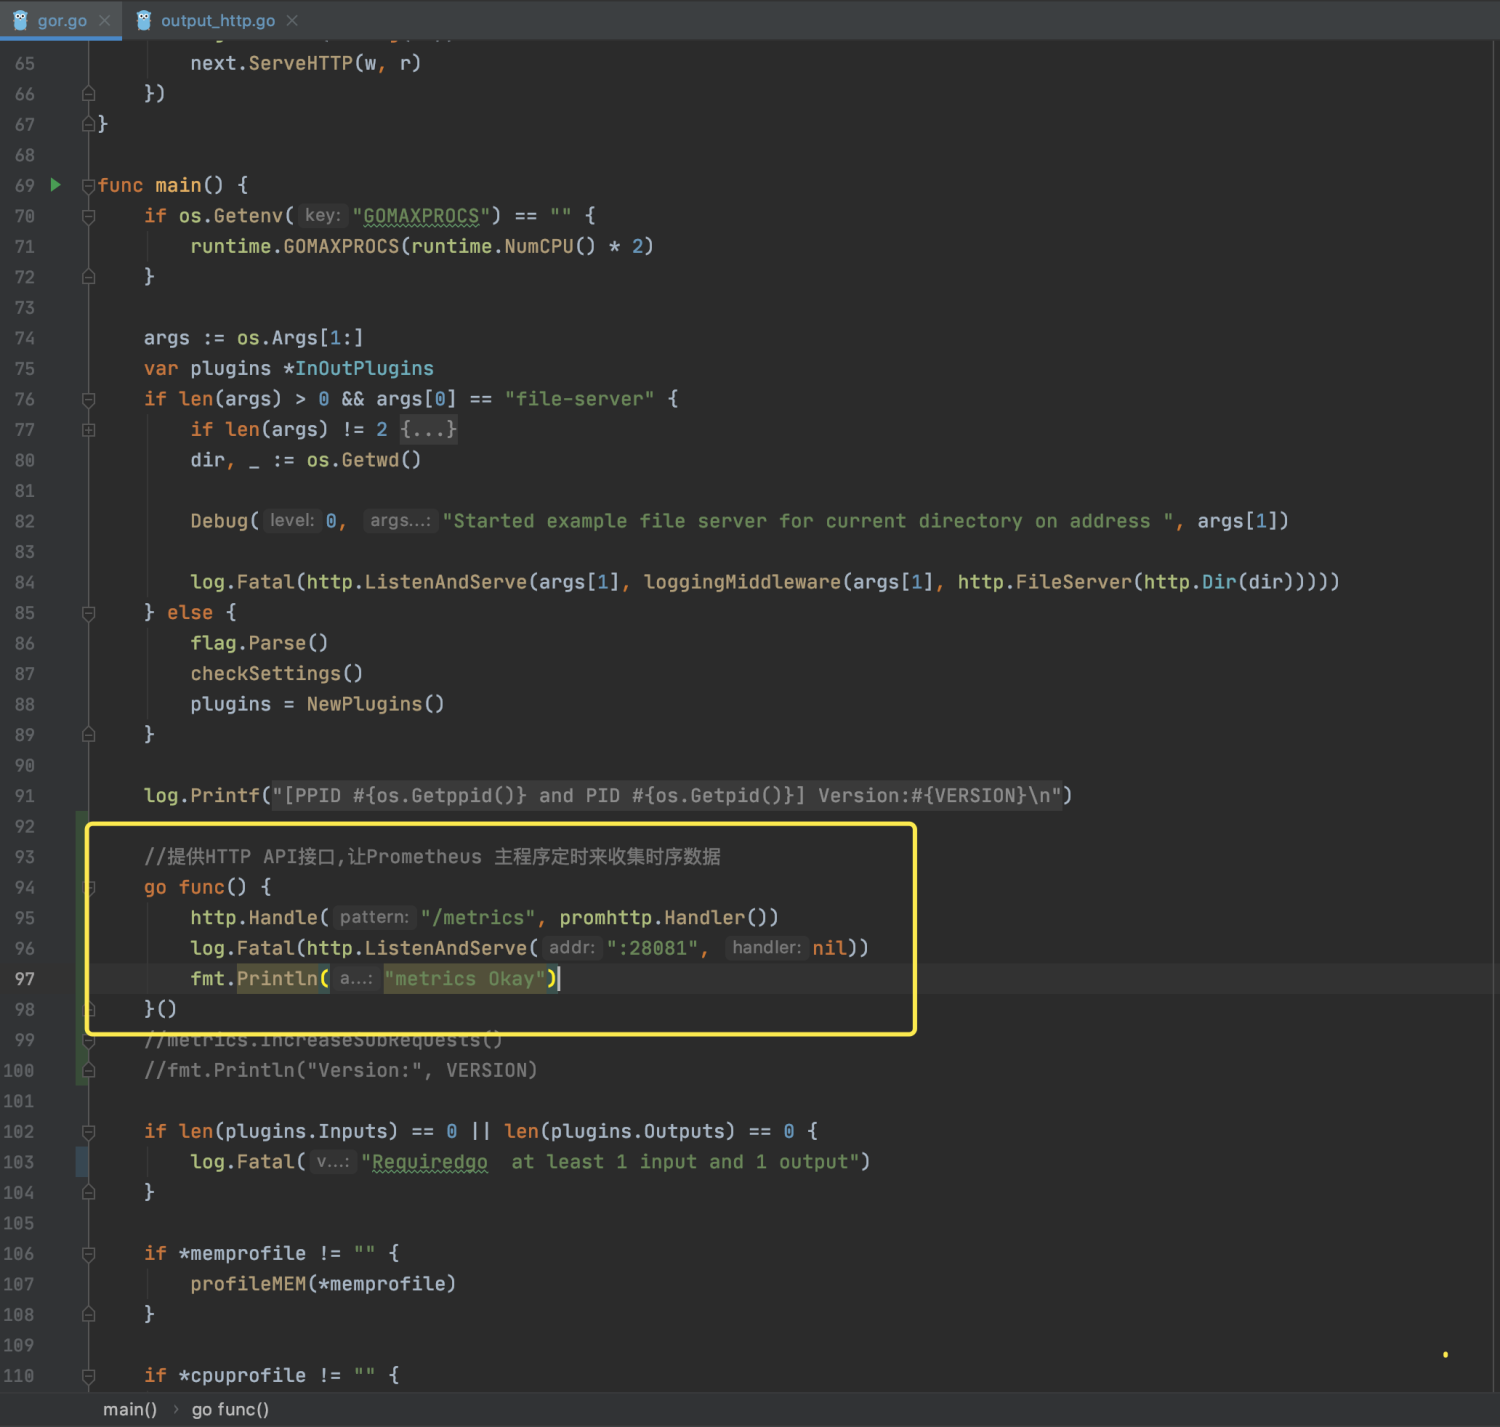
|
|||
|
|
|
|||
|
|
第五步,重新编译 GoReplay 程序。
|
|||
|
|
|
|||
|
|
在代码所在目录(./src/goreplay)下使用 go build 命令。
|
|||
|
|
|
|||
|
|
```bash
|
|||
|
|
go build
|
|||
|
|
|
|||
|
|
```
|
|||
|
|
|
|||
|
|
第六步,在启动 GoReplay 进行流量回放时,查看监听端口,可以看到我们注册的端口 28081,访问接口:[http://localhost:28081/metrics](http://localhost:28081/metrics)。
|
|||
|
|
|
|||
|
|
```bash
|
|||
|
|
。......
|
|||
|
|
|
|||
|
|
# HELP goreplay_total_requests total income requests
|
|||
|
|
# TYPE goreplay_total_requests counter
|
|||
|
|
goreplay_total_requests{code="200 ",location=""} 22
|
|||
|
|
# HELP goreplay_total_requests_time income requests time
|
|||
|
|
# TYPE goreplay_total_requests_time histogram
|
|||
|
|
goreplay_total_requests_time_bucket{location="",le="0"} 0
|
|||
|
|
goreplay_total_requests_time_bucket{location="",le="100"} 22
|
|||
|
|
goreplay_total_requests_time_bucket{location="",le="200"} 22
|
|||
|
|
goreplay_total_requests_time_bucket{location="",le="+Inf"} 22
|
|||
|
|
goreplay_total_requests_time_sum{location=""} 2.1513923769999996
|
|||
|
|
goreplay_total_requests_time_count{location=""} 22
|
|||
|
|
# HELP promhttp_metric_handler_requests_in_flight Current number of scrapes being served.
|
|||
|
|
# TYPE promhttp_metric_handler_requests_in_flight gauge
|
|||
|
|
promhttp_metric_handler_requests_in_flight 1
|
|||
|
|
# HELP promhttp_metric_handler_requests_total Total number of scrapes by HTTP status code.
|
|||
|
|
# TYPE promhttp_metric_handler_requests_total counter
|
|||
|
|
promhttp_metric_handler_requests_total{code="200"} 20
|
|||
|
|
promhttp_metric_handler_requests_total{code="500"} 0
|
|||
|
|
promhttp_metric_handler_requests_total{code="503"} 0
|
|||
|
|
|
|||
|
|
```
|
|||
|
|
|
|||
|
|
第七步,在Prometheus 主程序中拉取采集数据。
|
|||
|
|
|
|||
|
|
在Prometheus主程序的配置文件中填写第四步的API接口信息,这样,Prometheus TSDB 时序数据库就可以开始定时收集 Metric 数据了。
|
|||
|
|
|
|||
|
|
```yaml
|
|||
|
|
###################### GoReolay ######################
|
|||
|
|
- job_name: "GoReolays5"
|
|||
|
|
static_configs:
|
|||
|
|
- targets: ['172.31.184.225:28081']
|
|||
|
|
labels:
|
|||
|
|
instance: s5
|
|||
|
|
|
|||
|
|
```
|
|||
|
|
|
|||
|
|
第八步,在 Grafana 做图形数据展示。
|
|||
|
|
|
|||
|
|
Prometheus 提供了一种功能表达式语言 PromQL,这种语言可以允许用户实时选择和汇聚时间序列数据。另外,表达式的结果可以在结合 Grafana 的控件中显示为图形,也可以显示为表格数据,或者由外部系统通过 HTTP API 调用,因为篇幅有限,网上关于这部分的资料又很多,这里我就不多说了。
|
|||
|
|
|
|||
|
|
到这里,我们对 GoReplay 的埋点改造工作就做完了,通过 Metric 实现了从客户端统计压测过程中的各项指标。
|
|||
|
|
|
|||
|
|
## 总结
|
|||
|
|
|
|||
|
|
好,这节课就讲到这里。
|
|||
|
|
|
|||
|
|
刚才,我们介绍了流量平台的对象存储和性能监控功能的选型及改造,我还对这两个部分做了详细的演示。通过结合 MinIO Server 和 HTTP 服务,我们可以实现程序二进制包、执行器 jar 包、流量文件等文件管理,并能够使用通用的 HTTP 上传下载功能。另外,通过 Prometheus 在GoReplay 埋点,我们还进一步丰富了性能监控指标。
|
|||
|
|
|
|||
|
|
在当前的全链路压测的市场中,对全链路压测工具的分布式改造总是讳忌莫深的部分,而压力工具对全链路压测来说,目标是能够实现足够的流量即可。从本节课的内容可以看到,相比传统的压力工具,全链路压测工具在改造上的技术成本还算是高的,但值得欣慰的是开源的工具也是完全可以实现的。
|
|||
|
|
|
|||
|
|
下一节课,我们将继续讲解分布式改造的各环节,我会通过案例给你演示怎样进行分布式调度改造工作。
|
|||
|
|
|
|||
|
|
## 课后题
|
|||
|
|
|
|||
|
|
学完这节课,请你思考两个问题:
|
|||
|
|
|
|||
|
|
1. 你有没有做过 Prometheus 埋点,谈谈你对业务埋点的一些心得吧!
|
|||
|
|
2. 相比文件系统,你觉得对象存储的优势在什么地方?
|
|||
|
|
|
|||
|
|
欢迎你在留言区与我交流讨论。当然了,你也可以把这节课分享给你身边的朋友,他们的一些想法或许会让你有更大的收获。我们下节课见!
|
|||
|
|
|